How to make a canopy over a wooden porch with your own hands?
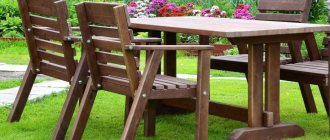
The entrance to the house always begins with a porch and a canopy above it, and the second element is a kind of business card that helps give the house a finished look, complements the style of the building and has a practical function (protects the space in front of the entrance from weather factors). A canopy over a porch made of wood is the most popular option, but often the canopy can be made of corrugated sheets, bitumen shingles, polycarbonate and metal. In this article we will look at the wooden option, as it looks impressive, and with some skills in construction work, you can make this decoration with your own hands. You can see a photo of a canopy over a wooden porch below, and choose the design you like to bring to life.
Species and types
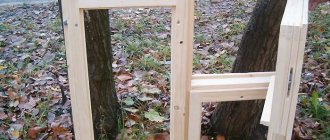
If we talk about the structure as a whole, the canopy or canopy over the porch consists of a frame and roofing material (cladding). There may also be support posts that support the outer edge of the canopy. They are an optional element. They are needed when there is no confidence that the structure without additional supports will be able to retain precipitation.
Canopy over the entrance: general device
Precipitation generally means snow. In regions with a lot of snow, you can either make the slope of the canopy steep so that the snow melts quickly, or install additional supports. You can do both, as is usually done - the margin of reliability/strength reassures and instills confidence.
Frame and stand materials
The frame and supports of the canopy over the front door are made from:
- metal: steel angle;
- metal strips;
- round pipe;
- profiled pipe;
Rolled metal of various types and wood are two materials that are used in the construction of a canopy over the porch
The most popular material recently for making the frame of a canopy over a porch is profiled pipe. With equal dimensions and wall thickness with a round pipe (if we compare the diagonal and diameter), the profile has greater rigidity. At the same time, it comes in a variety of sections - a square and a rectangle with different sides, it can be bent into arcs, it is easier to weld and attach to walls, it goes well with elements of traditional or cold forging, and its durability is the same as other steel products. In general, it is the profiled pipe that is in favor today.
What is the lining of the canopy over the porch made of?
If we talk about materials for cladding the canopy over the porch, there is a very wide choice. Very often the canopy over the entrance to the house is made of the same material as the roof. And this is correct, since in this case the result is a harmonious design of the house. With this solution, any roofing material is used:
- slate;
- metal tiles;
- corrugated sheeting;
The canopy over the porch and the roof are covered with the same material - tiles. The style must also match. Soft tiles on the porch and roof
Metal tiles on the roof and canopy
When style and material match, a harmonious look is obtained - soft bitumen shingles;
- natural tiles;
The second option is to use the material that is used in the fence. In this case, both the design style and decorative elements should be recognizable. This will create a single ensemble with the site. Here the materials can be like this:
- slate (usually flat, but not a fact);
- corrugated sheeting;
- polycarbonate;
- wooden plank.
And the third option for designing a canopy over the porch is to install a canopy that is “neutral” in style and material. This may include:
- wooden canopy;
- polycarbonate (not necessarily cellular polycarbonate, there is also sheet polycarbonate);
Polycarbonate combines with wood Looks good
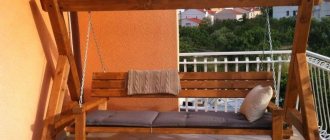
A long canopy not only over the porch, but also over the entrance path - sheet plastic;
- glass.
Glass is used less often. It is necessary to use reinforced types such as triplex, and not only are they expensive, they also weigh heavily, so additional suspensions or powerful support columns are definitely required. And if you consider that sheet polycarbonate or plastic is not much different in appearance from glass, it becomes clear why glass is unpopular.
Shapes of canopies
There are more than a dozen forms of canopies over the front door. The easiest one to make is a lean-to canopy. Requires a minimum of effort and materials, and can look very good. The downside is that when the snow melts, a snowdrift will end up in front of your door and will urgently need to be removed. Other models with slopes tilted forward suffer from the same “disease”. These are excellent options for regions with little snow in winters, but with hot sun - not quite for our latitudes. Although, if you are not afraid of the need for urgent snow removal, you can do any of the options.
Shapes and names of canopies over the porch
It’s a little more difficult to make a gable canopy (this is the house) and a simple arch. They are good because the melted snow ends up on the sides of the entrance and, even if there is a large amount of it, there is no need to urgently remove it. So for regions with a lot of snow, these are the best models.
No. 1. Advantages and disadvantages
The function of the canopy over the canopy is to protect the entrance area from precipitation, drain water and, of course, decorate and complement the house. Wooden canopies have been used for centuries, and even now they have not lost their popularity. True, with the advent of new materials for the construction and decoration of houses, wood has ceased to be universal. A wooden canopy will be a harmonious decoration of houses made of timber, logs, covered with wooden clapboard, as well as houses in the facade of which wooden elements are used.
The main advantages of wooden canopies include:
- absolute environmental friendliness and naturalness;
- chic appearance, which is ensured by the beauty of the natural pattern and color of the wood;
- wood is a malleable plastic material that can be given almost any shape, so in terms of variety, wooden canopies confidently outperform their competitors and can only compete with their forged counterparts. From wood you can make both a fairly simple canopy and a real work of art with an abundance of carved and openwork elements;
- reliability of design;
- relative ease of installation.
Frankly, wood is not the most ideal material. Its disadvantages include:
- fear of moisture, fire and pests;
- To extend the life of a wooden canopy, it will have to be regularly treated with special protective equipment. Although some people like to leave the canopy uncovered, it is better to use roofing material over it, which will provide additional protection for the material.
Wood is often combined with forged elements, tiles, corrugated sheets and other materials - the result is quite interesting. This combination visor is characterized by increased versatility.
How to connect the canopy over the porch and the wall of the house
One of the most difficult moments is to join the covering of the canopy over the porch so that water does not flow down the wall. Usually, standard methods of joining the roof are used - using a bumper strip. This method is suitable for any roofing material, as well as sheet metal and wood. You just need to choose the right color. There are two approaches: matching the wall or matching the roof covering of the canopy. The options are equal, so it’s up to you to decide/choose.
How to connect a canopy to a wall
A groove (5-7 mm deep) is made under the fender strip in the wall. The edge of the plank is inserted into the recess, secured, and the seam is sealed with moisture-resistant sealant for external use. The other edge of the strip rests on the roofing material. When water runs down the wall, it flows onto the plank, from it, bypassing the joint, onto the roofing material and further into the storm drain system or directly to the ground - depending on how it’s done.
If you use metal tiles, sellers have a special wall profile. It can also be used with other materials - it is important to choose the color. The standard unit includes rubber seals, which are placed a couple of centimeters from the outer edge. In this case, during strong winds, water and debris do not fall under the bar.
Standard solution for metal tiles. Suitable for slate and corrugated sheets
If the canopy over the front door and porch is made of polycarbonate, glass or sheet plastic, the method described above is unacceptable - it looks too rough. In this case there are two options:
- Place a sealing tape made of rubber or polyurethane between the polycarbonate and the wall. The material is pressed against the wall through this gasket, then fixed to the frame using self-tapping screws. You should look for seals at points of sale of polycarbonate.
How to seal the joint between a polycarbonate canopy and a wall - Place the sheet as close to the wall as possible, and seal the joint with transparent sealant (not white, because it will quickly become an incomprehensible color).
There are no other good options. You can only combine both proposed ones for reliability.
Canopy assembly
All subsequent operations are carried out in accordance with the design sketch using a standard design. According to it, first of all, the racks are installed, after which a mounting angle is mounted on the facade, which, together with the supports, forms a base for laying the rafters.
Note! Instead of a corner, another beam can be used, longitudinally fixed to the wall of the building.
To install racks at marked points, pits with a depth of about 40–50 cm are prepared, into which supports of arbitrary length are installed. Then the holes are concreted, and immediately after the concrete solution has set, the posts are cut at pre-marked points. After this, the front lintel and side rafters are laid on them, with the opposite end resting on the wall longitudinal beam. Next, you need to connect all these elements with brackets, which will allow you to obtain a reliable supporting structure.
Installation of the ceiling begins with the laying of intermediate rafters (bars 75 x 75), the distance between which should not be less than 80 cm.
Important! The permissible load on the visor, expected in winter with heavy snowfalls, depends on this indicator.
The rafters are fixed to the support beam and lintel using brackets or in pre-prepared recesses (grooves). Sheathing boards are laid across the rafters in increments determined by the dimensions of the roofing blanks.
When laying it, it is important to consider the following points.
Firstly, immediately before laying the roofing material, the sheathing frame is treated with a protective (antiseptic) compound that prevents wood rotting. Secondly, a layer of waterproofing material should be laid directly over the sheathing. Thirdly, any flooring blanks are laid starting from the edge of the canopy with gradual movement towards the wall of the building.
And finally, for the purpose of fastening it, it is recommended to use hardware suitable for this material (for slate, for example, special nails). We also note that the finished canopy can be supplemented with a number of decorative details that give it a more attractive look.
How to fix if the wall is multi-layered
Recently, more and more buildings have multi-layered external walls - ventilated facades, insulation... The load-bearing part of the wall turns out to be covered with a couple of layers of materials, the load-bearing capacity of which is only enough to hold its own weight. You won't be able to attach anything to them. The entire load must fall on the load-bearing wall.
How to attach a canopy over the front door to a three- or two-layer wall
Even if the outer layer is a finishing brick, it costs nothing to attach to it. Masonry is usually carried out in half a brick. So it only looks durable on the outside. Even the smallest and lightest canopy cannot support the weight, and the supporting columns do not help either.
Therefore, with any multi-layer wall, holes are made in all finishing/insulating layers, and the structural elements are attached to the load-bearing wall.
Preparation for use
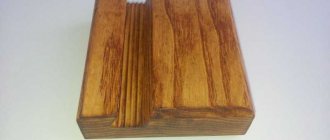
To ensure that a wooden carport for your suburban home lasts a long time, it is necessary to prepare the surface. To do this, we carry out: cleaning, grinding and impregnation with antiseptics.
Products for finishing wooden surfaces can be divided into two types: tinting and protective.
Single-pitch canopy: design features
An inclined or straight single-pitched canopy is the simplest thing that can be. We rarely see straight ones - they are not very functional, but there are quite a lot of single-slope inclined ones.
The inclined single-pitch canopy is based on a right-angled triangle. A right angle is adjacent to the wall, and the length of the sides depends on the desired slope.
Design of a single-pitched canopy over the entrance
In the simplest case, you can weld three identical triangles from a profiled pipe (as in the figure above), make holes in them for fasteners (at least three). These three elements can be combined into a single whole using sheathing for roofing material - as in the figure. Or you can weld cross members from the same pipe (but of a smaller cross-section) or a strip or corner. This option - with metal jumpers - is more suitable for a canopy over a porch made of polycarbonate or plastic. It is also good for metal sheets - it will be convenient to weld it or screw in self-tapping screws.
The idea is the same, but the material is different
There is also an option with a variable tilt angle. This is a rectangular frame with sheathing lintels to which lightweight roofing material is attached. This frame is attached above the entrance using a wall beam fixed to the wall (we described how to make the connection above).
Variable angle
Depending on the required angle of inclination, struts are made. They can be made of metal or wood. Fixed to the frame.
If desired, this option can be made with an adjustable tilt angle. Make the fastening of the frame and struts to the wall movable (on hinges, for example), make several holes in the frame. By rearranging the struts into different holes, you can get a different angle of inclination. This feature is not very relevant for doors - except for glass ones - to block out too bright sun, but for windows it can be useful.
Canopy made of wood without installing supports
A simpler design is a canopy resting on brackets or jibs, attached with one edge to the wall and the other to the canopy. In this case, support pillars are not needed.
Sergey Yurievich
Construction of houses, extensions, terraces and verandas.
Ask a Question
Every home begins with a porch. Its design affects the appearance of the entire building. A do-it-yourself wooden canopy over the porch will make the façade of the building attractive and unusual. Such designs are common due to the speed of installation, low cost, and the ability to create an original design.
Gable canopy frame
There are at least two ways to assemble a canopy with two slopes: from two or more (depending on the length of the canopy) triangular rafters or from two rectangular frames with sheathing, secured with crossbars. The second option is shown in the figure below, and the first will be a little further.
A canopy with a house is one of the popular options
Method one
Two quadrangles are assembled from a timber or thick board, which are united by a ridge board. The angle of inclination of the slopes is set by cuts on the ridge, fixed by crossbars - a spacer bar. Since the roofing material is laid from the ridge down, the sheathing strips are laid in the opposite direction. A continuous flooring is required under soft tiles. This can be moisture-resistant plywood or OSB.
How to make a canopy over a door in the shape of a house
Also, brackets are assembled on the ground - stops that will transfer the load from the canopy to a large area of the wall. It is better to assemble the structure on the ground (without fastening the roofing material). In order to lift and secure the canopy, assistants or the services of a manipulator will be required.
Method two
The second option is the assembly of individual rafter structures. Maybe this option will seem easier to you - all gable roofs are assembled according to this principle.
An example of a gable porch with a rafter system
Here, too, a frame is assembled from timber and brackets are needed. But the frame lies in a horizontal plane, supported by brackets. Two or three triangles are assembled from rafters, which rest on a ridge beam, and it rests on a post, the other end of which is fixed to the frame. It turns out a mini-model of a conventional rafter system.
To improve the appearance, bevels are placed near the counter. In the photo above they are curved, but this is far from necessary. You can simply make it from timber, sawing it at the desired angle. It is also better to assemble the system on the ground - it will not be possible to connect it smoothly at a height.
Made of metal
If the canopy frame is made of a metal pipe, everything is much simpler. The pipe has a high load-bearing capacity, so there are much fewer supporting and auxiliary elements.
Two identical triangles are cooked - according to the size of the future canopy. They are connected by jumpers, the length of which is determined by the “depth” of the visor. To prevent the cladding from bending, additional crossbars are welded.
Gable canopy over a porch made of metal pipe
The finished canopy structure is complemented by brackets - stops. In the picture above, the canopy over the porch has only a stop without slopes. For regions with little snow in winter, this is enough, but to hold a significant mass of snow, you will need a mow or stand. Or maybe both (as in the diagram below).
Beautiful gable canopy over the entrance, made of steel pipe with figured stops and pillars (diagram with dimensions)
Decorative elements are an optional part. There may be an ordinary triangle here.
Why tree?
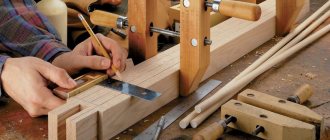
Wooden canopies are popular due to their low cost and ease of manufacture. Wood is easy to work with and you can make beautiful decorative elements. In order to cut the necessary parts of given sizes from wood, you do not need special tools or skills. A large selection of boards, beams, and plywood are available for sale.
A canopy made of wood is perfect for a building covered with wooden boards or a house made of timber. The frame and sheathing are made of wood, which is covered with roofing felt, tiles, slate or other roofing material. The structure looks organic when the roof of the house and the canopy over the porch are the same in color and type of material.
A significant disadvantage of such a visor is its fragility. Wood quickly deteriorates when exposed to moisture, subject to rotting. To prevent this, the prepared parts are treated with special compounds against insects and bacteria. They protect wood from rotting and moisture. But a canopy made of impregnated wood will have to be frequently repaired and the coating renewed.
Arched canopy over the porch: manufacturing features
A canopy over the front door in the form of an arch cannot be called difficult to manufacture. It is more convenient to make this shape from a steel pipe, and from a profile, rectangular section. Using a pipe bender (you can do it manually, but it’s more complicated) you make several arches of the same size. They are connected by jumpers, the length of which is determined by the desired size of the roofing part.
Arched design is the simplest option
The first and last arches are connected by horizontal jumpers, brackets or, as in the figure above, ordinary stops are welded to the last one.
You can often see double arches with decorative and not very decorative filling. They are typical for large structures. Still, the windage and snow load turn out to be large and it is better to play it safe by making a safety margin than to do everything all over again.
Preparatory work
Preparation should begin with the formation of a sketch, and then a drawing based on it. Calculate a flat, lean-to wooden canopy and find out what materials are needed and in what quantities. Most often, the following lumber is used to create a roof:
- Bar for racks - section 70 by 70 mm.
- The beam attached to the wall is 40 by 60 mm.
- Front type beam – 40 by 80 mm.
- Beam for floors – 40 by 60 mm.
- Polycarbonate.
- Antiseptic.
- Hardware.
- Wood cutting device and screwdriver.
- Crushed stone.
- Geotextiles.
Photo ideas
Canopy over the porch made of metal pipes and polycarbonate: different models Beautiful design using traditional or cold forging Canopy over the porch on a metal frame: models single-pitch, gable (house), arched
Different in style and shape
With supports on poles and metal tracery for decoration. A canopy over the porch is not only over the front door, but also over the terrace. A wooden canopy over the entrance in the form of a house - options with supporting pillars under the tiles
Features of polycarbonate fastening
Visor - what should it be like?
If the choice of shape, design and other things can be chosen independently, according to one’s taste, then production and installation should be carried out taking into account the following aspects:
- A wooden structure must not only withstand its own weight, but also precipitation in the form of rain and snow. When choosing a design, rely on the weather conditions of the region, the average thickness of snow, wind strength and total precipitation.
- It is equally important to take care of the water collection system into the reservoir or create an outflow into the storm sewer system.
- It will be great if the structure can protect the porch and front door from rain and wind.
- Don't forget about waterproofing. The materials for this can be slate, plastic, polycarbonate, roofing felt, sheet metal.
- The canopy should look harmonious in the overall style concept of the house.
The width of the canopy should be 0.6 meters larger than the doorway above which it will be located. And to ensure that water does not linger, a slope of at least 20 degrees should be provided.
DIY canopy attached to the house (photo report)
It was decided to attach a canopy to the house, under which to hide favorite equipment - a car and a boat. First, using a motor drill, we dug holes 1.5 m deep - below the freezing depth.
Motor drill to help you
We inserted waterproofing sleeves, a frame made of 10 mm rods with welded mortgages, and filled them with concrete.
Base for pillars
The installation step of the pillars is 2 meters.
This is what a poured row of supports for a carport looks like
When the concrete set, the pillars and top trim were installed. They are sanded and treated with protective impregnation. To prevent the frame from moving, we secured it with what we had - aluminum corners. The joint between the posts and the frame was reinforced with metal plates.
The pillars are screwed to the “heels”
A support board was nailed to the wall of the house. Roof beams (50-200 cm board) were attached to it. The slope turned out to be small, about 9°, but it was enough. Small cuts were made in the beams to fit the size of the timber - for support, the edges were cut off to create an even overhang.
Gaps on beams
The beams were fastened to the frame with nails diagonally, 2 pieces on each side.
A board was nailed to the wall, beams were attached to it
The beams on the wall are fixed to U-shaped metal plates.
Plates that attach beams to the wall
The rafter system was assembled - the beams were installed with a small pitch - 40 cm, they were made from 50 * 200 mm boards.
Rafter system of a lean-to canopy from below
OSB was attached to the rafters on top. Roofing material - soft tiles. It needs a continuous sheathing underneath.
OSB laid on the roof
A board was nailed to the side between the posts: for greater rigidity and so that the rain would wet the site less.
The sidewall was sewn up with a board - so that the rain would get in less
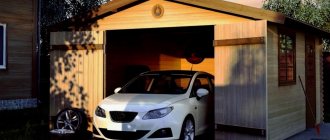
Soft tiles were laid. It worked - at least dance. You can dance on the canopy
Now there's competition in the parking lot.
Ready carport
How to build a carport with your own hands
Building a carport for a country house with your own hands is not a difficult task for those who are minimally familiar with the basics of construction. For the construction of the structure, the most suitable location is selected and a detailed project is drawn up. Next, you need to pour the foundation, put a frame with supports on it, design the site, and install the roof itself. The easiest way is to make a pitched roof yourself, supported by six to eight pillars.
To date, a large number of projects have been developed that allow you to build a canopy.
Selecting a location, creating a project with drawings, diagrams
The most suitable place to create a shelter is from the entrance to the site. It is leveled, cleared of debris and large plants. If there is a garage, the canopy is adjacent to it in front or on the side. When creating a drawing, you need to measure the length, width, height of the car - it should not be “cramped”, and enough space should be left on the site to easily walk around the car.
In regions where the wind is strong and gusty, the roof slope is made flatter and the angle of inclination is 25 degrees.
Making the foundation
The base for a heavy canopy with supports made of brick, stone, metal tiles, is made monolithic - made of concrete. To do this, markings are made, a trench is dug, a frame of reinforcement and formwork is installed, poured, and the base is leveled.
We select the perimeter for parking at a level of 3x6 m.
For a small car, a light shelter made of boards and polycarbonate, a pile foundation is sufficient. Under the piles, which are taken according to the number of support pillars (6-10 pieces), holes are drilled or dug. The latter are filled with cement after the support (pile) with the “anchor” has already been placed inside, and crushed stone and sand have been poured onto the bottom. In another option, screw piles are screwed directly into the ground, to a depth of 1.2-1.6 meters, and pipes of the required height are welded to them on top.
Construction of a frame with supports
The frame is installed on a pre-prepared base - the concrete must harden and dry well. Afterwards, supports are mounted on pre-installed embedded parts, horizontal jumpers and inclined parts of the sheathing are placed on them. The standard distance between supports located on the side is 120-150 cm, from the entrance side - 270-290 cm, height - 215-250 cm. The depth of the support elements into the foundation depends on the weight of the roof - 50-70 cm.
Fixation is carried out using reinforced steel strips or corners.
Venue design
The shelter site itself is poured with concrete, laid out with bricks, paving slabs, and porcelain stoneware. It is permissible to decorate the platform with pre-painted boards impregnated with anti-rot and insecticidal compounds, but such a coating is not very durable, especially if the machine is large and heavy. It is permissible to install railings and full high walls on the sides of the structure.
The area under the canopy can be lined with paving slabs.
Roof installation
The roofing structure is mounted on a pre-created metal or timber sheathing. First, the longest horizontal beams or pipes are laid on the supports, then crossbars and inclined parts are screwed, nailed, or welded to them. A small canopy is covered with one or two sheets of material; for larger ones the number of elements exceeds 6-12.
Among the materials for roof covering, it is better to choose corrugated sheeting.
Corrugated sheeting, polycarbonate, and tiles on a sloping roof begin to be laid from the bottom edge so that rainwater flowing from above does not accumulate on the surface. The parts are placed “overlapping” by 20-30 cm, using fasteners suitable for a particular material in sufficient quantities.
Design
The canopy structure is decorated at your discretion, but so that the decorations do not interfere with the entry and exit of the car. For a metal or brick structure, elegant forged parts (railings, cornices), plants in pots located under the roof, LED lighting, and garland are optimal. Made of wood - decorated with carvings, tinted to match elite species, hand-painted with patterns. Installation of railings made of turned wooden balusters and openwork decorative grilles is allowed.
All parts must be coated with a layer of a suitable protective composition.