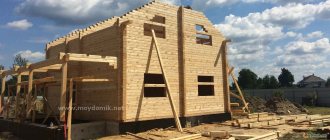
The veranda attached to the house performs several useful functions. In addition to the fact that it fits perfectly into the overall design picture, creating a look of completeness, the veranda allows you to retain heat in the house and also protects the entrance to the home from various external influences. Moreover, you can relax on the veranda in the summer, hiding from the heat and also from insects. Construction of a veranda does not require a lot of money or time, especially since you can build it yourself.
Types of verandas
There are 2 types of verandas that deserve attention: closed type (with glazing) and open type. Open verandas are less functional and are used mainly in the summer. As for closed verandas, they can be used all year round. There are also combined verandas, some of which are closed and some are open.
You can relax on the covered veranda all year round. It also reduces heat loss through this wall
As a rule, walk-through verandas are built. To get into the house, you have to go through the veranda. If a non-passable veranda is being built, it can only be accessed from the house. You won't be able to go outside from such a veranda. Unfortunately, such verandas are not practical and functional, so few people build them.
The attached veranda can be small and occupy some part of the wall, or it can be large, occupying 2 adjacent walls. Such verandas are called corner verandas.
The perimeter extension gives the house an extravagant look
As for the shapes, they can also be different, but mostly they are built rectangular. Although rare, there are extensions in the form of hexagons, semicircles and other non-standard shapes, and their construction takes much more time and money.
Various building materials are used for the construction of verandas.
Building materials used
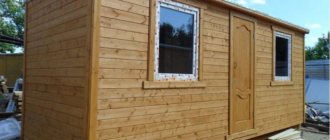
The most popular building material is wood, since wooden structures are easy to manufacture, and wood is quite affordable and environmentally friendly. Unfortunately, not in all regions it is possible to use wooden products due to their high cost, so they use metal elements. The frame made of metal can be sheathed with any finishing material. The glazing used is ordinary glass, double-glazed windows, polycarbonate, etc.
Veranda made of a metal frame and special window blocks
For the construction of verandas, building materials such as brick, shell rock, rubble stone, and building blocks are actively used. After the walls are built from similar materials, they are subsequently finished with the same materials as the entire house. You don’t have to build walls, but simply fence off the extension, as shown in the photo above.
If wood as a building material is difficult to obtain, then the veranda frame is made of metal profiles. This is often easier and faster. In this case, it is easier to use double-glazed windows, as well as other structural elements. In addition, the design is more reliable and more durable. Recently, polycarbonate, with varying degrees of transparency, has become very popular. The advantage of this material is that it combines perfectly with metal elements, while being lightweight. When using wood, polycarbonate practically does not look good, disrupting the harmonious combination of materials.
Polycarbonate veranda attached to a brick house. The entire frame is assembled from a profile pipe
Preparing tools
Anyone can build a beautiful veranda to the main house with their own hands. For such work, columnar foundation technology is most often used. All necessary building materials must be purchased in advance. To make a proper foundation for the structure you need brick and concrete. Additionally, small crushed stone and bitumen may be needed. The roof of the new extension should be harmoniously combined with the appearance of the main house. Modern specialists most often use roll type roofing material. In the process of creating the roof, you will need to make sheathing and install slats on the slope. To carry out such work, be sure to stock up on edged boards. Single frames are suitable for glazing the extension, since this room is practically not used during the cold season.
During the construction and installation of the structure, you may need various construction tools:
- Small hammer;
- Shovel;
- Bulgarian;
- Screwdriver;
- Roulette and level.
This is not a complete list, but all the necessary equipment can be easily found in any household. Small nails and screws can be used as fasteners. To extend the life of the veranda, you need to take care of its insulation, treat it with an antiseptic or a special varnish.
Technological stages of construction
First of all, you need to decide on the type of veranda, as well as the material of manufacture. Based on this, the type of foundation is selected. In addition, you need to decide on the construction site, after which all your wishes are transferred to paper. Of course, it is better to order a project from specialists, but this will greatly increase the cost of the design. As a rule, they do without a project, but still there must be a plan, since without it it is unlikely that it will be possible to build something similar to a veranda.
If wood is used as a building material, then the following operations are necessary:
- Armed with pegs and rope, the contours of the future extension are marked.
- At the designated location, all vegetation is removed, and the fertile layer is also removed.
- After this, the place for the foundation is marked. The height of the foundation depends on the height at which the lower edge of the entrance door is located from the ground surface. It is very important to accurately calculate the floor level so that it is neither high nor low. Entrance doors should open and close freely, and there should be no high steps.
- Then a support beam is attached to the wall, the lower edge of which should be at the height of the future foundation.
How to mark an extension: nail the support beam at the required level, and mark the height of the foundation along its lower edge - The foundation is being built.
- While the foundation is gaining strength, work continues to prepare the site. If the soil is sandy or sandy loam and allows moisture to pass through well, then it is enough to pour a layer of crushed stone on the bottom of the site, compacting it after that. If the soil layer does not allow moisture to pass through well, then the site is covered with the same soil (without a fertile layer) or clay. Moreover, this layer must be compacted very well, getting rid of voids so that moisture does not accumulate in them.
- A waterproofing layer is laid on top of the foundation.
- The main racks are exposed and fixed.
- The process of tying the racks around the perimeter is carried out, securing a beam 100x150 mm thick. It is mounted either on the outside of the racks or in the spaces between them. This is what the assembled frame of a veranda attached to the house looks like. Intermediate racks are needed only if the width of the veranda is more than 3 meters.
- Floor beams are attached to the support beam in increments of installing columns or piles.
- A rafter system is installed with an angle of inclination sufficient to remove precipitation from the roof.
- Side fences are installed and fixed if the veranda structure is open, or walls are formed if this is a version of a glazed veranda. At this stage, the main technological processes associated with arranging the frame of the veranda are completed. After this, they begin to form the floor:
- If the veranda is open, then the boards are nailed directly to the beams (joists).
- If the veranda is closed, then it is better to form a warm floor: first, the subfloor is installed, logs are laid on top, onto which the finished floor boards are nailed, with the obligatory installation of insulation.
- The roofing material is laid and secured.
- They begin finishing the walls, both outside and inside the veranda.
General stages are described here, without details and specifics of each stage, so each stage is discussed in more detail below.
Which material to choose?
The most popular projects for extensions to a wooden house are, of course, structures made of wood, as well as foam blocks. These are simpler and more economical options. The price of an extension to a wooden house depends entirely on the functional value, weight of the structure, as well as the materials used.
So, for example, a veranda made of timber can cost two hundred to three hundred thousand rubles. An extension to a wooden house made of foam blocks is usually built in cases where the brick version is not financially feasible. This option for additional premises is a profitable solution from a financial point of view, and at the same time speed construction of an additional dwelling is quite high. When using foam blocks, such a reliable foundation is not required, which would be very necessary if an extension was being built from brick. Also, when using this material, there is no need to make a mortar, since the blocks are easily laid on a special construction adhesive.
The disadvantage of a foam block structure is the need to correctly calculate the dew point and the need to protect the outer wall from freezing. Making an extension to a wooden house, although not an easy task, is quite doable. The structure is attached to a wooden house using reinforcement. For these purposes, in the corners, every 3 rows, a cut is made 3 by 3 centimeters, a groove 5 centimeters deep is knocked out, into which the reinforcement is then inserted, after which it is filled with adhesive. In the wall a hole is drilled into which the second end of the reinforcement is inserted and sealed with cement mortar.
Thus, the extension made of foam blocks is rigidly connected to the house itself, which reduces the depth of subsidence. A frame extension to the house will look the most aesthetically pleasing. Before direct work, it is necessary to take measurements and draw up a design for the additional room, as well as calculate the required amount of materials. After preparing the materials, you can start building the foundation. In this case, you can use piles, a shallow or columnar foundation. After the foundation is ready, begin assembling the frame, and you must first treat the frame with antiseptics. Screws, nails, and bolts can serve as fastening materials. At the end of the work, the roof is installed, windows are cut, the frame is sewn up, finishing work is carried out. It should be noted that the addition of a porch to a wooden house is always made from the same material as the house itself, in our case - from wooden beams.
Foundation arrangement
As a rule, if a veranda is attached to a house, then the foundation is not made, since it is technologically impossible to do, and there is no need for it, since the foundation of the house is already established, so its shrinkage is complete. If a newly built foundation is rigidly attached to such a foundation, this can lead to negative consequences. In addition, the veranda does not require the construction of a powerful foundation, like a residential building. In other words, these are completely different foundations in their characteristics. As a rule, to erect such a building next to a house, you can simply get by with a simple columnar or pile foundation.
If the veranda is planned during the construction stage of the house, then it is better to make one foundation for the house and for the veranda. If the veranda is attached to the house after some time, then it is better to build a columnar foundation, which is simple and low-cost, both time and money, although many experts argue that the simplest is a strip foundation, but it is somewhat more expensive.
Column and pile foundation
A columnar foundation, due to its load-bearing characteristics, can easily support a structure such as a veranda. The only problem is that you need to know at what depth such supports are installed and at what distance from each other. If the veranda is open, and the main building material was wood, then you can leave a space of up to one and a half meters between the posts. If the structure is heavier, then this distance is reduced to 1 meter.
Columnar foundation for the veranda - the columns are made of brick. This open veranda is attached to a wooden house. The house stands on a strip foundation. The foundations of the extension and the house are not connected
The depth of the columns depends on the implementation of the approach, which is based on the following principles:
- The posts are buried below the freezing level of the soil. This principle should not be ignored if the soil is water-saturated and prone to heaving. This approach will minimize the influence of the soil on the entire structure, so the veranda will always be on the same level. It makes sense to build a columnar foundation if the level of soil freezing is at around 1.2 meters, but no more. If this indicator is higher, then it is better to use a pile foundation. Wells for such a foundation can be easily drilled to a depth of 2 meters or more. To dig a pit to such a depth under a columnar foundation requires a lot of effort and time.
- Opt for a shallow foundation, no more than half a meter deep. The result is a floating veranda structure, which will change its level depending on the degree of heaving of the soil when it freezes. This approach is not particularly difficult to solve the problem, but with the arrival of spring, measures will have to be taken to eliminate traces of soil heaving. All pillars may be at different levels, which can lead to distortion of the entire veranda structure. If the soil is stable and not prone to heaving, then there will be no problems.
The advantages of these options are very obvious: minimal investment of time and money.
The veranda is attached to a brick house on a strip foundation. They placed it on a pile foundation. It differs from columnar in that the piles are either screwed in/driven ready-made, or poured into the formwork and are monolithic.
In fact, such foundation designs have their drawbacks. The main disadvantage is that it is difficult to predict the behavior of such a foundation in the future, and this applies to both deep and shallow foundations. Shallow foundations are highly susceptible to heaving forces, which depend on how frosty the winter is, which is very difficult to predict. In the case of deep foundations, the picture is the same, since it is impossible to know what kind of soil is under each pile or column. It is very easy to get onto a fragment of soil whose characteristics differ from the main one. In this case, the behavior of the pile or column in the future may differ significantly from that expected. In addition, each pile and each column are subject to lateral heaving forces, which are quite significant and can easily bend the pile, break it, or move it some distance in the horizontal plane. This must be taken into account, especially on problematic soils. In such conditions, it is better to use durable piles made of metal or asbestos, additionally reinforcing them with steel wire, placing it inside the piles. As an option, it is possible to lay reinforcing belts. As a result, we can conclude that the use of a columnar or pile foundation significantly simplifies the task of building an extension, but the behavior of such a structure in the future is difficult to predict due to the risks associated with soil heaving.
Monolithic foundations: strip and block
Everyone tries to build a veranda from cheap, affordable and traditional materials. Unfortunately, many of them are significant in weight, which requires a solid monolithic foundation. It is called tape because it is filled with tape, without any gaps. The principle of laying depth is the same as when constructing columnar or pile foundations. The best option is to make it the same as for building a house, with the same depth. It is permissible to associate such foundations (strip) with the main foundations: as a rule, they behave stably.
Naturally, such foundations are highly reliable and stable, although they take a lot of time and money.
Purpose of bedding
For regions with dry soils, where they do not know what frost heaving is, houses are built without a base, so a veranda can be built without any problems without a foundation. To do this, it is enough to remove the fertile layer of soil along with the vegetation and fill the place with a layer of crushed stone, and then a layer of sand. Each layer, as well as the bottom of the pit, should be compacted. The base prepared in this way is ready for laying flooring made of wood, paving slabs or other materials.
The only problem is attaching the posts that support the roof. In the places where they are installed, you will still have to build something similar to pillars, the depth of which may correspond to the depth of the pit itself.
The thickness of the bedding depends on the material from which the floor of the future extension will be made. If the floor is made of wooden panels, as in the photo above, the thickness of the layers is chosen so that the floor is flush with the ground. In the case of paving slabs, as shown in the photo below, it is better to raise the tiles to a certain height, otherwise such a floor will not look good. According to the technology for laying paving slabs, curbs should be installed along the edges.
In this photo, the open veranda is attached to the house without a foundation - it’s more like a summer shed with a polycarbonate roof and an open wooden fence
Open terrace with canopy
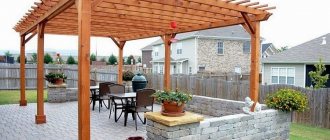
Perhaps the most common and most practical option for arranging a country terrace is an extension with a canopy or roof. Ideal for the summer season, allowing you to comfortably spend time in the fresh air outside the home and at the same time reliably protecting you from the scorching sun and drizzling rain.
Without walls
A roof or canopy and supporting pillars or columns made of wood, brick and other materials is a simple and very elegant structure, offering all the main advantages that we expect from an open country terrace adjacent to the house.
The “roof” of the terrace can be a specially equipped canopy or part of the upper floor of your country house.
There are also special awnings that roll up at the touch of a button and instantly transform your covered terrace into an open-air terrace. Relevant for those who like to sunbathe from time to time at their own dacha.
Please note: even if there is a roof over the country terrace, you should use only furniture designed for outdoor use, outside the home. After all, the absence of walls means that the veranda is not protected from excess humidity, temperature changes, or slanting rains
With drapery
An open veranda with a canopy can be complemented with translucent curtains, tulle and other drapery options.
This design looks cozy, airy, additionally protects from side sun rays, and with relatively tight curtains, also from unwanted insects. You can make this textile decor yourself.
By the way, the idea with drapery can be implemented not only on a terrace with a canopy, but also on the territory of a completely open veranda.
Photo: Instagram art_of_home_decor
With fencing
It is also possible to have a terrace adjacent to the house with a canopy, which includes a conditional fence. This could be a hedge, a low fence or other similar structure.
Photo: Instagram interior_delux
Fastening the racks and lower trim
After the foundation is poured, it is given the opportunity to gain at least 50 percent strength. Generally, concrete or cement mortar is used in either case. After this, you can begin installing the frame. At least a couple of layers of waterproofing should be laid on top of the foundation. Roofing felt or roofing felt, folded in half, is used as waterproofing. It is acceptable to use other, more modern waterproofing materials, including in liquid form.
After this you can do this:
- First, the racks are secured, after which the harness is formed.
- First of all, the strapping is done, and then the racks are attached.
In the case of the first option, when pouring the foundation, special fasteners are poured in the places where the racks are installed. In the photo below you can see what these fastening elements are. It can also be a metal plate in the shape of the letter “P”; in this case, it is poured upside down, and it is better to weld a rod at the bottom of the plate. A stand is inserted inside this letter “P” and secured with screws or self-tapping screws. Naturally, before installing it, all holes for fasteners must be drilled, and the dimensions of the plate must correspond to the cross-sectional dimensions of the racks. It is permissible to fasten with ordinary nails, which will not affect the reliability of the entire structure.
How to attach posts to the foundation
After installing and fastening all the racks, the strapping bars are attached between them.
If another option is used, the strapping beam is first installed. If, at the stage of pouring concrete, the studs are bricked up at a certain step, the task is greatly simplified. In the places where the beam is attached, it is enough to drill holes, after which the beam is placed on the studs and securely tightened with nuts to the base. After this, they begin to install the racks, armed with one of the methods presented in the image below.
Options for attaching racks to strapping beams
In any case, it is better to use metal corners, which will make the structure stronger and more reliable, especially since these racks are loaded with the roof, and this is very important.
We build the frame
Wooden beams or logs are used as the basis for constructing the frame. They begin to build the foundation for the future veranda from the bottom. It is better to connect the beams with each other using a straight lock.
At the place where the next log and the base are connected, boards and racks equipped with spikes are installed vertically. The entire structure is fastened with staples for strength and reliability. The base for the roof and the top trim is attached to wooden blocks.
Moreover, the frame for the rafters is attached to a beam located horizontally, which runs under the slope of the roof. All structural elements are fixed with anchor bolts. During the process of building it yourself, you need to ensure that the roof of the house and the terrace are well connected to each other.
How to secure joists
How to attach floor joists to the frame
You should think about the method of attaching the joists at the design stage, since the height of the floor depends on this. The fact is that the logs can be fixed end-to-end, forming a surface of the same height with the support beam, or they can be fixed directly to the strapping beam, raising the floor level by the thickness of the logs.
The photo below shows the options for attaching the joists.
Features of the layout of wooden houses with a terrace
Varieties of house layouts made of timber with a terrace and veranda are based on the convenience and desires of the owners.
The size and content of the terrace is the owner’s choice. Source krov-torg.ru
A filter for selecting timber projects usually includes:
- Houses made of timber with a large or compact terrace.
- Projects of houses made of timber with a terrace-veranda with and without a bay window.
- Decorative and functional variations.
- With large windows and open type.
- Buildings of corner, square and rectangular types.
- Selecting an elite package.
- Economy class projects.
All houses with a timber veranda have an attractive appearance.
Where the veranda roof joins the house
As a rule, when covering the veranda roof, the same roofing materials are used as when building a house, so as not to disturb the overall design of the building as a whole. The connection of the roof of the extension to the house can be done in various ways, depending on which wall the veranda is attached to. If the roof of the veranda is ultimately a continuation of the roof of the house, then the task is greatly simplified, since it is enough to splice two rafter systems. It turns out that the roof of the veranda is adjacent to the roof of the house.
In this case, proceed as follows:
- The upper trim of the veranda is formed with the fastening of the posts.
- Ceiling beams are attached to the frame, to which the veranda ceiling will subsequently be attached.
- The rafter legs of the house are shortened so that they do not extend beyond the wall.
- The elements of the extension truss system are attached to the house truss system as shown in the image below. The mounting method is selected depending on the complexity of the structure. For greater reliability, metal linings are used.
- To ensure that the structure is reliable and can withstand loads, special reinforcing struts are attached, the purpose of which is described in the image below.
Connecting the roof truss system of the veranda to the roof of the house
If the width of the veranda is more than 2 meters, and also if heavy roofing material is used, additional spacers are installed. As a rule, they are not attached to the sides of the rafters, but are inserted between the upper and lower beams, after which it is better to secure them.
In order to prevent the roof from sagging, spacers are installed between the ceiling beams and rafters
Sometimes it turns out that the roof of the veranda is adjacent to the wall of the house. To solve this problem, you need to make a groove in the wall and lay a special profile in it, carefully sealing all the cracks. The second side of the profile extends onto the surface of the roofing material, which prevents precipitation from entering the space that is caused by the adjoining of the structure to the wall.
How to attach a veranda roof to the wall of a house
You can make such a profile yourself by bending a piece of galvanized steel accordingly. The design differs in that it is necessary to strengthen a special beam, which moves this apron away from the wall to the required distance. The apron is also attached not to the wall itself, but to a beam embedded in the groove. In fact, if the design of the extension is simple and primitive, then such an apron can also be attached to the wall by bending the edge accordingly. After this, it is better to seal the groove with sealant.
The second option for connecting the roof of the extension to the wall of the house
The rafters are attached to the outer top frame using metal corners, as shown in the photo below, since the dimensions of the elements do not allow special cuttings to be made, as with a Mauerlat.
Method of attaching veranda rafters to the top frame
The solution is simple and reliable, although it does not look very good, but in fact no one will see it after the roofing material is laid on the roof and the ceiling is lined with any finishing materials.
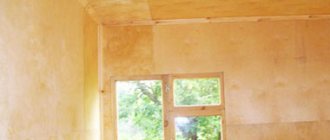
Installation of window frames
For the veranda, it is preferable to install low window sills, at a height of no more than 50 cm from the floor. The lower part of the wall is usually covered with clapboard or wooden panels. The wooden structure has excellent thermal insulation, so you can do without additional interior decoration. The external attractiveness of the building most often depends on the dimensions of the chosen window design. The veranda should be bright and well ventilated. To do this, it is necessary to install fixed windows and structures with sashes alternately. The window is inserted into a special opening and securely fixed with nails and wooden wedges. All cracks must be carefully filled with tow, covered with gypsum mortar and caulked with wooden trim.
Walling
To assemble the frame, you need to take support pillars from timber, the cross-section of which is 120 * 80 millimeters. The pillars need to be placed at the corners of the veranda, and then between them in half a meter increments. On the lower trim, the supports are secured with steel angles. The supports near the wall of the house must be higher to create a difference in the height of the walls, which will result in a lean-to roof structure. You can increase the rigidity of the structure by connecting the pillars with horizontal beams, which will later serve as a support for the windows.
Recommendations for choosing a project and photo gallery
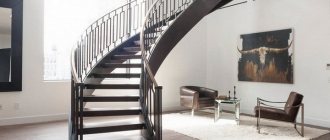
The traditional opinion that only a permanent veranda should be attached to a permanent house, and that lightweight structures should be left for frame and wooden houses is not the only possible way of thinking. More important for choosing a specific project will be the design style of the building.
Thus, for houses in a strict modern style, laconic verandas on a frame base with a roof made of polycarbonate or glass are suitable.
Buildings in which the traditional solid roof is replaced by a lattice roof look very harmonious. Of course, they do not provide protection from rain and snow, but they provide shade quite well.
Those who prefer an ethnic style can choose spectacular buildings made from intentionally rough-hewn or untreated wood.
If you need not only a place for relaxation, but also a suitable area for setting up a barbecue and barbecue, a veranda is also suitable. But serious brick barbecues and complex ovens will require a solid foundation.
You also don’t have to limit yourself to just a rectangular shape. The veranda can go around the corner/corners of the house (L-shaped or U-shaped), have the form of a trapezoid or a polygon, even a segment of a circle.
As you can see from the photos presented, the design of a veranda in a private house can be very different. The main thing is to find the best option for yourself and implement it!
Various structures
You can build your wooden deck on a variety of supports.
Often an unsightly concrete slab extends the house, you can use it by covering it with wood, thereby creating a warm terrace. All you need to do is fix the beams directly to the slab and screw the wooden boards to it. This is a job that can be done by any good craftsman and will not take you much time.
If you start straight from the garden soil, the preparation of the structure must be careful to avoid problems in the future: install concrete studs every two meters.
You will attach the beams to these studs, then a wooden batten perpendicular to which the boards will be attached. For high terraces or on stilts, contact a professional.