This will help you get the job done quickly, efficiently and without errors. Plywood is a material familiar to most. Many, many years ago, this was almost the most successful way to improve a room. =>But even today, with a stunning choice of finishing materials, the use for interior cladding remains quite relevant. The textured wood surface of natural origin does not lose its popularity.
[contents]
Buy plywood in Petrovich =>>
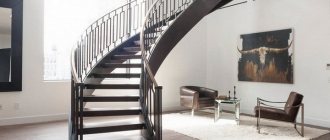
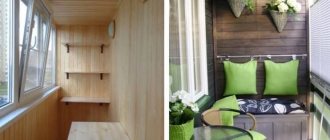
Examples of finishing rooms with plywood:
By the way, if you are not satisfied with the “classic” color of plywood cladding, then modern wood tinting oils or other paints and varnishes will always come to the rescue. Look, for example, what rich palettes are now available to masters:
Types of cladding
It is believed that finishing the walls of a wooden house from the inside should be done using frames. This is due to the fact that most types of coatings require them structurally, and the technology for manufacturing such houses usually does not involve creating perfectly smooth walls. Therefore, this technique is considered optimal.
An original version of covering the entire room with plywood
Plywood
Typical wall decoration with plywood in a wooden house usually involves subsequent coating with varnish, wallpaper or other finishing materials
This is important to consider when choosing, since the work will require additional costs
Ceiling covering with moisture-resistant sheets
- The frame for the structure is made of wooden slats. They can be pre-treated with a primer, and such products are fixed using self-tapping screws.
- The distance between the slats is usually set at 40 cm. However, it is best to focus on the dimensions of the plywood sheet so that it can be fixed at the edges and have several supports in the middle. In this case, during the manufacturing process it is necessary to use a water level and a plumb line to prevent distortions or deviations from the plane.
If ordinary plywood is used, then when laying it you need to leave small gaps, which will be compensators for expansion as a result of heating
When deciding what to decorate the walls of a wooden house with, you need to remember that the plywood is fixed using self-tapping screws that go right through the sheet. Therefore, they are recessed a little to create a secret area that can be closed with a special plug or putty.
Wood lining looks great in any type of room
Lining
When choosing this material for finishing walls in a wooden house, you should pay attention to the principle of its connection with each other. The fact is that there are many types and models of these elements that have different locks or joints
In this case, the appearance of the fastener will depend on such characteristics.
If you plan to install the modules horizontally, then the slats are placed vertically on the wall
- The frame for the lining is made of slats, which are placed horizontally. It is better to make the distance between them 40 cm, and they are fixed from the floor and ceiling at a height of 10-20 cm.
- Further finishing of the walls with clapboard in a wooden house is carried out taking into account the design features. In this case, special fasteners, staples or small nails are used to secure the material to the slats.
- If the design of the products requires a lock, then before nailing each module it must be inserted into a slot or groove.
The simplest block house module made of uncoated wood
Block house
Such finishing materials for the interior walls of a wooden house are practically no different from ordinary lining. However, they are created with the latest technology and often with a protective coating.
Principles for fixing such systems on the surface
- It is worth noting that the appearance of this coating imitates a wooden frame made from expensive wood species. Taking this into account, it is believed that a block house is the most suitable material for such work, since it allows for high-quality cladding and at the same time has a good appearance.
- Typically, finishing the interior walls of a wooden house with such a coating is done in exactly the same way as when using lining. However, some models of such materials have their own fasteners that must be used during operation.
Special fasteners and their use
Decorating walls with plywood: what is important to think about in advance?
And now, if you liked the idea of lining the walls with plywood, then it’s time to start preparing. Especially if you decide to do everything, so to speak, “with your own hands.”
First of all, there are some important issues to discuss:
- what plywood to choose for wall decoration?
- how to calculate the required amount of plywood?
- What are we going to mount it on?
- what tools will you need?
- Does the plywood need to be painted or impregnated and decorated in some other way?
We will try to at least briefly answer all these and some other questions that you may have in this article.
Choosing plywood for wall decoration
First of all, let's decide on the grade (type) of plywood that can be safely used for interior decoration.
Here you will have to understand some of the features of marking plywood sheets. It is important to understand what exactly all these abbreviations and “numbers” FK-3 or FSF-E, for example, mean.
We have written on this topic more than once in our articles. But for those who came to our site for the first time, we will gladly remind you of the main points that you should know about plywood marking.
Types of plywood (depending on the composition of the adhesive layers):
We remind you that plywood is a multilayer material consisting of thin sheets of wood veneer, which are specially positioned relative to each other. These layers of veneer are glued together under pressure using various adhesives.
Accordingly, plywood varieties are distinguished not only by the type of wood veneer (birch, pine, etc.), but also by the composition of adhesives. And it is the last factor that may be critical when choosing plywood for interior decoration. For example:
- Plywood with FC - in the production of this grade, predominantly carbamide adhesives are used, which are recognized as safe for indoor use. However, this variety is the least moisture resistant and is not recommended for finishing rooms with high humidity (bathrooms, swimming pools, etc.)
- Plywood marked FKM is a fairly rare type of plywood in our construction markets and expensive to produce, the production of which uses, among other things, low-toxic melamine and melamine-formaldehyde resins and glue based on them. Recommended for use for interior work, including for rooms with high humidity (as it is highly water resistant).
- Plywood marked FSF - in the production of this grade, glue based on phenol-formaldehyde resins (mainly) is used for gluing wood veneer, which themselves are characterized by a fairly high degree of emission. Those. may produce minor, but quite “harmful” fumes during operation of the finished product. That is why, although this type of plywood is characterized by high water resistance, experts do not recommend using this plywood for finishing residential premises or for making furniture, for example. But such plywood is ideal for exterior finishing and roofing work. After all, FSF plywood, despite containing formaldehyde, does not pose a health hazard outdoors.
It is clear that based on the above, the optimal choice for covering indoor walls will be plywood of the FK or FKM . Moreover, for wet areas it is recommended to use FKM .
Types of plywood (depending on the appearance of the facing layer of wood):
Plywood is also differentiated depending on the number of external defects on its surface and the degree of processing. Those. how smooth and high-quality the surface of the face layer of wood is for this type of plywood.
Attention! When purchasing, especially when it comes to finishing plywood floors and walls, it is recommended to carefully inspect each sheet, including along the edges of the plywood sheet - knotty cuts, chips, dents and stains can be evident in the finished work. As well as cavities excessively filled with resin.
Plywood comes in four main grades, which are marked with numbers from 1 to 4 (sometimes Roman - from I to IV). Also often identified is the 5th, highest grade of plywood, marked with the letter E.
In general, the grade of plywood depends on the number of knots and other defects per unit area:
| Plywood grade | Brief description (permissible defects, features). | Applicability |
| E (highest grade) | There should be no visible defects on the outer surface. Only small knots are allowed (no more than 3 pieces). In the production of this type of plywood, birch veneers are used, which increases the cost of plywood sheets. | Used for finishing floors, making arches and other decorative elements for finishing premises. Ideal for decorative cladding of walls “under varnish” (without additional sanding). However, it is extremely rare in the assortment of construction stores - both in Rostov and in the Rostov region. |
| I (1st grade) | The front surface of wood veneer may contain closed cracks (up to 25 cm), minor edge defects and repair inserts. Veneer gaps are allowed - up to 0.2 cm. Plywood of this grade can change its color. | Can be used for rough finishing - for leveling floor surfaces, for example. It can be used for covering walls for subsequent decoration with wallpaper or opaque painting (with preliminary puttying of individual defects). And also in loft-style interiors or if this solution was provided for by the original design idea. |
| II (1st grade) | The presence of knots, scratches and dents, adhesive tapes, traces of resin, and overlapping of the outer layer veneer is acceptable on the surface. As well as defects caused by the activity of insects and pests. | Fits under linoleum and other floor coverings. It is recommended to pre-fill cracks. Application for rough wall cladding - only taking into account the characteristics of this type and subject to additional finishing work. |
| III (1st grade) | The surface of the material contains all the defects as grade No. 2. At the same time, the permissible overlap length was increased to 40 cm, the length of cracks was increased to 60 cm, and the size of knots was increased to 7 cm. | The application is similar to the use of 2nd grade plywood. |
| IV (4th grade) | For this material, most of the restrictions on the number of external defects have been removed. On its surface there may be knots up to 10 cm and open cracks. Grade No. 4 plywood is formed during the process of adjusting the parameters of woodworking equipment. | Used as a technical material in the construction industry. |
Grinding
In addition, when choosing plywood for wall cladding, you should take into account that there is both sanded (marked with an additional letter Ш next to the grade) and unsanded plywood - the so-called rough processing (marked with the letters NSh ).
In this case, sanded plywood can also vary:
- polished only on one front side (Ш1)
- polished on both sides (Ш2).
It is clear that sanded plywood is better suited for cladding and decorating walls.
Moreover, the choice of type of grinding (on one or both sides) depends on the method of finishing the walls:
- If the plywood is fixed to the surface of a wall or fence, showing the viewer only one of its (front) sides, then it would be more logical (and more economical) to use material with one polished surface - Ш1 .
- If the design of the room provides for complex, voluminous decor (which will be visible from all sides), then completely polished material type Ш2 .
Plywood thickness for wall finishing
Plywood can consist of three, five or more sheets of veneer (always an odd number); in general, the thickness of the plywood sheet can range from 3 to 30 mm.
As a rule, experts recommend choosing plywood with a minimum thickness of 15-16 mm .
However, it should be taken into account that the thicker the plywood sheet you choose, the more rigid and durable the structure you can mount. But at the same time you will lose the flexibility of the sheet. This will significantly complicate (or even eliminate!) the possibility of obtaining smooth, curved surfaces.
Therefore, in each specific case, you need to proceed primarily from your design project and the technological features of wall cladding.
Conclusion:
So, the ideal choice for finishing premises with plywood can be sanded ( Ш1 or Ш2 ) plywood of the 1st or highest grade ( I or E ) with a thickness of 15-16 mm . However, in order to save budget or in accordance with your future interior design, as well as for rough finishing, it is permissible to use plywood of a lower grade ( II or even III ; including unsanded NSh ) or less thickness (but not less than 12-15 mm !)
How much will we charge?
So, it’s time to pick up a calculator and calculate exactly how many sheets of plywood you will need to make the walls you have in mind. To do this you will need:
- Take fairly accurate measurements of walls, ceilings and other surfaces that you are going to cover with plywood. This will be required to calculate the total (total) area that will be covered with plywood. Let's denote this total area - Ssum .
Attention! At the same time, most experts recommend calculating the total area WITHOUT taking into account the areas of window, door, etc. openings. However, if you have only 1-2 doors or windows in the room, then you don’t have to subtract the area of these openings from the total area for cladding - in this case, this will simply become an additional “stock” of materials, which may not be superfluous (especially if you have You still don’t have enough experience in such finishing works).
- Specify the dimensions (width and length) and, accordingly, calculate the area of the plywood sheets you have chosen for wall decoration. Let's denote the area of an individual sheet of plywood by Slist .
- Now we will find out exactly how many sheets of plywood of a given size you will need for finishing. Simply divide the total area ( Ssum ) by the area of one sheet of plywood ( Slist ):
Ssum ÷ Slist = Kol , where Kol is the number of plywood sheets per piece.
- And don’t forget to keep a supply of materials - for technological cuts and structural waste, as well as for various unforeseen circumstances or even for “rejects”. Especially if you plan to make plywood walls with your own hands, without involving more experienced craftsmen. Then, even if you “ruin” one or two sheets, you will still have enough material left to do it all over again. To do this, as a rule, the obtained value is multiplied by an average of 20 - 25%. Those. in fact, our formula can be written as follows:
(Ssum ÷ Slist) × 25% = Kol*
This is exactly the number of sheets of plywood you will have to purchase to decorate your room.
By the way, if you plan to mount plywood on a wall using a wooden or metal frame, then the frame slats are calculated based on the known dimensions of their cross-section and the number of plywood sheets required. However, the calculation will be greatly simplified if you first (on a sheet of paper, for example) at least roughly draw a diagram of the layout of the plywood and the corresponding frame elements.
And a few more words about the calculations of the required materials:
It is clear that in the case of complex, curved surfaces, plywood consumption can increase significantly. Yes, and additional structures, volumetric figures or applications should also be taken into account additionally when calculating the required amount of plywood.
In such cases, we would recommend that you make a preliminary calculation in specialized computer programs. Better yet, contact a specialist who can not only make you a full-fledged design project, but also calculate the required amount of materials.
General information
Nowadays, there are many building materials that can be used for wall decoration, while many prefer to use wood from plywood on the wall, since this material has the following qualities:
- environmental friendliness - does not emit harmful substances even when heated;
- looks attractive;
- strength and mechanical stability;
- good thermal insulation properties;
- moisture resistance (not applicable to all brands);
- due to its light weight, it is not difficult to carry out finishing work with your own hands;
- can be used as a finishing coating, for example, covered with varnish or stain, or as a rough coat under wallpaper or other finishing materials.
As for the disadvantages, they only include a higher price compared to other wall coverings.
Advice! Home craftsmen are often interested in what is better: drywall or plywood for walls? The choice depends on individual preferences. For example, if you want to decorate the walls with paintings or even hang furniture on them, then, of course, you should give preference to plywood.
FK grade plywood sheets
What tools might you need?
For successful and comfortable work, you need to stock up on a variety of devices and tools in advance. You may need:
- A drill (preferably with the ability to hammer drill - the so-called hammer drill - for working on concrete) and a set of drills (for concrete and wood; with different diameters);
- Screwdriver;
- Construction gun and staples for it.
- Jigsaw and/or hacksaw. Ideally, it would be nice to have both an electric and a manual jigsaw or hacksaw - in such work they are not always interchangeable;
- Don’t forget to also choose a set of files of different thicknesses and spare ones for your jigsaw (they periodically become dull and sometimes break);
- A sanding machine and fine-grained sandpaper for it - useful for final sanding;
- Hand files of various grain sizes will also help to polish the cuts and give them shape;
- a plumb line and level (water, bubble or laser - of your choice) - will be useful both when cutting plywood and when marking frame structures;
- wide flat and notched spatulas - for applying glue (for the adhesive method of attaching plywood).
- narrow spatula - for sealing seams;
To prepare parts and assemble you may also need:
- construction pencil
- hammer or mallet,
- screwdriver set,
- pliers,
- awl, etc.
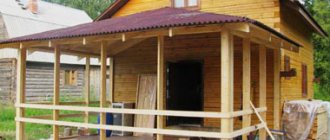
Plywood in construction - decorativeness, low cost and wide possibilities
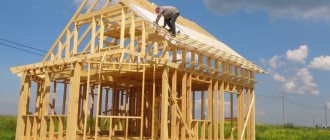
Set in the New Zealand countryside, the house's three frontal, peaked forms follow the contours of nearby buildings. The architects were given a task; build a convenient and comfortable home with minimal construction costs.
Construction materials have been selected to reduce operating costs. Metal profiles for the facade, wooden frames, metal structures and plywood interior decoration fully meet these requirements. This made it possible to build an affordable and comfortable cottage for a family of several people.
Lightweight and inexpensive structural elements give the building an effortless gracefulness and at the same time reduce the cost of building a foundation, since the requirements for its strength and volume are reduced.
We attach plywood not to walls: glue or frame?
To attach a sheet of plywood to a wall, you can use several basic methods:
| Name | Short description | Applicability |
| adhesive | Sheets of plywood are installed directly on the glue. Those. plywood is attached directly to the wall, and not to a mesh frame made of timber. In this case, it is advisable to provide in advance any devices that rigidly hold the plywood sheet on a vertical surface - until the glue completely sets. | Suitable for covering smooth, plastered walls with not too thick sheets of plywood. And besides, this finishing method does not involve obtaining complex (convex-concave) structures. It is recommended only for decorative finishing of walls with plywood - when in the future there is no provision for attaching additional, especially highly loaded structures to plywood. For example, this method is not recommended for organizing climbing walls or attaching folding beds to a plywood wall, etc. |
| frame | First, a supporting frame made of wooden beams or slats is mounted on the wall. Or from metal guides. After that, the pre-cut and prepared sheets of plywood are attached to the sheathing using self-tapping screws or dowel nails. | A universal method, which is also suitable for the implementation of geometrically complex structures or structures that subsequently imply greater loads on the plywood sheathing of the wall. And also for finishing with plywood non-pre-leveled walls made of any building materials (brick, reinforced concrete, wood, etc.) In addition, this method allows you to add additional sound, steam or heat insulation to the wall cladding. The disadvantages of the method include the need for subsequent additional sealing and masking of screw heads, for example. Although in some cases the fasteners themselves can act as decoration and even style-forming elements. |
| mixed (frame-adhesive) | As in the frame method, the sheathing is first attached to the wall. Wooden blocks are attached to this sheathing (according to a certain pattern) with dowels or using the same screws. And plywood sheets are already placed on these bars with glue. | A method quite rarely used by specialists, which is mainly applicable for cladding smooth plastered walls with plywood. Or to obtain decorative structures that do not require significant loads during further operation. The advantages include:
|
Let's look at each of the methods described above in a little more detail.
Plywood finishing with glue
Plastering walls under plywood: what is important to know?
Please note that when choosing plaster for walls, if you plan to cover these walls with plywood sheets in the future, be sure to choose cement plaster rather than gypsum. Because Glue will not adhere firmly to gypsum plaster.
Which glue to choose?
If you want to glue the plywood to the walls, and not mount it using the frame method, then you will need to choose the “right” glue. Which will hold your plywood firmly on the plastered surface.
After all, as we already mentioned above, the adhesive method of covering walls with plywood is only suitable for fairly even, smooth surfaces - as a rule, for pre-plastered ones.
When choosing an adhesive, be sure to ensure that the description indicates that the adhesive is suitable for gluing both wooden and cement surfaces.
This could be, among other things, specialized professional parquet adhesive, the description of which directly states:
- Material to be glued: parquet ;
- Base material: concrete , wood , plywood ;
Many experts recommend, for example, one-component rubber adhesive made in Poland - “ARTELIT RB-110”.
Although there are other equally high-quality compositions: both single-component and two- or multi-component.
We also draw your attention to the fact that sometimes on forms, for example, you can find advice to use mounting adhesive foam to attach plywood to the wall. However, we would not recommend following these tips if you want a truly smooth surface. Because when drying, polyurethane foams can expand in different directions not evenly enough. And the plywood sheets will also “prop up” unevenly. Which can lead to unsightly protrusions and distortions.
Sequence of work:
Wall preparation:
- If the wall has not yet been plastered, then we will plaster it.
Attention! The plaster must be completely dry.
- Carefully remove dust and dirt from the surface.
- Next, we prime the surface - also with complete drying. As a rule, no separate waterproofing is required between the plywood and the surface.
Placement and fastening of plywood sheets:
1. Mark and cut the plywood. It should be taken into account that:
- The plywood is attached with an indentation along the perimeter of the wall (from the floor and from the ceiling - approximately up to 10 mm).
- Between the sheets of plywood you also need to lay a technological gap - about 2 mm.
- It is recommended to cut the sheets into squares and/or rectangles of smaller area (size).
- We also thoroughly clean dust, sawdust residues, etc. from the surface of the plywood.
2. Next, apply glue to the plywood:
- the glue is applied in a continuous layer over the entire area of the plywood sheet;
- We form furrows with a notched trowel.
3. Press the plywood firmly against the wall surface. We fix the plywood until it dries completely and the glue sets.
| The walls are leveled and primed | Glue is applied to a plywood sheet |
| The plywood sheet is pressed against the wall | If necessary, the plywood is additionally fixed with self-tapping screws |
If rough wall cladding is planned, then the fastening of plywood to the walls can be duplicated using screws and dowels. The heads of the screws are recessed into the plywood.
Thorough drying completes the process. If necessary, and if this is provided for in the initial design project, the joints are puttied and further finished.
Wall cladding with plywood on frame
In fact, plywood is a fairly heavy material for wall cladding. Therefore, craftsmen prefer the frame method of attaching plywood to walls and ceilings, when a special reinforced sheathing with transverse strips is mounted under the slabs.
Wooden or metal?
As a rule, when covering walls with plywood on a frame, a metal or wooden frame is used:
- If the wall is brick or concrete, then preference may be given to a supporting frame made of metal hangers and guides - usually galvanized. In this case, installation of frame structures on the wall is done using dowels.
- If plywood finishing is required for wooden walls, then the frame is also easiest to make from wooden beams or slats. In this case, the slats are mounted to the walls using self-tapping screws or other types of wood screws.
| Wall cladding with plywood on a metal frame | Wall cladding with plywood on a wooden frame |
The simplest frame, for example, can be made from wooden slats with section dimensions:
- 100 x 25 - for the perimeter (to which adjacent sheets will be attached vertically and horizontally, 2 per rail)
- and 50 x 25 mm - for intermediate parts.
If there is a need for heat or sound insulation, then the wooden frame elements should be selected approximately 1 cm thicker - to form a gap; to be able to place appropriate insulating materials.
Don't forget about isolation...
By the way, mineral wool mats or foam panels are usually used as thermal insulation when covering walls with plywood:
In addition, depending on the type of wall surface or the characteristics of the room, you may need additional waterproofing or vapor barrier.
The waterproofing layer is most often mounted on the prepared sheathing, directly under the plywood sheets. We recommend using penofol for these purposes, for example.
But the vapor barrier, on the contrary, is mounted almost on the wall - under the sheathing.
Sequence of work
Preparing the frame:
- First, the attachment points of the main frame elements are marked on the wall - both along the perimeter and in the spaces - with a predetermined step. The optimal spacing for racks is considered to be 450 or 508 mm.
In this case, it is important that the vertical and horizontal elements of the frame are located taking into account the size of the plywood board or prepared cutting elements. The main rule here is simple - the edges of the plywood should not “hang”; those. be above the void, not attached to the frame.
In addition, if you are mounting large sheets of plywood entirely on the wall, it is also recommended to “pull” them, fixing them in several places in the center and across the entire surface of the sheet. For this purpose, you should provide intermediate frame slats, to which you will then “attract” the plywood.
- If you have chosen a wooden frame, then do not forget to dry the wooden beam first (after transporting it in the open air, for example). It is also recommended to carry out a comprehensive treatment of all elements of the future frame with specialized protective antiseptic solutions, which will protect the insides of your future wall from unwanted damage by fungi, mold, rot and even insects.
- Mounting the frame on the wall begins with installing the upper and lower beams. In this case, the so-called “direct fit” method is used for fastening to the wall. Or use metal hangers:
Attention!
At this stage, we recommend not to forget to use tools such as a plumb line and level. All frame parts are aligned with each other; taking into account the existing irregularities, the required distance from the wall is set; unevenness is corrected using substrates.Do not forget that in the future the resulting plywood wall surface should become absolutely flat and level.
- Then they begin to mount the vertical posts of the frame - also be sure to remember to align all the parts relative to each other using a plumb line and levels.
- The space inside between the vertical segments of the frame is further strengthened by horizontal jumpers.
- Insulation is laid between the sheathing elements. Mineral wool or other insulation is fixed - for example, using double-sided construction tape, or placed on a suitable construction adhesive, for example. It all depends on the type of insulation you choose and the specifics of working with it.
- If necessary, waterproofing material is laid on the sheathing (for example, “shooting” it with construction staples to the finished sheathing).
Plywood ceiling (50 photos). Instructions on how to sheathe it yourself.
- ladder;
- drill;
- screwdriver;
- construction and laser level;
- wooden slats or metal profiles for making sheathing;
- dowels and screws;
- chop cord;
- plywood sheets;
- perforated hangers;
- glue for working with wood, if you plan to glue the sheet to the base;
- roulette;
- ruler;
- pencil;
- notched spatula;
- jigsaw for cutting wood;
- antiseptic impregnation or primer for wood.
How to treat the surface → Room decoration → How to choose the right paint → Surface treatment technologies → Leveling and finishing the walls → Selecting and applying a primer → Removal from the surface → Stretch ceilings and technologies → Reviews and testimonials
Types of drywall
- Classic drywall consists of two layers of construction cardboard, between which hardened gypsum dough with filler is laid. It is suitable for rooms with moderate humidity;
- Moisture-resistant materials are suitable for covering wooden walls and ceilings, as the products contain antifungal and moisture-repellent additives. This will prevent the formation of fungus and mold on wooden surfaces;
- Special drywall is the most stable, durable and reliable material containing reinforcing additives. It can even withstand open fire;
- The combined material includes the properties of special and moisture-resistant drywall. It does not burn and is not exposed to the negative effects of moisture and ultraviolet radiation.
When do interior wall decoration work begin?
“It’s better not to rush and let the new building sit for at least 10 months”
The final finishing of a “fresh” log house can begin no earlier than the shrinkage process is completed. For a structure made of laminated veneer lumber, this period lasts about four weeks, for others it lasts for many months. To calculate the time required to shrink a new house, you need to know the percentage of humidity of the raw materials used for construction, the climatic features of the area where the cottage is located, and take into account the duration of construction. In any case, it is better not to rush and let the new building sit for at least 10 months. During this time, the logs themselves will dry out and the insulation lying between the crowns will shrink. Externally, it is difficult to notice the processes taking place with the eye, however, if you ignore the recommendations and sheathe the walls before the shrinkage is complete, you can clearly see that it is quite active. The finish will definitely become distorted, covered with a network of cracks, or even completely torn. In general, nothing will save you from remodeling, not even the installation of a floating frame.
Headlining
Finishing the ceiling with plasterboard with your own hands is a simple and at the same time unique way to transform the surface. It has a lot of advantages, which makes it stand out from other methods. Because of its low cost, it is often used in rented or rented apartments, which is convenient for young families. The advantages of such finishing include the low cost of materials - their cost is much lower than that of isoplaat panels, but externally they are indistinguishable.
You need to fasten the plywood with self-tapping screws, which can be done even by one person. The ceiling can be sheathed with matte plywood, as well as varnished, which will visually increase the area of the room. Wood cladding is suitable for a wooden ceiling, which will preserve the environmental friendliness of the room and recreate a favorable climate, while creating a unique design.
You can also cover the ceiling with plywood, various lumber from oak, maple, ash, and cherry. Of the coniferous species, larches and fir are ideal
When choosing a material, it is important to take into account humidity - it should not exceed 16%. In those places where lighting fixtures or communications for household appliances will be located, it is necessary to strengthen the frame as much as possible, reducing the pitch of the guides
Covering the ceiling with imitation timber is a newfangled trend, driven by the trend to use only isoplaat in repairs. To artificially recreate timber, different materials are used - plastic, painted “like wood”, as well as plywood.
Additional information on the topic:
- Curved plasterboard ceilings complete assembly instructions
- At what distance should I attach the drywall profile to the wall?
- What to do about an uneven plasterboard ceiling
- How to visually make the ceiling higher with plasterboard
- How to repair a hole in a drywall ceiling caused by light fixtures
Selecting materials for panels
The range of applications for soft panels made of leather or fabric is huge, starting with small ottomans with a soft seat and ending with solid decoration for cafes and other similar places, but the use of such finishing in the interior is a big topic worthy of a separate article.
Now we are talking about the applied direction, and any work on the manufacture of anything begins with the selection of materials.
- Basis - here it all depends on the purpose for which you are making your panel. So, for furniture, for example, headrests for beds, MDF, chipboard or OSB boards with a thickness of about 10 - 12 mm are taken. Plywood works well, but is more expensive. Pure wall cladding or lining of entrance doors should not be too thick, so such panels are made on the basis of thin plywood or fiberboard;
- The filler or backing is responsible for softness and volume. As already mentioned, this often includes furniture foam up to 100 mm thick. Although there are some smooth models that are filled with padding polyester and even batting. For example, if you make yourself a soft ironing board, then it is filled only with batting;
Furniture foam rubber is the most practical backing for soft panels.
The list of finishing materials for such panels consists of 3 points:
- Making soft wall panels covered with natural leather is a good option, but very expensive. After all, finely tanned leather is used for these purposes, and its price is high; not everyone can afford such a coating;
- Furniture fabrics, especially velvet, look impressive, but are difficult to care for. The more you vacuum and wash the fabric covering, the faster it will become unusable;
- Leatherette wall panels now occupy approximately 50–70% of the market. This material combines the best price with decent quality. Plus, you can wash artificial leather as much as you like.
Application in children's room
It is quite easy to completely change the interior of a children's room using wood sheet products. For example, parents can make or purchase a small rack for storing toys, books, and souvenirs. The following products will perfectly complement the overall appearance of the room:
- furniture sets (table, chairs, bed);
- sets for role-playing games (for example, a display case for a toy store, a cabinet for storing toy tools);
- desks (or real game centers with sorters, pencil holders, paper clips);
- doll furniture (cradles, chairs and tables);
- doll or toy houses (suitable for compact and neat storage of dolls, soft toys, cars).
Finishing a wooden house with plasterboard: pros and cons, nuances and stages of work, photos and videos
Fragility
– both during transportation and in operation.
Without special fasteners, attempts to hang something heavy on drywall are guaranteed to end in damage to the material; Combination of qualities
: it is a good covering material, and, in addition, is used for additional insulation of a house or its vapor barrier; It is believed that a wooden frame will last less than metal, however, subject to the installation and processing technology, their service life is approximately the same ( unless, of course, the timber itself is chosen to be of acceptable quality). The frame in a wooden house for plasterboard can also be made of wood or metal.
The latter is considered more durable, in addition, a wooden frame can only be used in a house with complete shrinkage. observe technological clearances
– you can leave 1 cm at the bottom, then covering it with a plinth, you will need more at the top – about 5 cm; Wall panels are products intended for decorative finishing of walls. They can be made from various materials (chipboard, fibreboard, PVC, wood) and in different shapes - in the form of slabs, sheets and slats. To finish walls made of aerated concrete, it is best to use both plaster and finishing with frame materials (plasterboard, lining). You just have to take into account that, due to its characteristics, gypsum plaster is best suited for aerated concrete.
If the building is located in an area with a harsh climate, then a layer of thermal insulation will need to be laid under the drywall. Tile types are also presented in a variety of sizes and colors, which allows you to hide walls behind real panels or reproduce the most incredible designs in the cladding, combining tile panels of different shades and shapes. Glass panels are often used not as independent cladding, but as inserts. Larger areas can be seen in rooms with a specific purpose. They are used to decorate a working wall in the kitchen or bathroom.
Glass slabs can be made entirely from colored raw materials or have only a surface decorated with corrugation, photo printing, or tonic designs.
Disadvantages of drywall
Fragility
The main disadvantage of drywall is its lack of strength. Drywall sheets may crack during transportation, installation or use. Therefore, you should be especially careful when finishing or erecting partitions, or better yet, entrust this task to an experienced builder.
For this reason, it is not recommended to use drywall where heavy loads on the walls are expected. If you plan to install shelves, a TV stand and other heavy structures on the wall, you should use a double layer of plasterboard for finishing. This is the only way to ensure secure fastening.
Soundproofing properties
The next, although not significant, disadvantage is poor sound insulation. All sounds will be heard through the partition. But there is a way out: you can put mineral wool or any other soundproofing material between the slabs.
Is it possible to attach shelves to drywall?
Another disadvantage of drywall is its inability to support weights. That is, it will be quite problematic to install a TV or some kind of shelf on it. It is better to think through the design and construction of the room in advance so that you can build a frame for the necessary accessories. There is a second option that can correct this drawback: a double layer of 12.5 mm sheets and special butterfly dowels can be used. Another option is to make shelves in the form of niches in the wall from plasterboard
Glass-magnesite sheet SML for cladding wooden walls
The best analogue of gypsum plasterboard in terms of the totality of properties and the range of possible areas of application, surpassing it in some parameters. LSU can also be cut with a knife, sawed with a hacksaw, drilled, driven in staples and nails, puttyed and painted, and any adhesives and finishing materials can be used on the surface, without additional priming. The material is not afraid of fungi and mold. It does not contain harmful components and does not emit toxic substances even at very high temperatures, therefore it is approved for use in finishing catering establishments, children's and medical institutions.
Advantages of LSU compared to plasterboard:
- harder, stronger and more flexible (flexural strength is 5 times higher);
- holds fasteners well without the use of butterfly dowels;
- weighs less (20%);
- practically does not absorb moisture, so it can be used in damp rooms and when performing external work;
- Absolutely non-flammable, suitable for arranging fireproof dividing partitions and finishing wooden surfaces in fire hazardous areas.
What to do first
Even before the actual finishing of the OSB walls inside the house begins, they need to be prepared for this. Preparation most often involves thorough cleaning and primer. However, some design options require additional operations. For example, when using varnish as a topcoat, the surface must be sanded with sandpaper with not too coarse grain.
Naturally, it is necessary to recess all the heads of the screws that secure the panels one to two millimeters inside the sheet. This way they will not interfere with further finishing. All joints of adjacent sheets must be inspected for chips, and the gaps between them are filled with sealant. After all of the above operations are completed, the walls made of OSB slabs will be fully prepared for further finishing stages:
- Varnishing.
- Coloring.
- Puttying or plastering.
- Wallpapering.
You need to choose the most suitable design option based on the general design idea and the preferences of the home owners. In addition, it is necessary to take into account the specifics of the room being finished - there is no point in using expensive and beautiful coatings in technical rooms. At the same time, in residential premises you always want to see beautiful walls and decoration is given special importance.