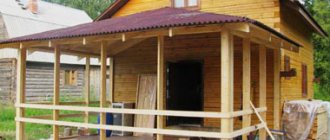
It’s not for nothing that frame houses are called energy efficient. Residential buildings of this type consume 30% less energy in winter than those built using conventional technology. The advantages include ease of assembly of structures, low weight and availability of materials. Assembling a frame house with your own hands is a completely feasible task for a person who has the skills to work with wood and a supply of the necessary tools. Detailed step-by-step instructions will help him with this.
Frames are erected on average in 2-4 months. The experience of cold Scandinavian and North American countries confirms the strength and durability of structures. In a short period of time, comfortable housing appears on the construction site, the price of which is 15-20% lower than that of brick or concrete. In Russia, the construction of frame houses is gaining momentum. It is standardized by the document SP 31-105-2002, which is based on Canadian and American developments.
Frame house - step by step instructions
A frame house is a rigid system of support posts, horizontal and inclined connections, resting on a pile, pile-grillage, slab or shallow strip foundation. In the classic version, the space between the racks is filled with insulation. Most often - basalt wool. The outside and inside of the structure is sheathed with finishing materials.
Another way to build a frame house is to install walls and ceilings from rigid SIP panels, consisting of two OSB boards and a layer of polystyrene foam between them. Systems are assembled in different ways. In the first case, the frame is installed element by element or in blocks, and in the second, large-sized panels are mounted like a constructor, observing the sequence. The easiest way to assemble a frame house with your own hands is step-by-step installation of the supporting system, insulation and finishing. In this case, construction lifting mechanisms and a large team of workers will not be needed. All operations can be performed independently or with the help of 1-2 friends.
Prices for cement and basic mixtures
Foundation
Foundation for a frame house
Since frame houses are recommended to be built no higher than two floors, they do not require a massive foundation. A strip foundation, a prefabricated concrete block foundation, or a columnar foundation are suitable. The most important thing is that they fulfill their main purpose - to ensure the rigidity of the frame in space.
For this purpose, reliable and durable reinforcement is used in a strip foundation, and a wooden or concrete grillage is used in a columnar foundation.
Floor
Foundation and floor of the first floor
The manufacture of the floor of a frame house begins with the laying of wooden beams with a section of 150x50 mm along the perimeter of the walls.
Note!
It must first be treated with an antiseptic solution.
The timber should be laid on roofing felt and secured with anchor bolts every two meters. Pay special attention to the alignment of the corners, check them using a level. Possible deviation 10 mm.
First, the logs are installed, then a subfloor is made from cheap edged boards, insulation is laid between the logs, and then the floorboards are installed.
Installation of room walls
The beams and boards are connected using mounting angles made of metal and (or) nails, sometimes they are connected with studs.
Almost the entire frame is made from boards 50x150 mm or 50x200 mm. This is affected by the thickness of the wall and insulation.
Installation of walls and windows and doors
The walls are assembled on the prepared floor. However, please note that all measurements must be accurate. This is necessary so that the walls do not come out larger or smaller than the laid floor.
The walls are assembled as follows:
- First you need to decide what height the ceiling will be. For example, 280 cm. Therefore, the size of the vertical posts of frame walls should be 265 cm (280-15). The image shows where the 15 cm value appeared.
- Taking into account the width of the sheet of insulating material, determine the size of the gap between the racks. Often it is 60 cm. In the case of a cotton base insulation, the distance is made shorter by a couple of centimeters. This is necessary in case of compacted joints.
- Having laid out the wall boards, mark the places where the vertical posts are attached. Next, lay out the racks, nailing 120-150 mm. It is not prohibited to connect them with corners.
- Any wall is always less than the thickness of the wall than the length of the floor.
- If the wall is longer than the board, the wall is assembled from two or more parts. This is also true with a small number of specialists, since an entire finished wall weighs too much.
- To make the structure rigid, jumpers are installed between the racks. There are no strict rules regarding the quantity and frequency of installation. This is affected by the height and length of the walls. However, they are often nailed two at a time or one per space between the posts. The second option is more relevant, when the jumpers are nailed one at a time. They are installed in a staggered order (first at the bottom, second at the top). This is also done after the walls are installed. Often, jumpers are nailed in full confidence that they will become the junction of plywood or osb board. This is influenced by the progress of further work.
- Openings in the walls and windows of the frame room are arranged according to the diagram.
The most common mistake when assembling the walls of a frame room is that most people do not remember the thickness of the board when making calculations. Because of this, the wall ends up being a different length than expected.
Wall installation
Read the instructions for assembling the walls in detail:
- They expose one wall of the room from the frame, connect it to the floor, and then make temporary supports.
- Now the remaining walls are lifted and installed one by one and connected with studs and (or) nails. If there are several parts to the wall, its top and bottom should be the same in size.
- The resulting corner is filled with insulation. This is many times superior to a solid corner made of timber.
- At this stage of construction, the walls “walk” a little. They need to be fixed for a while. They are secured using a thin board that is nailed diagonally across all walls.
- And when temporarily strengthening the structure, pay attention to the vertical position of the corners. It is recommended to use a plumb line, since the boards are often not entirely level. And this can lead to inaccuracies in measurements at the usual level.
When installing walls, you should work with a cord that is passed from corner to corner. Otherwise, the corners will become even, but the walls will be the opposite.
Corner frame design
The most problematic places in frame rooms include corners. Laying timber without the use of additional insulation contributes to the appearance of a cold bridge. Unlike mineral wool, wood has very high thermal conductivity. This suggests that the walls in the corners of the house sometimes freeze.
To eliminate this moment, structures are assembled using one of the following methods:
- Using two stands. The finishing corner enhances the junction of the two walls.
- California corner. A strip of OSB or board is nailed from the inside to the extreme point. This place is filled with insulating material.
- Scandinavian corner. It is the warmest of the options proposed above. It is assembled from 3 racks into such a pairing that almost no cold bridges appear.
The first and second methods are more technologically advanced, but they have lower quality of thermal insulation. At the junction of the two walls, there may be remnants of through gaps. They are very difficult to seal.
Top trim and structural reinforcement
The top trim is made from the same boards as the walls. It is needed to make the adhesion of the corners more reliable. It also gives unity to each part of the frame wall and distributes the load between them.
It is necessary to nail the board around the perimeter (on top of the walls) with 120-150 mm nails. This is done in such a way that all joints overlap with an overlap of at least 25-30 cm. Except for the corners in which the overlap is equal to the wall thickness.
The entire structure requires reinforcement. There are some ways. The most famous is reinforcement using OSB boards or plywood.
The frame of the room becomes rigid if you punch through one side along the entire perimeter using OSB sheets.
Stages of frame construction
Wooden structures are subject to biological destruction and are not resistant to fire. To solve this problem, flame retardants and bioprotective compounds . It is most convenient to use a complex product that protects against fire, woodworms and rot. Treatment with impregnations is necessary at every stage of construction of a frame house.
Foundation structure
A frame house weighs much less than a timber or brick house, so a lightweight foundation is sufficient for it.
The most popular option is tape . To equip it, they dig a trench along the markings of the future house, install wooden formwork in it, fill it with concrete mortar, and compact the mixture. For compaction, hand tools or special vibrators are used.
| Foundation type | Shallow | Deeply buried |
| Trench depth | 400-600 mm | Below freezing depth |
| Height above ground level | 200-400 mm | 300-400 mm |
| pros | Budget, proven technology | Reliability, windproof base |
| Minuses | It is necessary to take into account the characteristics of the soil; there are restrictions on the height of the building | Difficult to do with your own hands, not recommended for sloped areas, requires access to a mixer with concrete |
In second place is the pile foundation - bored or screw . In the first case, the piles are driven into pre-drilled holes, in the second they are screwed in manually or using special equipment. A grillage in the form of a tape 200-400 mm thick and 200-300 mm high . It binds the piles into a single whole, increasing the strength of the structure. When arranging a pile foundation, it is important to take into account the characteristics of the soil and strictly follow the technology. Otherwise, the soil will swell and loosen the piles.
Useful: Cheap frame houses
A slab foundation is an excellent option for those who decide to build a frame house with their own hands. A slab poured from concrete compensates for seasonal expansion of the soil. The recommended height is 250-500 mm. The most practical is an insulated Swedish plate (USP), consisting of several layers:
- compacted sand bedding;
- rigid foam 200 mm thick;
- reinforced concrete mixture;
- heated floor pipes;
- leveling screed.
USHP combines the foundation, monolithic floor and heating system. But such a foundation requires large financial investments.
One of the most affordable foundations is columnar . It consists of small posts installed on the ground or buried in it. A columnar foundation is easy to make with your own hands, but due to its low reliability, it is only suitable for domestic buildings.
Subfloor installation
There are two types of wooden subfloor:
- the supporting structure is used in combination with a strip or pile foundation ;
- the lattice structure is used in tandem with a slab or concrete screed.
In the first case, the horizontal level is maintained at the stage of arranging the base or grillage, in the second - at the stage of pouring the base.
The technology for laying the subfloor is reminiscent of the wall construction scheme . First, a load-bearing base is installed - joists and cross members. If necessary, the logs are overlapped. To strengthen the structure, additional spacers are used. At the same stage, engineering structures are laid: water supply, gas pipelines and sewerage.
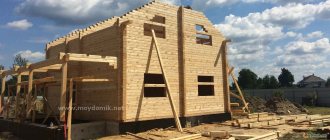
Construction of the frame
The frames of prefabricated houses can be metal or wood. If you do not have construction experience, it is better to order a ready-to-install factory kit. Otherwise, it is necessary to strictly follow the assembly technology . There are two options:
- assemble all elements at the installation site;
- gradually assemble the walls on a horizontal surface and install them in place.
The second method is more convenient and productive - especially for metal frames. To assemble the latter, a welding machine is used.
The construction of the frame takes place in several stages:
- Bottom harness. The size of its cross section depends on the type of foundation . The harness is placed above the ground level, thoroughly treated with antiseptics and waterproofed.
- Frame each wall. The pitch of the racks is 60 cm with plank cladding and 62.5 cm with panel cladding . The latter exactly corresponds to the standard dimensions of the OSB board. At the installation stage, temporary braces are often installed. The maximum load falls on the corners, so the most durable materials are used for their production.
- Top harness. The choice of material depends on the load that the structural element will bear. With high strength, the metal requires a lot of drilling and is expensive. It is more convenient to use wooden beams, single or double boards . Their thickness depends on the area of the house.
- Floor beams. When building a frame house, reinforced concrete floors are not used - they weigh too much. Boards measuring 50*200 mm or paired boards measuring 50*150 mm are best suited for this purpose . The pitch varies from 40 to 60 cm. Internal partitions. They can be plank (one- or two-layer), frame-sheathing with or without insulation. Dry lumber, plywood, chipboard, plasterboard, and OSB are suitable for the construction of partitions.
Useful: Energy-efficient (energy-saving) house: theory and practice
To connect wooden elements, several technologies are used: a joint at an angle of 90°, a joint with cutting at 45°, a half-wood joint, tongue-and-groove joints .
Roof arrangement
Erection of the roof is one of the most important stages in the construction of a frame house. You should determine in advance its type, type of rafter system, and cladding material. with a slope of no less than 28 and no more than 50 degrees is well suited for a frame structure .
For the rafter system you will need boards with a cross section of 50*150 or 50*200 mm - the dimensions depend on the design load and the insulation used. The standard pitch is 60 cm. Two boards are connected on the ground, the finished structure is lifted onto the roof and mounted on the top frame with an overhang of 35-70 cm. To ensure that the roof is level, the rafters are installed first on the gables, and then in the middle. The final stage is the installation of thinned or continuous sheathing, on top of which the roofing material is attached.
Insulation and frame covering
The finished frame is treated with antiseptics, dried well and sheathed with OSB boards. The resulting cells are filled with insulation - mineral wool or polystyrene foam . The thickness of the layer depends on the purpose of the house - for permanent residence, at least 15-20 cm is required. The wall cake looks like this:
- wind-waterproofing;
- external cladding made of OSB boards;
- insulation;
- vapor barrier;
- internal cladding made of gypsum plasterboard or OSB+gypsum plasterboard.
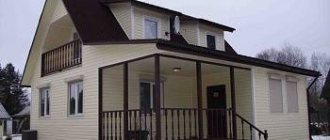
For exterior decoration, siding, wooden or fiber cement panels, plaster, and decorative brick are used.
Interior decoration
This is the final stage of building a frame house. Light walls do not shrink, so you can immediately begin finishing. It takes place in several stages:
- Final arrangement of the floor. First, a wooden base is mounted from boards with a cross-section of 50-150 mm - their ends are laid on support beams or on the foundation. The lower part of the logs is covered with waterproofing, followed by insulation, vapor barrier, boards or OSB. Flooring - linoleum, laminate or parquet.
- Ceiling lining. The sheathing is attached to the support beams, and vapor barrier and insulation . The layers are covered with plasterboard or other board material.
If you follow construction technology, a frame house will serve you for many years. The main thing is to choose the right project that meets the climatic conditions of the region and regulatory requirements.
Insulation of a built house
In a frame house, the floor base, walls and ceiling will need to be insulated.
When choosing insulation for walls, both the characteristics of the insulation and the characteristics of the wood are taken into account. The reason is that not all types of insulating material interact well with wood.
Instructions for insulating a frame structure:
- A special waterproofing membrane is stretched over the OSB sheets. The instructions indicate which side to pull on.
- Between the racks inside the building, 2-3 layers of insulation are laid. The number of layers depends on the thickness of the walls and the requirements for the building. Each layer is laid, making an overlap at the junction of the previous one. This will avoid cold bridges.
- The floor is insulated in the same way.
- The ceiling is insulated from the attic. First, a vapor barrier film is stuffed onto the ceiling beams, then insulation is hemmed with boards or plywood.
- Having laid the insulation, a vapor barrier film is stuffed on top; it protects the insulation from moisture from the inside.
Further finishing of the frame house depends on the needs and capabilities. Usually, sheathing material is placed on top of the film on the walls. This can be either a board or OSB sheets. And already on top of the sheathed walls, finishing is done.
We recommend studying: how much money can you build a normal country house for today?
Laying communications and subflooring
Due to the design features of a frame house, the installation of communications should be taken care of even at the stage of building the foundation. As a rule, utility networks are laid in the ground, placing special recesses under them that need to be insulated and waterproofed. In this case, all communication connections should be noted and marked so that there is no confusion during their further installation.
The next stage of work is the installation of a floor, which will also serve as the base of the subfloor of the first floor. The most correct choice is a concrete screed, for the manufacture of which you should install formwork and pour a layer of mortar about 10 cm thick.
Before pouring, be sure to lay a layer of thermal and waterproofing, for which you can use ordinary roofing felt, the material is quite reliable and inexpensive.
After the screed has gained the necessary strength, you can install logs and lay boards on them, which will become the base for the floor covering. This work can be done immediately after the screed, but it is better after, for example, the roof has been installed on a one-story frame house with a flat roof.
You should definitely think about insulating such a structure, for which you can use thermal insulation materials based on mineral wool or expanded polystyrene, although it is quite reasonable to arrange an insulating layer of expanded clay or wood shavings. Take the survey at the end of the article!
Basic materials and tools used in the construction process
- Screw piles;
- Rockwool 1.5 cm for roof insulation;
- Boards 150x50 m;
- Antiseptic for treating all wooden coatings Senezh red ognebio;
- Rough nails 90 mm;
- Screw nails 50-60 mm;
- Sheathing paint;
- Metal tiles;
- Film for the facade and vapor barrier of the house;
- Windows and doors;
- Drywall;
- Workers from a construction company were hired to install the façade;
- OSB 18.3 mm (subfloor) and 9 mm (wall and roof cladding);
- Foam plastic for subfloor;
Installation and section of racks
Corner rack elements - timber 150x150 mm or 100x100 mm. It is worth noting that everything depends on the load, for example, for a one-story building 10 cm is enough, for a two-story building – 15 cm and above.
There are several ways to attach racks:
- on wooden dowels;
- cutting;
- on steel corners.
The method of installation on dowels is old and complicated:
- You must first prepare dowels from dry wood of the required diameter.
- Then drill holes diagonally through the bottom trim beam and the stand.
- Hammer the dowel into the prepared hole and saw off the protruding ends.
It is worth mentioning right away that this method is reliable only if the material is well dried. In the case of raw wood, it dries out, the wooden tenon will also dry out, and the rigidity of the fastening will be lost.
The cutting is made into the lower frame, and you can only choose 50% of the depth of the beam.
The easiest way is steel corners, which are installed on both sides of the racks and screwed with screws, 3-5 pieces on each side of the corner, depending on the load.
Also, when building using Canadian technology, the beams for doors and windows must be double, since the load on these structures is very large and reinforcement is necessary.
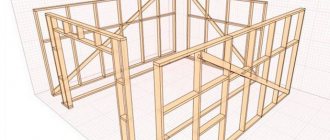
Frame installation
Frame house diagram
Frame houses are built using wooden or metal structures. During self-construction, the latter are rarely used; they increase the cost of construction by 40-45%, but their use allows saving financial costs on the construction of the foundation, this is due to the lightness of metal structures.
A wooden frame is best built from oak, but it can also be made from other types of wood. The timber must be made of high-quality wood with a cross-section of at least 150x150 mm. Corner joints must have no gaps. Choose a tongue-and-groove connection method.
Note!
A metal connection is undesirable, since wood rots when it comes into contact with metal. Over time, such fasteners will weaken and the house will begin to loosen. Wooden dowels will provide reliable and durable fastening, and this guarantees a long service life of the frame house.
The frame must be braced with braces; they give the house rigidity. The technology for constructing a frame house provides for the installation of three braces. They are made from the same material as the stands.
The outside of the house is sheathed with boards or clapboards no more than 60 mm wide and at an angle of 45°. Old craftsmen do not advise nailing them firmly; during the first year of use they can swell and dry out.
Roof
Rafter frame
The roof frame is the main part of the entire structure of the house. The frame bears most of the mechanical load. It must be made according to accepted rules from high-quality material. If you do all this, you will have a reliable and long-lasting roof. You choose the roofing material, insulation and waterproofing material yourself, based on your financial capabilities.
It is not difficult to build a frame house; you just need to follow all the rules prescribed by this technology. Then in the end you will get a beautiful and warm, reliable and durable home.
Laying a floor made of wood
The tying of the pile foundation includes the beginning of lining floors made of wood. It is made from beams measuring 150×150 mm or 150×200 mm. This is affected by the thickness of the wall and the size of the gap between the piles. If the distance is very large, it is better to take thick timber. This moment will eliminate sagging.
In order for the foundation to remain rigid, strapping is needed. It is also used when the load is evenly distributed on the base and serves as a support for the floor.
For unhindered manual tying, perform the following procedure:
- The boards are laid around the perimeter of the foundation, the diagonal and size of the walls are checked. This stage includes the accurate and final marking of the walls in accordance with the approved project. Pay attention to waterproofing. It is laid out under the harness as roofing material.
- Now mark the place where the boards are connected, which should be on the pile. These are vulnerable places; they cannot sag.
- The beam is connected to an overlap of approximately 20-30 cm. The master cuts out “locks” from the end.
- The corners are connected using almost the same method.
- Using studs and bolts, the timber is connected to the foundation. Drill gaps in the head of the foundation and directly in the board. To make further installation comfortable, deepen the nuts with studs or bolt heads. The connection lines are nailed using nails, the size of which is 200 mm or 150 mm. It is affected by the size of the boards.
- After the perimeter is ready, we begin to tie the foundation under the internal walls of the room from the frame. In a similar way, the timber is attached to the previously laid outer one. To enhance the effect, metal mounting angles are also used.
The installation of the frame floor begins after the foundation of the room has been laid.
Preparation for the construction of a frame building
For the construction of any house, the preparatory work is identical and consists of:
- Preparing the area.
- Building markings.
Preparing the area for construction
The first step is to clear the area of green spaces. It is important to completely clear the area where construction of the house will begin. If the area is well prepared, this will simplify the marking, making measurements more accurate and with less error. When the site is located on a slope, it is either leveled horizontally using special equipment, or an appropriate foundation is erected.
Important! Do not neglect site preparation. By spending 2-4 hours clearing today, construction work will move faster in the future.
House marking
The layout and how even the corners of the walls will depend on the correct marking. You need to approach marking responsibly. Any inaccuracies made at this stage will be difficult to correct.
Marking the base of a frame building consists of placing pegs. They mark external and internal walls.
What is a frame structure?
If we look at it in detail, a frame house is:
- lower and upper trim, fastened with vertical posts, which form a frame for the subsequent installation of walls - both internal and external;
- a base made of timber for the attic space, consisting of load-bearing beams and floors;
- timber rafter system on which the roofing material is mounted - it should not be too heavy;
- Depending on the region of construction, appropriate insulating material is laid between the frame elements.
Important! the thickness of the insulator must correspond to the distance between the wall sheathing.
The frame is sheathed on both sides with moisture-resistant material.
You can build a frame house yourself, without any special construction education. You don’t need a specialized tool for this, just study the technology and be patient, performing all the steps in the construction strictly according to the instructions.
Auxiliary structures for house construction
When building a frame house, it is necessary to have various temporary structures. To secure the films and cover the frame with OSB sheets, homemade scaffolding, a trestle, and a wooden ladder were used. Scaffolding, trestles and making a ladder with your own hands is not at all difficult.