Wooden partitions are universal structures that can be erected in any building. But most often this is done in residential buildings, and even more often in wooden houses. If you want to divide a room into several zones, you can use this technology. It involves not only the construction of a light wall that does not put a load on the ceiling, but also the creation of a partition with all kinds of internal filling.
Construction features and safety issues
Partitions made of wood are not load-bearing, which is their advantage, because minimal requirements are imposed on structures. They can be made from any material, including the one you have enough money for. An additional advantage is that the structure does not have to be taken into account when calculating the load on the foundation. It is lightweight and can perform many different functions, for example, soundproofing a space.
If you want to install a partition in a wooden house that has just been built, it is better to start such work a year after the building was erected. This is due to the fact that it will shrink, so the partition may warp and change its original linear parameters.
A wooden partition in a room can perform almost one single function - zoning, but this does not mean that there are no requirements here at all. Firstly, the structure must be not only stable, but also durable. Secondly, it should also be made safe from a fire protection point of view. Thirdly, if rooms are separated and operated at different temperatures and humidity levels, the partition must have thermal insulation qualities.
Expert advice
- If you have an assumption that the walls will put unnecessary load on the foundation of the house, you should choose lightweight materials for their construction. For example, a brick partition can create a serious load. But if you still prefer this solution, you should follow some rules. One of them is that if the structure is too long, you should lay out no more than a meter in height per day, otherwise you may encounter deformation of the new wall even at the stage of its construction. In order to control the evenness of the brick partition, a rope should be stretched between the opposite walls, along which the masonry will be carried out. When the thickness does not exceed 25 cm, reinforcement should be carried out. To do this, a 6-mm metal wire is laid in every 4th row. It can be replaced with a plaster mesh.
- To build a wooden wall, at the first stage, after marking, you should install a vertically located central block. Its position is leveled and controlled by a level. Until the block is well strengthened, it is only slightly attached to a nail installed in the center of the product. Due to this, adjustments will be made. Using the same principle, guides are installed at the top and bottom.
Plank partitions are perhaps one of the simplest in terms of labor-intensive work. Such designs can be single or double. The former should be classified as thin-walled partitions, while the latter may include a soundproofing layer. If a more specific wall is required, a multi-layer plank partition should be built, which can have several layers of boards. Unplaned boards are used if the wall is to be covered with decorative plaster in the future. In all other cases, it is recommended to purchase an edged board. Sometimes finishing of such walls is not provided at all, then it is recommended to buy boards with a smooth front surface processed by grinding.
Mandatory requirements
Wooden interior partitions, first of all, should be as durable as possible, and secondly, they should preserve as much free space in the house as possible. It also happens that partitions are erected for the purpose of changing the purpose of the premises. Thus, it is prohibited to place a bathroom in the place where the neighbors have a kitchen below.
Zoning in general should be approached with caution and attention. For example, if your kitchen has only one natural light source in the form of a window, blocking it with a new wall located parallel to the window is prohibited. The base must be as strong as possible, since it is this that will support the entire weight of the partition in the house.
Sequence of installation of a wood-frame partition
Important! Often, partitions do not require special foundation preparation. However, if they are installed over significant spans of floors or a massive structure is installed, it may be necessary to strengthen its base. In this case, an additional beam is laid with its ends supported on the foundations of the walls.
Frame making
- The projection lines of the frame partition are marked along the ceiling, floor and load-bearing walls.
- Rigid fastening of the end beam is allowed only to the floor. The horizontal load-bearing element can be immediately installed on a thick damper pad, for example, made of felt; or fix it on steel brackets with a gap, which will subsequently be filled with foam.
- Vertical end beams are installed, securing them with temporary rigid connections to the walls.
- Two post beams are also installed at the location of the future doorway. Their vertical position is controlled by a float level, and temporary fixation is carried out by oblique struts to the floor.
- Install the upper horizontal end element. It is often made up of several parts connected by steel plates. The plates are placed on the upper and lower planes of the beams. It is recommended to calculate the locations of such connections in advance so that they are above the vertical posts.
- After assembling the frame of the frame partition, internal vertical posts are installed with a pitch of 600 mm. It is optimal for laying mineral wool thermal and sound insulation with a standard slab width of 610 mm.
- It is recommended to make horizontal jumpers from short bars inside the formed cells in a checkerboard pattern (taking into account the height of the cladding material, if it is sheet). This will not only make it easier to fix the lintels and sheets, but will also give the frame additional rigidity.
- At the location of the doors, a horizontal element is mounted to the vertical bars, limiting the top of the opening. It is strengthened with an additional short vertical post to the upper horizontal beam.
- Rigid temporary connections with walls are replaced with floating ones. They are made in the same way as for the frames of decorative wall cladding in wooden houses.
Important! Having a certain professional skill, you can avoid establishing temporary connections. The end vertical bars are initially secured with floating elements, similar to those shown in the figure below.
Infill and lining
- After the cells are filled with mineral wool, the interior partition made of wood is sheathed on both sides with a vapor barrier membrane (striped with a stapler). At the same time, it is important not to confuse the direction of vapor diffusion - it must be provided with an exit in the direction from the insulation, i.e. from inside the partition. The membrane strips are secured with overlaps, and the puncture sites with staples, damage and joints are taped with tape intended for this purpose.
- If the frame is sheathed with plasterboard, OSB or plywood, then their sheets are fixed with offset joints, which are then puttied. The resulting surfaces can play the role of rough or semi-finish and are subject to further processing in accordance with the selected technology. If lining or blockhouse is used as cladding, then they only need to be coated with paints and varnishes.
Construction of a panel partition
If you want to make a partition in a wooden house with your own hands and get by with little money, you should choose a panel structure. The work will not be difficult. It is usually based not only on boards, but also on a frame, the latter of which is made of 5 or 10 cm boards. These elements will serve as vertical supports. The strapping will be a beam laid parallel to the floor.
Attention! Interior panel partitions in a wooden house can have from one to three layers. Double-layer ones provide for the placement of shields vertically. But three-layer partitions are structures in which the shields will be oriented perpendicular to each other.
In a log house, the panels will be fastened from above and below; nails are perfect for this. The boards are positioned so that there are no through gaps between them, and the seams are covered with a second layer of products.
Wooden partitions in the interior in the photo
We recommend reading: DIY plasterboard arch
Wooden partitions are still the most popular option for furnishing premises. The flexibility of wood allows you to create attractive and durable structures with your own hands. They can be made in different ways, and which one to choose depends on the purpose of the partition and the requirements.
How to make a frameless partition
A frameless timber partition is laid with your own hands, starting from the bottom. Waterproofing should be placed between this layer and subsequent ones. The bars are separated from each other by jute fiber, which will provide sound and heat insulation.
When installing a partition in a wooden house, you need to take care of strong adhesion of the elements to each other. For this, metal or wooden dowels are used. The distance between them should be about 150 cm with a deviation from the edges of 150 mm. Installation of partitions may involve the use of square timber with a side of 100 mm. The surface of the wood is sanded after completion of installation work. And then you can think about how to sheathe a partition in a wooden house. This could be decorative plaster or, for example, liquid wallpaper.
Tools:
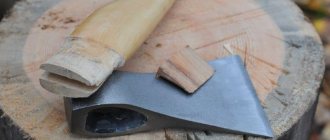
- Hand saw or jigsaw/grinder;
- Hammer or drill with impact function;
- Screwdriver or screwdriver;
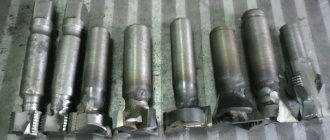
- Metal drill (diameter 6 mm and 9 mm);
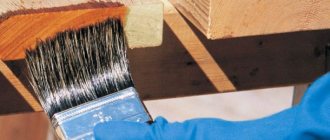
- Paint brush;
- Tape measure and pencil.
Step 1. Support bars for the partition
To construct a partition, you first need to install support bars 150 cm long from below and above. To do this, I sawed a block with a cross-section of 50x50 mm along the floors using a jigsaw with a wood saw.
Next I sanded the bars with sandpaper. This made it possible to give the bars a smooth surface on which paint would be better applied. I painted the bars with wood impregnation (walnut color).
I drilled two holes in the block that needs to be fixed to the ceiling. To do this, on each side of the block I stepped back 25 cm from the edge and drilled through holes with a drill dia. 6 mm. Then I drilled a countersunk hole for the self-tapping screw with a drill bit dia. 9 mm to a depth of 1 cm.
I marked the holes in the ceiling using a drilled block. Next, I drilled holes in the ceiling with a hammer drill and secured the block using two self-tapping screws with a 4.5x80 mm plastic dowel.
The bottom block was secured to the floor using double-sided tape and additionally secured to the wall with a metal corner. I decided to do this so as not to spoil the floor covering (laminate).
Double-sided tape was attached to the block with staples using a construction stapler.
Here's what happened:
Step 2. Installation of furniture board
To begin with, I measured the distance between the installed bars (I got a value of 255 cm) and sawed off the furniture board according to this length. The shield was sawed off using a circular saw to make the cut more even. When sawing, it is also necessary to take into account the gap between the top beam and the end of the shield of at least 5 mm (i.e., made the shield 254.5 cm long).
To install the shield, I installed embedded T-shaped profiles (30 cm long) on the lower and upper bars. This solution helped hide the shield mount and simplified its installation.
Each T-shape The profile was secured using 3 pcs. wood screws 4.0x30 mm.
I made slots on the ends of the furniture board with a grinder (it would be more convenient to do this with a circular saw). The slots are needed to install the shield on the T-shape. profiles.
Before painting, the furniture panel was sanded well with sandpaper and painted with wood impregnation. Next, I pushed the shield along the T-shape. runners and that's it. I did not additionally fix the furniture panel.
The cat constantly monitored the process so that there were no mistakes))
Step 3. Installation of vertical bars
I made vertical bars 255 cm long (the distance between the upper and lower bars). If there are any defects on the bars, you can cover them with wood putty and then carefully sand these places.
After sanding all the bars, I begin painting with wood impregnation.
Next we install the bars. I fastened them using 4.0x70 mm wood screws at an angle and screwed them completely into the body of the block. I started the installation with the outermost bar, then installed the central one, and so on.
If a little bit of the head of the screws is visible, you can tint them with the same wood impregnation.
As a result, I then added intermediate lintels from the remains of the timber for a more rigid design of the decorative partition.
In terms of money, this partition cost about 4,000 rubles. I think it turned out very well) I hope this solution will be useful to someone.
Interesting ideas for partitions
You should not assume that wooden partitions are installed only for zoning or clear delimitation of space, as well as heat and sound insulation. A wooden partition can also be made for the purpose of making the interior more attractive. If you are a lover of open space, and in your home the living and dining rooms are not separated from each other in any way, you can install a wooden partition with an interesting design. Its design will be stylized as a pergola.
Frame wooden partitions are finished with absolutely any materials, for example, roll imitation of natural solutions. Such a wall, stylized as a lawn, will look quite unusual. It will not only zone the space, but also perform an additional function - to hold the TV on its surface.
Attention! If sound insulation is not so important to you, but you still need a partition, you can purchase it ready-made. Such a wooden structure can even be made to order, and its appearance can resemble a screen. Then, if necessary, it is rearranged from one place to another, obtaining new functional areas.
In order not to think about the question of how to cover a partition in a wooden house, you can consider almost transparent and weightless structures with ornaments that delimit the room and make, for example, a bed separated from the general space of a small apartment. This is the right approach if you don’t want to make the atmosphere heavier.
Sound insulation, resistance to rot, mold and fire
When choosing the type of partition, it is necessary to take into account the requirements for sound insulation, as well as the impact of aggressive factors - dampness, mold, open fire. It is impossible to increase the sound insulation of timber partitions due to the fact that both sides are part of the interior of the house. Therefore, sound insulation is limited by the thickness of the timber or boards from which the partition is made. The sound insulation of plank and frame partitions can be increased by installing sound-absorbing elements - mineral wool, polystyrene foam, foam rubber. The exception is plank partitions, both sides of which have a direct impact on the interior of the house.
To increase the resistance of partitions to fire, rot and mold, boards and timber are treated with special substances. The first time this is done before assembling the partition, the second time before final grinding. If grinding is not required, then re-processing is carried out after installation is completed, and then repeated once every 3-5 years.
Manufacturing of rack structures
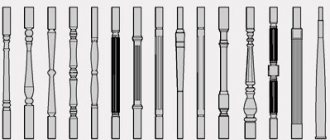
If you manage to make a slatted partition, you will complement the interior with a new original element that does not have to be sheathed. Photos will help you understand how varied the design of a lattice wall can be. With their help, you will also determine where in a wooden house it will be possible to place such a structure. Usually such a lightweight wall is ordered, but if you have wood, you can make a lattice structure yourself. Although it will not provide sound insulation, it will be able to solve the zoning issue.
This approach is also relevant if it is not recommended to build partitions with impressive weight on the floor. If you can only install a lightweight structure on the second level of a wooden house, a slatted wall is just for you. You can make blanks with your own hands using:
- MDF;
- pine needles;
- valuable wood species.
The basis of such a wooden partition, which you install on the second floor of the house, may also be a furniture panel. It is environmentally friendly, easy to process and connect, and can also be painted with different materials.
Types of interior wooden partitions
A wooden interior partition is a simple design that you can make yourself if you wish. In private construction, 3 types of partitions are usually used, each of which has its own design features.
Frame-panel
This is one of the most common options for wooden partitions, which provides additional heat and sound insulation of interior spaces. From the name it follows that such partitions are made on a frame basis, then sheathed with panels.
For the frame, a beam with a cross section of 60 x 100 mm is usually used, which forms a horizontal and vertical frame. The distance between the elements can be calculated based on the thickness of the insulation, which will fill the free space. For these purposes, mineral wool or polystyrene foam is usually used.
The following options are suggested for wood cladding:
- plywood. A practical and affordable material that is easy to process and install, however, plywood can delaminate over time, so it is not suitable for rooms with high humidity;
- Fiberboard. Fiberboard, which is made from wood processing waste and cellulose by hot pressing. The composition often includes fire retardants, polymer additives and antiseptics;
- Chipboard. Chipboard, which is made on the basis of shavings and sawdust, the connecting link is resin or formaldehyde. The products cannot be called environmentally friendly, although the manufacturers claim that the content of volatile compounds complies with the standards. Chipboard is not recommended for the construction of partitions that are planned to be subsequently moved or installed in the nursery. Damage always remains in the fastening areas; the fibrous structure does not hold fastening elements well.
When choosing wood siding, you can pay attention to OSB - oriented strand board, which is a strong and durable material. Disadvantages include high cost and dependence on a humid environment.
Carpentry
This is a paneled structure that usually does not require finishing, which provides significant benefits during construction work. In production, valuable wood is usually used, which is coated with several layers of varnish.
Here you need to take into account that such partitions do not require the use of insulation, and therefore are not able to provide the premises with heat and sound insulation. The design performs a purely decorative function and is used for zoning space, for example, separating the dressing room from the total area of the bedroom.
Solid
Solid partitions are built from the material that was used in the construction of the house (timber, logs, frame structure), therefore they have a fundamental appearance, although they do not heavily load the base. The structural elements are fastened together with metal spikes, giving the wall additional rigidity and stability. The partition is connected to the load-bearing bases using triangular bars and nails.
Thermal and sound insulation indicators directly depend on the characteristics of the lumber, but if desired, they can be increased by stitching the surface with foam plastic.
Note! In this case, finishing of the wooden partition will be required.
Using lining
Partitions made from lining not only look attractive, but are also inexpensive. Of course, you need to try to fit such designs into the house according to the style of the room. To avoid thinking about how to cover a partition in a wooden house, use clapboard.
The installation of such a partition can also be carried out on the second floor of a wooden house, since the new wall will not have too much weight. It will be based on the same frame, which can be sound and heat insulated. The outside can be finished with clapboard, which is installed on vertical or horizontal posts. They should be positioned perpendicular to the sheathing.
Frame construction technology
As a rule, 100x100 mm timber is used for the construction of frame houses. In the case of the construction of multi-story structures, its cross-section can be increased to 150x150 mm or 200x200 mm. For crossbars, a rectangular beam or board is used. Frame parts are made of pine, spruce, cedar or larch.
Most often in construction, ordinary massive timber is used. This material is relatively inexpensive and easy to process. But ordinary timber has a significant drawback: it is very sensitive to changes in air humidity. If you use natural moisture timber in construction, then after a few months it may become cracked and warped.
Glued laminated timber is more practical. It is made from well-dried boards. The boards are arranged with fibers in different directions and glued together. Such products do not react to dampness and pressure. Their only drawback is reduced vapor permeability due to the use of glue.
The following technologies are used during construction:
- Vertical. The assembly of the structure is carried out in stages. First, the racks are installed, then the crossbars and the top trim are secured. This technology requires high accuracy of operation and control of the verticality of the racks.
- Horizontal. In this case, the individual modules are pre-assembled on the ground. After assembly, they are lifted using levers, a winch or stops and installed in the desired location.
To assemble frame houses, you need to prepare equipment and tools.