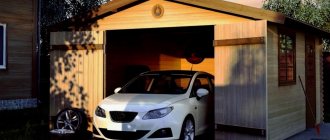
Topics devoted to the construction of garages, greenhouses and outbuildings traditionally arouse increased interest among FORUMHOUSE users. This is reflected in the demand for such objects on the site and the possibility of their independent construction at a reasonable price. Many people start building a large house with small architectural forms - you can improve your skills and test your strength.
Our portal has already told you how to build a budget and functional shed. In today’s material we will tell you how to build a frame garage on wooden poles with your own hands using the example of a step-by-step description of the story of a portal participant with the nickname Alano.
Selection of construction technology
From logs
The main thing is to select the optimal construction technology and complete all stages in strict accordance with the chosen type of construction.
The most common two technologies for constructing garages made of wood: using frame technology and using rounded logs.
It is necessary to give preference to the construction of a box for a car using log technology if the main building, house or cottage, is built from similar material. A frame structure will cost less, it is easier to select materials for it, and the construction time will be significantly reduced. In addition, the exterior of a wooden frame garage can be finished with any facade materials suitable for the style of a country house immediately after the construction of the building or after some period of time.
Garage Doors
To install any gate, you need to install a box, which is attached to the frame using a casing or frame. And garage doors are chosen from the following list:
- Swing. This type is the most common, but not the best for a wooden garage. The design is a rigid frame plus sheathing. Disadvantage: when the garage door leaves are open, they place quite a large load on the frame and door frame, free space is required between the car and the garage, and the automated drive is quite expensive.
- Recoil. In the classic design, gates are made of one or two leaves that “ride” parallel to the outer wall. For the mechanisms to work, it is necessary that the distance from the opening to the corner of the garage be greater than the width of the door leaf or sash. Sometimes the canvas is made sectional. The disadvantage is low tightness and thermal insulation.
- Lift-and-swivel. It is a single sheet that completely covers the opening. Lifting with rotation is carried out using a system of levers with fixation of the canvas parallel to the ceiling. The lifting mechanism has an automatic drive (with the ability to operate in “manual mode”). Disadvantages - poor tightness and the mandatory presence of a free space of 1 m outside between the gate and the car.
- Sectional. The canvas consists of several sections connected by hinged steel hinges.
This provides “flexibility” to the canvas, which allows it to be moved smoothly in the space under the ceiling. The section is a sandwich panel made of galvanized steel or aluminum filled with insulation in the form of polyurethane foam. Sectional doors do not have most of the disadvantages of other types. - Garage roller shutters. This type is somewhat reminiscent of sectional doors, but with thin and narrow slats that are wound onto a drum in a protective box. Gates are much cheaper than sectional ones, but have low burglary resistance and low thermal insulation properties.
Finally. Floors in a garage on a strip foundation are made with mandatory reinforcement, and in principle they are almost no different from a slab foundation. The roof of the garage is made of timber either single-pitch or gable.
Otherwise, it is a conventional structure with a wooden frame and sheathing, the appearance of which is determined by the roofing materials.
dizlandshafta
Preparatory work
Frame drawing
Maximum speed and ease of work are the main advantages of frame technology. But, despite its simplicity, the construction of a frame garage requires preliminary preparation and the development of a project, with the help of which it will be possible to calculate the required amount of materials and components. The project is calculated independently, with the involvement of experienced specialists, or downloaded from specialized Internet resources. The dimensions of the building should take into account the number of cars, the presence of an open shed for summer car storage and an attic floor, which many car enthusiasts install above the garage.
Displaying the project on paper
Having become familiar with the nuances of professional projects and choosing interesting points, they begin to sketch out ideas on paper. To begin with, the parameters of the garage are determined and plotted on the diagram. Standard sizes:
- 5x6 m;
- 4.5x6 m;
- 6x6 m;
- 6x8 m.
The last option is chosen for the construction of a double building. If large dimensions are required, then any parameter can be doubled.
After drawing the perimeter, mark the partitions, placement of windows, doors and other desired elements. In the case of a utility room, a space of about 2 m2 is allocated for it. For ease of installation of the gate, the ceiling level is planned to be no lower than 2 m.
Schematic representation of the garage Source b8.mxc.com.ru
Depending on the established dimensions, the amount of material is calculated.
Foundation work
Pouring a monolithic foundation Scheme
A high-quality and reliable foundation is the basis of any structure. The choice of technology for constructing a foundation depends on many different factors: the design of the structure, the characteristics of the soil, the financial capabilities of the owner, etc.
Basically, for the construction of a garage, the base is a concrete slab poured using monolithic technology.
The concrete slab will serve as a subfloor, which can then be lined with any finishing materials. Being a type of “floating” foundation, a concrete slab absorbs evenly high loads, helping to avoid deformation of the structure during its operation.
To construct a monolithic foundation, a shallow trench is dug around the perimeter of the planned building and formwork is installed. First, make a cushion of sand and gravel and compact it. Then the base is reinforced with two meshes of metal rods, preparing the site, and it is filled with concrete. After this, the foundation must be allowed to stand for about 3 weeks.
Foundation
Columnar foundation
For a garage of this type, it is allowed to use a columnar foundation that is simple in design and cheap in price, which can be implemented in industrial production in one of the following ways:
- with pillars made of a monolith of concrete; with supports made of reinforced concrete blocks (prefabricated foundation); pile pillars driven into the ground; screw-type supports (screw foundation).
If you decide to build a wooden garage with your own hands, one of the first two methods of arranging the foundation will suit you. The last two types of foundations can only be implemented with the use of special construction equipment.
Independent construction should begin with an examination of those terrain features to which it will be necessary to link the main characteristics of the foundation (height difference, soil freezing depth, etc.). This is done in order to correctly determine the zero level of laying the elements of the future frame (base frame).
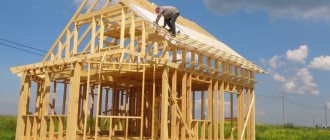
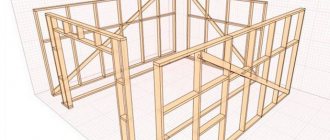
Assembling a frame from boards and timber
Frame assembly
Garage using frame technology
The bottom frame is made of a 100x50 mm wooden board, pre-treated with an antiseptic. For racks in the corners of the garage and in the gate leaves, 100x100 mm timber is used, for other parts of the building - rafters and floor blocks - 100x50 mm. In the lower trim between the posts, a pitch of no more than 1200 mm is maintained.
To give the frame greater strength, struts should be installed in the corners of the building.
If the garage is planned to be more than 4 m wide, it is better to make the ceiling beams from stronger and more reliable boards 50x100 mm. The longitudinal elements are made of timber no less than 50x50 mm.
Features of frame buildings
During the construction of garages of this type, wood (timber and thick boards) is traditionally selected for the manufacture of the frame, which belongs to the category of lightweight and easy-to-process materials with a very reasonable cost.
In this case, any finishing coatings suitable for these purposes can be used as cladding for the finished frame, usually selected from the following list:
- coatings based on the same wood (chipboard or fiberboard);
- vinyl or metal siding;
- corrugated sheets or sandwich panels
The advantages of prefabricated structures of the class we are considering include:
- convenience and ease of installation, which can be carried out independently (without involving a third party)
- special equipment and in the absence of professional skills);
- optional arrangement of a buried foundation;
- profitability due to the relative cheapness of building materials and low labor costs;
- short construction time, not related to seasonal factors
The disadvantages of this option include the fire hazard of the wood base and, as a result, the need to use special non-combustible materials as cladding.
Note! To insulate such a garage, stone wool is most often used, which does not support the spread of combustion. In addition, the wooden frame elements are treated with special antiseptic compounds and fire retardants, which significantly extend their service life and protect against accidental fire.
Roof and walls
Wall cladding
To furnish the roof, a 100x25 mm board is used, which is sheathed with a pre-selected roofing material. Metal tiles or slate can be attached directly to a wooden sheathing, not forgetting to equip a hydro- and vapor barrier system to organize a comfortable microclimate in the garage.
A drain must be installed outside the roofing system, which can be made independently from a plastic pipe cut in two.
For cladding the outside of the building, you can use a special facade lining or a solid wooden board, pre-treated with impregnation to protect it from moisture. The inside of the garage is insulated with mineral wool, always laid with a layer of vapor barrier and covered with clapboard.
Roofing device
As for the roof, it can be of two types: gable or single-pitch. Its installation will require a rafter system and cladding material. It all comes down to the fact that the corresponding grooves are made in the frame and on top, to which the rafters will be mounted. Bars with a cross section of 40×100 mm can be used as rafters. In the photo you can see a flat version of the roof.
Next, the sheathing is made and the roofing material is laid. For the garage, bitumen shingles, corrugated sheets, metal tiles, slate or ondulin are most often used. Which material to choose is a purely personal matter.
Wooden garage 6x4
Garage 6x4
We invite you to familiarize yourself with the principle of constructing a garage, the size of which is 6x4 m with a ceiling height of 3 m. It will have a gate measuring 2.8x2.5 m, the foundation is made of reinforced concrete slabs, and the frame is made of wooden beams 100 ×100 mm. As for the exterior finishing, it will be made of corrugated board or other similar material.
Preparing the base
The first thing you need to do is clean the construction site. At the site of the future structure, remove soil up to 10 cm deep. The bottom of the pit is filled with sand, leveled and compacted.
Foundation
Lay formwork boards 1.5×0.5 cm around the perimeter and 15 cm in height. The base is reinforced with Ø 12 mm wire. The cells must be made 20x20 cm. The resulting mesh should be in the middle of the formwork. After this, concrete is poured. Although it may seem that such a foundation is unreliable, it is important not to forget that the weight of the frame structure of a 6x4 m garage is relatively small.
Construction of the frame
The principle of frame construction has already been described in this article. The difference here is that it is important to respect the dimensions of the garage. So, a frame is erected from beams 3 m long. Assembly begins with the lower crown. You attach the corner drains to it and the upper crown is already on them.
In order for the racks to have a reliable fixation, they should be temporarily fixed using slats or boards.
The resulting structure will be quite strong. If necessary, the frame is reinforced with jumpers for greater rigidity. As for the opening, a beam is laid horizontally on top of the racks. It must also be securely fastened.
Roof construction
In our case, we will build a gable roof for the garage. The ridge beam will be attached to two supports, the cross-section of which is 10x10 cm. These supports will rest on the gables. For the manufacture of rafters and ridge, a 40x100 mm board is used.
Reason for markdown
A garage is an excellent gift for boys who love cars. Developmental designer. Made from 4 mm birch plywood, which makes it more durable. INCLUDES: 40 parts for assembling a garage with drive-ins, 4 traffic signs ASSEMBLY: Easy. The assembled model is sold unassembled, with step-by-step instructions included. PURPOSE: For children from 3 years old. Used for role-playing games with cars and accessories. Constant contact with small parts has a great effect on intellectual abilities by developing fine motor skills. QUALITY: KUBIGRAD brand products for those who prefer QUALITY. All parts are smooth and even. Every detail of the toy is carefully polished. The product is environmentally safe and certified. CREATIVITY: Showing your imagination, you can color the toy with paints, pencils, and gouache. ASSEMBLED SIZES: 18*29*15 cm. CAN BE JOINTED: with KubiGrad Racing Track toys Art. 10184254, Refill Art. 10184253.
Article on the topic: How to open a garage door
Product characteristics
| Favorite heroes | Cars |
| Weight with packaging (kg) | 0.83 kg |
| Packing width | 29 cm |
| Packing height | 4 cm |
| Packing depth | 18 cm |
| Assembled width | 29 cm |
| Assembled height | 15 cm |
| Assembled depth | 18 cm |
| Toy material | tree; plywood |
| Country of Origin | Russia |
| Equipment | instructions; parts for assembly |
Information about technical characteristics, delivery set, country of manufacture and appearance of the product is for reference only and is based on the latest available information from the seller
Photo
In the provided photo gallery, you can see various options for building a wooden garage:
Do-it-yourself shed: step-by-step instructions
The very first stage of building a barn is preparing the site. For this:
- the soil is thoroughly cleaned of debris;
- vegetation is removed;
- the surface is leveled.
All building materials that may be damaged by moisture are placed under a canopy. If this is not possible, shelter is provided for them. To
Creating a foundation
Light frame structures are installed on a columnar or pile foundation. A block shed will require a more solid foundation. The choice of foundation also depends on the characteristics of the soil.
The use of a columnar foundation is not recommended on heaving soil. During the process of movement, the supports are squeezed out, which leads to misalignment. On soft soils and peat bogs, preference should be given to piles.
Marking
To mark, you will need a cord, tape measure, and stakes. You can quickly make the correct markup using the following methods:
- Using a theodolite - with the help of a cord and stakes, the location of the longest wall of the barn and nearby corners is determined. Using a tape measure or measuring device, mark the location of the remaining corners and tighten the cord.
- Egyptian triangle - mark a point on a stretched cord located 4 meters from the corner. A point is laid perpendicularly at a distance of 3 meters. There should be exactly 5 meters between the ends of the segments (points 2 and 3). Further marking is carried out from the right angle, the correctness of the construction is checked using the Pythagorean theorem.
A cast-off made from posts and cross slats will allow you to more accurately fix the geometry of the barn. The cord is secured to the nails. It can be removed before starting excavation work.
Features of different types of bases
The following types of foundation are used to build a barn:
- Tape - its arrangement will require a trench about 50 cm deep and arrangement of formwork. To ensure the strength of the base, the structure is reinforced with wire or reinforcement. You can continue work a week after pouring the concrete. You can also make a strip foundation from blocks.
- Columnar - represents free-standing supports installed at the corners of the box, along the perimeter, under the partitions. For their installation, holes 40 cm deep are also dug. To prevent the supports from moving during the operation of the building, the bottom of the hole is lined with sand, and the support itself is filled with cement.
- Pile - requires the use of special structures for screwing in supports, excellent for moving soils. After installing the supports, their top is cut off level, and the cavity is filled with cement mortar.
Barn without foundation
A temporary structure can be erected without laying a foundation. If the building area does not exceed 20 square meters and the height is 2.5 meters, it can be installed directly on the ground.
When making such a decision, keep in mind that on clay soil, during snow melting and seasonal rains, a large amount of moisture remains on the soil surface, which will contribute to the destruction of wood. On sandy soil, a shed without a foundation will last for several seasons, since moisture is quickly absorbed by the soil. The construction procedure will be as follows:
- Site preparation, including soil leveling, compaction, and arrangement of a sand and crushed stone bed.
- Deepening the corner posts by 60-70 cm.
- Construction of a frame from 50x100 mm timber.
- Covering with boards or other finishing materials.
It is recommended to use a metal profile sheet for the roof. It looks beautiful, has a low weight, which eliminates the creation of a high load on the walls of the structure or the soil.
This shed is suitable for seasonal use, storing equipment and firewood.
Construction of the frame
The frame consists of racks, upper and lower trim, inclined jibs, and jumpers. To create it, a beam with a cross-section of 100x100 mm or a board measuring 150x150 mm can be used. You can use staples, pads, bolts, nails, and self-tapping screws as fasteners. The work order is as follows:
- The bottom trim beam is laid on a layer of waterproofing and secured with studs, bolts, and anchors.
- Floor joists are installed.
- Racks are installed from the corner and secured at the top using strapping.
- The frame is strengthened with jibs attached to the upper and lower beams, the openings are reinforced with boards.
If OSB, plywood, and jibs are used as finishing, you may not use them.
Roof arrangement
The roof can be single-pitched or gable, its angle of inclination depends on the wind load in the region
During construction, it is important to take into account the pitch recommended by the roofing material manufacturer.
Schemes and drawings
If you decide to build a wooden garage yourself, then first study the diagrams and drawings:
Did the article help you?
What will you need?
To make a toy plywood garage, you will need to stock up on certain materials and tools. The craftsman also needs to have drawings according to which the parts will be made. You should think in advance about the size of the product so that there is enough space in it to accommodate children's cars of all sizes and shapes.
Article on the topic: How to get rid of water in a garage cellar
So, you need to prepare the following tools and materials in advance.
- Plywood . In this case, it is advisable to take a sheet 0.3 cm wide. This size will make the product durable, while working with such material is not so difficult.
- Glue for gluing parts . For such work, it is better to choose PVA, since it is non-toxic and suitable for fastening wooden elements.
- Jigsaw . This tool is necessary for cutting parts from plywood. An electric jigsaw would be an ideal option. Work with a jigsaw will be carried out much faster than when choosing the manual option. A regular jigsaw is also suitable for cutting out shaped parts.
- Sandpaper. It is needed for polishing individual elements after cutting them out.
- Needle file . Using a small needle file will give the pieces the desired shape.
You should also prepare a sheet of paper or whatman paper to make a drawing, take a pencil and a ruler. You can make a drawing for a toy plywood garage yourself or take ready-made models from the Internet. According to users, the PRO100 program will help create a drawing for a future garage.