Any work with wood is always exciting, because it gives you the opportunity not only to show your own imagination, but also to make something that fully suits your needs and tastes. Agree, it’s nice when there is something made by yourself in the house.
If, for example, you worry about how to make a wooden box with your own hands, you can get a useful and beautiful accessory! This box can be used to store collectible coins, jewelry, and other small items. The thing is, in a word, convenient.
How to make a wooden box with your own hands
The idea of beautifully decorating a box with your own hands
The nuances of making wooden boxes
There are various ways to make a wooden box. A simple method, which is most suitable for beginners, involves using a sheet of plywood, which must be carefully leveled and treated against various types of defects. After preparing the surface, it is marked in accordance with the drawing of the future box, which will require a ruler, compass and pencil.
Creative projects do not require a lot of time, complex measurements and planning
On a note! It is important to accurately work out the design of the product, because the quality of the final result will largely depend on this stage.
The most common type of box is the classic one.
To maximize savings on consumables, all elements of the box can be made rectangular - this way there will be almost nothing left over.
After checking the applied markings, the walls, lid and bottom of the structure are cut out. It is important to cut very carefully to obtain the smoothest possible contours. Otherwise, due to negligence, you will have to re-manufacture the damaged parts.
Plywood box
After this, the parts need to be connected. It is best to use wood tenons for connections. If the box is small, the tenons can be ordinary ones with a square cross-section (their height should be the same as the thickness of the plywood sheet).
Tenon joints
If you have cut out all the blanks and removed excess fragments from them with a file, then you can rejoice - the most difficult part of the work is over! Now all that remains is to build a box from ready-made parts. The spikes are driven into the sockets (if necessary, if they do not fit, the excess is filed off with a file). It is recommended to lubricate the walls with glue for greater strength, and then firmly connect them to each other, which is traditionally done using a vice.
Making a wooden box with your own hands
The bottom of the product is placed along the edges with glue, after which it is pressed against the walls and kept for some time. To secure the lid you will need small metal hinges. This is exactly how the simplest wooden boxes are made. Having finished manufacturing, you can begin decorating.
Graceful form, unusual style, modern design
Creating a pattern
When making boxes from wood or plywood, they follow a certain pattern, using a drawing on paper indicating the exact dimensions of each component. Cardboard boxes are made using the same principle. First, select the template you like, and then print it out in the required scale. You can create your own sketch by taking parameters from a finished sample or implementing personal design solutions.
To make an original box, the patterns of all the parts must fit each other perfectly. If the parameters do not match, it will be impossible to assemble the product.
Schemes and blanks for cardboard boxes can take different shapes and be of different sizes. However, they are all created according to two basic principles:
- A model with a common base, the configuration of which is cut from a single sheet. In this case, it is assembled by bending the segments along the contour lines and gluing them at the closure points. This method is good for linear structures.
- The second option involves assembling individual elements into a common whole using stitching. Using this method, you can take a configuration of any complexity.
When making a box using the first method, to ensure clear contours of the bent lines, you should mark the bend points using a sharpened rod. This procedure will ensure smooth corner borders even when using thick cardboard. In addition, when drawing up the drawing, connection points should be marked. Indentations for gluing should be left at each joining point.
When using the second method, the parts are connected with colored threads. In order for the seams to acquire a decorative appearance, it is necessary to first mark the entry points of the thread into the cardboard. The marks should be placed at equal distances from the edge and from each other. Using an awl, neat holes are pierced along the finished lines and the segments are sewn together with a needle. To finish the interior of the box, various seals are often used, which are installed under the fabric. Cotton wool, foam rubber or synthetic fiber are suitable for this purpose.
The material is attached to the cardboard with glue or sewn with thread.
With a common base From separate parts
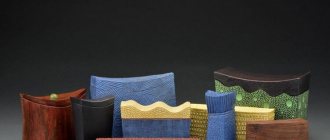
How to decorate a box?
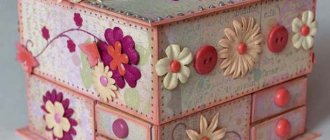
To decorate the product, you can varnish or paint it. Some people prefer carved boxes (such as the one in the photo below) or those made using decoupage technology. In any case, the final result will depend on the creativity and imagination of the master.
Chic vintage box created using decoupage technique
Let's sum it up
As you can see, there are many different plywood box designs available. Not all of them are presented in this material, however, you can find the drawing you need or get an idea on the Internet. However, many of you are able to make a drawing yourself, simply using the materials presented in the article you are reading now as a guide, while determining your own dimensions for the products.
The box can be assembled without drawings, by eye, however, such aerobatics is a sign of the highest skill in the field of furniture assembly. If you can do it, then go for it, and everything will definitely turn out the way it was intended.
About carved boxes
To perform this type of woodwork, you should prepare:
- oblique knife;
- pencil;
- pen knife;
- compass;
- ruler.
Oblique knife
If you need to cut out oblong-shaped parts, use a feather knife for the job. It is more convenient to cut geometric shapes and straight lines with an oblique knife.
On a note! The required pattern must first be applied to the wood, for which you can use a ruler with a compass or a stencil. If a piece cannot be cut with a knife, then stripping will be required. Having finished cutting, all that remains is to sand the product with sandpaper.
Carved wooden box
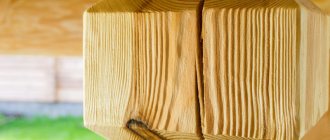
How to choose plywood for making a box
Plywood is made from trees of various species, so the properties of each category of these plates may also differ from each other. That is why it is important to carefully look at the description of the material when purchasing.
Thus, plywood made from linden boasts:
- dense structure;
- flexibility.
Material made from pine will by its nature be durable and resistant to various mechanical damage.
Birch plywood is famous for its smoothness and even surface. If you need to make a product of impeccable beauty to be displayed, then, as a rule, they take it.
Most often, furniture is made of plywood marked “FK”
Not only that when choosing a specific plywood, you have to pay attention to which tree became its “progenitor”, you also need to carefully study the abbreviations, which imply that additives were added to the layer of wood, necessary to improve certain quality characteristics of the product.
Option #1. Beautiful wooden box
Let's start with something simple - with the plywood box mentioned above.
DIY plywood box
To make it, prepare:
- eight-layer plywood;
- router, end mill and 45 degree cutter;
- polymer glue;
- gold paint;
- electric jigsaw;
- acrylic varnish;
- sandpaper;
- gas burner;
- putty;
- screws;
- 2 loops.
Step 1. To begin with, future blanks are marked on a plywood sheet (these are 4 walls, 1 bottom, 1 lid and 4 lid walls).
Marking future blanks
Step 2. All parts are cut out using an electric jigsaw. Although it is better - if possible - to use a circular saw (this way the cuts will be smoother).
Cut blanks
Step 3. The edges of the workpieces are processed with a router at an angle of 45 degrees - this way the layers of plywood will be visible from the outside.
Workpiece edges after processing
Step 4. The surfaces of the workpieces are carefully processed with sandpaper, all flaws are eliminated.
Workpieces are sanded with sandpaper
Step 5. On a flat working surface, a box is created from the walls. It is better to use polymer glue for this - it sets quickly enough and has good viscosity.
Assembling the box with glue
Step 6. The walls of the lid are connected in the same way.
The lid walls are also assembled
Step 7. The walls of the lid are aligned flush with the box until the glue has completely hardened.
Fitting parts
Step 8. The result is the following design, which relatively clearly demonstrates what the box will look like.
This is what the box will look like
Step 9. The joints are puttied. By the way, if a milling table was used (and in our example there was none), then there would be no gaps, since manipulations with small parts would not be carried out by weight.
All cracks are filled with putty
Step 10. The parts are sanded using putty.
Sanding over putty
Step 11. Next, you need to mark the places for attaching the hinges.
Places for hinges are marked
Step 12. Seats are selected using a miter cutter.
Seats selected
Step 13 This is what you should have. You can guess.
Result of work
Step 14. The metal loops are fixed with screws.
Screwing the hinges
Note! Before screwing the hinges, the holes for the screws are made in advance, and with a drill of a slightly smaller diameter! Otherwise, the plywood may tear due to screwing in the screws.
Step 15. The hinges are removed. The product is fired carefully, but it is important not to overheat it (otherwise the walls will move like a screw).
Firing the box
Step 16. The hinges are reinstalled. The lid of the product is coated with acrylic varnish. Then the box is covered with masking tape, as in the photo below, and the edges are painted with a sponge.
Painting the edges with a sponge
Step 17. You can decorate the box with some kind of design. In our example, this is a hieroglyph, pre-printed on paper and cut out (the result is a homemade stencil).
Paper stencils are cut out
Step 18. The stencils are filled, after which you need to wait a while for the drawings to dry.
Stencils are stuffed
Step 19. Actually, that's all. The homemade box is ready!
Photo of the finished plywood box This is what the box looks like inside
Another photo of the box
Now you can put something in it and put it in the designated place.
The box is in its designated place
We're sure it turned out pretty good
LiveInternetLiveInternet
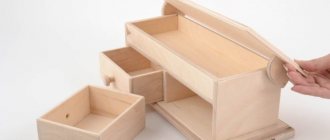
The box is sliding. Description of work .
The subtlety of such a box is one thing - the sides of the box cannot be overloaded with paint, varnish and pictures, otherwise it will not open easily, or will generally become difficult to move. But we are not looking for easy ways, especially since the birthday girl dreamed of just such a box. The work is done slowly, during the process you always want to meditate on the work in order to understand what will look better and how the drawing will lay out.
First you need to remove all the fittings, including the side guides. The lazy person will do it twice if these slats are not unscrewed. And one more small nuance: number or sign the slats with a pencil, this will make the work easier when assembling. There is a handle on the lid of the blank, but somehow I decided that it had no place there, and I think that we can do without it. I pulled out the handle, covered the holes with wood putty, and sanded it after drying. (It’s as if the hands didn’t “grow” here)
It is better to sign the slats on the inside, the one that will be adjacent to the body of the product, since they need to be painted on top, and the numbering will be painted over.
We sand the box and prime it with water emulsion. let it dry, you can blow it with a hairdryer. Then sand again until smooth.
And now we start aging: we go over the protruding corners and the most frequently wiped places with brown acrylic paint (burnt sienna was used here). Then we cover these places (only brown ones) with varnish. If this is not done, then when applying light paint and sanding (the appearance of abrasions), you can accidentally remove all the layers of white and brown paint down to the wood, and the varnish will not allow you to do this, unless of course you are fanatical rub these places)
After the varnish has dried, rub the brown areas with a paraffin candle. We brush off the excess crumbs and paint the box in a light tone with acrylic paint. Acrylic dries quickly, so we take sandpaper and lightly sand the areas rubbed with candles. Brown paint begins to appear, but we do not remove it; the varnish applied in advance will not help us. We don’t try too hard to avoid tearing off the varnish. All the abrasions appear and the “antique” is ready.
Glue on the fragments of the selected napkin. It’s a matter of taste how many flowers there will be on the box, at your discretion. You just need to make sure that the pasted fragments on all three sections look harmonious and as one whole. Stack all three sections on top of each other and select the fragments.
A rather large fragment is glued on the back side: first we glue it, dry it, and then cut it between the two sections with a scalpel or blade. When assembled it will look whole and harmonious, albeit from the “back”
There is a subtle black and white design on the inside of the lid. Of course, you can draw, but it’s unlikely to be perfect. Therefore, you can print some fragment (there are plenty of them on the Internet), print it on a napkin, carefully cut it out and paste it on. the napkin is so thin and will absorb the glue, the transition will not be visible at all, it looks like a realistic drawing, makes the entire box more airy and delicate.
Below is the second option and drawing. The boundaries of the transition are not visible, the napkin seems to be implanted into the lid. (This box was made earlier, we look only at the lid, the rest - later)
We cover all parts and spare parts with one layer of varnish and after that we assemble the box into a single whole. If you have painted the insides of the box, then feel free to proceed with assembly. But if you need to decorate the inside with a material, in my case it is leatherette, then it is better to first glue the leatherette onto the bottom, and only then assemble the entire structure. If you do this already assembled, it is inconvenient to glue and press the material; the height of the sliding sections is too small. It is better to glue leatherette leather with Moment glue.
I tried PVA, it absorbs a lot, and as a result, in some places the edges still lag behind. I had to disassemble the entire structure and re-glue it to Moment. So, the box was varnished and assembled. If there are rough spots somewhere, go over them with fine sandpaper and coat the box with varnish again, but just do not touch the sides of the box, where the slats that move the sections are located. The varnish used is quick-drying polyurethane, it dries in just a few minutes. We screw on the fittings, check how the locks work, and are happy with the result.
And the second chest of drawers, it differs only in the arrangement of the roses. I had to make it urgently, I ordered it as a wedding gift. and so two very similar, but cute chests of drawers were born.
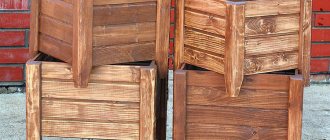
Option #2. Original double-walled box
Making such a box is much more difficult, but we will help you figure it out.
Double-walled cherry box
Step 1. On the pre-processed workpiece, you need to draw cut lines with a pencil. And here one important point should be taken into account: when transferring the sketch, it is imperative that the longitudinal orientation of the fibers be observed!
Drawing of a cherry box
Step 2. An even longitudinal part is cut from the workpiece (its thickness should be 1.5-2 cm). This part will serve as the cover of the product in the future.
Sawing the workpiece
Step 3. Next, change the inclination of the saw table. It is necessary to change the angle literally by a few degrees.
Changing the inclination of the saw table
Step 4. After this, the part is cut into 2 parts and the internal waste part is cut out. Thus, a conical cavity of the product is formed.
Cutting out internal waste
Step 5. The halves are glued back together. Thanks to this, by the way, internal stress is also relieved and cracking and deformation of the product are prevented. The glue should be applied in a thin layer, and all excess inside should be carefully removed.
The two halves are glued back together
Step 6. The glued parts are placed under the clamps. In this case, you need to carefully ensure that there are no distortions or displacements.
The glued workpiece is carefully placed under the clamps
Step 7. The table returns to the horizontal position, a couple of slices are cut from the waste part. This will be the bottom and cover of the future product.
Drawing of the blank for the lid and bottom Sawing blanks
Step 8. The interior of the box is painted. It is more convenient to carry out painting at this stage, while there is free access from both sides.
Cavity painting
Step 9. The table returns to the inclined position, after which cuts are made along the outer contour.
Step 10. A thin layer of glue is applied to the ends of the bottom, then it is inserted into the lower part of the product (you need to press it with your fingers until it stops).
Bottom gluing
Step 11. The lid elements are glued to the workpiece, cut off at the initial stages of work.
Cover stopper
Step 12. When the glue has dried, the main outline of the lid is outlined, after which this part is cut out.
Sawing the lid
Finished lid for the box
Note! The technique described above is universal, because it makes it possible to experiment with shapes and designs, making original and beautiful boxes with your own hands.
Safety precautions while working on the box
Safety precautions when working with sharp cutting tools must be followed very clearly and without fail.
You should not think that injuries such as cuts are an accident: they are inevitable whenever safety rules are violated. Cuts are an unpleasant thing, and if they are strong enough, then the person cannot work for several days and after recovery he is afraid to cut, and does not adapt for a long time. Of course, there is nothing to even think about free and beautiful carving, plastic movements and creativity! Our rules, when followed, exclude injuries.
You should not work when you are very nervous or tired, when your attention is dulled and it is difficult to concentrate.
The workplace must always be kept in order. There should be no unnecessary objects on the surface of the table; it should be promptly cleaned of chips, which are recommended to be swept away only with a brush. An unused tool should not interfere with work. It must always be placed in a specific place. If you move or push awkwardly, the tool should not fall, but it is also dangerous to keep it tightly secured when force is required to release it.
The tool should always be kept in good working order. When burning, charring produces acrid smoke, so do not lean too far over the work. If possible, sit up straight.
The room in which burning occurs must be ventilated more often. Flat burning is characterized by the fact that the image and background are on the same level, and the expressiveness of the drawing is achieved by a variety of contour lines and shading in the form of strokes, dots, etc. The techniques for performing this type of burning are reminiscent of contour carving, where the purity and conciseness of the line determine success affairs.
By moving the pin slower or faster, lines of different width and depth are obtained. By changing the adjustment of the pin heat and giving the pin a different inclination, you can achieve deeply saturated lines and barely noticeable strokes. In this case, the color strength of the line changes from dark brown to light yellowish-brown tones.
You cannot push the pin with special effort or hesitantly slow down its movement along the pattern. If the edges of the burnt grooves are charred, then apparently the movement of the pin was too slow or the pin was overheated. In this case, it is necessary to reduce the voltage or reduce the air supply. You can also cool the tip of the pin by touching it to the surface of the marble tile or by holding it in an upright position for a while.
In general, the pins should not be heated, as the tip may become wrinkled. It must be remembered that it is impossible to correct or remove a damaged line or an erroneously applied stroke, therefore, while showing courage in work, one must not forget about caution. It’s better to underburn the line a little than to burn it out.
Unfinished lines, as well as finishing touches, should not be left until the end of the work, as they can become veiled and go unnoticed. In addition, the carbon deposits of early firing harden and make finishing difficult.
You should always have a bandage, iodine, ammonia, hydrogen peroxide and a bactericidal adhesive plaster on hand.
Option #3. Simple walnut box
The same steps must be followed when making another project - a wooden box with four walls. Having an unusual design and curved shape, such a box will look really modern and stylish!
A simple box made of walnut. Drawing of a box made of walnut. Stages of making the box. This box was made from walnut
Tools
A jigsaw is needed to accurately and quickly cut out designs in plywood.
- An electric or manual jigsaw that can be used for curved carving.
- Hammer.
- When using self-tapping screws, you will need a screwdriver.
- Wood files (for cutting plywood sheets).
- Jigsaw files.
- Wood files (triangular, flat and round).
- Tampons, rollers and brushes for finishing the box.
- Sandpaper.
Option number 4. Product with concave lid
Drawing of a box with a concave lid
Box with a concave lid Making a simple box Sawing out a curved lid Finishing the lid
Option #5. Ice cream stick box
Box made of ice cream sticks
To make such a box suitable for storing various small items, prepare:
- ice cream sticks (29 pieces);
- scissors;
- acrylic paints (2 colors required);
- ruler;
- corrugated cardboard;
- pencil;
- satin ribbon;
- hot glue.
Step 1. To begin, the sticks are painted in 2 colors (choose them yourself). Since our number is odd, it is divisible by 15 and 14.
A total of 29 sticks were used. Painting the sticks.
Step 2. A pair of rectangles (70x55 mm) and a pair of semicircles (height - 30 mm, base - 70 mm) are cut out of corrugated cardboard, after which the cut out parts are painted.
Corrugated cardboard blanks
Step 3. For the bottom, 7 sticks are used, laid out in alternating colors. To prevent the sticks from moving, you can temporarily fix them in the center with tape.
7 sticks on the bottom
Step 4. Cardboard rectangles are glued to the sides.
Gluing the sides
Sidewalls are glued
Step 5. Next, sticks are glued along the edges (also with alternating colors, 6 pieces per side).
Glue 6 sticks on each side
Step 6. Another 10 sticks are glued onto the semicircles - the result is the lid of the future box.
10 sticks per lid
That's it, now you can see exactly what the product will look like.
The box is almost finished
Step 7. Strips are cut out from satin ribbon. Next, the ends of the cardboard are sealed with these strips.
Cutting strips Sealing cardboard ends
Step 8. A couple of pieces of tape are glued to the lid of the product, but in such a way that the edges hang down on one side by about 20 mm. These hanging edges are glued to the box, resulting in a kind of “loops” through which the lid will open.
Pieces of tape are glued to the lid. Securing the lid.
Step 8. Additionally, a bow (made from the same satin) and a bead are glued. That's it, our beautiful box is ready! And if you have any other questions, check out the video below.
Finished box made from ice cream sticks
Video – Decorative box made from popsicle sticks
Technological map of product manufacturing
| № p/p | Type of work | Image | Tools, devices |
| 1 | Choice of material. | Internet, literature. | |
| 2 | Marking of parts. | Corner, ruler, pencil. | |
| 3 | Sawing blanks. | Hacksaw for metal. | |
| 4 | Fitting of blanks. | File. | |
| 5 | Sanding workpieces. | Sandpaper. | |
| 6 | Selecting a picture. | Internet, literature. | |
| 7 | Marking the drawing | Ruler, pencil, carbon paper. | |
| 8 | Burning out a drawing. | Burner. | |
| 9 | Gluing the box. | PVA glue, brush. | |
| 10 | Sanding the product. | Sandpaper. | |
| 11 | Varnishing. | Varnish NTs-228, brush. | |
| 12 | Decoration of the box inside | PVA glue, velvet paper. |
We chose pine to make the box. Having chosen the material, we began marking out the parts of the box.
Dimensions of the box: length – 210 mm, width – 160 mm, height – 90 mm, wall thickness – 15 mm. Having secured the workpiece in a vice, begin cutting out the product blanks using a hacksaw. In compliance with all safety regulations.
Using a square, adjust all corners of the workpieces. Cut the edges of the product on one side at an angle of 45 degrees. for further assembly of the product.
Grind all surfaces of the product blanks using sandpaper.
Using a ruler and square, finally check the dimensions of the product being manufactured.
Select a design to burn.
Using a ruler, square, pencil, compass, mark the drawing.
Following safety rules, burn the applied design onto the product blank using a burner.
Glue the box with PVA glue. Secure the parts with a clamp and leave until the glue dries completely.
Clean the edges of the product and all surfaces of the box.
Coat the outer surfaces of the box with NTs-228 varnish in a well-ventilated area, observing safety rules when working with varnish, and leave until completely dry.
Finish the interior of the box using velvet paper and PVA glue.
Economic justification for a wooden box
| Name | Quantity | Price(rubles) |
| 1. Pine board | 150x80x15 mm | 90 |
| 2. PVA glue | 100 gr. | 20 |
| 3. Varnish NTs-228 | 200 ml | 15 |
| 4. Sandpaper | 150x200 mm | 15 |
| 5.Velvet paper | 3 sheets | 30 |
| 6.Hinges for the lid of the box | 4 things. | 24 |
| 7.Decorative handles | 2 pcs. | 30 |
| TOTAL | 224 |
Conclusion
While making the box, we learned a lot about wood and methods of processing it. We gained new knowledge about the tools and devices used when working with wood, the technique of wood burning, and much more. Learned how to use a burner correctly.
And most importantly, we realized that no matter how strictly we adhere to the diagrams and descriptions, the product always turns out a little different. This is because it is made by ourselves. And there is no limit to creative imagination.
Product advertising
This is a very wonderful product. You can store a lot of little things in the box; it is also a very good gift that will fit into any interior and will appeal to every person. The best gift for friends and family is a gift made with your own hands.
Conclusion
During the work, I learned how to make a box and burn patterns on wood, and now I can put this into practice. I made a box to store small items and gave it to my mom for Mother's Day.
Decorating a wooden box – what is worth knowing?
Despite the attractive design and shape, the box will look truly original only after decoration. The technique of relief carving provides in this case almost limitless scope for creativity.
You can decorate the box in different ways
Using key carving techniques, you can create original textures on the box. We can talk about both simple textures and complex ornaments or geometric shapes.
Chisels for applying relief
- A semicircular chisel used to texture the product with small dimples.
- Forming grooves with an angled chisel on the surface of the box lid.
On a note! In the photo below you can find more complex examples of decoration that use complex textures and geometric patterns.
Options for decorating boxes Several more decoration options
Preparatory stage
First, decide what type of carving you are going to decorate the wooden box with. The simplest option (ideal for beginners) is contour carving. The pattern runs shallow across the flat surface, the lines form only the outline of the pattern. It could turn out very interesting.
Contour thread
Geometric wood carving will be more difficult, but almost anyone can master it. The patterns in it are formed not by lines, but by a combination of geometric shapes (usually wedge-shaped notches).
Geometric pattern
Finally, flat-notched carving - an ornament or pattern is applied to a flat surface, and the desired pattern is formed using the recesses.
Tools
The carver’s universal tool is a jamb knife; it is used for both geometric carving and sculptural work.
Also useful in your work:
- chisels – flat, bracketed, semicircular, corner;
- ruler;
- pencil;
- compass;
- eraser.
The carver may have much more tools, but for the first endeavors - cutting out a geometric pattern on a box, the above list will be enough.
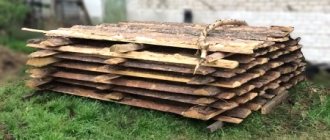
Wooden base
It is better to start with soft wood - it is more pliable and comfortable to work with. Linden, pine and aspen are three types of wood that have the desired structure. But linden, for example, is not always easy to get, and pine is prickly if you make a small design on it. Therefore, aspen can be the best option for making carved patterns on a box.
You will find complete information about wood suitable for carving in our article: “Wood for wood carving: features of materials, and what types of wood are best to choose?”
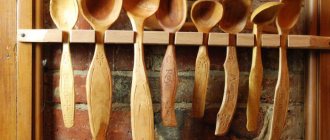
You should have a blank on which all that remains is to apply the ornament. Carvers call such blanks “linen”—things that are clean and prepared for painting. These can be not only boxes, but also spoons and cutting boards. Only in this case they are not painted, but decorated with carvings. Most masters assure that it is easier and less expensive to buy “linen” than to make it yourself.
Choosing an ornament
The main secret of experienced craftsmen is to first master the technique of creating templates and stencils, and only then take up the tool. Please note that the options offered for Internet beginners correspond (almost always) to an average level of difficulty. If you used a ready-made sketch, you also need to correctly transfer it to the workpiece.
A typical beginner mistake is rubbing out the sketch with your fingers. Here it is appropriate to recall the puncturing technique. If you are transferring simple geometric shapes to wood, then attach the sketch to the workpiece and use an awl (or needle) to mark the key points. And then connect these marks with pencil lines.
Do not take too detailed and detailed ornaments for the first works: until your hands get used to the tool and the way of handling it on the box, you will almost inevitably erase part of the sketch. With a large ornament, such risks are reduced. Move according to the principle “from simple to complex.”