If you still consider plywood to be a rough building material, then it’s time to discard these prejudices. Cost-effectiveness, durability, versatility are just a small part of the reasons why it is increasingly appearing in interiors as an independent unit. This article contains a step-by-step guide with photos on how to make plywood shelves with your own hands. And 6 models that everyone will like.
Preparing your desktop
First of all, you need to prepare your table on which you will work. There should be no unnecessary things on it and every tool should be at hand. Not everyone has their own desktop and has probably already thought about creating one. Making a table is not difficult, but choosing a place for it in the house is difficult. The ideal option is an insulated balcony, on which you can do crafts at any time. I have already written about preparing the table in a separate article and tried to describe in as much detail as possible the entire process of creating it. If you don’t know how to prepare your workplace, then read the following Article. After you have completed the process of creating a table, try to start choosing your future craft.
Some important tips
When working with a plywood sheet and cutting it, you need to remember several rules that will allow you to safely make even bookshelves for the wall. Experts recommend taking the following recommendations into account:
- Before you start cutting, you need to check the drawing to avoid an annoying mistake.
- If the technician works with an electric tool, it is necessary to periodically monitor the power cord.
- The equipment must first be adjusted, and the saw itself must be suitable for cutting a specific type of plywood.
- When carrying out work, you must use protective gloves and goggles. It is prohibited to bring your hands close to the blade.
- It is better not to use a power tool if a person does not know how to use it.
- It is worth remembering that a dull saw blade is less safe than a sharpened one.
We choose quality material
The main material is plywood. The choice is always difficult. Each of us has probably encountered such a problem as delamination of plywood from the end part and asked the question, what causes this delamination? Well, of course, this is mainly due to low-quality plywood. If this is not the first time you have picked up a jigsaw, then you can select plywood from the remnants of a previous craft. If you are new to sawing and you don’t have plywood, then buy it at a hardware store. Choosing material for sawing is always difficult. You should always choose plywood carefully, often look at the defects of the wood (knots, cracks) and draw conclusions. The difficulty in choosing plywood lies in the fact that no matter how you guess at its defects and shelf life. For example, you bought plywood, cleaned it, translated the drawing and suddenly it began to delaminate. Of course, this has happened to almost everyone and it’s oh, how unpleasant. So it is better to pay attention when choosing and choose good plywood. I wrote a special Article in which all the principles of choosing plywood are described step by step.
Features of the material
First, let's figure out why plywood? The answer is simple: characteristics that make pressed veneer an excellent alternative to wood, MDF or chipboard.
- Flexibility due to its small thickness, lightness and strength.
- Resistant to temperature changes.
- Simple installation - you can cut, glue and install this material without special skills.
- Cost-effective - the cost of a plywood sheet is significantly lower than that of natural wood.
Instagram @lot1design
Instagram @studiojessejames
Instagram @jayne.s.davies
The main disadvantage of the material is that it is not suitable for areas with high humidity. Since the material is made from specially prepared veneer, which is glued together, when exposed to water, harmful fumes from the glue may be released.
But for living rooms or corridors this material is perfect. Therefore, if you want to quickly and inexpensively furnish your home, read our tips on how to make a shelf out of plywood with your own hands.
- Furniture
How to make a box under the bed with your own hands
Stripping plywood
We clean our plywood with sandpaper. As you already know, “Medium-grained” and “Fine-grained” sandpaper is used for cleaning plywood when sawing. You've probably seen sandpaper in hardware stores, and that's what we'll need. In your work you will need “Coarse-grained”, “Medium-grained” and “Fine-grained” sandpaper. Each of them has its own property, but a completely different coating, by which it is classified. “Coarse-grained” sandpaper is used for processing rough plywood, i.e. which has many defects, chips, and cracks. “Medium-grained” sandpaper is used for processing plywood after “Coarse” sandpaper and has a slight coating. “Fine-grained” or otherwise “Nulevka”. This sandpaper serves as the final process for stripping plywood. It gives the plywood smoothness, and therefore the plywood will be pleasant to the touch. Sand the prepared plywood in stages, starting with medium-grain sandpaper and ending with fine sandpaper. Sanding should be done along the layers, not across. A well-polished surface should be flat, completely smooth, glossy in the light and silky to the touch. How best to prepare plywood for sawing and which sandpaper is best to choose Read here. After stripping, check the plywood for burrs and small irregularities. If there are no visible defects, then you can proceed to the process of translating the drawing.
How can plywood be treated?
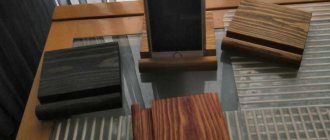
Many people wonder how to process plywood to make the finished product look attractive and stylish. Most often, paint is used to process the material. With its help you can give the product any shade. It is better to choose abrasion-resistant matte paint. In this case, the shelf can be washed, and it will retain its attractive appearance for a long time.
In addition, protective varnish with or without the addition of dyes can be used for processing. Additionally, you may need to use a special wood putty. It is necessary to level the surface of the plywood.
Translation of the drawing
For me, drawing translation has always been the main process in my work. I will tell you a couple of rules, as well as tips for high-quality translation of a drawing. Many people transfer the drawing onto plywood not only using a pencil and copying, but also using “Black Tape”, glue the drawing to the plywood, then wash off the drawing with water and the markings of the drawing remain on the plywood. In general, there are many ways, but I will tell you about the most common method. To transfer the drawing onto prepared plywood, you must use a copy, a ruler, a sharp pencil and a non-writing pen. Fasten the drawing in plywood using buttons or simply hold it with your left hand. Check if the drawing fits the dimensions. Arrange the clock drawing so that you can use a sheet of plywood as economically as possible. Translate the drawing using a non-writing pen and ruler. There is no need to rush, because your future craft depends on the drawing.
Sawing tools
Cutting plywood at home can be done using the following tools:
- regular hand saw;
- electrical;
- disk;
- electric jigsaw.
It is believed that it is better to use a regular handsaw for the job. First of all, there is no need to spend money on an expensive electric tool. And secondly, when working with a hand saw, the master has complete control over the process, so the likelihood of chipping is minimal. The only disadvantage of a hand saw is the physical effort that needs to be applied to cut plywood.
Drilling holes in the parts
As you have already noticed, the parts contain parts of the grooves that need to be cut out from the inside. To cut out such parts, you need to drill holes in them using a hand drill or, as in the old fashioned way, make holes with an awl. By the way, the diameter of the hole must be at least 1 mm, otherwise you can damage the elements of the drawing, which, alas, are sometimes difficult to restore. To avoid damaging your work table when drilling holes, you must place a board under the workpiece so as not to damage the work table. It is always difficult to drill holes alone, so ask a friend to help you in your task.
Interesting and simple ideas
One of the simplest shelves is made using plywood and rope. For this, small pieces are produced. If necessary, they are treated with paint and varnish. Then large holes are made along the edges of the workpieces for the rope. The shelf elements are connected using it. The result is an original suspended structure.
The modular shelf also looks unusual in the interior. To do this, blanks are produced of different lengths, but the same width. Only some elements are connected to each other. The blanks are mounted on the wall, forming an interesting design. It can be a square or a polygon, a complex labyrinth, etc.
You can make a small shelf with your own hands in just a few hours. This is a fun activity that the whole family can get involved in. First, you can make the simplest product from plywood. Gradually, honing your skills, you will be able to produce interesting and unusual modular structures not only for yourself, but also for sale.
Sawing parts
There are many rules for cutting, but you need to stick to the most common ones. First of all, you need to cut out the internal parts, only then according to the external pattern. There is no need to rush when cutting. The main thing is to always keep the jigsaw straight at a 90-degree angle when cutting. Cut out the parts along the lines you accurately marked. The movements of the jigsaw should always be smooth up and down. Also, do not forget to monitor your posture. Try to avoid bevels and unevenness. If you go off the line while cutting, don't worry. Such bevels and irregularities can be removed using flat files or “coarse-grained” sandpaper.
Electrical equipment
Convenient cutting with a mobile and practical electric jigsaw. It makes cuts quickly and accurately, it is easy to work with and does not require any special effort. However, you need to carefully monitor the cutting process, press the jigsaw against the plywood, avoiding jerky movements.
As for the electric and circular saws, they are best used for thick plywood. The tool makes cuts very quickly, but you need to work with such devices with the utmost care. There is a high probability of material damage and chipping. And the cost of such tools is much higher. Therefore, the best option for a home shelf is a mechanical jigsaw.
Cleaning Parts
You should always clean the parts of a future craft carefully. At the very beginning of the work, you already sanded the plywood with sandpaper. Now you have to do a small part of stripping the plywood. Using medium-grain sandpaper, sand the edges of the parts and the back of the plywood. “Fine-grained” sandpaper is considered the final stage of cleaning parts. It is better to clean the front part of the parts with fine sandpaper. When processing plywood, take your time. You can also use a rounded file, which is convenient for cleaning the inside of the holes. Try to ensure that the parts come out without burrs or irregularities.
Varnishing crafts
If desired, you can transform our craft by covering it with Wood Varnish, preferably colorless. Read how best to varnish a craft. Try to choose a quality varnish. Varnishing is carried out using a special brush “For glue”. Take your time. Try not to leave visible marks or scratches on the craft.