Types of phone holders for the car
The following varieties are currently on the market:
- Plastic clamp with silicone beads for fixing to the steering wheel. It is easy to use, but blocks the view of the dashboard.
- Clamp for installation in the air duct. Devices of this type benefit from functionality. There are models that allow you to quickly secure your mobile phone with one hand. They produce holders with a flexible cord, which allows you to rotate the gadget in any direction. But the fastening to the air duct grille is not reliable in itself. If the holder swings too much during movement, the phone or tablet will fall.
- Suction cup – attaches to the dashboard or windshield. The holder does not limit your view and allows you to quickly access the gadget’s buttons. But while moving, the mobile device will sway.
- Magnetic holder. It consists of 2 parts: a magnet, veiled in a frame placed on the panel, and a metal plate with a rubber gasket, which must be secured to the gadget. As long as you use a strong enough magnet, your devices will be safe. You can also make such a complex tablet holder for a car dashboard with your own hands.
- Silicone mat is a modern multifunctional mechanism. The clamps are angled for easy viewing of the screen. The mat is equipped with a USB connector to charge your phone if necessary. Additionally, magnetic outputs for Lightning and micro-USB can be built-in. The mat is installed on the panel without additional fasteners on its own sole, treated with a special compound.
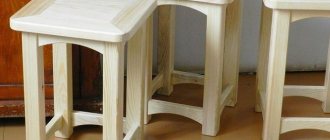
Car tablet holder-mat
There are many offers from manufacturers. All products are in different price ranges, and every car owner can find something for themselves. But there are affordable ways to create your own model.
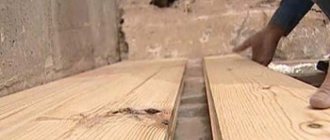
Sawing parts
There are many rules for cutting, but you need to stick to the most common ones. First of all, you need to cut out the internal parts, only then according to the external pattern. There is no need to rush when cutting. The main thing is to always keep the jigsaw straight at a 90-degree angle when cutting. Cut out the parts along the lines you accurately marked. The movements of the jigsaw should always be smooth up and down. Also, do not forget to monitor your posture. Try to avoid bevels and unevenness. If you go off the line while cutting, don't worry. Such bevels and irregularities can be removed using flat files or “coarse-grained” sandpaper.
Varnishing crafts
If desired, you can transform our craft by covering it with Wood Varnish, preferably colorless. Read how best to varnish a craft. Try to choose a quality varnish. Varnishing is carried out using a special brush “For glue”. Take your time. Try not to leave visible marks or scratches on the craft.
DIY plywood phone stand. Drawing.
This elephant-shaped phone stand will look great on your desk at home or in the office, and thanks to its size and stability it is suitable not only for a phone, but also for a tablet or e-reader. It will become an indispensable assistant when viewing information together on your desk or desktop.
In addition, it is not only a stand, but also an organizer for all kinds of office supplies.
Made by yourself, it will be a good original gift.
And the source of your inspiration will be a drawing of a phone stand, which you can download from the link below.
The phone stand is cut out using a hand jigsaw or a jigsaw (which is much faster) from 4 mm plywood measuring 300 by 200 mm and consists of 5 components. The work is not difficult and is accessible to beginners.
This work was completed on a homemade jigsaw in about half an hour. You can see how to make such a machine yourself here - “Homemade jigsaw machine.”
Completing of the work.
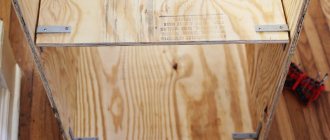
1. Download the drawing of the phone stand, print it out and stick it on the plywood.
2. Use a 3 mm drill to drill holes at the joints of the stand parts. When drilling, we do not use excessive force, especially when the drill comes out, so as not to split the plywood and ruin the entire work.
3. Using a hand jigsaw or a jigsaw, we cut out the product and clean it of any remaining drawing paper.
4. We assemble the stand for the phone, treat it with varnish, stains, etc.
After completing the work, it will not be superfluous to process the workpieces with “zero” sandpaper; it can also correct any inaccuracies.
If you did everything carefully and exactly according to the drawings, then you will not have any problems assembling the phone stand. The stand is easy and simple to assemble.
For greater reliability, the connection points can be “planted” with glue, for example, PVA.
Photo tips on how to make a stand
Sources
- https://1PoMebeli.ru/spalnya/podstavka-dlya-smartfona.html
- https://www.mirpodelki.ru/index.php?id=475
- https://1001zagotovka.ru/derevjannie-zagotovki-podstavok-pod-telefon/
- https://www.iphones.ru/iNotes/sobral-podstavku-dlya-smartfona-svoimi-rukami-a-eshche-drakona-iz-dereva-08-26-2021
- https://svoimirykami.guru/podstavka-dlya-telefona-svoimi-rukami/
- https://master4dom.ru/podstavka-dlya-telefona-iz-dereva-svoimi-rukami.html
- https://pilka-nn.ru/izdeliya/derevyannaya-podstavka-dlya-telefona-svoimi-rukami.html
- https://RuslesMarket.ru/produkciya/derevyannaya-podstavka-dlya-telefona-svoimi-rukami.html
- https://kaksdelat.guru/kak-sdelat-podstavku/
[collapse]
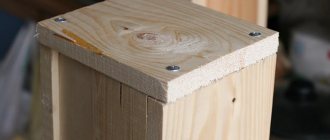
Wooden stand
First of all, for a wooden phone stand, you need to choose two bars so that they contrast with each other in color. Then you should make sure that they are the same height and their edges are square.
Dimensions of the wooden stand. The sizes are selected in accordance with the parameters of the gadget. If necessary, you can find a project diagram on the Internet.
Making a wooden stand. A band saw is used to cut a thin strip of a larger piece of wood. Then the 3 parts are glued together. In this picture you can see the final dimensions of the main face.
Then another piece of wood is taken, which must be cut, giving it an acute angle (about 55 degrees).
Now you should glue it to the main structure.
You also need to cut a small piece of wood that will hold the smartphone. It is also glued to the body. Your DIY wooden phone stand is ready! The final stage. After sanding, the smartphone stand should be varnished.
Option 1.
To make a phone stand, I took the scraps left over from the blanks for the end boards. I glued them together in order to obtain the required width of the workpiece. After the glue had dried, I leveled the surfaces of the workpiece with a hand router on a home-made device that allowed me to mill a plane. The planes were cleaned with a grinder.
Next, I sawed off the ends of the workpiece on a miter saw.
Having installed the router on the table, I processed the edges of the workpiece. The lower edge is a cutter with a radius of 3 mm, and the upper edge is a cutter with a cutting angle of 450.
I cleaned the ends and edges with a grinder and used a miter saw to divide the workpiece into two parts at an angle of 300. The first longer part is the base of the stand. The second part, which is shorter in length, is the back on which the phone will rest.
Since the base had been chamfered, the back had to be cut to the amount of this chamfer on both sides and the chamfer on the side edges of the back had to be chamfered again. As a result, the back was narrower than the base.
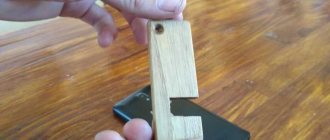
On the base, in order to prevent the phone from sliding off the stand, I formed a groove with a V-shaped cutter using a router. In order for the backrest to rest securely on the base, I decided to fasten it to two dowels with a diameter of 6 mm and a length of 15 mm.
To do this, at a distance of 9 mm from the v-shaped groove, hammered two nails of 5 millimeters, bit off the heads with pliers and placed the back end to the base, aligning the edge of the back with the edge of the v-shaped groove.
Using the resulting nail marks, I drilled holes to a depth of 8 mm both at the base and at the end of the back.
Next, I applied glue to the dowels and the end of the back and glued both parts into one structure.
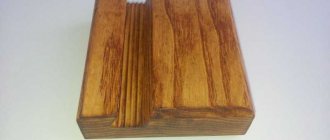
The last stage of making a phone stand is applying a finishing coating to protect the product from dirt and moisture. I coated the stand with colorless furniture wax and after waiting a few hours, polished it with a lint-free cloth.
This DIY wooden phone stand is ready for use!
Option 2. “A kitten named Woof”
Option 3
Unlike cardboard, which can be cut with a knife or scissors, these materials require a jigsaw. But it will turn out to be a very strong and stable stand.
Have you chosen the grumpy cat shape? Great, draw its outline as if looking at it from the front. The ears are strictly on the top of the head. Insert the lower part into the slot of the rectangle on which the cat will sit.
Stick stand
If the reader likes to make vlogs through his phone, then this project recording stand is what he needs. A very simple project on how to make a smartphone stand out of chopsticks.
Step 1. Glue the chopsticks together. Chopsticks are glued into the desired shape using wood glue. You can start with a U-shape. You will need 13 chopsticks. 6 sticks on each side, 12 in total. Then the last stick is cut into small pieces. It requires gluing them on the bottom of two glued 6-piece chopsticks. You need to make sure that the phone can slide into the U-shaped stand.
Simple design
The easiest way to make a wooden phone stand with your own hands is to simply make it from an ordinary plank. The design of such a product is as simple as possible - a groove of the required width is made in the board and the stand is already ready. Since the board has a large plane, after you put your mobile phone in the slot, it will stand firmly and securely on the table.
The most important thing in this wooden phone stand is the base area that will be in contact with the table; it must be large enough to cope with the functional load. As a base, such a homemade phone stand can have any wood and can be given any shape. But the manufacturing process itself is limited to the fact that a groove is simply made in the board using a router. The groove can be made flat or sloped, depending on the angle at which the device should be positioned.
When you make your own smartphone stand, it is important to sand it well, especially in the groove area where the mobile will sit. After all, if there are irregularities, you can scratch the glass, and this will ruin the appearance of your gadget.
The basic version looks the most minimalistic - the device will be small and universal. Wood is a classic material, so the product will fit into any interior; the stand will look good both at home and on the office desk.
Advice! A simple wood phone stand project is the best way to practice. You should not take expensive types of wood as a workpiece; an ordinary beam or board will do.
You can focus on one phone model or several devices. For example, make cross grooves along and across the workpiece. The narrow slot will fit a smartphone, and the wide slot will fit a tablet or e-reader.
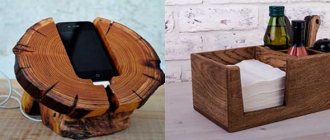
Sophisticated phone holder made of wood
A complex design is a way to turn an object that is simple in its purpose into an interesting element of the interior. The stand in this case can be made of several parts. One example is a design based on the principle of a photo frame. One surface fixes the device, the other serves as a support.
There are two popular options:
- The recesses are cut to fit the size of the phone. When placed in the stand, the smartphone looks like a glove - the screen is flush with the wooden surface. Additionally, you can make a recess for the charging cable. The stand looks impressive, but requires careful preparation - the dimensions must match perfectly. It is difficult to make it without a router the first time - numerous modifications will be required.
- Two planks are placed at an angle. One serves as a support for both the entire structure and the bottom of the phone. The second is installed obliquely. One of the advantages is that the stand can be made wide, suitable for any devices; holders for accessories or office supplies are placed in the free space.
When preparing for work, special attention should be paid to the final processing of the product. The workpiece is initially selected from high-quality wood species - for example, to match the shades of the interior. The surface is treated with impregnation and varnish. Attention! When working with paints and varnishes, you must follow the safety rules indicated on the containers.
If you want your mobile device to always be in sight, not get lost in documents, and at the same time your desk looks beautiful and solid, then the stand should be appropriate. To do this, you can make it not just from a plank, but from several parts. Don’t worry, you don’t need a lot of tools or material for this either. The most important thing is not to rush and carefully think through the design that your homemade product will have.
A good do-it-yourself smartphone stand, which is suitable not only for any phone, but also for a tablet, and at the same time will be as stable as possible, can be made from two small planks.
The design of such a stand is as simple as possible; two identical rectangular wooden blanks are taken. On one side, approximately a quarter from the edge, a slot is made to the middle of the board. It is important that the slot does not go at a right angle, but obliquely, so that the stand is more stable and has the correct slope of the plane that will support the phone. On both workpieces, a slot is made up to half the width of the workpiece.
For someone just starting out, it can be challenging to find the right angle for the slot. But this is not difficult to do, just attach two parts to one another at the planned angle and simply make marks on the side at the end. Well, in addition, to prevent the phone from slipping, you need to make a groove on a horizontal board, or glue a small strip that will be a stopper.
After all the slots are ready, you just need to sand the stand well so that the bumps don’t scratch the phone’s body, and cover it with tinting or just varnish.
There are many ways to make a phone stand of this design; for example, you can make the vertical part of the stand shaped, which will significantly improve its appearance. The shapes can be a wide variety of hands, leaves, animals and in general anything you can think of, since a tree can be given almost any shape.
Simple and beautiful
- First you need to bend both edges of the hanger so that they are located from each other at a distance equal to the width of the gadget. The edges are compressed with pliers until they are completely connected.
- Make 2 folds at each end, about 3-4 cm in size.
- At the next stage, the hook is bent at an angle of 90° and turned in the direction of the wings.
- Then a hook is made at the end of the upper part, onto which the inner element of the hanger is hooked and fixed.
How to treat the surface → Room decoration → How to choose the right paint → Surface treatment technologies → Leveling and finishing the walls → Selecting and applying a primer → Removal from the surface → Stretch ceilings and technologies → Reviews and testimonials