Despite the abundance of various furniture in stores, a simple stool has been and remains a fairly popular piece of furniture in the home. It is especially relevant if the apartment is decorated in a rustic style - in a kitchen with such a design, an ordinary stool will be simply irreplaceable.
But it’s not easy to buy a quality product now, so it’s easier to make it yourself. How to make a stool with your own hands from wood? The drawing, diagram and step-by-step instructions are in this material.
How to make a stool with your own hands from wood
Some general information and history
A stool, or, as this piece of furniture is commonly called, a stool, is a product designed for sitting, which has neither a back nor armrests, and can accommodate only one person. That is, the stool has only the seat itself, as well as support legs connected to each other by drawers and legs. There are usually 4 legs, but some types of stools may have 3 or 1 leg.
The dimensions of the classic stool are standard. The seat has a width of about 30-45 cm for an adult, and for a child this parameter is approximately 25-28 cm. The height of the product is on average 42-48 cm for an adult, and 26-28 cm for a child.
Scheme of a classic stool
The history of the stool goes back many centuries, if not millennia. The first product in history was created according to the principle of building a dolmen, when one was placed horizontally on two vertically installed stones and acted as a roof. In general, the history of this modest piece of furniture officially began with Ancient Egypt (about 5000 years ago). The first stools were very low, which is directly related to the short stature of people of that time (men of that time rarely exceeded the height mark of 159 cm).
On a note! Stools served a variety of purposes at the time. Even the appearance of children, according to some frescoes, took place on a stool.
For a long time, an ordinary stool was considered an attribute of the interior of the rich. Even pharaohs sat on it, although soft pillows were placed on the seat. A little later, the stool “evolved” into the prototype of a chair - it had a small back.
Design features of the stool
Also, stools conquered Rome and survived until the Middle Ages, not disappearing even in the midst of wars. Medieval products were assembled without nails and had wide legs. Then stool-chests began to appear in which something could be stored. The same seats with storage drawers appeared in Rus'.
It’s interesting that for a long time she could only sit on chairs and stools. The low-born were located directly on the floor and ground, without experiencing any discomfort. The monks also contributed to the development of furniture in their time, thanks to whom stools began to be used for sitting at desks. To facilitate intellectual work, a rotating stool was invented, which appeared around the 14th century.
Antique stools
Thus, the stool, changing, survived until the twentieth century, and then to the present day. And it still continues to be in great demand, remaining a convenient and functional product. So, it is convenient to sit on it at the table; if necessary, it can be pushed under it so that it does not interfere. And in some cases, you can safely stand on a stool to reach something from above. This is a very stable, practical and interesting product, despite its apparent simplicity and modesty.
On a note! In Soviet-era schools, almost all boys made stools during labor lessons. And the girls coped with this task perfectly if necessary. Such lessons helped lay the foundations of carpentry skills.
How to make a three-legged stool
Important points
As part of the design of the structure and the manufacture of workpieces, several important rules must be observed:
- Firstly, the seat height from the floor should be 400-450 mm (with the exception of bar stools with long legs);
- Secondly, the lumber must come from a high-quality wood species - birch, ash, larch, cedar, oak (pine can be used, but it is less durable than the above species);
- Thirdly, for legs and legs it is recommended to use blanks without knots;
- Fourthly, the surface of the finished workpieces should be extremely even and smooth, and the edge should be slightly semicircular.
Therefore, before assembly, the workpieces must be sanded sequentially with a file, fine-grained and zero-grain sandpaper. For this activity it is better to use a belt sander.
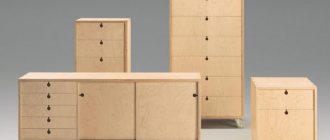
Types of furniture products
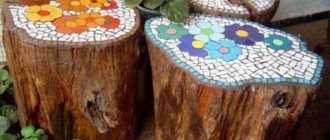
Stools can differ in size and appearance, as well as in the materials from which they are made. So, most often they are made from ordinary wood, but there are stools made of metal, plastic, and also those created by combining various materials (for example, the seat can be wooden and the legs can be metal). It is worth noting that, if desired, the seat of the stool can be made soft or simply covered with fabric to give the product a beautiful appearance or achieve a certain level of comfort when sitting on it. The legs may also differ in appearance. There are products with simple, even legs, and there are those whose lower part is a real work of art. It can be patterned, carved and decorated in every possible way.
Products made from natural wood are strong and durable, and also have an original design, which is why they do not lose their popularity
On a note! There are stools that differ in appearance depending on the purpose of their use.
Table. Types of stools.
| Type | Short description |
| Kitchen | This is the simplest and most common option that can be found in many apartments. These stools are used in the kitchen. |
| Bar | Such stools are distinguished by a large seat height, and for a more comfortable position, they have a special foot support underneath. They are used in bars for comfortable seating at a high bar counter. |
| Tourist | This stool is usually foldable and quite durable. Its seat is usually fabric, but is made of durable material that can withstand changes in humidity and temperature. The legs are made of aluminum, which is the lightest type of metal. |
| Musical | This stool is needed specifically by musicians to play musical instruments. It can change its height and also rotate around its axis. |
Children's stool
On a note! In addition to these types of stools, there are also specialized products that differ in certain characteristics (for example, strength, height, etc.). These include children's stools, which are very small in size.
Preparation of the drawing
The sketch shows the dimensions of the drawer, legs, and seat. If crackers (fasteners) are provided, their location and dimensions are shown. Draw out the shape of the seat and set the dimensions. The dimensions and locations of the grooves are shown on the legs; the design of the protruding tenons and the milling depth are shown on the drawers and legs.
The size of the stool is determined according to needs. There is tall furniture for sitting at a regular table or low furniture for gathering around a coffee table in the garden. The standard height of the stool is 450 – 550 mm (seat with legs).
What kind of stool should I make?
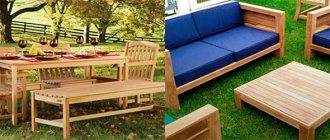
At home, ordinary stools are usually made from wood, however, their size and design as a whole, as well as their appearance, will directly depend on the purpose for which the furniture is made. So, for example, you can make stools for a child - they will be small in size and without sharp corners. These are mandatory conditions. Moreover, the legs must be very stable so that the child does not fall along with the stool, no matter how much he spins on it.
You can also make a simple wooden stool for your garden. It will not be distinguished by sophistication and beauty. It is undesirable to cover such a product with fabric, since the influence of low temperatures and high humidity will greatly affect the appearance of the furniture over time. But for the kitchen in a house or apartment, you can make original carved and beautiful stools.
DIY drawing of a simple stool
Attention! The more complex the configuration of the product and the more elegant and beautiful its appearance, the more difficult it will be to bring the idea to life. It will take much more time and skill, so first you should practice creating the simplest design possible. Also, to create patterns and beautiful curly legs, you may need a specialized tool, which not every home has.
How to make a simple rectangular stool?
Having dealt with the design, it’s time to start actual manufacturing. Let's look at a few examples. The simplest is the rectangular model. Good for small rooms.
Technical characteristics of this design:
Hallways 2022: TOP-200 photos of the best new products and modern design. Options for the ideal combination of color and style of furniture in the hallway- Do-it-yourself door finishing: 115 photos of the best options for entrance and interior doors
- DIY cornice: a detailed description of how to design and decorate a stylish interior element (80 photos)
The height of the finished product is from 44 to 50 centimeters;
- Leg section: 3.5 x 3.5 or 5 x 5 centimeters;
- Drawers – 29 x 6 x 2 centimeters;
- Spacers – 29 x 2 x 2 centimeters;
- “Crusks” – 6 x 6 x 2 centimeters.
All details must be prepared in advance. You can make them yourself or order them from a carpentry workshop. If you want to get an original and beautiful product, then you should make curly or turned legs.
Then comes the crucial stage. You need to measure exactly where to make the holes for the fasteners. The dry assembly method is used. Thus, you can even do without glue.
What material should I use?
Naturally, it is easiest to work with wood at home, since it is the most convenient material to process and the simplest. But here it is important to understand that any kind of wood will not be suitable for creating a stool. So, for any parts of the stool you can use solid wood, that is, boards and timber. But in some cases, in the seating area, wood can be replaced with ordinary plywood. You can also use furniture board.
It is better to take plywood that is not afraid of water. Of course, it can be coated with protective compounds or varnish, but the product will still last longer and retain its original appearance for a longer time if you take water-repellent plywood. True, it is not cheap. Also, the plywood should be of high quality, with a small number of knots, etc. The ideal plywood option is the FK brand.
Plywood
As for wood, you can take wood of different species, but the easiest and cheapest option would be to choose larch. It is easy to handle, durable, and inexpensive. In addition, larch does not deteriorate under the influence of moisture in the same way that other types of wood deteriorate. As for other inexpensive species, but suitable for creating stools, you can take acacia or ash.
In any case, the wood must be dry before starting work. It is prohibited to use one whose humidity is more than 20%.
Another do-it-yourself stool drawing
Tools for work
To work, you need to prepare a basic set of carpentry tools.
Without carpentry tools, making any piece of furniture from wood simply won’t work. Professional furniture makers have workshops fully equipped with special expensive machines. But just to try yourself as a carpenter, of course, you shouldn’t immediately purchase professional equipment, however, you will still have to prepare some tools.
The list of the most popular tools for working with wood is as follows:
Many operations are performed with a manual milling cutter
- It’s great if you have a hand router with a set of cutters that will help you process the edges of boards, timber and plywood, drill holes of different sizes, or carefully select grooves and grooves on any part.
The grinding machine allows you to quickly process parts to perfection
- To get rid of tedious operations, you will need a sanding machine with interchangeable wheels of varying degrees of grain to give the wood surface a smooth finish. This work can be done manually, but it will take much longer.
An electric jigsaw is extremely easy to use
- Electric jigsaw. This tool, of course, can be replaced with a hand hacksaw, but after sawing the boards with it, the edges of the parts will not turn out neat, and you will have to work hard on them using a router. Again, cutting the material by hand will take much longer.
No one can argue with the versatility of a screwdriver
- A screwdriver will be needed not only for screwing in fasteners, but also for drilling holes in parts. Therefore, it is necessary to prepare a set of screwdriver bits and drills of different diameters. Instead of a screwdriver, you can use any drill and a set of hand screwdrivers.
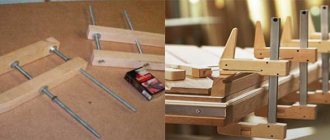
A clamp is an essential element of a quality carpentry tool kit.
- Clamps of various sizes. If you want to make a really high-quality and durable thing, then you must have clamps on hand, since when gluing boards into a solid panel or individual parts together, they must be strongly compressed and left in this position for a fairly long time, and besides these no other instrument can do this.
- You always need a hammer and chisels of different sizes. Sometimes you have to resort to using a plane - it can also be manual or electric.
- Measuring and marking equipment is being prepared - a tape measure, a construction square, a wooden ruler 500÷1000 mm, a simple pencil, a thickness planer, etc.
In addition to these tools, to carry out the work conveniently, you will need a fairly large and durable table - a workbench.
Find out how to make a rocking chair with your own hands by studying several available options in a special article on our portal.
What else is needed?
You can’t do without the necessary tools that you will need to create a stool. The minimum set includes a tape measure, a drill, a grinder or sandpaper, a carpenter's corner, a sawing tool such as a jigsaw, and a plane. The tool can be purchased at a store or borrowed from someone if you don’t have one at home.
If the stool is covered with fabric or carved patterns are planned to appear on it, then other tools and materials will be needed. Also, do not forget that to create the same carved patterns you need at least minimal wood carving skills, otherwise the product can be disfigured. Before starting such work, you should practice on a board that no one needs.
Carved stool
Original furniture ideas
The size of the stool depends entirely on the ideas that the owners want to bring to life. In addition to the standard four-legged stool, it can be:
- A small folding chair with three or four legs, which is created from a flexible seat and three base legs.
- Step stool, where an additional step extends
- A transformable chair that can be furniture with a backrest or a stepladder
The most complex design is a transforming chair, the seat of which is made of two halves. One of them can serve as an additional step when turning into a stepladder.
For a step stool, you need to make an additional step, which will be smaller than the seat, and will also have two additional legs. Also, for such a design you will need crossbars with puzzles, with the help of which an additional step will be extended.
Making a Simple Wooden Stool
Let's look at how you can make the most ordinary wooden stool, which all the boys used to make in labor lessons. In this case, the furniture will be made from wooden boards, and the seat will be made from two pieces of board. Let's see how the process goes.
Important! Before you start working on creating a stool, you must find or draw a drawing of a stool yourself with the dimensions of the future product marked on it and, focusing on it, make all the parts.
Step 1. The first thing you need to do is create the seat. As we remember, it will be made from two pieces of board. You need to take two pieces of board of the same length (as a rule, the seat is made square, and the sides of the resulting square seat should be equal).
The seat will be made from two pieces of board
Step 2. You can glue two boards with PVA glue (construction glue). So, you need to carefully coat both end joints of the boards with glue, and then press them tightly against each other, placing them between any objects (in this case, between fixed bars with additional sealing with wedges). You need to leave the boards like this until the glue dries.
Applying glue Gluing boards
Step 3. Next you need to start making the upper drawers for the stools. To do this, you need to take bars of the required length and sand them a little.
The upper drawers are polished
Step 4. Then, using a circular saw or a router, you need to make protrusions on the drawers that will help fix them between the legs. The length of the protrusions should be equal to the width of the stool leg. They are simple to make - you need to install the support ruler so that the distance from it to the saw blade is equal to the width of the leg, and the height of the disk should be small. And you just need to move the block along the running saw until the excess part of the tree is cut down. The block must be turned over periodically. You need to make 2 tsars. The legs for the lower part of the stool are made using the same principle.
Protrusions are created
Ready-made tabs for fixing between legs
Step 5. You also need to make 4 legs from the timber, 2 prongs that will be installed between the legs at the bottom of the stool, and you will also need one support beam to strengthen the joint between the two seat boards.
Installing the feet
Step 6. Each detail of the stool must be carefully sanded, and all sharp corners and edges of the elements must be rounded.
All corners need to be rounded Sanding the seat Finishing the ribs
Step 7. In each leg of the stool in the upper part you need to make grooves into which the drawers will be inserted. The same circular saw comes to the rescue. The grooves should be the same size as the inserted parts of the drawers.
Grooves are formed
Step 8. You can start assembling. First you need to connect the legs and drawers to each other. If the drawers do not fit into the grooves well, then the inside of the grooves can be slightly widened with a chisel.
Legs and drawers are connected
Expansion of grooves
Step 9. On the legs you need to mark places to strengthen the legs. They should be located at the same height.
The places where the legs are attached are marked
Step 10. You need to make holes in the legs where the markings are made for installing the legs.
Drilling holes
Step 11. Now you can connect the legs, drawers and legs together to form the lower part of the stool.
Assembling the lower part of the stool
Step 12. You need to drill holes in the drawers for screwing in self-tapping screws, with which the seat will be fixed.
Holes for self-tapping screws
Step 13. The seat also needs to be finalized. The prepared block (slightly shorter in length than the length of the stool) must be placed in the middle of the junction of the two halves of the seat and secured through previously drilled holes in it with self-tapping screws.
Screwing in self-tapping screws
Step 14. The seat of the stool must be screwed to the base of the product with self-tapping screws. All joints between wooden elements, and especially at the junctions of legs, legs and drawers, must be coated with PVA glue to create a certain level of strength.
Seat attachment
Step 15. Additionally, the junctions of the frames and legs need to be connected with bolts, drilling through these places.
Additional reinforcement with bolts
Step 16. You can further strengthen the seat by installing a pair of wooden supports under it, located at a slight angle and resting on the legs. Then the seat will definitely not collapse under the weight of an adult.
Installing supports under the seat
Step 17. Now the stool can be varnished or painted, depending on the wishes of the master. After the layer of paint and varnish material has dried, the stool is ready. If desired, the seat can be decorated with fabric.
Painting the finished stool
Auxiliary elements
The stool has a simple design - three or four legs and a seat. However, you can add to these elements:
- A drawbar for attaching the legs to each other relative to the seat;
- Upholstery and filling to make the seat soft;
- Legs for improved fixation of the legs together;
- End caps to prevent the stool from rolling around and leaving dents on the flooring.
You can avoid the latter by using insulating tape. It's perfect for wrapping the ends of legs.
Main differences
Wooden and metal stools of simple shape are conventionally divided into kitchen, bar, tourist, musical, children's, adult, and garden. Other models are usually classified as designer.
In addition to carving, casting, inlay, and the presence of many additional decorative details, they are distinguished by the active use of exquisite and expensive materials - ivory, mahogany, amber.
Eurobook sofa - 130 photo recommendations on how to make and assemble a comfortable and compact sofa- Assembling furniture with your own hands - 105 photos and a detailed video of how various furniture elements are assembled
- Do-it-yourself bookshelves - ideas for building shelves and shelves quickly and easily from scrap materials (155 photos and videos)
For the upholstery of exclusive stools, it is customary to use tapestry with multi-color patterns, abrasion-resistant jacquard, and natural velor.
Photo
Small stool made of chipboard with a soft seat Furniture made of laminated chipboard Round stool made of plywood Original folding stool Types of folding stools
Chipboard stool with soft seat
A stool from a stack of magazines A stool of an unusual shape A stool made of chipboard
Did the article help you?
Conclusion
A wooden stool is used so often in the household that often without it there is always something missing in the house. Using our article, you can independently make as much of this kind of furniture as you need not only in the country house, but also in the apartment. There are no special tricks here, you just need patience and time (also find out how to make a wooden table with your own hands).
The video in this article will give you the opportunity to find additional information on the above topic.