Today I want to talk about how to carve a wooden spoon. About six months ago I suddenly really wanted to make something out of wood. And do it not just like that, but with benefit. Of course, one of the most popular items in this case is a wooden spoon. Before getting started, I read various articles, but many of them seemed too complicated and after reading them, it was not entirely clear which way to approach making a wooden spoon. In reality, everything turned out to be much simpler and you need to read less and try more. So let's go.
To make a wooden spoon we will need the following items:
- Material (wood)
- Saw
- Ax (optional)
- Knife
- spoon cutter
- Sandpaper
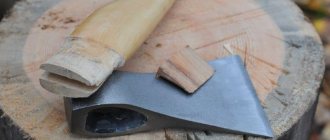
Basic tools and workpieces
To roughly understand how to make a wooden spoon, watch the sketches of the masters and videos on the topic. For small dishes you will need:
- A piece of wood, preferably a walnut. Not soft, young. As a last resort, you can use hard wood if you are a skilled craftsman.
- Skobel.
- Chisel.
- Sandpaper of different grits.
- File for wood processing.
- Stichel thin, steel cutter for decorative carvings.
- Clamp for fixing timber.
- Rag.
- Edible oil, not base oil.
- Rasp.
Use a pencil to draw a spoon shape onto a piece of wood and then cut it with a bandsaw. If you don't have one, you can get by with a rasp.
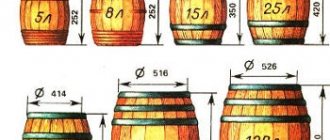
Picture of shape and dimensions
A piece of wood that is too thin will not allow the spoon to be deep. Rather, it is suitable for kneading salads, cooking porridge, and soups. Deep ladle for first courses have always been distinguished by their convexity and large shape.
Mark with a pencil the boundaries of the spoon and the place where the indentation will be. Wear gloves and prepare for nicks and rough edges—splinters are guaranteed. The rasp has sharp corners and the blade itself, be careful. The technique for making wooden spoons is simple:
- Use a paring knife to remove excess pieces from the wood block.
- We fix the block with a clamp.
- We form a recess with a chisel or cranberry.
- Cutting is done in the direction of the fibers.
- Leave a thickness allowance for trimming and sanding.
If you don’t know how to make a wooden spoon of the correct depth, draw a cut line on the side of the cut with a pencil and insert a button. Once you reach it from the inside, take it out.
Shaping and finishing the handle
When the workpiece is completed, the approximate size and shape are achieved, proceed to the next step. First you need to fix the spoon to give it a perfectly round shape. For this, a Bogorodsk knife is used, but you can make a tool for making wooden spoons yourself.
- A wide chisel is used to grind and at the same time cut off unnecessary small parts.
- You need to work out the handle with a knife so that it is not too thin and fragile.
Next, all irregularities are removed with a spoon cutter and the edges are leveled. Using sanding, go over the product several times, each time reducing the grain size of the material.
Lint removal for kitchen use
Knowing how to make a wooden spoon, the task now is to remove the lint from its surface. If a spoon is used during the cooking process, then as a result of water getting in, the fine lint can come off and enter the food and the body through it. Therefore, you need to do the following:
- Immerse the spoon in cold water for several hours.
- Dry it and sand it with sandpaper.
- Repeat the procedure several times until the fibers no longer appear.
It is important! The abrasive must be fine-grained so that the spoon retains its shape, but becomes smooth without the formation of new lint.
Application
Wooden cutlery is still very convenient in everyday life - they are very well suited for stirring hot food and cooking it in non-stick cookware. We should also not forget that wood is an environmentally friendly, inexpensive and widespread material. Often the handles of spoons are decorated with paintings. The carving can be primitive, or it can represent an entire work of art.
And this is not all of its advantages, because in our country wooden spoons are a unique musical instrument. The traditions of playing it have deep roots. People have long noticed that if you lightly hit these objects against each other, you can hear a very pleasant clear sound. Nowadays, this cutlery occupies an important place among the percussion instruments in any Russian folk orchestra. Ensembles of spoon players and skilled soloists make a great impression on the audience.
Processing with oils: giving the spoon a beautiful appearance
The technology for making wooden spoons is not limited to stripping. After all work to remove lint, it is necessary to treat the product with special means so that it can be used in the cooking process.
- Edible oils are used to create a smooth surface.
- Base oils can only be used if the spoon will serve as a piece of decoration in the house.
- Flaxseed oil is the only product that can retain moisture outside. Suitable for processing food kitchen utensils.
The impregnation is environmentally friendly. It protects the wood from moisture, has antibacterial properties, and emphasizes the structure of the wood without filling the decorative cutout with layers of emulsions. The only negative is its constant updating. Since the oil periodically evaporates, it is necessary to carry out treatment once every 2-3 months.
Industrial food additives and oils for wood processing
Focusing on a template on how to make a wooden spoon, many craftsmen only have difficulty choosing the finishing material. They are necessary for working with cutting boards, handles, spoons and other kitchen utensils made of natural wood.
- The degree of liquid absorption of wood is higher than that of paper, so it is common to use mineral oils.
- Wooden utensils and countertops are treated with water-repellent materials.
- They do not form a film, the pores are open, and the wood continues to “breathe.”
Mineral components do not affect the taste of the product, do not spoil its structure, and do not cause an unpleasant odor. Industry uses petroleum jelly, which does not need to be renewed over time. It is also more popular due to the lack of rancid taste.
Any making of wooden spoons with your own hands comes to the logical final stage - nut butter is also used at home.
How to carve a spoon from wood?
Perhaps this book is in English, but with the help of intelligible….
03/26/2012 16mb 742I’ll show you the first spoon that I cut out after a very long break using only a semicircular chisel and an ordinary blunt knife.
I cut a few more spoons, but I just can’t take pictures of them in normal quality, as soon as I get them I’ll definitely post them.
From the remaining pieces I cut out this spoon, which I immediately adapted to the wooden barrel in which I store tea
Hover your cursor over the photo and you will see that same tea jar.
Spoon carved in Tatyanka carving style.
Next wooden spoon
which I want to show you was made from the very album that is presented for download. The only thing I changed was that the spoon was made completely voluminous.
The process of treating products with oils is an important component of safe use.
Before applying the oil, prepare the spoon:
- Clean and sand, dry well.
- Soak a clean rag or brush with oil.
- Coat the product on all sides with a generous amount of finishing material.
- Leave in a dark place to soak completely for 25 minutes.
Excess must be removed with a dry swab in the direction of the fibers. The impregnation procedure is repeated several times until the last layer dries within a day. Therefore, in total, each subsequent layer of oil will dry 30-40 minutes longer than the previous one. During the day it will be possible to apply 12-15 layers due to the low polymerization rate of the components.
Safety of other finishing materials
In large industries, instead of oils, secondary oil products are used, which last longer. They are more expensive, but the cost is justified.
- Wooden finishing materials need a durable “frame” that will not wear off and enter the body along with food.
- There are compositions based on oils, polyurethane, nitrocellulose varnish, shellac, and linseed oil.
They are absolutely harmless if completely dry. The formed film does not yet indicate complete drying of the product, since oils and other components may remain moist inside the fibers. This is important to know so as not to endanger people.
To maintain the attractive appearance of the spoon over a long period of use, you need to clean it from food in warm water. Use only soap-based, environmentally friendly products, without chemicals or abrasives. Do not allow spoons to remain in water for a long time. If the spoon is damaged (cracks, breaks, lint), it is ground and polished again, after which several layers of oil are reapplied. This way you can use the accessory in the kitchen for a long time.
Wooden spoon production technology. A little about us and our products...
The city of Semenov, Nizhny Novgorod region, is legitimately considered the “false capital”. From the very moment of its foundation, carved spoons were brought to Semyonov from the surrounding villages. Back at the beginning of the 20th century, there was a spoon bazaar in the city, where traders from all over Russia and the world gathered. And one of the most famous attractions of the city is also connected with the spoon trade - this is the estate of Grigory Artemyevich Vitushkin, a spoon dealer (now the federal post office building). Spoon production is in the blood of the residents of Semenov. We have been producing spoons for over 7 years, constantly increasing volumes and improving quality. We have permanent partners in almost every major city in Russia, and there are more and more of them every day, which we are very proud of. Our production employs real masters of spoon making, thanks to well-established production, the spoon turns out smooth, beautiful, accurate in size and proportions. It preserves all the features and advantages of the original oldest hand-carved spoon and increases the quality. All products are made from fresh birch wood. Our artists put their soul into painting a spoon, because it is done entirely by hand! We produce half-bass table spoon, children's teaspoon and long-handled pickle spoon. The spoon is sold both white (without painting, in its original form) and painted. We paint both traditional spoons (Khokhloma spoon, Chernushka spoon), and “Matryoshka spoon” painting, and various stylized paintings (cartoon characters, fairy tales, coats of arms, flags, brand names, etc., you can see examples here). An individual spoon is also painted according to the client’s sketch. Do you want a logo for your company? We'll draw! Need a spoon with your favorite character on it? We will cope with this task too! Need a spoon with a picture of "whatever comes into your head"? And we can do this too! It is also possible to apply any inscription on the spoon according to your order. The result is an unforgettable souvenir, gift, or just a favorite spoon that won’t get lost in a bunch of others! We also remind you that we are manufacturers, so our prices for making individual spoons are the lowest. We take an individual approach to each client, taking into account all requirements and wishes.Now a few words about production. The production of wooden spoons is a rather complex process, divided into dozens of small and large sub-operations. Perhaps a complete description of the process and all the subtleties would take a whole book. We will try to describe the process as briefly and clearly as possible. We cut birch in the Semyonovsky forests, then bring it to our sawmill. At the sawmill, the birch tree blooms into timber and boards of various sizes. Then they are processed into small blocks and boards, equal in length and height to future spoons. The whetstones and boards enter the workshop, where they undergo several dozen operations on various machines, be it giving a general shape, processing the handle, the adze of the scoop, cutting the rim of a spoon and many many others. As a result of these operations, we obtain a semi-finished spoon, which in general terms resembles it, but is quite rough and unsmooth. This semi-finished product enters the drying chamber, where it is dried for 24 hours at a certain temperature. Then the dry semi-finished product goes for grinding (processing on a grinding machine, where all irregularities are smoothed out and the final shape of the spoon is given). That's it, the spoon is ready, now it is being sorted. During sorting, defects are identified, and the spoon is also divided into a spoon for sale as “linen” and a spoon for painting. A spoon selected for sale as linen is sent for packaging, and a spoon selected for painting also goes through a huge number of operations to prepare for painting, this includes priming, sanding the primed spoon, coating with drying oil and silver, painting with colored and clear varnish, treatment with starch... After all stages of preparation, the spoon is given to our artists for painting, and then goes to the final shop. After the spoon is coated with the final coat of varnish, it is loaded into the dryer, where it is heated at high temperatures. Then the tails of the spoon are written off and it goes onto the packaging. The difference between hempel spoons and milling spoons. Milling spoons are made from a solid block of birch through complex processing, which ultimately results in a rather rough semi-finished product, which takes on its final beauty, shape and smoothness only when sanded. The hempel spoon is produced in the following way: the cuttings are made separately, the scoops are made separately, then all this is dried and joined using a special method of tensing and gluing. Only after this does the spoon go into grinding, where it acquires its final shape and smoothness. Thanks to the division of operations for the handle and scoop, the hempel spoon looks a little more elegant than the milling spoon and has more clear shapes. However, if the spoon is docked, this does not mean that it is less durable. The handle and scoop have a special fastening system (spike), and are also glued together with a special high-strength wood glue. And, if there are single defective specimens, they are discovered during grinding, since when grinding a spoon, a huge load is applied to it. Moreover, when the spoon is painted and varnished, the difference between them is practically not noticeable at all.
Wooden spoons, our production. Some photos of the production process:
We will be glad to see you among our partners!
How to make a wooden spoon with your own hands: drawings for decorating simple products
“A spoon is for dinner,” and in our case, for decoration. Not only boards and plates, cups and stands can serve as decoration in the kitchen interior. If the facades allow you to preserve the design, then why not take carvings on such small decorative items as spoons as a guide. This is a great idea, especially if you already know how to make your own wooden spoon.
To add originality and beauty to the workpiece, patterns of various shapes are used:
- Geometric figured carving.
- Burning out drawings.
- Khokhloma painting in Russian style.
Below are the steps of the process on how to make a wooden spoon at home, as well as ways to decorate it.
In modern crafts it is impossible to do without a burning machine, but now they use printers that beautifully imitate the design. By transferring an image from a computer, you can set any setting to the machine so that it does the “manual work” for a person. Thus, each spoon can be painted literally in a matter of seconds with a laser jet.
Souvenirs
Like many other things, nowadays dishes are often used as souvenirs. Spoons and plates can be covered with traditional paintings or intricate carvings, which often deteriorate with frequent use in everyday life. To give durability to the design, painted souvenirs are coated with varnish. However, such products are not recommended for cooking or eating food. Their function is completely different - they are exclusively souvenirs and decorative items.
Some time ago I remembered my childhood hobby associated, of course, with wood carving, wooden spoons. Why spoons? Yes, everything is very simple, let's look at the advantages of this type of folk art:
- You can cut almost on the knee.
- no specially equipped workshop required
- no special tool is needed; if desired, a semicircular chisel and knife are enough
- You can take almost any material for making a spoon.
- the shape of the spoon is limited only by your imagination
So let's summarize, you want to do wood carving, but you don't have a workshop or a special tool for this, and here's the solution: carved wooden spoons.
To begin with, you can see what kind of spoons are cut abroad; for this you can download a book dedicated to this type of wood carving.
| Cutting wooden spoons |
Artistic spoons and decoration of household tools
Carving gives wood greater elegance, since it can only be done by hand. Thanks to calculations, carpenters have long come up with “sets” of such decors that will look good on thin and dense spoons, with large and small recesses, square or round:
- A star is a three-dimensional image on the handle.
- A braid or weave is mainly depicted on the “trunk” of a spoon.
- Geometric chain - several deep lines placed perpendicular to each other. They form convex diamonds.
You can also find many patterns that will suit a specific spoon shape. You can easily learn how to make your own wooden spoon, fork or spatula. Thanks to accessibility, contemporary art becomes easy to learn and master, even for women. Right now, in some Russian cities, school students are learning techniques for decorating spoons and boards with carvings. Children in kindergartens draw on wooden objects, learn to combine colors, and work with natural materials.
But burning is becoming a separate art direction. With its help, the master can not only add zest to a simple piece of wood, but also imbue it with “history.” On a cutting board and the recesses of spoons you can easily depict a still life, landscape and even a portrait. It all depends on the dexterity and skill of the master, his experience and work experience.
Classic and original spoons differ not only in the design, but also in the volume of work. For example, the drawing above shows a way to create an original spoon that will serve as a decorative element. They usually have unusually shaped handles that would be awkward to hold if you needed to cook dinner or stir food. Household tools are more pliable and reliable in cooking, so no finesse is provided for them, but the choice remains with the master.
Thread
Wooden utensils are often decorated. This can be either a simple design or intricate patterns. It all depends on the skill and desire of the master. If a person has little experience in creating ornaments, then you can turn to specialized sites. They present a large volume of materials of varying complexity.
If you know that the work will be limited to one or two products, then there is no point in purchasing many different tools. Using improvised means, you can also decorate wooden spoons. Photos demonstrate various devices for professionals. These are jamb knives, flat, angular and semicircular chisels, cleavers, jigsaws, rasps. However, to make a simple pattern, a sharply sharpened knife will be enough. It is better if the blade is short and wide.
A drawing is applied to the untreated handle with a pencil (if geometric, then using a ruler) or the ornament is copied from tracing paper. Most often, the thread has a triangular recess. In order to complete it, you need to draw two auxiliary lines on the sides of the main line of the drawing, indicating the width of the cut. First, the main strip is cut strictly vertically. Then the knife is placed against the side marks and cuts are made at an angle of 45 degrees. Then the procedure is repeated on the opposite side. The cut wood should come out of the resulting groove on its own.
If the pattern is more ornate, then it is made with the same grooves, but less deep. The main cut is made along the marking line. To make side cuts it is not necessary to draw auxiliary contours. Slight fluctuations in the shape of the groove are allowed to emphasize the relief of the image.