A router, or manual milling machine, is a universal tool suitable for various types of wood processing. It can be used to drill holes, cut grooves, grooves and chamfers, and process the edges and edges of a wooden product. It is very convenient for installing locks on doors, assembling floors and furniture, and other work with this material. Carving on pre-prepared wood using a router can be mastered quickly with your own hands if you immediately choose the type of manual machine for yourself.
There are several types depending on the work performed. So, they distinguish:
- A vertical milling cutter is used both for making through holes and for cutting blind grooves in the rock
- Edging is useful for processing the edges of wood. Has low power, the big advantage is low weight
- The combined one serves both of the above purposes and has two bases for them.
Let's look at wood carving techniques using a router with our own hands
The now popular art of wood carving can also be done using this tool. There are many cutters, that is, working heads, for various purposes. Advanced craftsmen even make cutters or parts themselves. The main task when working with a hand router is to learn how to use it correctly. Once you master this tool, you can perform any type of artistic carving.
How to learn to cut wood with a hand router: tips and ideas for beginners
In order to learn how to carve pre-prepared wood using a router with your own hands, you can enroll in thematic courses. However, not everyone has the time or desire to visit them. For such people, there are many video lessons, which, when viewed, will give you an idea of this skill.
Even before watching the video, it is important for beginners to carefully read the instructions for using their electric assistant. There you can find a lot of practical advice on how to assemble the tool, adjust the depth of the cut, what each cutter is needed for, read about the complete set of your router model, and also find out what additional attachments you can buy to achieve exactly your goals. Don't forget to look at the safety precautions and technical specifications section of the device.
After this, you can begin the first small steps in developing the skill of carving with a wood cutter. These training activities are described below.
Through or slotted wood carving.
To have a general idea of the learning process, suffice it to say that most craftsmen start by cutting out simple patterns using a template. To do this, you need to take a piece of wood and draw a sketch on it. There is a large selection on the Internet and in art books; in addition, looking at photos of finished works with abstract ornaments, it is easy to copy these drawings in pencil.
After the sketch is applied to the log, you should adjust the router so that it makes through cuts. Start working with the outer parts, and when the form is ready, you need to cut holes and give the pattern an openwork pattern. If you are cutting out platbands or other elements of the facade of a house, then you need to take a blade made of hard wood. Conifers and oak are good choices. For smaller interior products, it is better to take softer linden or birch.
Figured wood carving using a hand router.
After mastering the technique of through threading, you can proceed to more complex elements. For example, after adjusting the depth of the cutout, add a pattern to the finished trim using V-shaped or other cutters. Not just flat figures look beautiful, but those complemented by notched carvings or made using other techniques. Chamfers on flat or rounded surfaces of large diameters will look very useful.
Various types of chamfers.
After training in these techniques, you can take on more complex ones. With the help of a customized router, it will not be difficult to make your first product using the flat-relief technique. Such drawings look amazingly beautiful on wall panels, boxes, and in addition, photographs of furniture with carved elements make you look closely and examine the entire pattern.
We hone our skills in using a router and wood carving
To achieve mastery in absolutely any task, constant practice is important. Even if the products turn out a little clumsy the first time or nothing comes out at all, you shouldn’t give up. After all, each time the cut will be smoother, the finish will be thinner, and the products will be more beautiful.
Wood carving with a router – photo for inspiration.
Peculiarities
Artistic cutting with a jigsaw is a unique opportunity to show your creative talents and find a hobby you like.
Even a child can master the simplest cutting patterns. However, there are some peculiarities here that you should be aware of before getting started. Carving can be done on the simplest materials, such as plywood or small wood planks. Later, when you gain work experience, you can begin more complex forms of work - cutting out patterns on interior items.
There are several basic types of jigsaw carving. You should master the technique from the simplest of them.
Another feature of artistic wood carving with this tool lies in the fact that when performing it, it most often requires the use of several jigsaws at once. Some are designed for cutting small parts, others for large ones. Therefore, it is necessary to have at least two types of such tools in your arsenal.
What is a router and why is it needed?
A router is a device for processing wood or metal. They process flat and shaped surfaces, and also form technological recesses - grooves, ridges, recesses for installing hinges, etc. According to the installation method, there are stationary machines (there are different types to perform different operations), and there are manual milling machines. Hand-held electric milling machines are a universal tool that allows you to carry out any operation. To change the operation, you just need to change the attachment - the cutter and/or its location on the part.
Read also: What gas is used to fill cylinders for a gas stove?
Machine tools are used mainly in mass production. In them, the cutter is installed motionless, and the workpiece moves along a certain trajectory. When working with a manual router, the situation is the opposite - the workpiece is fixed motionless and the router is moved. When processing large volumes of identical parts, it is more convenient to mount a hand router on a horizontal surface, making something similar to a milling machine.
Homemade milling machine - a horizontal plane with a hole in the middle, to which a manual router is attached from below
There are many different types of milling machines, but for the home craftsman or semi-professional use, universal ones are more suitable. They are equipped with various cutters and special devices, which allows you to perform any operation. They just require more time and skill to perform than on a specialized machine.
What can be done with a hand router:
- grooves and recesses of any shape (curly, rectangular, complex shapes);
- through and blind holes;
- process the edges and ends (can be made straight, or curly);
- cut out complex parts;
- apply inscriptions, patterns, drawings to the surface;
- copy details.
Copying parts is one of the capabilities of an electric milling machine
Similar operations are used in carpentry, in the production and assembly of furniture. A hand router can even cut into a lock or hinges on a door. Moreover, it will do this much faster and more elegantly than similar operations performed using hand tools.
Preparation for work and care
To understand the principles of working with a hand router, it is advisable to have at least a general understanding of its structure and the purpose of its parts.
Structure and purpose of main components
A manual electric router consists of a housing in which a motor is hidden. A holder protrudes from the body into which the collets are inserted. Collets are small adapters that allow you to use cutters with shanks of different diameters. The cutter is inserted into the collet and tightened with a clamping bolt (on some models it is fixed with a button).
The main components of a hand router and their purpose
Another important part of a manual router is the platform, which is connected to the body using two rods. The platform is usually made of metal. There is a sliding plate on the underside of the platform. It is made of a smooth material that ensures smooth operation of the tool as it moves around the part.
Setting up the milling cutter operating parameters is done using:
- Handles and dials for adjusting the milling depth. The adjustment step is 1/10 mm.
- Adjusting the speed. Changes the rotation speed of the cutter. To begin with, you should try working at low or medium speeds - it’s easier to operate the tool at first.
There is also an on/off button on the case, and there may also be a lock button. Here, in brief, are all the nodes. In addition, there is also a parallel stop that is quite convenient to use. It can be simple or adjustable - you can move the cutting part slightly to the right or left.
The equipment leaves the factory lubricated, so in principle, no additional operations are required. But it is necessary to keep the equipment clean - you need to clean off dust more often and change the lubricant if necessary. Lubrication is needed for moving parts - guides. You can use liquid aerosol lubricants (preferably), but you can also use regular consistent ones like Litol. But, when using thick lubricants, you will have to remove them periodically, as chips and dust stick and it becomes difficult to work. When using light aerosol formulations there is practically no sticking.
To make the sole slide easily, you can lubricate it with silicone grease. This is especially useful when working with templates. Then the tool literally glides, moves smoothly and without jerking.
Rotational speed
Working with a hand router on wood, composite, plywood, etc. begins with setting the basic parameters. First you need to set the rotation speed. It is selected depending on the selected cutter and the hardness of the material and the characteristics of the cutter, so you should look for exact recommendations in the operating instructions.
Approximate processing speed when using different cutters
Securing the cutter
Next, the cutter is installed. Most branded cutters have marks that you can use to guide you. If they are not there, then the minimum requirement is to clamp at least 3/4 of the length of the shank (cylindrical part). Insert the cutter to the required depth (if necessary, after installing a collet - an adapter chuck for different cutter diameters), secure the shaft, and tighten it with an open-end wrench until it stops (but do not overtighten).
Working with a hand router on wood and other materials begins with installing the cutter
If the model is simple, two keys are needed. They do not have a shaft locking mechanism; you will need to hold it with a second key. Mid-class devices have a lock button. Holding it, use an open-end wrench to tighten the cutter. In expensive models, in addition to the lock, there is a ratchet that you can use to navigate.
Setting the milling depth
Each model of a manual milling cutter has a certain reach - this is the maximum depth to which this unit is capable of processing material. The maximum depth of milling is not always required; then it needs to be adjusted. Even if you need to mill to a greater depth, so as not to overload the cutter and unit, you can divide it into several levels. There is a revolver stop for this. This is a small disk under a barbell with a number of stops of different heights - legs. The number of legs is from three to seven, and more does not mean better. It is much more convenient if it is possible to adjust the height of each leg. This shows the class of the equipment. To secure the turret stop in the desired position, there is a lock, usually made in the form of a flag.
Setting the milling depth on a manual router occurs in several stages:
- Place the tool on a flat surface, release the clamps, and press with your hand so that the cutter rests on the surface.
- Release the turret stop by unscrewing its lock.
Selecting the turret stop leg
- Depending on what depth of milling is needed, choose the leg of the turret stop. The disc with legs is rotated to the desired position.
- The screw is not fixed, but the bar is held with a finger, and the movable pointer is moved so that it coincides with zero (in the photo above).
- The rod is raised to the milling depth mark, after which the turret stop lock is lowered (pictured below).
Read also: How to make a potato digger with your own hands video
Set the depth on the scale
Now, when installed on the workpiece and pressing on the upper part, the cutter will enter the part at the set distance.
Now the workpiece will be processed to the required depth
Good milling cutters have a wheel for precise adjustment of the milling depth. It allows you to adjust the depth without changing the settings (there is no need to repeat the entire operation), albeit within small limits (in the photo above it is the green wheel).
Typical case: slight bend
Most boards in this category warp when they swell or shrink, adapting to environmental humidity. Plan the future straight edge in such a way as to obtain an effective textured pattern on the front surfaces of the product. Boards belonging to this category are processed differently depending on their length.
Boards less than 0.3 m long are processed quickly
For short boards, use the simplest options: a planer, circular saw or band saw. Planers are usually faster, even if it takes multiple passes to get a straight edge. The same technique is used when sawing on machines: the board is sawn longitudinally, while its concave edge moves along the parallel stop. The edges obtained in this way, being straight, have sawing marks that can be quickly removed in one pass on the planer. A router table will produce the same quality as a planer, but it will take more time to set up.
Choose the right tools for straight edges
The tools and techniques used to straighten edges vary depending on the degree of curve and length of the board. Use this decision tree to select the best tools and techniques for use in each situation. Additional options are described in the article.
Boards 0.3-0/9 m long: many possibilities
With boards of this length (the thickness and width of the board can be any) you have the largest number of options to choose from. On a planer, such boards can be processed in two ways. The first is a conventional planing of a concave edge, removing a small amount of material each pass until the edge is straight. The second option involves preliminary planing in several passes, first one edge of the board and then the other, as shown in the figure above. This is repeated until the bend disappears almost completely, after which the entire edge of the board is planed. A band saw and circular saw will also do the job, but with one major addition.
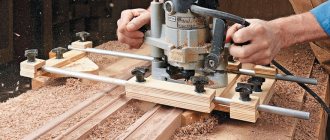
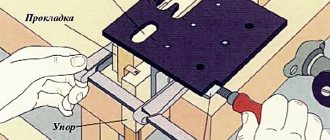
To ensure that the concave edge of the board contacts the rip fence when cutting boards longer than 30 cm, add a long trim as shown in the photo below left. The length of the overlay is equal to twice the length of the workpiece, increased by 300 mm. Center the pad relative to the saw blade and secure it to the longitudinal stop of the machine using clamps or double-sided fabric-based tape.
The auxiliary stop ensures the linear movement of the workpiece, thanks to which the sawn edge will be straight.
When making an auxiliary longitudinal stop for a milling table, make a cutout in its middle so that the cutter rotates freely.
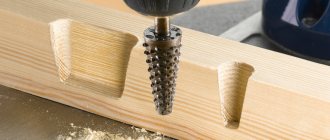
Milling cutters for hand router
Milling cutters are cutting tools that process and shape a surface. They consist of a cylindrical part, which is clamped by collets in the unit holder, and a cutting part. The cylindrical part can be of different diameters. Choose one that has a collet for which your device has. The shape and location of the knives of the cutting part determines the appearance that the wood receives after processing. Some cutters (for edges) have a stop roller. It specifies the distance from the cutting surface to the material being processed.
Working with a hand router on wood requires the presence of a certain number of cutters. This is a small part of what exists
Milling cutters are made from different metals and alloys. For processing soft wood - pine, spruce, etc. - use conventional nozzles (HSS), for hard woods - oak, beech and others - from hard alloys (HM).
Each cutter has a certain resource and maximum speed at which normal operation is ensured with minimal runout. You should not exceed the recommended speed - this may cause damage to the router. There is also no point in sharpening a cutter if it is dull. This is done using special equipment (costing about $1000), where you can set the required sharpening angle. Nothing good will come of it manually. So, dull ones are easier (and cheaper) to replace, since they cost relatively little.
Popular types
There are a number of types of router bits that are used most often.
- Edges. Serve for processing the side surfaces of workpieces. With their help, you can make smooth or shaped edges, you can form recesses and spikes for joining parts. It is this type of cutter that comes with a bearing at the end - it rests on the part, setting the distance from the edge of the workpiece to the cutter.
Some types of edge cutters
Groove cutters - for forming grooves anywhere on the part
There are simple cutters, formed from a single piece of metal, and there are typesetting ones. Stacked ones have a shank - a base, a certain set of different cutting planes, a set of washers of different thicknesses. From these parts you can independently form the required relief.
A set cutter is a set of several cutting surfaces and washers from which you can make a cutter of the required shape
These are the most popular types of cutters, but in fact there are a lot of them. In addition to the different diameters of the shanks, there are different diameters of the cutting surfaces, their height, the location of the knives relative to each other, etc. In general, for do-it-yourself milling, you usually need about five of the most common cutters. They are usually present constantly, and the rest are purchased for specific types of work.
Selecting the right equipment
A manual milling machine is selected according to the type of work and the planned load. There are main types of equipment for woodworking:
- vertical – top type;
- lamellar;
- edge
Horizontal lamellar router. A disk with teeth along the edge moves parallel to the sole and cuts grooves in the side surface for flat keys in the mating parts without marking. The use of the tool is narrow. The lamellar type of tool is in demand in the production of furniture and building wooden structures. It is rarely purchased for a home workshop if the owner is seriously interested in making furniture and has models of universal hand routers available.
The edge router is designed to give a beautiful look and complex shape to the ends of the board. Lateral processing of parts with complex configurations is possible if templates and cutters with bearings are used.
The top type router is universal for wood processing. It is he who is capable of performing almost all operations. Its kit includes several devices that allow you to process the ends and work along the plane of the board. Basically this is a parallel fence with rods, milling bushings and a set of cutters of various types. The former guide the machine exactly along a straight cutting line or help make an even circle. The bushings guide the machine along the template, repeating its shape of any complexity.
To make grooves, cuts for locks and canopies, and create beautiful edges of any configuration in wood, a top-type router is suitable.
Principles of working with a hand router
An electric router is a rather dangerous thing - sharp cutting parts rotating at high speed can cause serious injuries, and chips flying from under the tool too. And although most models have a protective shield that reflects the main flow of chips, safety glasses will not hurt. So working with a manual wood router requires attention and concentration.
One of the models is with a connected vacuum cleaner to remove chips
General requirements
Working with a manual wood router will be easier and more enjoyable, and the products will be of normal quality if you meet certain conditions:
- The cutter must be sharp. It is difficult to evaluate this parameter “by eye”, so you need to focus on operating moments: if the motor gets very hot and/or the machined surface is not smooth (they say “dirty”), then the cutter is dull. It needs to be replaced.
- The workpiece to be processed must be firmly and securely fastened. You won't get anything good from a jumping and jerking workpiece.
The workpieces must be firmly secured. It is best to use clamps
The requirements are not so complex, but fulfilling them is the key to good work and safety. Well, the main requirement is that the router must be driven smoothly, without jerks or jolts. If you feel a strong beat, change the speed. Most often it needs to be reduced, but in general it is worth focusing on the manufacturer’s recommendations (available on the packaging).
Materials and tools
To begin to master this type of creativity and even make the simplest product, you need to prepare the necessary materials and tools. Both ordinary ones, which are used in any work, and professional ones, without which it will not be possible to create a clear and high-quality pattern, can be useful.
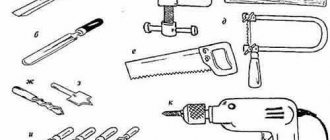
The following tools should be prepared for work:
- saw;
- drill;
- file;
- blunt knife;
- chisels - flat, semicircular, corner, bracket;
- cranberries (a special type of chisel that helps make indentations).
It is wrong to think that the simplest and cheapest specimens will do for the first experiment. A completely different rule applies here. The better the quality of all the devices, the more successful the first experience will be. So, perhaps, there will be a desire to continue creating beautiful things with your own hands and master other types of wood carving.
The choice of material is no less important. Not every type of wood is suitable for creativity
Here are the materials wood carvers recommend using:
- Linden;
- alder;
- birch;
- oak;
- pear.
Alder is also considered a good option, despite the fact that this type of wood is denser. But it is not always possible to find it. Birch is considered a harder wood, but it is also suitable for beginning carvers. You just need to take into account that after drying, birch is subject to deformation.
Oak allows you to do perfect work, but only with a sharp tool and some experience of the craftsman. But pear, due to its density and uniformity, allows you to do the most delicate work. Materials, like tools, must be selected carefully to make the work easy and enjoyable. First, blanks are cut out of wood, then they are dried, processed, and then designs for carving are applied.
Edge processing - working with a template
It’s easier and faster to process the edges of a regular board using a surface planer, but if you don’t have one, a hand router will also do the job, but it will just take more time. There are two ways: without a template and with a template. If this is your first experience with a router, it is better to use a template. When processing the edges of boards, you need straight edge cutters, and most likely you will need two - with a bearing at the beginning and at the end of the cutting part (pictured).
To process the edge - make a flat surface
As a template, you can use an already processed board or, for example, a building rule. The length of the template should be slightly longer than the length of the workpiece - 5-6 cutter radii on each side. This will make it possible to avoid the cutter “diving” into the material at the beginning and at the end. One important point: the horizontal plane (perpendicular to the one being processed) must be level. In any case, its curvature should not be greater than the gap between the bearing and the cutting part, otherwise the cutter will touch the template, and this is very bad - it becomes imperfect and the applied irregularities will appear on other copies.
If the width of the part is no more than the length of the cutting edge
The cutting part of the cutters is of different lengths, but the larger the cutting part, the more difficult it is to work - more effort has to be made to hold the unit. Therefore, it is easier to start working with a medium cutter. The procedure for processing an edge with a router (with a template) is as follows:
- Set the template so that it defines the required flat surface - stepping back the required distance from the edge.
- The workpiece with the template is securely attached to the table or any other horizontal surface.
- Install a cutter with a roller in the middle part. It is set so that the roller rolls along the template, and the cutting part rolls along the part. To do this, place the cutter on a fixed workpiece with a template, place the cutter disconnected from the network, adjust the position of the nozzle, and clamp it.
- Set the cutter to the working position - lower the body and clamp it.
- Turn on the hand router and guide it along the template. The speed of movement is determined by the depth of processing. You will feel everything yourself.
- How to operate the router? Pull or push? Depends on which side you are standing on. If the workpiece is on the left, you push, if it is on the right, you pull. You can also navigate by the flight of the chips - they should fly forward.
Read also: What are qualities and roughness parameters
That's all, actually. After you have completed the passage, evaluate the result and remove the clamps.
This, by the way, is another way to remove a quarter along the edge of the workpiece or in some part of it. To remove a quarter, adjust the cutting part so that the processing is at the specified depth.
Removed quarter on a furniture facade
By replacing the cutter with a curved one (fillet) and moving the template or using the included stop, you can apply a longitudinal pattern to the workpiece (pictured below).
The principle of working with a hand router is the same.
In general, this milling technique is quite convenient. For the first steps in woodworking, this is the best way to “get your hands on it”; then you will be able to straighten the edges even without guides.
A straight edge without a guide requires experience
The width is greater than the length of the cutting part
What to do if the thickness of the workpiece is no more than the length of the cutting part of the cutter? In this case, work with a manual wood router continues:
- Remove the template and use the same cutter again. Only in this case, the template will be an already processed part of the workpiece - the bearing will roll along the newly milled part. You rearrange the cutter so that you can process as much as possible. The protrusion of the holder will not allow you to move much, but you will still be able to process some part.
- After this, take another attachment - with a bearing at the end, turn the workpiece over so that the processed part is on the bottom. Secure it to the table with clamps. Install the attachment with the lower roller so that the bearing rolls along the machined part. This way you completely copy the already processed part.
The bearing rolls along the machined part, the cutting part levels the rest
Now the edge is completely processed on one side. If necessary, repeat with the second side. In general, to master working with a manual wood router, you will need several “rough” blanks. Choose from those that you don’t mind throwing away - at first there will be a lot of jambs, then gradually you will learn.
Obtaining a figured and curved edge
If you need not a straight edge, but a rounded one or any other shape of the edge, you need to look at the condition of the existing edge. If the workpiece is more or less flat, take the required edge cutter, install it and process the surface as described above. If the surface is too curved, it is first brought to normal condition and then milled.
This is necessary because the bearing roller rolls over the surface and if there are flaws, they will be copied. Therefore, act sequentially - first level it, then add curvature.
If a curved surface is at all boring, a template is cut out. The design is applied to plywood 8-12 mm thick; first it can be cut out with a jigsaw, so the edge can be brought to perfection with a router.
The required pattern is drawn on the plywood.
In this case, you will also have to work with a router, but without a template for now. When the surface is perfect, the template is fixed to the workpiece and then the work already described above with a manual wood router. Just one thing: if you need to remove a large amount of material in some places, it is better to do it with a jigsaw, for example. Otherwise, the cutter will quickly become dull.
Straight edges start in the shop
When purchasing lumber, select the best boards possible, paying particular attention to the grain pattern and how it will look on the finished product. You can purchase unplaned material, either having two planed faces or planed on both faces and on both edges
The latter option, being more expensive, often solves the problem of obtaining a straight edge. However, even such boards can warp. Warped boards, although difficult to work with, can also be a good material. A flat board with curved edges (photo on the right) can easily be processed to straight edges by following the decision diagram.
Video tutorials on working with a hand router
When installing doors, you need to cut in the hinges, how to do this using a router - in the next video (there is also information on how to make a groove, for example, for installing an extension). How to make a homemade milling machine from laminate samples (plywood can be used) and how to make a tenon joint for drawers (a table, for example) - in the next video Working with a manual wood router is shown well in the next video, but it is in English. Even if you don't know English, take the time to watch it. Many operations will become clearer.
The OF 1010 EB vertical router (see Fig. 1 below) is perfect for artistic processing of wooden surfaces. In this case, the tool is guided freely without any stops. Lines are cut out of a wooden surface either according to your own sketch or using ready-made templates. How accurately you will be able to convey the drawing and not blur it depends mainly on your skill. Your movements when driving the router should not only be very easy and confident, but also extremely accurate. Wood with pronounced rings requires particularly precise guidance of the router, as the cutter tends to follow the ring pattern of late (summer) wood. To obtain a more contrasting pattern, the workpieces were treated with a dark stain before milling.
The following cutters can be used for milling:
Font cutter (Fig. 2)
V-groove cutter (Fig. 3)
Grooving cutter (Fig. 4)
Small diameter slot cutter (Fig. 5)
To remove dust from the work area and ensure a good view, use a dust extractor with a Ø 27 suction hose (Fig. 6). A multifunctional table with clamps is perfect for securing workpieces (Fig. 7)
Let’s just look at the option with an oval background (outline)
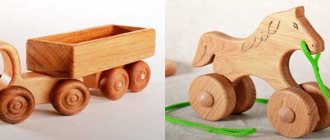
Handmade carved wooden furniture
To perform this type of carving, grooves are cut along the outline of the sketch, which are then ovalized (rounded) both from the background and from the ornament side.
First, make cuts with a blunt knife along the contour. On curves, cuts are made using semicircular chisels of suitable width.
The background of the picture is also removed with a knife or a straight chisel, maintaining a 30-degree inclination of the cut to the plane of the workpiece.
On the side of the image of the ornament, the contour should be steeper, on the background side it should be sloping, this will allow the pattern to look more convex. After finishing the rounding, you can use cutters to sand the product with fine sandpaper.
With a selected background.
The difference between a carving with a selected background and a flat-relief carving with an oval background is that the background around the ornament is removed with one inclination angle to the workpiece plane selected for the entire product (30-45°) and is not further processed (rounded) with a cutting tool and not sanding.
With pillow background.
Cushion carving is a type of carving with an oval outline. The only difference is that the background does not remain flat and may be lower than the plane of the product’s ornament. Raising the ornament above the background has its advantages, but also its disadvantages. Cutting the entire background to the same height takes quite a lot of time, especially with large volumes. In addition, this work requires skill and accuracy so as not to damage the product.
With a selected and trimmed background.
This type differs from others in that depressions are created around the main picture, which is why the image seems to rise above the background to a different height (usually within 5-7mm), turning out to be deeper and more interesting in appearance.
It is very difficult to see and feel the difference between different types of carving. Often many types are combined in one product, because of this it is not worth giving clear definitions and starting any disputes on this basis.