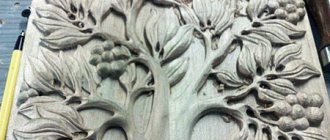
Let's look at what stencils for wood carving are, how they can be used and what they are. Today this ancient craft fascinates many, but it is a rather complex and painstaking task that requires not only talent, but also artistic skills. If everything necessary for this task has been acquired and you know how to work with each of the tools, then determine the drawing.
Stencil pattern for applying a design to wood
But it is not always possible to choose and draw the one you need. In this case, purchase stencils for wood carving, which help the novice craftsman do everything correctly.
Types of stencils
Let's look at what a stencil is. This is a device that helps to apply a pattern or identical symbols to a surface. For example, templates for carving wooden trims occupy a special place in this niche, since they are produced specifically so that the master can perform complex work intended to decorate the interior of the house and external walls.
Stencils for carving wood with a jigsaw exist for the following interior items:
- ribbon carved ornament;
- carved platbands;
- pilaster;
- towels;
- brackets;
- carved balusters, etc.
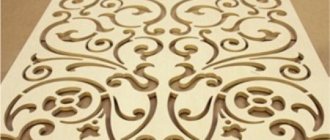
Stencil with a complex pattern for carving
These are specialized templates, it is from them that three-dimensional ornaments and patterns are created. They greatly facilitate the task of changing the appearance of the interior. After all, you don’t have to look for a stencil, but you can simply download it or order it through the World Wide Web. And then create your masterpiece.
Templates and drawings
It can be more difficult to find a jigsaw and high-quality files than to figure out what exactly you want to do - the variety of options makes your eyes wide open. You can cut out anything: from butterflies to complex floral patterns. When making wooden furniture, scalable diagrams are useful.
Once you have found a sketch you like, all that remains is to print out the template for cutting it out of plywood with a jigsaw. The next task will be to transfer the drawing to the work surface . This can be done in several ways:
- Cut out a stencil from paper and trace it. This option is good when you need to make many identical parts. In this case, it is better to make the pattern from cardboard.
- Transfer the drawing using carbon paper.
- Use glue. The diagram is printed in a mirror image. Apply PVA glue to the drawing and let it dry. Plywood is also coated with glue, but before that it must be sanded well. Place the design face down on the selected location and smooth it out thoroughly. After complete drying, the drawing is moistened with water and the paper is removed. The method is suitable for images printed on both inkjet and laser printers.
- Iron the image. The principle is the same as with glue: the mirror pattern is applied face down to the plywood, secured and thoroughly heated with an iron.
Openwork cutting with a hand jigsaw looks great, drawings and patterns for which can also be found on the Internet or come up with yourself.
How to choose and where to find a stencil
There are a large number of different wood carving patterns for beginners: from simple ornaments to sculptural carvings of an animal, bird, person or an entire painting. When making a choice, you must remember the following rules:
- if you are holding carving tools in your hands for the first time, then do not purchase a template from an old painting or engraving, since it is quite difficult to work on it and you can ruin the original material;
- There are stencils for a certain type of carving;
- In order to complete the work accurately, all lines are transferred accurately to the source material.
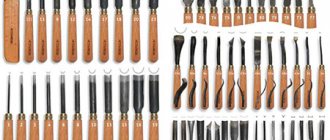
We select tools and devices used to create patterns
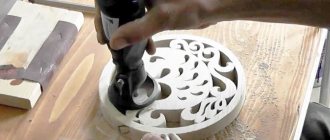
When performing this type of carving, a variety of cutting tools are used, such as ordinary knives and chisels. But working with such tools is very labor-intensive and tiring. Therefore, drills and saws are more popular for such purposes, and the type of saw can be different - from a jigsaw to a hand saw, depending on the size of the template you created.
Nowadays, craftsmen rarely use manual labor when performing large-scale work. Convenient household power tools are often used, such as an electric drill, a hand router and a jigsaw. Using a jigsaw, work is done quickly, easily and efficiently. But with such work it is impossible to do without a drill used to pre-drill holes for the file. Working with a hand router is not so easy and productive; moreover, it requires preliminary skills in handling this power tool. But the carving is much better quality and there is no need to make preliminary holes in the workpiece.
There are also more original ways to create a slotted pattern on a wooden workpiece. One of these methods is burning. The essence of this method is to literally burn through a pattern on wood with highly heated nichrome wire. The disadvantages include the specific burning smell, the need to cool the working tool, which causes the work to take a little longer, as well as noticeably charred edges of the finished pattern.
A more advanced method of this method can be considered laser cutting, which is distinguished by the high quality and accuracy of the resulting pattern. However, the use of this method is only possible when purchasing very expensive equipment, which is why this type of work is now not very often used in practice.
In conclusion of the article, I would like to show you the amazing work of a very experienced master, who depicts in his works not just abstract drawings, but very accurate and detailed copies of animals.
Preparatory stage
Prepare the necessary tools and materials for slotted carving:
- planed edged boards from coniferous trees with a thickness of 18 - 20 mm;
- a simple pencil;
- carbon paper;
- jigsaw
Instead of a jigsaw, you can choose a set of chisels and knives, but an electric hand tool has a number of advantages:
- house carving is performed quickly, accurately, and with high quality;
- compact dimensions;
- light weight;
- the ability to make straight and curved cuts;
- making round and rectangular holes with different diameters.
Professional carvers note that a universal jigsaw is convenient and easy to use. When choosing a tool, power is of paramount importance. Using a household jigsaw, you can cut wooden trims for windows with a thickness of less than 70 mm.
The professional model has more capabilities: a jigsaw cuts wood with a thickness of 80–135 mm. The cost of high-performance tools is influenced by the presence of additional functionality. What equipment is required to work with a jigsaw?
The following items are often included with a jigsaw:
- replaceable files;
- several screwdrivers;
- lubricating fluid;
- storage case.
The master will also need a table on which the tool will be mounted at the workplace. This handy tool allows you to move the material instead of the jigsaw. This is necessary when processing small parts. By attaching a replacement plate to the support platform, optimal gliding can be achieved.
Cutting designs on painted plywood
This carving method is similar to engraving. Cutting is carried out on plywood coated with ink or other dyes. Such products can decorate homes, company premises, be used as elements of outdoor advertising, or simply enrich the home interior. Like any other work, creating such jewelry requires a certain consistency.
The basis
The basis is plywood on which the image will be cut. It must be of good quality, without delamination, knots or other defects. The thickness can be 3-12 mm. Accordingly, the shape and size must correspond to the pattern that will be cut out.
Advice! It is much easier to cut lines along the layer rather than across it. Therefore, the base from a sheet of plywood must be cut out in such a way that the lines of the future engraving are predominantly located along the outer layer.
Before you start painting the plywood, you need to prepare it.
To do this you need to do the following:
- First of all, you need to clean the edges of the plywood with a file. Movements should be made along the edge so that the base does not crumble or pinch off.
- Then you should process the working side of the base on which the design will be cut. First, it must be cleaned with coarse and then fine sandpaper. After this, the surface should become smooth.
- Use a clean cloth to thoroughly clean the base from dust.
Coloring
The base should be painted with dark tones. The most commonly used colors are black, brown and blue. You can also use watercolor and gouache paints, ink, and a solution of potassium permanganate. But it is best to work with nitro paint.
The advantage of this paint is that it covers the base with an even layer that covers the texture of the plywood. If you apply the nitro paint in a thin layer, it will be completely dry within 20 minutes.
Apply the paint with a foam pad, rather than with a brush, in an even layer and quickly to prevent subsequent touch-up. If touch-up cannot be avoided, it should be done after the previous layer has dried.
On a base painted with the above dyes, only silhouette and contour images can be applied. To apply shadow images, the base must be coated with an aqueous solution. In this case, after the image is cut out, certain areas are wiped with an ink eraser or sandpaper.
Example of outline drawing
Drawing
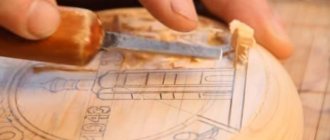
For carving, you can use any graphic images that are made with complete, clear lines. Plywood carving patterns can be your own or borrowed from somewhere.
It is more convenient to transfer the drawings onto tracing paper, and then apply them using carbon paper to the base. If the original does not correspond to the intended image size, it can be enlarged or reduced using the grid. It is important to ensure that there are no gaps in the lines when drawing.
Tool
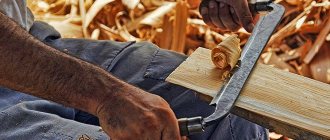
Cutters must be made of high-strength steel. The blanks can be old drills, needle files, reamers or scraps of alloy wire from 3 to 7 mm in diameter. Thread
The workplace should be well lit and comfortable. The table must have stops to prevent shifting during operation.
The cutter should be held in the right hand so that the handle rests on the palm and the shaft is pressed with the thumb against the index finger. In this case, the bent little finger should rest against the base and control the angle of inclination of the incisor in relation to the base.
The angle should be such that the cutter does not slide along the plywood and does not cut into it, but cuts. The angle largely depends on the sharpening angle of the blade.
The cutter should also be held with the fingers of your left hand to prevent spontaneous failure. In order for the line to have the same width along the entire length, it is necessary to monitor the pressure of the left hand on the cutter, which should be the same. When cutting curved lines, the blade should move without tilting.
Finishing
When the image is applied, it must be coated with colorless varnish to make it more saturated. The varnish must be applied in several layers. Each layer is applied after the previous one has dried.
Nuances of creation
Products intended for paintings beautifully border expensive masterpieces.
Original pattern of carved frame for a mirror
Mirrors are also chic items that require rich framing. Production is characterized by the use of only high-quality materials. The production of carved frames can be carried out by professional specialists. If they are made to order, then the price increases: the buyer has to pay extra for the originality, sophistication and unusualness of the solution.
Products are presented in various price categories:
- ready-made frames;
- custom made.
The first option is available to all consumers. It is made from a ready-made baguette.
The process of making a carved baguette for a picture
You can choose from the catalog any relief profile for paintings that you like. You can purchase baguettes and make a frame of the required size with your own hands.
Framing workshops make custom frames for pictures or mirrors at the client’s request. You can bring any sample in the form of a sketch, 3D model or simple drawing. Exclusive wooden products help create high-precision CNC milling machines. Automated equipment copes with the task of creating complex relief patterns and unusual shapes.
The material for production is the wood of the following tree species:
- beech;
- ash;
- oak
Hand carved frames
Exquisite portraits, timeless landscapes or beautiful still lifes should occupy a prominent place in the home. The carved frame will draw the attention of guests to the most important accents of the surrounding interior. Friends and acquaintances will not be able to simply pass by the beautiful paintings. And thanks to the elegant addition of an exquisite hand-made baguette, everyone around you will be happy to look in the mirror to see their own image in a carved frame.
It is manual work that allows you to reveal all the visual effects of the paintings. There is not a single unnecessary touch in the baguettes of the great masters; they themselves are elegant masterpieces worthy of admiration.
Only real masters are familiar with the ancient technologies that were used for the originals of the Louvre or the Hermitage. Each carved frame is unique.
Homemade frame for a mirror or picture
You won't find anything like it anywhere. The following species are considered in demand:
- baroque;
- feather;
- fillet.
“Double Baroque” is a frame for bright and picturesque paintings. The product will emphasize the style of the interior. It has 2 circuits: inside and outside. Both are represented by openwork curls. Such a frame makes the mirror luxurious and impressive. "Baroque" is represented by ornamentation, luxurious and fascinating. There is a “feather” profile here. The frame has leaf-shaped corners that make the product complete. For large-scale paintings, you need to choose an option with a large angle.
A lightweight and creative frame for an exquisite piece of feather art, it impresses with its versatility. It can be used for paintings of any genre. This is a suitable design for a classic. The product looks great with a masterpiece created by an impressionist artist.
Round carved frame for a small mirror
The “feather with a butt” has a flat part at the back. This detail gives more solidity. In addition to works by great artists, it is also suitable for mirrors. Products of the “feather” type in the Rococo style look interesting: they have amazing stucco molding. The frames have slits and the expressive silhouette itself looks elegant, which fits perfectly with the creations of artists created in a free style.
"Fillet" stands out for its exquisite profile. Most classical works are framed using this frame. The profile is decorated with various paintings. Such a baguette frame will perfectly hold a massive mirror.
This is what a carved fillet frame looks like
If the product is made in the Empire style, then it is universal. “Fillet” with a passe-partout is an elegant and ceremonial option. It should be chosen for ceremonial portraits or copies of classical works.
Repair of dilapidated platbands
If the owner of a summer cottage inherited a house, then dilapidated frames may remain on the windows. Damaged items that cannot be repaired should be removed. Replace them with new parts. Carefully remove the layer of old paintwork.
Wood is a soft material, so it is easy to damage. How to remove old paint depends on the thickness of the layer and the presence of damage. If the previous paint coating is thin, without cracks or blisters, then the surface of the wood is treated with sandpaper to remove the gloss and painted with appropriate paint.
The process of repairing carved platbands
When the surface has been painted in several layers or there are swellings and cracks on it, then the coating cannot be left. It is scraped down to the wood with a metal spatula.
The thin layer of old paint does not need to be completely removed.
It is also necessary to remove paint from wood when you plan to use another type of coloring composition. When incompatible substances interact, they destroy wood and coatings. To protect the wood, coat it with a special primer and apply new paint.