Let's look at what flat-relief wood carving is, what types still exist and what is needed to make them. Products made from this material have long been part of human life (from toys to houses). And when creating wooden objects, they try to show their natural beauty. Carving is one of the first decorations that was applied to fences, dishes, boxes, furniture, etc. But different techniques were used to make each item.
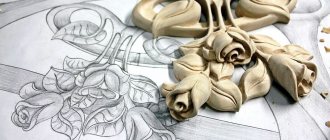
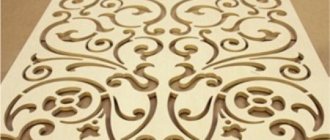
Painting made with flat-relief carving
For example, incised or openwork carving was used to decorate a house, furniture or dishes, and sculptural carving was used to decorate a ship, carved balusters for a staircase, a souvenir or a toy.
Materials for work
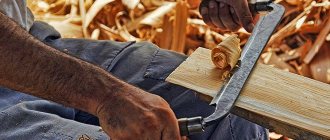
Each type of wood for carving has its pros and cons. Soft wood is easy to work with, but there can also be a lot of defects. These are aspen, linden, birch. This wood is best for beginners.
Oak, boxwood, mahogany are more expensive and complex wood. It is hard and durable, so it is difficult to carve from such wood. Very often there are troubles when working with such types of wood. Either the instrument or the craftsman may be harmed.
An experienced carver can easily work with a variety of woods, including juniper. Well, for beginners it is better to use inexpensive materials - spruce, pine, pear or birch.
Whatever tools are chosen for wood carving, safety precautions must be strictly observed!
Where is it used?
First of all, these are large and small interior elements. For example, wooden openwork partitions are not losing their popularity (and, perhaps, are even gaining more and more popularity). A chic zoning element in the kitchen-living room can be in the form of a partition with beautiful slotted patterns.
Carving is still actively used to decorate furniture, and if not everyone in the house can imagine such a design, then for the dacha you want something beautiful, subtle, evoking nostalgic feelings. Wood carving allows you to make beautiful openwork dishes and cutlery. And working with simple plywood, you can make interesting shelves or hangers.
If a product can fit into an already created interior and become a harmonious part of it, then openwork carving will be an excellent way to decorate your home. And since the interior trends of recent years sing a hymn to natural and simple materials, natural shades and textures, traditionalism in choosing a decorating style, you can definitely bet on openwork techniques.
Types of carving and technique
Types of wood carving are divided into several groups:
- contour;
- geometric;
- flat-notched;
- sculptural;
- end-to-end;
- embossed.
Each technique has its own characteristics, which you can read about later in the article.
Contour
Contour threads are characterized by narrow recesses with 2 edges. They are made shallow and carried along the entire product. The main patterns are elements of living nature, for example, plant leaves, inflorescences, berry bunches, as well as animals and birds. The picture that is obtained thanks to this technique visually resembles engraving. All lines are rough, with clear edges. Light and shadow remain undefined.
Experienced craftsmen prefer to mix this technique with other types of carving, for example, geometric and flat-relief. This style also goes well with many traditional paintings.
Pure contour patterns, without collaborations with other styles, look good only on small wall panels. Such patterns are made using chisels and a knife with a beveled blade. The technique of contour carving is simple, but in order to decorate various products with it, you need artistic experience and skillful use of tools.
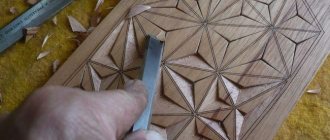
Geometric
This type of carving is one of the easiest to perform. The patterns consist of indentations of different sizes, which have from 2 to 4 edges.
Together they form various geometric shapes:
- triangles;
- diamonds;
- circles;
- rectangles.
This technique is used to decorate furniture and also create unusual-looking kitchen utensils, for example, hot pads. For work, they use the simplest set of tools: knives, chisels and cutters.
Flat-notched
Another simple wood carving technique that requires only a knife with a beveled blade. The peculiarity of flat-pit carving is the smooth surface of the background. The recesses in the wood are made shallow. The lines are smooth, but have sharp edges.
The finished drawings are visually similar to those made using the contour technique. They also do not have a clear division into light and shadow. The main patterns are elements of living nature, such as trees, flower buds and animal silhouettes.
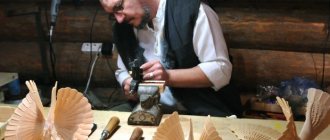
Sculptural
This is one of the most difficult types of wood carving. It differs from previous techniques in that the image is not flat, it is three-dimensional. Sculptural carvings include three-dimensional figurines of animals, people and divine idols.
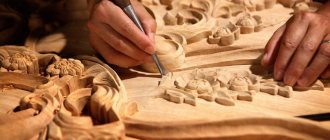
Sculptural wood carving
In the Middle Ages, such carvings were used to decorate the roofs of rich houses, decorate the inside of rooms, and place large wooden figurines on the bows of ships. Currently, sculptural carving also refers to decoration.
Wood is shaped with more than one tool; more often than not, several sets are used. Learning to work with this technique will require a lot of time and patience.
Through
This type of thread has several alternative names: through, openwork and sawn. The resulting pattern resembles thin lace. This effect is achieved by sawing through sanded boards.
The peculiarity of this technique is the complete or partial removal of the background. Craftsmen use this wood processing technology in various design options. Through carvings decorate the frames of windows and doors, as well as cornices. Often such wooden patterns can be replaced on stair railings.
This technology is also used for small decorative elements, for example, for boxes, picture and mirror frames and caskets.
Embossed
This technology is similar to sculptural carving in terms of complexity. On a flat background, craftsmen carve convex, three-dimensional images. These can be figures of animals, plants and even human portraits.
Relief carvings are divided into 2 groups: bas-relief and high relief. In the first version, the ornament turns out to be convex to more than half the thickness of the main workpiece. In the second case, the pattern is made very voluminous. All lines rise above the background and have smooth curves.
Carving with pillow background
Unlike ordinary flat-relief carving, wood carving with a cushion background preserves the background, and the master is limited to rounding the corners. The background of works in this style resembles pillows, which gives it its name.
The technique is similar to contour carving in that grooves are cut along the contour of the design. But the difference lies in the fact that the edges of the sketch are subsequently rounded both from the background and from the ornament side.
The cuts are made along the contour of the design, after which the trimming is carried out from the background side, then they begin to fill the edges. A similar contour can be obtained by highlighting the lines of the image with a cutter, and its toe should smoothly go around the contours and chamfer until the end. The latter is removed in two ways - both “from oneself” and “towards oneself”.
Tools for work
In order to get started, you will need to select special tools and study the features of the technology. This matter has its own nuances that make it possible to more fully reveal the beauty of wood in the ornament.
You also need to stock up on suitable blanks and sketches that will be repeated on wood in the form of patterns, lace, compositions or genre scenes.
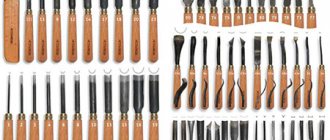
For his work, the carver uses a large set of tools:
- knives;
- jigsaws;
- needle files;
- chisels;
- electric drill;
- drill;
- bars;
- chisels;
- spoon cutters;
- milling machine;
- drill.
A special set of tools is designed for a beginner. It will be enough to master the basics of artistic processing of wooden blanks.
You will also need raw materials from certain species. The quality of the product will depend on this. There are hard and soft varieties of trees. Each type has its pros and cons; in each specific case, a specific processing technology is selected.
Soft breeds include:
- Linden;
- birch,
- aspen
- spruce;
- pine;
- juniper.
Soft material is easier to process, but it is easier to ruin it with one wrong move of a knife or chisel. Another thing is hardwood. These include:
- oak;
- Red tree;
- beech;
- boxwood
Solid raw materials are expensive, but products made from them are beautiful, durable and in demand. Experienced craftsmen work with expensive rocks and know how to process a hard surface without breaking the tool or causing injury. Therefore, beginners should start with cheaper and more amenable material.
To select raw materials, it is necessary to take into account not only the hardness, but also the color of the wood. For beginning carvers, birch is an ideal choice for creativity. It can be cut in different directions and lends itself well to drilling and cutting. When choosing a design for a product, it is necessary to take into account that over time, light birch wood may darken.
Coniferous species are suitable for products with a large number of slots. The soft material of pine, spruce, and cedar allows you to apply large designs and create intricate patterns. Beginners can start with conifers, as well as linden, birch and aspen.
A beginning carver should learn the basics of craftsmanship from simple ornaments. For the first job you will need a small set of tools. First, you can get by with a jigsaw, an awl and a knife.
Before you start cutting, you should set up your workspace with good lighting. Having selected a suitable workpiece with a flat surface and without knots, you need to transfer the selected pattern onto the surface of the workpiece. You can use tracing paper for this. When the stencil is transferred, it is coated with varnish on top so that it does not disappear or deteriorate during work.
A beginner will need knives, chisels, and an awl. For through slots, it is better to use a jigsaw or a manual milling machine, this will save time and effort.
The carver must master all the techniques that he will then use in his work on the product. Using a variety of decorative wood processing methods, you can create artistic masterpieces.
Amazing animals
For work you will need the following tools and materials:
- Wood;
- Sandpaper;
- A sketch based on which the carving will take place;
- Carving tools;
- Varnish;
- Paint brush;
- Copy paper;
- Black pencil.
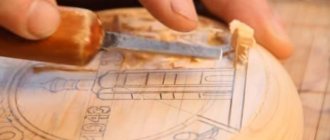
Step-by-step instructions for making a painting.
First of all, we level the wood. To do this, take sandpaper and start sanding. After the wood is completely ready, we redraw the drawing. To do this, find the required picture on the Internet and print it out. We translate using a black simple pencil.
Let's start carving. In this case, three layers are removed, thereby giving the painting a three-dimensional appearance.
This is what should happen.
To give the painting an interesting appearance, we suggest making a frame for it, also made of wood. After the frame is ready, we insert our picture and you can hang it on the wall.
This type of work is also suitable for beginner carvers. When working, do not forget to follow safety precautions.
Details
The main forms of carved ornaments
Depending on the compositional nature, placement and shape, this type of ornament can be divided into categories:
- Border and ribbon ornament is a sharp type detail that borders the product or runs along its edge.
- Garland is a pattern with a wave-like shape that has plant motifs.
- A rosette is a separate type of symmetrical type ornament with a regular shape (polygon, circle or oval).
- Arabesque is an ornate, complex pattern of floral or geometric patterns.
- Palmette is a fan-shaped carved decoration.
- A wreath is a carved element with plant motifs.
- Braiding is a pattern in which elements (ribbons, stems, stripes, etc.) are intertwined.
- A panel is a pattern that is placed in a ribbon or carved frame.
- An openwork type ornament is produced using the saw-type carving technique, and its peculiarity is the creation of a through patterned background.
Below you will find beautiful sketches.
Sketches for wood carving
Before implementing a carved pattern on the surface of wood, you first need to create sketches and patterns for carving on the surface of paper. After selecting the ideal ornament, you need to make a template with a certain size. This is very easy to do using a copy machine or printer, setting the required copy size in advance (enlarge, expand, reduce or compress).
The template can even be made manually by scaling by cells. Linear magnification makes it possible to change dimensions with the original sketch. Afterwards, the ornament is transferred to the surface of the tree using ordinary copy paper.
A simple template for through thread can be cut out with scissors, applied to the workpiece, and then everything is outlined with a pencil.
On the Internet or in special stores you will find suitable templates for carving - from ordinary geometric patterns to huge paintings.
You can also make a stencil and transfer the pattern onto a piece of wood, and it is important to do this accurately and carefully. The final appearance of the product will depend on the accuracy of the applied pattern.
Wood carving patterns are a great way to add variety to wooden objects.
Types of patterns
To understand the main distinctive features of a particular ornament made using the technique of geometric carving, it is necessary to familiarize yourself with several types of patterns, as well as with the diagrams and basics of their execution.
Skolishki
The main elements that need to be learned are chips, which are the cutting and cutting of wood parts.
Then you can start pruning, following the instructions.
- The cutting part of the blade should be applied to the left side of the triangle, and the beveled part should be in the area of its apex.
- We move the knife handle back without breaking the parallel between the right side of the triangle and the edge of the blade.
- Press down on the knife and return the handle to its original position. When performing these actions, a part of the desired shape and size should break off.
Diamond
Cutting a diamond on the surface of wood is quite easy, especially if you have already mastered the technique of working with pegs. The thing is that this figure consists of two triangles that have the same base, so it can be cut out using the principle described in the previous version.
In order to get an even pattern, you must first work out the top row of triangles, and then move on to the bottom, forming the figure we need.
Viteika
Also a very interesting element, which is based on the operating principle used when working with pegs. The only distinctive feature is that the triangles do not have a common base, but, on the contrary, are shifted in different directions from each other.
Pyramid
The pyramid is the first complex design you will learn when mastering the art of geometric wood carving.
The work takes place by drawing several triangles - while maintaining a certain order and distance between them. Three triangles are drawn at equal distances from each other, two of which are in the upper part and have a common edge. In the middle between the figures it will be necessary to mark the point of contact of the corners. The cutting part of the knife should occupy a central position, and movements should be made in the direction in which the natural layers of wood lie.
Star
The next figure to study is a little more complex, since it is based on a larger number of triangles than in all previously studied options. But despite this seemingly important nuance, the principle of working with this figure does not change, and the basis is still the creation of chips.
To create a star, you need to apply four or more triangles according to the principle used in working with a pyramid.
Squares
Creating squares is radically different from working with all previous patterns, since a completely different technique is used - straws.
To create a square, you must proceed as follows:
- after applying the marking, you need to step back a couple of millimeters from its edge and deepen the tip of the knife by 3 millimeters at an angle of about 45 degrees, then make a cut along the line;
- then, according to the principle of mirror reflection, it is necessary to perform all the same actions on the other side of the marking strip;
- after this, you need to position the knife vertically in relation to the workpiece and make two punctures (at the beginning and at the end of the line).
If all of the above steps are performed correctly, you will get a thin cut in the form of a straw, and by processing all the edges of the marking using this technique, you will be able to create an interesting pattern of the shape you need.
This technique is most often used to frame products of square and rectangular shapes, respectively.
Socket
Perhaps the following geometric pattern is the most difficult to execute, and at the same time it can rightly be called the most beautiful of all the patterns already familiar to you.
At the next stage, it is necessary to mark the middle of each segment located within the boundaries of the small circle and connect it with the points of contact of the segments with the boundaries of the large circle, located on both sides of the center we have outlined.
Having received the markings, we can begin carving, using the first technique we learned for working with triangles.
Using this pattern, you can decorate the lid of a box, the bottom of a decorative plate, the surface of a round table and other products of a suitable shape.
Creating a grid and squares pattern on a special piece of wood
Grid or squares are a new element in mastering geometric carving.
To create this simple design, you first need to make strips along the length of the fibers with equal widths from each other, then cut grooves across the fibers. The end result is this gorgeous pattern. You can also make a grid not along and across the bar, but purely diagonally. How to weave a cactus from beads: master class Crafts from birch bark: a few tips for beginners DIY crafts, how to make a clock from scrap materials? Summary of an appliqué lesson in the middle group on the topic of mushrooms, stencils, crafts
In this case, it is necessary to pay even more attention to the accuracy of the hand and the straightness of the cut lines. If you end up with an unnecessary cut, it will be little noticeable during the process, but then, after staining or painting, it will stand out greatly.
How to correctly cut triangles on wood?
Triangles are a popular design on various household items. You can often see triangles on cutting boards, photo frames and jewelry boxes. Triangles are created as follows: lines are drawn from the top of the triangle to its center, along which a cut is made.
To do this, the sharp part of the knife penetrates into the material, and the heel only touches, but does not insert, into the vertex of the triangle. This action is performed from each of the vertices. So the center of our ornament will be the deepest point in the pattern.
Then you need to tilt the cutter to the right and cut along the side from right to left and towards you. The new edge should not be made from left to right, but after you have turned the block over. The hand should make the same movements as with the first face.
After creating the lightest triangles, you can try to design triangles with a curved center or with round sides. In this case, the cutting technique will be the same, the main thing is to follow the movement of your hand along the intended lines.
This geometry technique is much more complex, but with more practice, you can easily create a drawing of any complexity.
Decoration of boxes, sketch
It’s worth talking about beautiful designs for boxes. They can be made using different techniques: with slotted carving, placing a base of fabric, foil or wood boards of the desired color under the design; flat-notched thread, to which geometric and contour are attached. Its difference is that in a flat background, indentations are made to the same depth.
In the version with the geometric technique, the recesses have the shape of triangles or quadrangles. In addition, there is also a staple thread, which is also considered a type of flat notched thread. Before each design and work, it is worth familiarizing yourself with sketchbooks to decide what you want to do.
Wood carvings using different types of carvings
As already mentioned, wood cutting came to us “by inheritance” from our ancestors. But few people know that such a craft originated in ancient times not far from the Sverdlovsk region. Here, on the eastern slope of the Ural Mountains, during the development of a gold mine in the 19th century, the Great Shigir Idol made of larch was found.
Archaeologists date its age to the 9th century BC. Today it is the oldest historical monument made of wood in the world. Why, it’s made of wood, it’s older than the Egyptian pyramids, which attract millions of tourists every year. But few people know about our miracle. I just want to repeat the words of Pavel Vereshchagin from the film “White Sun of the Desert”: “Oh, it’s a shame for the state!”
With house carving
House wood carving – its name speaks for itself. Products made using this technique are intended for decorating the facades of wooden houses, stairs and fences. You look at these, and it’s as if you are transported back to the time of the existence of Ancient Rus'. Some elements are reminiscent of grandma’s house in the village... oh, there was a time...
This type of thread is characterized by two factors:
- non-cut background;
- the drawing is flush with the wooden base itself.
The main elements are geometric shapes of various types, curls and ornaments. Any beginner can make such products. The main thing is to stock up on a set of knives for cutting wood.
But the execution of entire paintings is the lot of real masters. To make many identical products, first draw the desired pattern on a piece of paper, and then transfer it to tracing paper.
When the scaling reaches the desired parameters, cut the prepared image into squares and transfer to a wooden blank. Congratulations, with a little effort you have created a template for further work.
Related article:
Carved wood decor with three-dimensional carvings
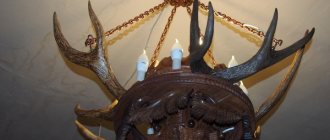
The technique of volumetric carving allows you to create not just patterns, but entire 3D images, paintings, products, furniture and utensils. Carved wooden pillars are most often made using this type of carving. Although you can create a real masterpiece from an ordinary log by combining different carving techniques.
Volumetric wood carving or sculptural carving is the most complex, as it requires from the master not only experience, dexterity, perseverance, accuracy and patience, but also artistic imagination and certain skills in this area. Here you can no longer make a template, it is drawn by the imagination, but embodied by hands.
With geometric wood carvings
Geometric carving is an artistic execution of designs consisting of various geometric shapes. Moreover, there can be not only squares, diamonds and circles. Graceful lines, ovals, angular and intricate figures - all this, intertwined, creates fancy ornaments for wood carving.
By the way, it is precisely this kind of carving that a beginner is advised to do initially in order to hone his technique and “get better at it.” Line your board into squares and cut out different geometric shapes until you achieve perfection. Just when performing such monotonous work, it becomes clear whether this hobby is “yours or not.”
With slotted
Carved wood carving can include all of the above types and is done using a free technique, with the only amendment - the base does not remain, but is completely cut out, turning an ordinary pattern into an openwork one.
If earlier craftsmen performed such delicate work manually with knives, then with the advent of modern tools the work has become much easier. A jigsaw simplifies the cutting process so much that it becomes accessible to any beginner. I transferred the image from the template to the board, carefully worked with a jigsaw, and the openwork pattern was ready.
Of course, an ordinary jigsaw will not be suitable for performing such delicate work. It is necessary to purchase a special power tool. For example, the Bosch PST 650 jigsaw is famous in carving circles. The model is not the most expensive, but practical and allows you to cut even the smallest and most intricate pieces.
Stages of woodworking
Wood carving (pictures depicting different technologies will help beginners understand how to work with wood correctly) always begins with an idea. The master comes up with patterns and makes a schematic sketch on paper, which he then transfers to a wooden surface using a simple pencil or marker.
He then carves out the rough design, then cuts off the corners and makes the lines smooth. Processes the background, polishes all the details and varnishes the finished product.
Further in the article you can read a description of the stages of work in different techniques.
With house carving
Wood carving (pictures are needed to correctly represent the basics of the technology) of this type is similar to the through technique. The master makes through cuts in the workpiece, completely removes the background and leaves only openwork patterns. Such carvings decorate window frames, doorways and roofs of houses.
The work is carried out in 3 stages:
- Choice of style. All patterns must be in harmony with each other, so the master first selects suitable stencils. Then he transfers them to the workpieces.
- The background is removed using a drill and jigsaw. The ornament is carved by hand using chisels and knives.
- The finished work is sanded and varnished.
For house carvings, hardwood is chosen. It is not prone to rotting and delamination, so it can last more than 20 years.
Carved wood decor with three-dimensional carvings
Wood carving (the pictures show the procedure for working) with convex patterns is carried out in 6 stages.
They can be examined using the example of making a large brooch with images of mountains:
- The master cuts out a round blank and transfers the sketch onto it.
- Using knives and chisels, he carves small indentations along the drawn outlines.
- Using a special knife, the carver gives rounded outlines to the patterns and removes sharp corners and serifs.
- Sands the product using sandpaper of different grain sizes and an abrasive sponge.
- Paints the product with paints.
- After complete drying, treat the craft with wax mastic.
Soft wood is suitable for such work. It is easier to create smooth contours and convex elements.
With geometric wood carvings
Wood carving (pictures will help you make the markings correctly) with geometric carvings is quite simple to perform. Most of the time is spent on creating sketches and markings.
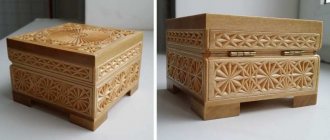
Using the example of making a box, we can consider 5 main stages of work:
- First you need to think about the location and shape of the patterns on each wall of the box, as well as on the lid. You will need to make a schematic drawing.
- Then the product is lined and even squares are drawn on all sides.
- The cells make up the intended pattern.
- Starting from the edges and moving towards the center, the pattern needs to be cut out on each side of the box.
- At the end, the product is sanded with sandpaper. Periodically sweep away the crumbs with a special brush.
Products that will be actively used are varnished by craftsmen. You can choose a colorless coating or a colored one that imitates the natural shades of other wood species.
With slotted
This is a through carving, where the background is completely removed using a jigsaw, but the pattern remains.
The work is carried out in 4 stages, which can be considered in more detail using the example of making a book stand:
- The master selects a sketch, transfers it to paper and pastes it on top of a wooden blank.
- Drills holes. Where the jigsaw blade will be inserted. Then he cuts out the pattern, removing the background.
- Sands the product with sandpaper of different grits.
- Connects the parts of the stand with glue and covers with colored varnish.
For products with slotted patterns, it is recommended to use hardwood.
Technology of carving along the finished contour
When the drawing is transferred to the workpiece, the most difficult part of the work begins, namely the process of wood processing.
Making starting holes for through threads
- If our task is through threading, then first we need to make a starting hole in each element. This is done using a drill with a drill whose diameter corresponds to the width of the blade of the saw or jigsaw used for wood.
- After this, a saw is inserted into the hole and part of the wood is cut out. The edges of the hole are then smoothed out either with a knife or using files and abrasives.
Flat and volumetric threads are performed differently:
We start work by cutting the outline
First, the contours of future recesses are cut with a sharp knife.
- Then, using the edge of the jamb or cutter, we make a central cut into the deepest part. After this, we begin to form the recesses, choosing wood between the outline and the central recess.
- We form small details and textures using a chisel. Ideally, it should be sharp enough to cut the material without using a mallet, but sometimes (especially if you have to cut oak, beech or maple) additional effort is necessary.
Selection of main recesses according to the sketch
- It is convenient to select deep grooves with chisels with a curved blade - the so-called cranberries. In this case, you need to try to ensure that the cutting edge does not plunge below the selected level.
- After completing the carving, you should once again go through the contours with a knife, restoring smooth edges. When this stage is completed, you can proceed to sanding the surfaces.
Types of thread
In principle, among all types of carvings, which are conventionally divided into several groups, it is difficult, and there is no point in setting clear limits on technology, since the methods for manufacturing a particular product can be combined in any way you like. But for orientation, it’s worth mentioning some common wood processing methods:
- slotted, which we are talking about today;
- flat-relief;
- embossed.
Of course, this division is conditional, so we will not consider this type separately. Stencils, sketches and drawings of finished products, as well as photographs of striking works by masters, combine several processing techniques. For example, some textbooks highlight the cutting technology using jigsaws or saws, as well as the one that is performed with cutters and chisels.