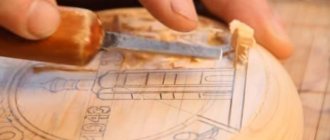
Wood carving is a complex but interesting hobby that can develop into real art. Interior crafts, furniture, decorative panels, house frames - all this can be made of wood, with a set of necessary tools and a little perseverance. We invite you to familiarize yourself with the wood carving in the form of a beautiful bird using a large photo and video selection.
Figures of animals and birds look beautiful in the interior; besides, experts in the Chinese philosophy of Feng Shui claim that different animals have different effects on areas of human life. The rat, they say, is a harbinger of wealth, the owl is a symbol of wisdom, and images of paired animals or birds have a beneficial effect on the sphere of love.
In addition to the Feng Shui gurus, our great-grandmothers gave symbolic meaning to animals, and echoes of folklore still play a significant role in our everyday life. So, many people still let the cat be the first one into a new home or are wary of black cats. At weddings, newlyweds release a pair of doves. Many more examples can be given.
Heroes of folk tales, such as fox, rooster, bear, decorate the shelves, walls and furniture of many homes.
To decorate your home with an auspicious symbol, you can purchase it at the market, or you can create a bird yourself using wood carving, a photo or sketch of which can easily be found on the Internet.
Decorative animalism
Very often, carvers choose images of animals to create sculptures. Creating animal figurines from wood is a fascinating and rewarding activity. How beautiful they are in their diversity - graceful, powerful, calm or swift. Masters seek inspiration for their work both in various photographs and drawings depicting animals, and in observing specimens of interest in zoos or zoological museums.
Observing the behavior of cats, dogs or other animals will allow you to better understand their structure and plasticity. They will serve as a model for creating a sketch for a carving or a series of photographs. Images of birds are no less attractive for embodiment in carvings. Owls, partridges, wood grouse and even domestic chickens look great in handmade figurines, thanks to the ability to effectively depict the beauty of their plumage.
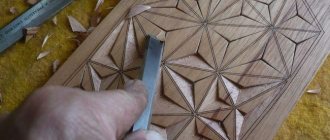
Example of various handmade carvings
It is also worth paying attention to the images of elephants. The massive appearance of this noble animal can be embodied in exotic wood species. Of course, at the beginning you need to choose the right object so as not to be disappointed with the result of the work.
You should not immediately take on complex carved figures, focusing on beautiful photographs of a flying owl, wild cats or beautiful elephants carved from mahogany.
Practicality and correct calculation of one’s strengths are important criteria for choosing a sketch for creating a carved figurine with one’s own hands. The design for the carving should be clear, with clearly visible details and preferably in profile. Photographs, sketches and observations are also important - they provide additional information about the structure of animals.
Preparing to create wooden figures
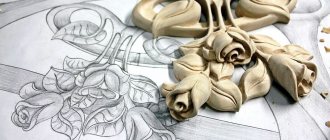
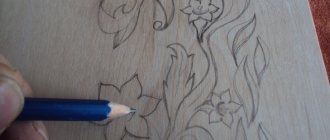
After the idea has been formed and enough material has been accumulated, it’s time to create a sketch.
The process of creating wood carvings
If a whole composition has been formed together with a figurine of an animal or bird, it also needs to be drawn in detail. It is advisable to disassemble a complex figure in space from all sides. The sketch is transferred to tracing paper and then to a wooden blank.
At the preparatory stage, experienced carvers strongly recommend not to start working on wood right away. First, you should make a model by molding it from clay or plasticine. A measured, carefully thought-out stucco model will help you avoid making mistakes, and the work will be done much faster and with better quality.
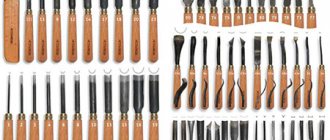
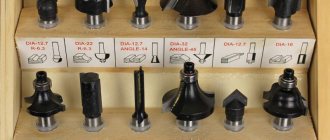
Carving tools
Although you can cut wood with any sharp object, using specialized equipment, making a beautiful figurine with your own hands is much easier and more enjoyable. To work you will need the following wood carving tools:
- Cutter. A knife with a short beveled blade.
Depending on the width of the cutting edge, it can have very different purposes. For example, a hatchet cutter is used for rough cutting of wood. Cutters with a narrow edge up to 16 mm are ideal for hard-to-reach areas and cutting out small parts. - Bogorodsky knife. Suitable for almost all types of work, from rough processing to fine detailing. Perfect for sculptural carving.
- Knife-jamb. An almost universal knife for a craftsman. The jamb blade is short and beveled. Most often used to create carved designs on a flat surface.
- The chisels are bent. They are used for background sampling and have different cutting edge widths from 5 to 10 mm.
- Chisels are semicircular, flat, angular. They are used for rough notching, producing concave parts and depressions on the surface of the product.
Set of chisels for wood carving - Klepiki. Chisels with a pointed blade. Used to work on small elements and details.
To make wooden figurines with your own hands you will also need the following tools:
- drill;
- hacksaw;
- Sander;
- rasps;
- mallet;
- sandpaper of different grits.
Wood selection
Do-it-yourself carving can be done from almost any wood - logs, glued boards, chocks, unusually shaped branches, driftwood and more. For example, tree butts with roots are perfect for creating animal sculptures. And the branching trunks make beautiful wooden cat figurines. The main thing is that the material is well dried and has no defects in the form of cracks, rot or damage by insects.
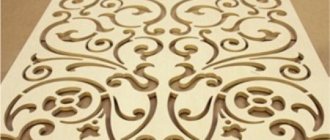
Pattern of carved chess pieces
The ability to use the material effectively comes with experience, and the following softwoods are suitable for training:
- Linden;
- aspen;
- alder;
- cedar;
- nut;
- Apple tree.
Wooden blanks from these varieties are cut without extra effort and do not dull the tools. There are other material options, but carving and processing them will be more difficult:
- Oak. Very durable and decorative, but difficult to process due to the high density of the wood.
- Maple. It has a dense structure and resistance to chipping. Maple can be used to make small decorations and details.
- Pine. It has a distinct beautiful pattern, but is prone to chipping.
- Spruce. Pine is less easy to cut, but has a more uniform structure.
- Birch. It has a caustic structure, but lends itself well to decorative processing, is perfectly polished and takes on color.
The process of making a carving
To make a hand-carved figurine, you need to organize a comfortable workplace. The height of the table should be comfortable and the lighting should be correct. To protect the work process, it is better to fix the workpiece on the workbench.
Roughing and sampling of the main shape
The finished sketch is transferred to wooden blanks. It is not necessary to transfer all the details of the drawing; the basic contours are enough. The largest areas where the thread does not reach are cut off. However, you don’t need to cut everything down to make the workpiece easier to hold. The remaining parts are cut down after the figurine is almost ready.
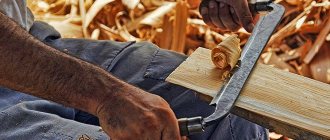
- Rough processing. Using a hacksaw or hatchet, the workpiece is processed into a generalized geometric figure, which will soon become a figurine of a cat, owl, monkey or other animal.
- Output on four sides. Cutting out the contours of a figure along four edges: side, front and back. At this stage, the protruding parts of the figurine stand out more noticeably. Wide bladed cutters are used.
- Eight-sided cutting. The corners are cut off from the square contours of the workpiece, taking into account the relief of the figure.
From time to time you need to check the sketch and draw additional lines with a simple pencil, which stains the wood less and does not eat into its structure. Also at this stage, the position of the figure and its dynamics are finally formed. The artist’s intention is already clearly visible, although it is too early to do rounding and detailing. For work, it is better to use narrower chisels and cutters (jamb knife and Bogorodsky knife).
Finishing
After the formation of the main contours, they move on to rounding the edges and designing small details, ornaments and reliefs. A variety of chisels and spear-shaped cutters are used. If you have to draw on a workpiece, you need to do it carefully, otherwise it will be more difficult to clean the wooden surfaces afterwards.
Finishing requires precision, so the cutting tool must be constantly sharpened.
The blades are sharpened with special whetstones or sandpaper of maximum grit. After this, the instruments are straightened with a leather belt using chromium-containing pastes.
Detailed carving is carried out as follows:
- The lines of the drawing details are applied to the rough blank.
- The edges of the figurine elements are cut to the required depth with a knife.
- Carving is carried out with gradual removal of wood using a chisel or cutter.
- Edges and corners are smoothed.
- The recesses are carefully formed. First, they are cut through, after which more accurate edges are formed.
- If the figure has through holes, they are drilled with a drill, and then expanded and formed with cutters.
- A carving is formed on the smooth surfaces of the figurine, creating a repeating relief (notches, sampling).
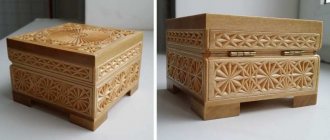
Sanding and protective treatment
Sanding the figurine is not always done - it depends on the artist’s vision.
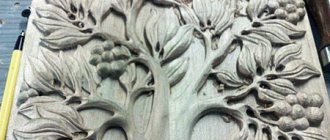
Carvings ready for sanding
Sometimes finishing carving is carried out after sanding the product. Just keep in mind that in this case the tool will become dull faster. For sanding you will need sandpaper and a sander. First, use paper with a coarse abrasive surface, gradually moving to a finer grain.
After sanding, the finished figurine should be coated with special compounds that will protect the wood from external factors and emphasize its natural beauty.
At the same time, the main thing is not to spoil the product with low-quality products or excesses. The final finishing of a wooden figurine can vary from simple coating with varnish or stain, to giving the product a noble antiquity using a variety of techniques.
Wood selection
It is believed that the ideal material for beginners is linden, which has soft, flexible wood. In fact, without practice, such a craft can be quite easily ruined by careless movement, which is much more difficult to do with hard rock. The choice of wood type is important for the type of craft. So, for example, for sculpting a face, light, plain wood is chosen (dark varieties are less expressive). Recommendations boil down to the following tips:
- If you are planning medium-sized wooden figures, apple, birch, hazel or cypress wood is suitable.
- If you are planning a miniature with a lot of detail, choose birch, alder, pear and linden; Both aspen and maple will do.
Fairytale story Source dachnaya-zhizn.ru
- Pine and spruce wood with a pronounced texture (striped pattern) are used for crafts with large elements; These varieties are not suitable for working with small parts.
- For large figures, you can use aspen: durable, inexpensive wood is not afraid of moisture and does not rot when it comes into contact with the soil.
Carved wood animal figurines
Animals are depicted both in motion and in a sitting or lying position.
The image of an animal or bird does not have to be copied entirely. This is only available to professional artists. Wooden animal figurines are also recognizable in simpler forms.
Carved wooden cats
The image of cats in carvings is a symbol of grace, beauty and independence. The cat may sit peacefully on its hind legs, prepare to jump, or lazily stretch. Figurines of wooden cats will decorate any interior and bring a cheerful and cozy note to the room.
There is a belief that a cat with its tail raised symbolizes prosperity. A cat with a kitten means happy motherhood. Several cats represent friendship and love. Often cat figurines have an elongated shape. Even a novice craftsman can make such an elegant figurine with his own hands.
The main thing is to carefully work out the smoothness of the lines and polish the craft to a shine. Dark stain will add nobility to the product.
Elephant figurine
Elephant carvings are a symbol of wisdom, prudence and power. In Asian and African countries, elephants are revered as insightful and noble animals. It is believed that wooden figurines of elephants with their trunks raised bring happiness. A trunk rolled into a ring promises a successful resolution of any matter. Elephant figurines are also considered a symbol of material well-being and prosperity.
For majestic elephant figurines, it is not a pity to waste valuable wood: mahogany, zebrawood or wenge. Although in this case you can’t do without an axe, wide chisels and a mallet.
Monkey
Monkeys are very interesting animals for the carver, thanks to their lively, often very “human” facial expressions. Monkeys are smart and dexterous animals, especially revered in eastern countries. Popular sculptural compositions associated with monkeys are often created in the image of three wise monkeys.
Wood carved monkey figurine
One of them closes her ears so as not to hear evil, the second covers her eyes with her hands so as not to see evil, and the third presses her finger to her lips so as not to talk about evil.
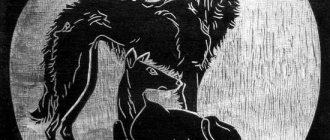
Owls
It is best to start carving birds from wood with your own hands by making a figurine of an owl with folded wings. The compact, slightly angular body of an owl is easy to carve if you have a rectangular block of wood on hand.
The most difficult stage of the work will be cutting out the end part of the owl, where the eyes and beak of the bird will be located. Wings will be located on the sides, and on the back of the owl you will need to cut out a repeating relief that imitates the pattern of feathers, and a beautiful night bird will decorate any interior.
The principles of creating wood carvings are quite difficult to describe in words, so before work you will need to study a lot more video materials in order to become more fully familiar with the technique of sculptural carving.
Rough work
Before cutting a figurine out of wood, you need to bring the material into the desired form - saw it to size, remove the bark, if any, and thoroughly clean out the irregularities. When transferring a design onto wood, mark the main lines that will be cut out first. If this figurine is a person, it is worth determining where the head, legs, arms, and torso are. If this is an animal or some kind of abstraction, then it is also worth noting the widest and narrowest places in the figure. The excess is cut out. This is called rough processing. Its purpose is to leave in the hands of the master a form ready for detailed processing. And at this stage you shouldn’t cut off absolutely all the excess, as sometimes relief processing may be needed to make it more realistic. But even if the product does not provide anything like this, it is worth remembering that this is only the first stage of processing the figurine.