Simple carving of geometric shapes
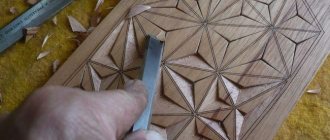
The simplest example of carving from a combination of various triangles is the triangular-notched method. Each fragment of such work consists of a separate triangular figure, the depth of which is created using three notches that create the edges of a pyramid, the top of which goes deep into the board.
Many such triangles of different sizes could form a complex ornament, alternating in a certain order.
Training of woodcarvers often begins with this method, as it gives a good understanding of the peculiarities of working with fibrous material.
Transition to complex patterns
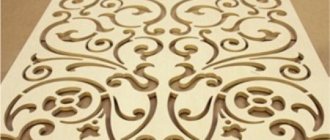
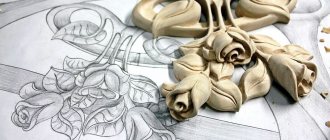
Having mastered cutting straight lines, you can gradually move on to using a cutter to depict smooth patterns and complex combinations of various shapes. Uniquely complex compositions are created from single figures precisely distributed over the surface of the tree, each of which is a simple geometric shape.
The effect of the image is achieved by careful carving, highlighting the edges that create the main pattern on the surface, while the carved recesses emphasize them with shadow.
Gradually gaining experience and accuracy in working with cutters, you can become a good craftsman and professional in the field of artistic carving, which is currently used to decorate furniture, interior details and facades.
How to choose a stencil or template
Experts say that a correctly selected pattern is considered a guarantee of a successful result. You can find an image on the Internet or purchase a special pattern in handicraft departments.
The size of the finished craft is important. To do this, the sketch is printed in full size. Professional craftsmen only need several types of patterns to create a luxurious composition.
After this, the images are transferred to the surface of a wooden board using a pencil and tracing paper. This reduces the number of errors that can ruin the final result.
Main types of geometric carving
Over the centuries, different regions have developed their own techniques for creating beautiful patterns from geometric shapes, and their original features make it possible to classify ancient finds according to the ethnographic characteristics of nationalities.
Newer products used generalized experience, which served as the basis for the use of various techniques and combinations.
Combinations of various lines and elements are made using several carving techniques, including:
- Triangular wedge cutter, used for cutting triangular shapes.
- Dihedral, with wedges in the form of sectors or segments.
- Tetrahedral, with recesses made in the form of a square, rhombus or rectangle.
- A curved appearance, the edge of which was obtained by cutting a circle, oval, spiral or bracket into wood.
For each individual work, its own level of recess and width is selected, as well as the angle of inclination relative to the surface of the board or wooden product. The notches are combined in a given order and form a solid ornament.
The use of carved decor in the interior
Various decorative elements with geometric carvings are widely used in decorating residential interiors in the Empire, Victorian, Baroque and other types of classical design styles.
Carved furniture adds solemnity, luxury and splendor to any living space. A bed with carved headboards will be the main formative element of the interior design of the bedroom and will give the entire furniture a touch of piquant sophistication.
On a note! Various interior elements (balusters, railings, handrails, balustrades) decorated with carved decor are quite popular in private homes.
The use of geometric carvings on slopes or pilasters allows you to visualize the increase in ceiling height. Patterned railing support posts will look no less aesthetically pleasing. Particularly popular are these elements of staircases decorated with concentric or spiral carved additions.
On a note! Ceiling rosettes, interior door frames, ceiling consoles and beams for hanging lamps will help increase the decorative effect of any living space.
No less popular are baguettes, frames and friezes. Today, products made of polyurethane, polyvinyl chloride or expanded polystyrene are usually used as these decorative and finishing elements. However, if you use wooden products with carvings, the comfort and elegance of your home will significantly increase. In addition, wooden decor, with appropriate protective finishing, is in no way inferior in durability to plastic products. A carved wooden ceiling frieze will also add originality to the interior of a living space.
Carved wood processing is widely used for various details used for facade decoration of residential premises and for the formation of exclusive landscape design. Today you won’t surprise anyone with small architectural forms (gazebos, tables, benches) placed on a personal plot and decorated with various decor. Entrance gates and street gates installed in the fences of personal plots, decorated with even the simplest carvings, look quite attractive.
Today it is enough to simply order products for decorating the interior of a living space and creating landscape design in specialized workshops or from individual carvers. Simple products - ceiling rosettes, ornaments on cutting boards and kitchen utensils can be done independently if you have certain skills and free time.
Tools for working with geometric patterns
For high-quality and comfortable creative work, it is necessary to prepare appropriate conditions. You should equip your workplace with good lighting, arrange your tools comfortably, and find the right seat height.
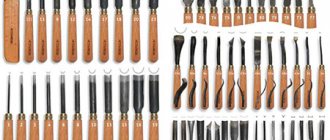
Of the tools you need to stock up on the following set:
- A ruler and a medium-hard pencil are needed for marking and drawing figures on a flat wooden surface.
- A file or jigsaw is useful for shaping blanks for cutting.
- A compass designed for quickly marking and dividing repeating fragments.
- Several chisels and oblique knives of different widths, which are used for carving.
- Devices for sharpening tools.
The width and angle of the cutter are selected based on the sizes of individual geometric fragments, the edges of which are cut, trying not to go beyond the perimeters of the figures. To correct the pattern, you may need fine-grained sandpaper and an eraser.
Finish coating
The box is sent to the final stage of work - varnishing. There are many options for what exactly to cover the casket with. The most convenient for a beginner would be acrylic varnish in an aerosol can. It applies a protective layer evenly and quickly. The varnish will perfectly preserve the natural color of the wood, hide traces of superglue, and add shine. Finally, it will protect the box from the possible destructive effects of sunlight and oxygen, from water, dirt and dust.
If you are going to apply the varnish with a brush, be prepared for the fact that the process will be long and multi-step. It is necessary to cover the casket in several layers, each time waiting for the previous one to dry. Aerosol varnish is much more convenient.
All that remains is to wish you successful testing, deft management of tools and pliable, high-quality wood. And remember, appetite comes while eating: in the process of carving, new creative ideas and the mood for bringing them to life arise!
Selecting the right wood
The quality of work largely depends on the type of wood from which the carving base is made. Depending on the type of wood, its fibers can be soft and easily peeled, like those of spruce and pine, or they can be hard and uniform, like those of birch, cherry or beech.
Oak consists of stripes formed by annual rings, which vary greatly in softness, so the precise patterns on it will look less neat than on a board made of linden or ash.
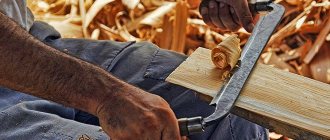
Hardwood carving
Hand carving on hard wood can be done by craftsmen with extensive experience in this field. But the result of such work turns out to be the most expressive and durable, especially if the ornament decorates a household item, interior detail or the facade of a wooden house.
Beginner carvers try their hand at tree species such as alder, linden or pine. Elements of geometric patterns are smooth without much stress on the part of the performer.
Linden is the most popular material among specialists, as it has a fine-fiber, uniform structure and is quite easy to cut.
Its neutral light shade allows you to tint finished products to match more expensive types of wood.
Relief carving: from basic skills to confident technique
We will tell you step by step how to make bas-relief carvings on wood using the simple “Fox” project as an example. As a blank, we recommend using a cut of linden or a regular board made of any other soft hardwood.
Transferring a drawing
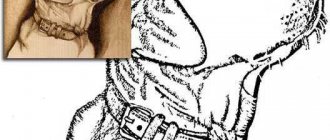
To transfer a drawing onto a wooden base, carbon paper is used as the simplest and most effective solution. If necessary, the carbon paper lines can be easily erased by making the necessary changes as you go. To prevent the design from shifting during the transfer process, secure the piece of wood or place a rubber backing underneath it. Think about where best to place the image to make the composition look more lively and interesting. In our case, we will move it from the center to the bottom (photo 1).
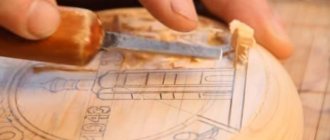
Cutting out the main outline
#12 ( 10mm / 60° ) to cut the outer outline It will not only allow you to make a neat outline of the main figure, but will also immediately remove a significant part of the background (photo 2).
Technique for cutting with an angle chisel:
- Fix the instrument tightly with your left hand, and push it forward with your right; The correct grip of the chisel will allow you to accurately guide the cutter, maintain a neat cutting line and prevent the blade from slipping off the contour.
- Mark the main contour of the lines with a cutter, then cut them to the desired depth (in our case 4-5 mm ). By cutting the wood a little at a time, you will have more control over the carving process and reduce the risk of chipping.
- Overcoming the resistance of the wood, evenly distribute the pressure on the chisel, achieving a smooth and uniform surface.
- When working with a chisel, take into account the direction of the wood grain, because the cutter always tends to move along the solid annual rings.
- Under no circumstances should you point the chisel towards yourself: cut away from you or hold the tool parallel to your chest.
- Work the cutter directly behind the pencil lines, leaving them visible.
Background sampling
Correct and accurate removal of the background is largely the essence of relief wood carving. Mastering this skill is a responsible task for a beginning carver. Radius chisels (semicircular or sloping) help to remove a lot of background with minimal effort. In our case, we will leave the background of the composition in the form of wide decorative grooves (photo 3). If necessary, it can be made even using a flat chisel.
Having formed the background, we will return to the corner chisel and once again “finish” we will walk along the contour of the main composition (photo 4). Then we’ll straighten the background (photo 5).
Development of the main composition
#15 (blade width 6 mm /angle 45° ) or #16 (blade width 6 mm /angle 35° ) are optimal as a tool for fine contour work
Outline the fox's eye, keeping the pencil outline (photo 6). Go down and start working on the mouth: carefully select the background around the teeth and inside the mouth (photo 7). Focus on volume and the laws of perspective in the composition: since the front teeth are in the foreground, they should be slightly exaggerated. Work on the nose area.
10 mm wide radius (sloping) chisel . Start with the ears: make the left ear in the foreground taller (photo 8).
Round the shape of the head (photo 9), making a smooth transition to the muzzle, which should remain flatter and without pronounced volume (photo 10).
When working on specific areas, do not forget to periodically evaluate the overall composition: how correctly the volume flows, how the perspective is worked out, etc. Here, every detail is interconnected with each other. Relief carving should be perceived as a complete composition, and not a collage of a set of carved elements.
Sheet thread
To work on this element, use a cerasic - a deep semicircular chisel 5 mm (photo 11). This narrow tool is well suited for working out small elements and creating leaf relief.
Make a neat trim along the entire perimeter of the sheet so that it stands out well from the overall composition and seems to be torn away from the background (photo 12). Having outlined the main outline and selected the background around the leaf, proceed to cutting out the veins (photo 13). Having finished forming the relief, cut off all the remaining flat places with a serger (photo 14).
Detailing facial features
Using a trimming knife, create a deep shadow above the eye, line the lower eyelid with the incisor and give the eye a roundness (photo 15).
Finish working out the small elements of the mouth with a chisel (photo 16).
Fur detailing
Imitating the texture of wool is an important skill that every carver needs to practice, because in the future you will repeatedly encounter carvings of various animals. In the presented project, fox fur is created according to the simplest scheme: short and shallow strokes are made 5 mm
For greater naturalism, you can work out the texture of the wool with a thin steel cutter - a serger. Work on the texture until there are no flat spots left.
Preparing sketches and transferring drawings
A complex geometric composition requires preparing a drawing and creating a preliminary sketch on paper using drawing tools.
- Preparatory activities consist of several stages, the first of which is drawing a sketch on paper.
- This is followed by sanding the edged piece of board or object that will be decorated with geometric patterns.
- You should not sand the wood too thoroughly; it is enough to remove irregularities and chips with sandpaper so that these defects do not interfere with the careful execution of carvings that require precision.
- You can transfer the pattern onto the board using carbon paper or an awl with a wooden handle.
- Each cell, bounded by contour lines, becomes a fragment to create recessed edges, which together create a complex geometric design.