Pyrography, also known as the art of wood burning, is gaining more and more popularity every day among people of all age groups and categories. One of the reasons for such an unexpected surge of interest in wood burning, we believe, is the emergence of new, simple and safe to use tools - pyrographs. Paintings created specifically for burning on any wood are an excellent gift for any celebration, made with love by your own hands. The person who gives you such a gift shows the full strength of his love and attention to you, because it will take him at least several hours to make one such work.
How to choose a tool and wood for making scorched paintings:
- Wood burning is an art that does not require any expensive, hard-to-find tools and materials. As a burning tool for beginners, a very ordinary soldering iron can be suitable, which has the shape of an ordinary writing pen, slightly larger in size than what we are used to, which means you will simply trace the lines of a pattern previously applied to the base material. Some people use nails heated with a flame from a lighter or torch as a pyrograph, which are held with the heads of pliers. This method is not suitable for everyone. The ideal option would be a professional pyrograph or the most budget-friendly equivalent - a burner, which you can purchase at any specialized store.
- Images for such paintings do not have to be drawn by hand with a pencil; you just need to download the picture you like on the Internet, print it and transfer it to the tree. You can transfer a drawing to wood using black graphite paper; unlike regular carbon paper, it can be easily erased if necessary and retains the accuracy of the image lines when heated. Some people print the design on thin parchment paper, glue it to the wood and then burn it. The heat melts the paper, and the excess is then easily removed. At first, choose light patterns and ornaments that will help you develop your skills and hone your burning skills.
- It is better for young burners to take wooden blanks cut from soft, easily processed trees, with a uniform fiber structure. Wood from trees such as poplar, aspen, and linden is suitable for this. Small-sized blanks are an excellent start for beginning pyrographers. Do not forget to sand the surface of the board with fine-grained sandpaper immediately before work. Instead of wooden planks cut on your own, you can use inexpensive and commonly available plywood, because it does not have a pronounced structure and can be easily burned out.
What is pyrography
Pyrography is the burning of various patterns and designs on wooden plates using a special device - a pyrograph. This activity has a rather interesting history, because even ancient people were engaged in burning on wood. Of course, it is difficult to compare the drawings of that time and today’s, because the technology of this craft has greatly advanced.
In the process of work, stencils for wood burning are used, which can be purchased separately from the pyrograph, or painted on special boards. This activity can be both fun and beneficial, because burning trains hand motor skills, imagination, and also develops artistic skills.
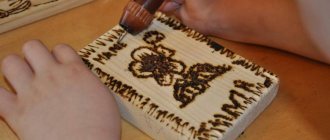
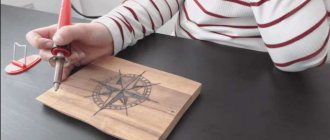
Step by step process
Pyrography is a very creative and exciting process. First you need to collect all the necessary tools and make a sketch. You will need a pyrograph or soldering iron, various attachments, sandpaper, and a stand for the burner. The design burning technology itself is quite simple:
- At the first stage, you need to decide on the wooden base. If it is plywood, then you can start working right away, but when the surface is rough or uneven, you need to sand it with sandpaper. And to make the work look brighter, you can coat the surface with a special wood varnish before work;
- Then you need to transfer the drawing. To do this, you need to use carbon paper and carefully transfer the image onto the wood along the contour;
- The electric burner must be warmed up well. You need to hold it like a regular pen or pencil;
- To burn the design accurately, the strokes should be quick and smooth; you should not spend a long time with the tip over one place. It is better to start with the main contours and gradually move on to small details;
- For a better result, you can visually divide the drawing into several parts and work on each one in turn;
- When the image is completely ready, you need to treat the wood with fine sandpaper and, if desired, varnish it.
When the burner first touches wood, a fairly large black dot may form. To prevent this, there is a little trick - you can lightly blow on the tip of the tool, and then it will not appear and will not be able to ruin the work.
You can learn how to burn wood correctly, the main thing is to never settle on one style and tool, you need to try to develop your creative abilities in this direction and try to learn something new.
Technology and features of wood burning
There are several technologies and features of this process. They look like this:
- Contour technique. All the main lines are drawn on the board, along which a simple picture is gradually sketched. This is a beginner's technique, it is better to choose it to understand the principle of operation of the device.
- Silhouette technique. In this technique, only the background is burned out, and the design itself remains the color of the board. An interesting way, because the pictures then turn out not dark, but on the contrary – light.
- Artistic technique. This is the most complex technique, as it combines the two previous methods. In it, the artist works not so much on the figures, but on the incidence of light, shadow, volume, and so on.
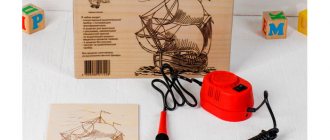
Interesting: Companies and organizations that are engaged in burning logos and inscriptions on various objects, of course, without using a pyrograph.
This would be strange, because the process of applying a design with your own hands takes too much time, which would make it impossible to put production on an assembly line. For this purpose, special laser machines are used that are connected to a computer. A design for burning is entered into the program, and it is gradually applied to the object.
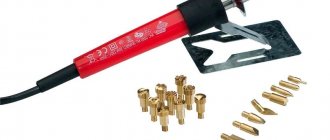
Burning set
To create art and act as a pyrographer, you will need a set of several items. You should start with a burner, of which there are two types.
Loop pyrograph
This is a classic tool for burning on plywood, which was invented in the middle of the last century. It is a handle at one end of which there is a sting and a loop. It is by heating the loop that the process of depicting various figures occurs.
This tool has a power supply with a temperature controller. The only downside of this device is the fact that it cools down quite quickly. But heating does not take much time.
Soldering iron burner
This is a tool for higher level pyrographers. The tool looks a lot like a soldering iron, but performs different functions. It burns wood faster, although it takes a little longer to heat up than its loop counterpart. The advantage is a large number of replaceable nozzles, as well as a long cooling process.
After applying the drawing, the picture is processed. In addition, pictures for burning are first applied to the board, and this requires tools. The set here is:
- A simple sharpened pencil, carbon paper.
- Paints, varnish, masking tape, scissors.
- Sandpaper, pliers.
- Wet cloth, dry towel.
Having assembled this set, you can begin wood burning.
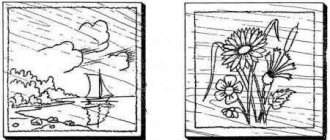
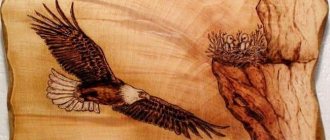
Live nature
For work we will need the following tools and materials:
- A sheet of plywood measuring 10 cm * 15 cm;
- Frame to fit the painting;
- Matte acrylic varnish;
- Brush for varnishing;
- Black simple pencil;
- Burning device;
- An eraser.
Having prepared all the materials, tools and decided on the place of work, we begin the creative process.
We sand the plywood sheet using sandpaper and remove any unevenness. Afterwards, we either draw a thoughtful sketch on wood, or transfer a drawing using carbon paper that can be printed.
Connect the burning device to the electrical network, wait until it is completely heated. We start burning from the foreground of the picture. We make the strokes carefully, take our time.
We burn out all the main parts of the composition.
Then we shade the drawn clouds. And then the flying birds.
After burning, you need to use an eraser to remove all excess pencil lines.
We coat the picture with varnish using a brush. Leave out of reach of children until completely dry.
We insert our product into the purchased frame and hang the picture on one of the walls of your apartment. That's it, ready.
As a sketch, you can choose other beautiful pictures, which you can download for free in today’s article.
It is not difficult to care for such works; it is enough to wipe it with a damp cloth once a week.
Tips and secrets for beginners
To ensure that your drawings are neat from the very beginning, it is enough to follow simple rules:
- In the process of applying the first point, you can blow a little on the sting, so it will turn out neat.
- Contours are done with slow movements and one line. It is important not to scratch the wood.
- The tip often needs to be cleaned to remove burn marks. A metal brush is suitable for this.
Note!
- Plasticineography - interesting options for creating pictures from plasticine on cardboard for children
DIY scrapbooking for beginners: what it is and how to do it. What you need to create a beautiful album or notebook (photo + video)
How to make a craft with your own hands: what you can do with your own hands at home
Important: There is no need to overheat the pyrograph, otherwise the lines will turn out too black.
All experienced pyrographers give this advice to their students.
Safety precautions
There is a set of rules that must be followed when burning designs on wood. The safety rules look like this:
- You cannot play with the instrument. Even a simple touch with a hot sting will cause a severe burn.
- You can only hold the pyrograph by the handle - you cannot grab the tip, even if it seems more convenient.
- Nozzles need to be changed only with pliers. You shouldn't grab it with your bare fingers.
- During operation, the device is placed only on a special stand. Remember that even after turning off the tip will still remain hot for several minutes.
- Exposed wires are wrapped with electrical tape before use. Accidental touch will cause electric shock.
These simple rules will make a picture for burning on plywood not only beautiful, but safe.
Important: If a child is working, at first an adult should look after him.
Where to begin
First you need to correctly position the tools at your workplace:
- A soft towel lies under the elbow of your working arm.
- The tool is located on a non-stick stand.
- Not far from your work area there are pliers and a damp cloth.
- The hood or fan is turned on in the room.
You need to start working by preparing the surface.
Surface preparation
The lighting above the board should be sufficient to see the lines when drawing. Next to the board there are attachments that can be quickly changed if necessary. It is better to wear a respirator to avoid breathing smoke.
Note!
DIY foam crafts: snowman, Christmas tree, sculptures, original figures with instructions (photo + video)
Papier mache from egg trays, boxes, cassettes: the best ideas on what can be made from egg packaging
DIY vase: step-by-step photo instructions, master class for a beautiful and unusual craft
Drawing
If designs for wood burning are applied from a stencil already prepared on a sheet of paper, then you need to use carbon paper. The image transfer looks like this:
- First, a sheet of copy paper is placed on the board.
- The printed image is placed on carbon paper.
- The image is outlined with a pencil.
- The carbon copy and printout are removed from the board.
Now you pick up a wood burner and begin the main work.
Burnout
First, the external and internal contours of the design are burned out, gradually moving to the central parts. Wood burning for children can be tiring for a child - you don't have to paint everything at once. You can rest a little and then get back to work.
Finishing
The finished pattern is sanded with a fine-grain sanding sheet. After which the picture is wiped with a towel to remove wood dust. Wood burning for beginners often occurs without the use of stencils, but if the artist liked the design, it should be coated with wood varnish. All that remains is to let the painting dry.
Burning flowers
For work you will need the following tools and materials:
- Burnout apparatus;
- The wood on which we will do the work;
- Copy paper;
- A simple black pencil;
- Eraser;
- Varnish intended for coating wood;
- Paints.
Let's get to work.
Before work, you need to decide on the drawing. We print the sketch. We prepare the selected wood for burning. To do this, you need to sand it with sandpaper. Using carbon paper, transfer the drawing to the board.
Check to see if all the lines are printed. If not, then draw additional lines with a simple pencil.
We connect the burning device to the power supply and wait until it warms up. We burn it carefully and slowly.
Related article: DIY sleep bandage
Color the finished drawing. Remove until completely dry. If you don’t want to do this, then you can leave it in the same version as it turned out - black and white.
In order for the finished picture to be hung, we make a hole on the back side.
As soon as the drawing has dried, coat it with colorless varnish. If you don’t have a special one on hand, you can use hairspray (it must be applied three times).
That's all, the picture is completely ready.
We present to your attention a selection of sketches.
Lungs:
Difficult:
Paintings for wood burning
Sketches for wood burning can range from large projects with shadows and three-dimensional figures to simple drawings. It is better for beginning pyrographers not to take on complex tasks, but to gradually learn this craft.
Note!
- Paintings from buttons, panels, appliques and compositions with your own hands: how to make flowers, a butterfly, a fish or a tree craft from buttons
Flowers made of wool (85 photos) - how to felt a flower from felt or a wool brooch. Step-by-step instructions for beginners
What can be made from wool (95 photos): felting for beginners, master class, felting techniques
Popular stories
You can draw scenes from cartoons or films. Characters from various books, stories, and so on are suitable.
Drawings of patterns for frames
Wood pyrography also includes the application of various frames in which photo cards will later be placed. You can draw both ordinary patterns and national sketches.
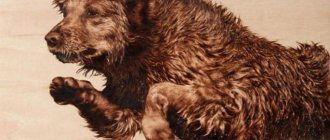
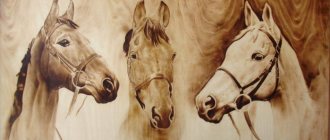
Animal sketches
In addition to conventional animals, you can try to draw your pet.
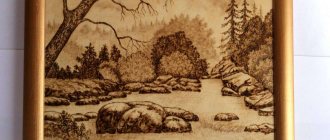
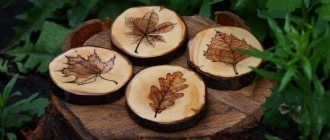
Nature theme
Trees, fields, flowers and other plants - all this is suitable for paintings.
As you can see, pyrography is a fascinating and interesting process. Not only an adult can be interested in it; a child or teenager can also be interested in it. And what could be better than to distract a child from gadgets and teach him such an entertaining hobby.
Please repost
0
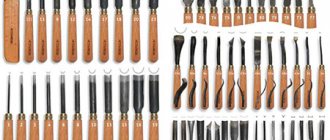
Tools for work
Wood burning is a decorative art form. And in order for the product to turn out beautiful and of high quality, you need to decide on the main tool for the job. There are two options:
- electric burner.
- soldering iron
But you will also need additional materials, such as:
- sheet of plywood or pieces of wooden board.
- carbon or graphite paper.
- a simple pencil or black pen.
- fine sandpaper.
- a set of various nozzles for a pyrograph.
The first stage of wood burning for beginners is to choose the right board for further work. Plywood or wooden planks should have a uniform structure, since such wood is easier to process and apply designs to. Before starting work, it is advisable to draw an exact sketch on paper so that you know approximately what the final result will be.
Choosing a wooden base
Choosing a board to work with is one of the most difficult moments in the art of burning.
To begin with, it is important to understand that there are a large number of tree varieties. Soft species include birch, poplar and linden, and hard species include hornbeam, boxwood and oak. Wood burning is quite difficult for beginners, so you should give preference to soft types of wood. To make your task easier, you can choose regular plywood. This will save you money and not worry about processing. Also, when choosing wood, it is important to pay attention to the temperature indicators that it can withstand. The softer the material, the less likely it is to catch fire.
Features of drawing
To make the picture neat and beautiful, you need to come up with and draw a sketch in advance, and only then start burning it. Drawing can be done using several methods:
- using special stencils with a cut out pattern.
- using a simple pencil and carbon paper.
- using tissue or graphite paper.
Craftsmen advise using black and white graphite paper for drawing, since, unlike carbon paper, it does not leave dark marks on the wood. You should not immediately take on complex compositional and detailed drawings.
First you need to get good at it and only then start burning complex paintings.
How to choose a pyrograph
Choosing a quality electric burner is not an easy task. For a beginner, most likely, the most ordinary pyrograph with a standard set of attachments will be suitable, but over time it will reveal many shortcomings:
- long process of heating and cooling.
- Over time, the handles begin to quickly overheat, which is why your hands begin to burn.
- may burn out if used for a long time.
- The nozzles heat up unevenly, resulting in lines of different thicknesses.
The use of more expensive models guarantees longer tool life and a greater variety of tips. But if there is no opportunity or desire to buy an expensive pyrograph, you can choose the old and proven method of burning wood with a soldering iron. It has several significant advantages:
- A fairly safe burning process, since the power is not too high.
- The tool is easy to use, unlike special electric burners, which have modes and attachments.
How to burn wood with a soldering iron:
- First of all, you need to wait until the instrument is completely warmed up. To do this, you need to turn it on and place it on a special stand;
- The essence of the process is to press on the working tip. The stronger it is, the thicker the line becomes;
- When applying a drawing with a soldering iron, do not rush, as the lines may turn out crooked or of the wrong size;
- It is better to burn the drawing slowly and try to follow the drawn contour clearly, especially if it is an inscription.
To learn how to burn well with a soldering iron, you need to devote enough time to the process and do not forget to experiment with types of wood.