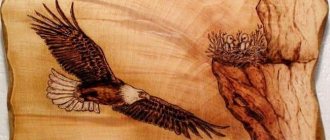
Pyrography (the art of burning or “painting with fire” on wood) is a separate direction in artistic graphics. This is a special philosophy of creativity in the field of decorative and applied arts. It has an interesting history and its own secrets. To create a beautiful design, you will need a wooden board, an electric burner (pyrograph) and a little imagination.
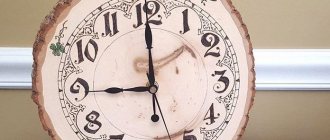
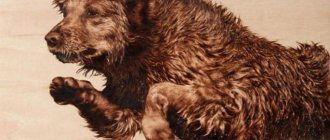
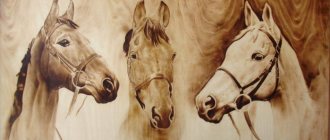
Using a wood burning device, you can draw unique embossed and smooth patterns on plywood blanks, as well as other available materials: leather, plastic and even paper. The very process of “painting with fire” on wood gives indescribable pleasure. In addition, fine motor skills, attentiveness and perseverance develop. If you have some experience, you can burn out drawings in the form of a large picture, which will become real masterpieces of art, taking pride of place in your home collection.
Main types of burning process
Pyrography is expressed using classical methods and techniques for wood processing. Craftsmen practice an open stream of flame, evenly treating the entire surface of the front side of the product. This creates the desired, deeper background for the painting.
It is effective to use a layer of clay, which allows you to burn a bare pattern previously cut out on the applied material. This method allows you to paint a light picture on a dark background and vice versa.
The method of treating wood with hot sand is practiced. The master immerses the workpiece in the mass, if it is necessary to give a shade to the light material, experimentally determining the required exposure time.
The device of a butane cutter, like a wood burner, is considered independently. The main characteristics of this technique are suitable for creating heterogeneous elements with irregular shapes (waves, clouds). There are ways to burn with a solar ray by focusing the energy with a lens.
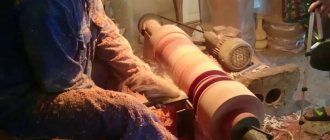
Burning out by friction on a lathe and hot objects is known. Relief burning is used, making boundary cuts. Miniature pyrography with the smallest specimens of feathers is also in use.
Preparation of material
The surface of the workpiece for burning must be leveled and, if possible, thoroughly sanded with sandpaper. At first, you should not resort to using too complex drawings. If the image does not correspond to the size of the workpiece, its scale should be reduced or enlarged.
If you don’t want to, you don’t have to draw the design on the workpiece yourself. It is enough to use carbon paper, which will allow you to draw the main outlines of the drawing, which can later be traced with a pencil. To avoid staining the material, it is better to choose old copy paper. This is the only way to avoid damage to the wooden base, which was carefully sanded and prepared for work.
Methods of working with a wood burner
A classic device for wood burning can perform various types of application of objects based on the general idea of the future painting.
A popular option is contour burning, where only the boundary lines of objects are processed. In the case of silhouette burning, some figures or background are completely burned out. Experienced craftsmen can resort to decorative burning, which allows them to convey shadows.
Mastering the chiaroscuro method will allow a sophisticated creator to draw pictures that convey volume and dynamics using a homemade burner.
Tips and secrets for beginners
- When making the first point, blow lightly on the sting, and then the beginning of the line will be smooth and will not stand out.
- Try to follow the contours in one line. Move the tip slowly to avoid scratching the wood. Help yourself by moving the material itself.
- Filling is best done with a tip heated to medium temperature. Movements should be soft, circular. If you heat the pyrograph too hot, it will leave deep black grooves in the wood.
- Periodically clean the tip from carbon deposits during operation. This can be done with a regular metal dishwashing sponge.
- Remember that a scorched line cannot be erased, so try to draw it very carefully.
- If you want thick lines, move the tip slowly. Thin lines are drawn quickly.
- The hotter the pyrograph is, the darker the lines will be.
- To achieve smooth tone transitions within one line, use a table fan. It will periodically cool the tip, and the color will turn out darker or lighter. Be careful!
Burning device
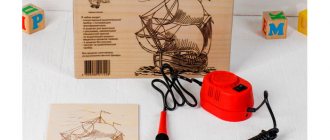
A modern electric burner will allow even beginners to practice. The burner consists of a step-down transformer, the main characteristics of which must be at least 5 V and 2A. You need a handle with attachments and an electrical cord, which are connected into a single circuit. Various feathers and filaments can be used as nozzles, which can be given the desired shape. Factory instruments are often converted by replacing the original rheostat with a laboratory transformer. This addition will allow you to control the intensity of the incandescence, which allows you to diversify the color scheme in your work.
There are two types of burners:
- Burning apparatus with a wire tip, including those made by yourself.
- Electric burner with a hard pen for wood.
The main characteristics of an electric burner with a hard pen are distinguished by the rapid heating and cooling of the tool. A few seconds after switching on, the electric burner is ready for use. Thermal mode allows you to control the power value. A tip made of nichrome wire allows you to achieve precise movements and better results. It is attached to a special fork holder. The sting heats up red in a few moments. The tip of the device can be adjusted to the desired shape. Wire feathers can be attached in various ways: either with two bolts, or using replaceable attachments.
The device with a wire pen has the following main characteristics:
- long service life of the heating element;
- simple replacement of the wire element;
- A wood burning device allows you to draw lines of various parameters.
The poor qualities of the device include the high cost and difficulty of repair, and the difficulty of finding components.
Burning machine with hard pen
Electric burner with wire tip
Electric burners using a hard tip have the general appearance of a soldering iron. The difference is the sets with replaceable attachments for more convenient work with wood. The advantages of such a unit include a low price (3 times less) and a large number of attachments.
The models are easy to use and durable. However, such a tool will heat up and cool down for about 5 minutes, and the shape often does not allow for painstaking, small work. The handle of the equipment also heats up during operation and requires regular stopping of work.
This device is suitable for creating thick lines and shadows over a large area of the drawing.
Universal burning device with t regulator, 220V/40W ZD-8905
Photo: https://market.yandex.ru
An excellent option for professional and semi-professional use with a maximum power of 40 W and a temperature of 750 degrees. Operating modes are regulated using a special control unit. The heating time of the device is only 15 seconds.
Universal burning device with t regulator, 220V/40W ZD-8905
Advantages:
- fast heating
- convenient temperature adjustment
- high power
Flaws:
- need to buy additional attachments
Anyone can burn a beautiful design onto wood. This does not require many elements, just a pyrograph and desire. Happy shopping!
#Top 10
Read us first - add the site to your favorite sources.
Add a comment
{"commentics_url":"\/\/express-novosti.ru\/comments\/","page_id":1448920,"enabled_country":false,"enabled_state":false,"state_id":0,"enabled_upload": false,"maximum_upload_amount":3,"maximum_upload_size":5,"maximum_upload_total":5,"securimage":true,"securimage_url":"\/\/express-novosti.ru\/comments\/3rdparty\/securimage\ /securimage_show.php?namespace=cmtx_1448920″,”lang_error_file_num”:”\u041c\u0430\u043a\u0441\u0438\u043c\u0443\u043c %d \u0444\u0430\u0439\u043b\u043e\ u0432\u043c\u043e\ u0436\u0435\u0442 \u0431\u044b\u0442\u044c \u0437\u0430\u0433\u0440\u0443\u0436\u0435\u043d\u043e.","lang_error_file_size":"\u041f\u043e \u0436\u0430\u043b\ u0443\u0439\u0441\u0442\u0430, \u0437\u0430\u0433\u0440\u0443\u0437\u0438\u0442\u0435 \u0444\u0430\u0439\u043b \u0440\u0430\ u0437\u043c\u0435\u0440\u043e \u043c \u043d\u0435 \u0431\u043e\u043b\u0435\u0435 %d MB.","lang_error_file_total":"\u041e\u0431\u0449\u0438\u0439 \u0440\u0430\u0437\u043 c\u0435\u0440\ u0432\u0441\u0435\u0445 \u0444\u0430\u0439\u043b\u043e\u0432 \u0434\u043e\u043b\u0436\u0435\u043d \u0431\u044b\u0442\u044c \ u043d\u0435\u0431\u043e\u043b\ u0435\u0435 %d MB.","lang_error_file_type":"\u041c\u043e\u0436\u043d\u043e \u0437\u0430\u0433\u0440\u0443\u0436\u0430\u0442\u044c \u0442\u0 43e\u043b\u044c ""lang_text_loading":" u0437\u043a\u0430 ..","lang_placeholder_state":"\u0420\u0435\u0433\u0438\u043e\u043d","lang_text_country_first":"\u0421\u043d\u0430\u0447\u0430\u043b\u0430 \u0432\u044b\u04 31\u0435 \u0440\u0438\u0442\u0435 \u0441\u0442\u0440\u0430\u043d\u0443″,”lang_button_submit”:”\u0414\u043e\u0431\u0430\u0432\u0438\u0442\u04 4c","lang_button_preview":" \u041f\u0440\u0435\u0434\u0432\u0430\u0440\u0438\u0442\u0435\u043b\u044c\u043d\u044b\u0439 \u043f\u0440\u043e\u0441\u043c\u 043e\u0442\u0440″,”lang_button_remove ":"\u0423\u0434\u0430\u043b\u0438\u0442\u044c","lang_button_processing":"\u041f\u043e\u0434\u043e\u0436\u0434\u0438\u0442\u0435..."}
Wood burner diagram
Any wood burner circuit consists of the same elements:
- metal screen;
- nichrome wire holder or other element for effective wood burning;
- burning element;
- device body;
- wire for electrical power.
Devices, as a rule, are powered from a standard 220V network using a transformer. Modern devices with a built-in laser for burning wood have appeared on the market.
Wood burner diagram
Do-it-yourself manual wood burning circuit diagram and subsequent setup are always relevant for burning enthusiasts. To create all the elements of a homemade device, knowledge of radio electronics is required. There are already invented schemes that are perfect for a homemade mechanism.
Making a simple burner
If you wish, you can assemble a wood burner with your own hands. To do this, you will need a small set of tools and some improvised means, commonly used household items. To assemble a homemade burner you need the following materials:
- Wood bead.
- Insulating adhesive tape.
- Power unit.
- Nichrome alloy filament.
- Soldering device.
- Flux for soldering.
- Tin for solder.
- Electric drill with attachments.
Other materials may be added to the list, such as sewing threads and rubber thermal tubes.
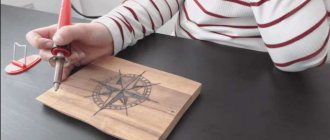
How to hold a pen correctly
There are several simple rules for handling it:
•Hold the pen as you would a pencil or ballpoint pen. It should fit comfortably in your hand, and your fingers should be as close to the tip of the pen as possible.
•To work with most types of wood, the temperature is set just below the level at which the tip of the pen, or the coil if you are using a poker, is red hot. Some types of wood require higher temperatures; other materials, including pumpkins and leather, require lower heat. If the pen is too hot, an orange edge will form around the lines you draw - scale. Most often this happens when an inexperienced master cannot wait to complete his work as soon as possible. It is very rare to turn on the device at full power.
•Draw with a pen the same way you draw with a pencil, just a little slower. There is no need to press the pen tightly against the surface of the wood - this will also create scale. Lightly place the pen on the wood and move it slowly and smoothly. If you press the pen too hard, a scorched furrow will form. Aim to keep your lines clean, even and consistent in color.