| This article need additional quotes for verification . |
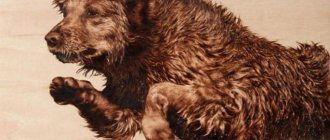
White horse, pyrography on poplar.
Pyrography
or
pyrogravure
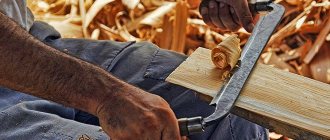
is the free art of decorating wood or other materials with burn marks resulting from the controlled application of a heated object, such as a poker.
It is also known as poker
or
tree burning
.
This term means "writing by fire" from the Greek Pur
(fire) and
graphos
(writing).[1] It can be practiced using specialized modern pyrography tools, or using a metal tool heated in a fire, or even sunlight concentrated with magnification. lens. “Pyrography dates back to the 17th century and reached its highest level in the 19th century. Roughly speaking, this is poker work.”[2]
A wide range of tones and shades can be obtained. Varying tip type, temperature, or the way the iron is applied to the material creates different effects. Often wooden objects are painted after firing the design. Light hardwoods such as sycamore, linden, beech and birch are most often used, as their fine grain is not intrusive. However, other types of wood, such as maple, pine or oak, are also used. Pyrography is also used on leather products using the same hot iron technique. Genuine leather lends itself to bold designs and also allows for very subtle shades. For pyrography, specially tanned vegetable tanned leather should be used (as modern tanning methods leave chemicals in the leather that are toxic when burned), usually in light colors for good contrast.
Pyrography is also popular among pumpkin crafters and artists, where designs are burned into the outside of a dried, hard-shelled pumpkin.
Tools and materials
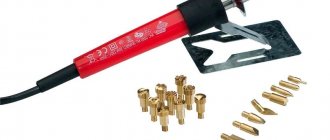
For pyrography, you will need a special device - an electric burner with a pen (tip) made of nichrome or brass or a soldering iron burner. What is the difference?
Loop pyrographs consist of a box with a transformer and a handle with a wire loop.
- They heat up quickly to the desired temperature, but also cool down quickly.
- The heating level is adjustable.
- Includes replacement hinges of different shapes and sizes.
- Convenient to use.
- The burning process is relatively fast.
The disadvantages of this type of burner include the fact that the attachments quickly become unusable, they are difficult to change, and due to the rapid cooling of the loop, you have to take frequent breaks. The drawing turns out to be dotted, consisting of small strokes, since it is quite difficult to draw a continuous line.
Soldering iron burners look and work like the device of the same name. The device is a thick “handle” with a sting at the end.
- They heat up slowly, but maintain operating temperature for a very long time.
- Large selection of replaceable nozzles, reliable and long lasting.
- The attachments can be easily changed even during operation.
- Allows you to make drawings with solid fills, shadows, transitions, and draw solid lines of any thickness.
Cons: if the soldering iron pyrograph breaks, you will have to buy a new one. In addition, the temperature and power of the device are fixed, so the process is slow. With desire and diligence, regardless of the type of pyrograph, you can learn to create real masterpieces.
As for the material, it is best to choose plywood, MDF board or plates made of solid poplar, aspen, alder, linden, chestnut, cedar, cherry. It is important that the wood is completely dry, light, smooth, without knots or eyes.
Never use foundations that are coated with anything, such as varnish or paint. You may be poisoned by toxic fumes or suffer from a fire.
To work you will also need:
- fine-grained sandpaper;
- black copy paper (this option will not cause any trouble);
- sharp hard pencil;
- pliers;
- pyrograph stand;
- masking tape;
- paints and varnish, finishing brushes;
- dry clean rag, old terry towel.
It’s best to start getting acquainted with pyrography with ready-made creativity kits. There is everything you need, except the device itself, and most importantly: excellent results are guaranteed.
What do you need for burning?
The main attribute that should be in the arsenal of a person who decides to try his hand at pyrography is a burning device called a pyrograph.
The first devices were small soldering irons with a pen similar to a paper clip. Modern pyrographs are most often equipped with stronger, harder pens, which are much more convenient to use and more practical. Let us immediately note that modern devices have a number of disadvantages:
- Long heating and cooling times.
- If you burn a painting for a long time, the handle of the device may heat up and the artist will have to take a forced break.
- The device may not withstand operation for too long and may burn out.
There are also disadvantages to old pyroraphs, and in particular these are:
- High price;
- Expensive repairs;
- The need for frequent tip replacement;
- Difficulties in selecting spare parts.
The choice of a device is a voluntary and individual matter, and each master can choose a pyrograph that meets his requirements and expectations. Increased attention should still be paid to modern devices, equipped with a variety of nozzles of various thicknesses and which have proven themselves positively among users. Note that most modern devices can be used for burning wood of any type.
When choosing a device, pay attention to its configuration. High-quality pyrographs are most often sold in special cases, which makes them easier to store and transport. The kit usually includes attachments and a stand. A high-quality device will be an excellent gift for both beginners and experienced craftsmen.
Having decided on the purchase of a pyrograph, you can move on to choosing a burning kit. You can currently find a wide range of products of this kind on store shelves. Note that buying a ready-made kit is much easier and cheaper than looking for materials yourself.
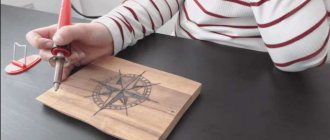
Ready-made sets for burning are boards with a sketch of a design applied, which needs to be burned.
Burning techniques and methods
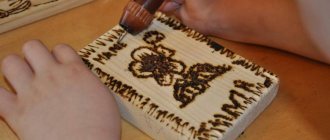
Contour technique. If you are just taking your first steps in pyrography, then it is better to choose this method. The drawing is burned only along the main lines, so it is very easy to do. Inscriptions and shading are done in the same way.
Silhouette technique. The desired image is created by burning the background around it. The drawing remains clean, and the background is completely shaded.
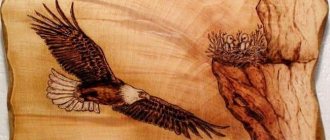
Artistic technique involves the combined use of both methods. The drawing turns out to be very complex, it perfectly conveys perspective, and all the details are worked out. This requires the ability to create high-quality paintings in pencil; without this skill nothing will work. It’s better to start with basic geometric shapes, trying to work as carefully as possible on chiaroscuro, volume, and depth.
In addition to burning with an electric pyrograph, there are several more interesting methods:
- With acid. A thin layer of wax is applied to the wood, the contours are scratched, and then the image is etched with a chemical composition.
- Pyrotype. The design is applied to the wood with a hot, ready-made stamp. The harder the pressure, the brighter and clearer the print.
- With electric discharge. The image is “painted” with electrolytes, and then an electric current is passed along the “lines”.
- Laser. This method can create a large-scale, very complex and clear image, since the laser beam is controlled by a computer program.
- The sun. This is the oldest, but very labor-intensive method. The sun's rays are “collected” into a beam with a magnifying glass and directed onto the surface of the plywood. The quality of the drawing is quite low.
Everything for burning in the catalog
Preparing for work
If you decide to choose the material yourself, then please note that pine, linden, birch or ash are best suited for creating works of art with a pyrograph.
Before starting work, the wood needs to be sanded. By following the recommendations below, you will get a neat, even canvas to work with:
- To get rid of unevenness on the surface of the wood, you need to sand it along the grain.
- After high-quality sanding, the wood must be wiped with a damp, soft cloth.
- After the surface has completely dried, you should carefully apply a sketch of the design to it using a simple pencil.
Pyrography is an art that cannot be rushed. To truly enjoy the process, you need to immerse yourself in it, carefully considering every step.
Tips for getting the job done
- If you do not have drawing skills, then use a template or carbon paper to create a sketch.
- When burning a design, try to draw lines with equal pressure on the soldering iron so that they are even, of the same thickness and without gaps.
- Calculate the burning time of one element. If you overexpose the hot nozzle at one point, it will be darker than the rest and this will negatively affect the finished work.
- Position the board so that the grain is facing down. This way the nozzle will move freely along the lines of the sketch, and the finished drawing will be smooth and neat.
Where to begin?
First of all, prepare your work area. You should have not only a pyrograph at hand, but also a stand for it, a set of replaceable nozzles, and pliers. The room should be well ventilated; in extreme cases, be sure to turn on the fan and wear a respirator. Place a rolled towel under the elbow of your working hand. Make sure you have good lighting.
Surface preparation
First of all, prepare your work area. You should have not only a pyrograph at hand, but also a stand for it, a set of replaceable nozzles, and pliers. The room should be well ventilated; in extreme cases, be sure to turn on the fan and wear a respirator. Place a rolled towel under the elbow of your working hand. Make sure you have good lighting.
Drawing
Use a sharp, hard pencil to outline the contours of the future image. Remove excess lines with a soft white eraser. The drawing can be transferred using black copy paper.
- Place a carbon copy on the workpiece.
- Place the desired image on top. Secure with masking tape.
- Trace it with a pencil, trying to press firmly without missing any details.
- Now remove the tape and carbon paper.
Ready!
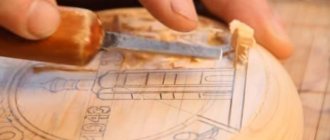
Burnout
First, burn the edges of the drawing, its main lines, and only then move on to the internal details and shading. Move your hand towards you, and then you will be less tired.
If you have taken a complex image with a fill or gradient, then first draw the outlines. If something goes wrong, the erroneous lines can be sanded with sandpaper. Mistakes are inevitable, but you shouldn't be afraid of them.
Finishing
The finished image is carefully sanded with fine-grained sandpaper. Be sure to remove all coals. If you want to get a colored drawing, you can color it with paints or pencils. Finally, the work is coated with colorless wood varnish and allowed to dry completely.
Image selection
The first requirement is that the drawing must have a clearly defined outline. There are a lot of such works on various thematic sites, make your choice and print out the sketch that you like best. Whether it is an ordinary pattern, a simple landscape or still life, or maybe a plot scene, it is not so important. Of course, you need to start with simpler works, gradually complicating the drawings and honing your skills.
Types of pyrography (relative to images):
- Negative pyrography. She shows the pattern that surrounds the burnt surface. The drawing itself stands out with a light, clear relief in a dark frame. You can achieve this result by adding a background or removing a picture.
- Contour burning. Conventionally, the simplest type of burning, which is what children pyrographers do. But no matter how old you are, you can learn at any age. Start mastering contour burning, and then learn how to do work with relief, background, combined, etc.
The drawing is transferred to the surface using carbon paper; small details and lines need careful drawing. The simplest drawings are burned evenly, but there are works where the laws of chiaroscuro come into force. Interesting tone transitions can be achieved by applying light strokes while lowering the temperature or reducing the burning time.
Safety precautions
When working with a pyrograph, the following rules must be strictly observed:
- When the tool is turned on, it is very hot, and you can only handle it by the handle.
- Don't play with the pyrograph. If the tip accidentally touches the skin, it will result in a serious burn.
- A heated tool can only be placed on a special fireproof stand. Remember that even after turning off the tip remains hot for some time.
- Nozzles can only be changed using pliers. You cannot touch them with your bare hands, even if it seems that they are not very hot.
- If the burner overheats, it will quickly break; this applies to both loop and soldering iron models. Therefore, unplug the device from the outlet from time to time.
- Never leave the pyrograph unattended while it is on, even when you leave for a couple of minutes.
- If the wires are exposed or there is other damage to the device, then it should not be used. This may cause a fire.
If a child is burning, carefully monitor him while working and always check that he remembers the rules for handling the tool.
Ready-made burning kits
Preparation of the workplace
A well-lit, thoroughly ventilated place is suitable for work. If possible, this is best done on a balcony or on the street near a private house.
In an enclosed space, it is appropriate to sit near a window into which fresh air will flow.
- The working surface can be a table, but it will need to be protected from possible damage.
- This is easy to do with a piece of rags and a sheet of tin. You can use a regular baking sheet.
It is important to prevent accidental sparks from touching flammable objects: textiles, furniture. If you handle the working device carelessly, damage to property may occur, which is expressed in the form of holes and scorch marks.
Tips and secrets for beginners
- When making the first point, blow lightly on the sting, and then the beginning of the line will be smooth and will not stand out.
- Try to follow the contours in one line. Move the tip slowly to avoid scratching the wood. Help yourself by moving the material itself.
- Filling is best done with a tip heated to medium temperature. Movements should be soft, circular. If you heat the pyrograph too hot, it will leave deep black grooves in the wood.
- Periodically clean the tip from carbon deposits during operation. This can be done with a regular metal dishwashing sponge.
- Remember that a scorched line cannot be erased, so try to draw it very carefully.
- If you want thick lines, move the tip slowly. Thin lines are drawn quickly.
- The hotter the pyrograph is, the darker the lines will be.
- To achieve smooth tone transitions within one line, use a table fan. It will periodically cool the tip, and the color will turn out darker or lighter. Be careful!
Registration of the finished work
A wood burning master class cannot be complete without a description of the design of the work.
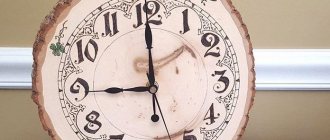
Sometimes the natural texture of wood makes the best decoration
What options are there:
- patterned frame, which is part of the design itself;
- if you are burning a piece of wood, then the outline of the cut itself will be a beautiful frame, you just need to think about how to fix the work on the wall;
- standard – frame, glass;
- specially ordered baguette;
- homemade frame from PVC skirting board, etc.
Important! If it is decided to varnish the work, this is the task of an adult; the child should not come into contact with toxic materials.
Take things step by step, follow the principle of “from simple to complex,” don’t be afraid to make mistakes and don’t be too critical. Pyrography is an interesting and popular trend, the practice of which can turn from an ordinary hobby into a way to earn money.
What else can you burn on?
In addition, as on wood, with the help of a pyrograph you can create beautiful designs on fabric. This type of creativity is called guilloche. Usually for this purpose they take acetate silk, satin, nylon, panvelvet and other synthetic fabrics, since they are melted evenly, applied to natural fabric and burned with an electric pyrograph.
This technique is used to make various panels, collars, napkins, imitation lace borders, covers for diaries and books, and decor for scrapbooking.
Making a simple burner
If you wish, you can assemble a wood burner with your own hands. To do this, you will need a small set of tools and some improvised means, commonly used household items. To assemble a homemade burner you need the following materials:
- Wood bead.
- Insulating adhesive tape.
- Power unit.
- Nichrome alloy filament.
- Soldering device.
- Flux for soldering.
- Tin for solder.
- Electric drill with attachments.
Other materials may be added to the list, such as sewing threads and rubber thermal tubes.
Master class: burning out a funny puppy
First, let's make a panel with some cute animal, for example, a puppy, using the contour technique. Prepare the following for work:
- plywood blank with processed edges;
- fine-grained sandpaper;
- black carbon copy;
- a simple pencil;
- sketch;
- paints, brushes, clear varnish for wood;
- pyrograph
Burning on plywood
The procedure for burning a sheet of plywood is not fundamentally different from the procedure for burning wood. The advantage of this burning method is the availability of materials. Plywood can be purchased at any building supply store at an affordable price. In addition, according to the buyer’s order, the material will be divided into sheets of suitable size.
The step-by-step algorithm for burning a pattern on plywood is as follows:
- Place a sheet of plywood on the work surface and thoroughly clean it from nicks and irregularities using fine sandpaper.
- Dissolve chalk in water at room temperature and soak the sheet with the resulting liquid.
- After the material has completely dried, draw a sketch on it with a simple pencil.
- Place the pyrograph on a special stand and plug it in. Wait until it warms up.
- After the device has sufficiently warmed up and the sketch is ready, you can begin the main work - burning.
When working with a pyrograph, remember basic safety rules when working with electrical and heating devices.
How to choose a tool?
In order to learn how to work with a tool, you should choose it correctly. Recommendations for selecting a suitable burner:
- The volume of work carried out and its complexity are determined. Small burnt designs with fine lines look attractive, but they can be almost invisible on larger pieces.
- Beginners often purchase a tool from a low price category. This decision is justified by the fact that in the absence of experience, mistakes can be made, due to which the device will cease to function.
- The most important parameters include power, tip dimensions, the possibility of using attachments and their number, heating time, etc. All required information is indicated in the operating instructions.
- The classic version of the tool is represented by a combination of a step-down transformer, a handle and a working part. There are also sophisticated burning machines on the market that can be used to produce complex images.
- It is recommended to give preference to products from popular manufacturers, as they can last for a long period.
Only over time will the master, based on personal experience, be able to select the most suitable tool. The choice of design is often made depending on the available options for burners and attachments for them.
STEPS AND MAIN WORK
Before drawing the sketch, you should select a tree for the base. Since the main factor in working with wood is its density, beginners should choose soft hardwood: ash, poplar, linden.
The surface must be dry and pre-prepared. For a smooth texture of the base and smooth movement of the soldering iron tip, the wood, if necessary, is sanded with fine-grained sandpaper and wiped from dust.
Transferring the drawing to the base
To better draw the pattern, especially if you don’t know how to draw, use a sketch. You can create it in several ways:
- Draw using special stencils for decoration;
- Trace the sketch with a pencil through carbon paper;
- Trace the sketch with a pencil through graphite paper.
The last option is highly recommended by practicing burners. They say that graphite paper, unlike carbon paper, does not leave a mark on wood. You need to try - everything is learned in practice.
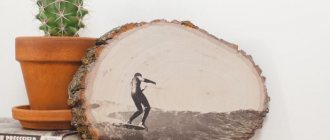
At first it can be difficult to decide on the ornament and the final look of the product. Interesting works can be obtained from a regular tree cut.
Such small but unusual patterns will harmoniously complement any interior, made in both classical and modern styles. For a beginner, this will be the optimal start: simple to try, but effective to see the first results.
Features of the technique: tips for beginners
Before you start burning complex compositions, you should practice on rough boards. Try different strokes, straight and curved lines.
Simple pyrography techniques include the following techniques:
- Contour – applying dots and short strokes that create a single silhouette;
- Silhouette - the picture is burned out in solid, continuous lines;
- Simple shading - creating areas of shading using thin strokes and dots.
To give the pattern expressiveness, shading is used. Using strokes and dots with different depths of saturation, hatching is performed in one direction.
According to the laws of creating an artistic composition, the nearest elements of the picture should be made several tones darker than the distant ones.
Work begins after the design has been selected and transferred, and the soldering iron tip has heated to the desired temperature. Uneven color development during burning indicates that the tool is faulty. Periodically (optimally after 10 minutes), the tool must be disconnected from the network, allowing it to cool completely.
Features of burning
It is impossible to correct incorrectly drawn lines without losing the quality of the drawing. Drawing complex patterns requires experience; beginners train on basic elements (lines, geometric shapes, etc.).
You can still eliminate the mistake you made - with sandpaper. But you need to sand the area carefully, trying not to get on the burnt adjacent elements of the pattern.
The soldering iron handle is held in the same way as a pencil. You should not put pressure on the soldering iron or hold it at one point for a long time, unless, of course, the goal is to burn out the black spot. With quick smooth movements you get a solid thin line.
The location of the wood fibers also plays an important role in the design. It is more convenient to move the soldering iron along. If the bar was poorly processed, and the master burns the pattern across the fibers, there is a high chance of getting black marks or, by catching the soldering iron tip on a fluffy fiber, leading the line in the wrong direction.
Experienced craftsmen recommend protecting the burnt pattern with a finishing coat to avoid loss of brightness. The wood can be varnished or the empty elements of the design can be painted over, and then also varnished.
The choice of varnishes is variable and depends only on personal preferences. We recommend trying acrylic. It does not have a strong odor and can be used in residential areas.
How to work correctly?
First of all, it is necessary to ensure good and proper lighting. If the work will be done on the street, then properly installed street light poles will help with this.
The working tool resembles a simple pencil with a wide working part. Therefore, the work carried out is practically no different from drawing on paper, except that the working part is heated before use. The whole process is divided into several main stages:
- Preparation. It involves choosing the wood on which the design will be applied. The surface should be smooth and even. It is possible to make the board smooth by sanding it.
- Drawing. For those who create pencil drawings, the task will be simple. In the absence of appropriate skills, a suitable design is printed and then applied to a board using stencil paper.
- Burning out. After warming up the working part of the tool, you can begin burning. The handle of the tool, if it has a small thickness, is taken like a pencil. Simple drawings begin with drawing contours, straight lines are created with quick movements without applying strong pressure. If several lines are located in close proximity, they should be applied with some delay, which is required for cooling. The hue changes by setting the appropriate power. Also, to obtain complex patterns, the nozzles are changed.
Many people leave the product after applying the design without carrying out final processing. This may lead to a reduction in the service life of the product.
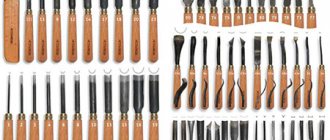
TOOLS FOR WOOD BURNING
We, as aesthetes and great lovers of unusual things, will continue to engage in pyrography, and for this we will need the following tools:
Pyrograph with a wire pen - a device with a nichrome loop that heats up within 15 seconds is suitable for more experienced artists. The device allows you to burn complex patterns with many shadows.
A pyrograph with a hard pen is an exact copy of a classic soldering iron, but with a lightweight handle. Allows you to change attachments, thereby complicating and making simple designs visually more voluminous.
Heating of a metal pen takes longer than a lavalier type electric burner. You can change the attachments only after they have completely cooled down (on average after 7-10 minutes). One of the disadvantages is the lack of power control.
The choice of an electric burner depends only on personal preferences and financial capabilities. But it is not recommended to save too much on the tool. Craftsmen are aware of, to put it mildly, the unacceptable quality of cheap pyrographs: over time, the handle begins to melt, the device heats up for a long time and unevenly, and often burns out after a week of operation.
In addition to the pyrograph, we will need:
- Wooden board or plywood;
- Graphite (copy) paper;
- Simple pencil;
- Fine-grit sandpaper;
- Finish coating.
Final processing
After receiving the image, the surface is treated with sandpaper. You can protect wood from the negative effects of the environment as follows:
- The wood is varnished. This substance significantly extends the life of the product. At the same time, the drawing does not lose its contours, remains bright and rich.
- If necessary, partial or complete coloring of the space that is formed between the drawn lines is carried out.
Final processing of the product can be carried out using a variety of protective substances. The choice is made depending on what result needs to be achieved.