Wood carving today is no longer so much a hobby as an art that anyone can master. But before you start carving wood figures for beginners, you have to go through a difficult path to master this craft. First of all, buy tools, prepare a workbench and learn how to work with wood. When you start to “feel” it and get used to the tools.
Features of wood carving
Nowadays, there are many alternative ways to process wood and create the desired item, but none of this compares to traditional hand carving. Such works turn out to be unique, warm and cozy. The craftsmen put their soul into the figures and paintings, and you can feel it. At the same time, it is very important that the woodcarver loves what he does and enjoys the process, otherwise there is simply no point in it.
Wood carving is painstaking work.
It is best to learn the art of wood carving under the supervision of an experienced mentor, but it is quite possible to learn the basics of the craft on your own. The first thing a beginner will have to face is the abundance of techniques and types of carving, the variety of tools in stores and a million conflicting advice. It can be quite difficult to understand all this, so let's go in order.
History of origin and development
It is believed that wood carving is an original Slavic craft, but there are also craftsmen in the East. National ornaments decorate everything: from household utensils to the Koran. And in Scandinavian countries there are images of gods and animals.
Since ancient times, wood carving has been practiced in all countries and cities, but in Rus' this craft has acquired a special scope. Just look at the famous Bogorodsk figurines. Images of people and animals are still held in high esteem.
Carvers of Ancient Rus' decorated houses with intricate patterns, and even now in villages there are houses with carved platbands.
What can you do on your site?
Fencing.
The fence is an important part of any site. And to make it, you don’t have to buy expensive materials; you can use the “gifts of the forest.” A picket fence made from branches collected in the forest will look original.
Fences are needed not only to surround your garden from the outside, but also to divide the space internally.
These can be slatted walls that will appeal to climbing plants, or flower boxes arranged vertically in a checkerboard pattern. This wall looks very beautiful thanks to the flowering plants.
Flowerbed.
This is the kind of craft that no garden can do without. But a stump left from a cut down tree, a log, or even an ordinary large log can become a flowerbed. But you will have to arm yourself with a chisel and a hammer to hollow out a recess in which the flowers will then grow.
You can make it simpler and decorate a ready-made flowerbed with twigs or neat bars.
Bridges.
The decorative bridge will delight both children and adults. You can even dig an artificial pond for it, but even without water such an element will look quite natural.
Track.
Ordinary paths instantly change the impression of your dacha or garden. Neatly designed paths help create the “face” of the site.
And making them is as easy as shelling pears:
- It is enough to prepare tree cuts and collect pebbles from the shore of the nearest body of water. At the same time, the cuts do not have to be the same diameter - it will be even more interesting if they are different, but the thickness should be the same.
- Don't forget to first dig a trench (its depth should not exceed 10 cm) and fill it with sand.
- Cuttings, pebbles, earth are laid on top, and lawn grass seeds are planted.
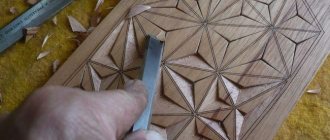
Types of techniques
Depending on what kind of product is to be made, wood carving is performed using several techniques.
Among the most popular types of carving are:
- Through . Using this technique, they create truly lacy, weightless masterpieces.
- Flat. A popular type of carving, it is distinguished by its relative simplicity of execution.
- Brownie. Shows the skill of the carver. House carvings decorate the exterior elements of a residential building.
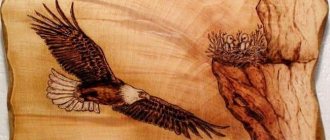
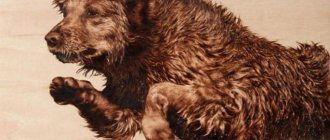
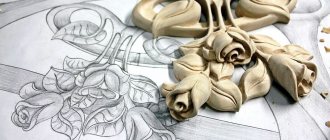
- Sculptural. Here the flight of imagination is not limited in any way, but in order to start carving figures from wood you need basic skills. Wooden sculptures are distinguished by fine details and delight no less than plaster or granite statues.
In order to create a pattern using any of the presented techniques, you must first cut out a relief figure. For this purpose the following is used:
- geometric;
- flat-relief;
- openwork;
- invoice of equipment.
It is better for a beginner to start by mastering geometric techniques, because... it is the simplest and most accessible.
How to choose the right material
Instructions on how to create crafts from wood.
The appearance of the craft depends on the quality of the harvested branches. What is important is the color, appearance, and the absence of visible defects and damage.
The main thing to pay attention to:
- no resin;
- For some crafts, good flexibility of branches or twigs is important;
- We discard parts of the tree damaged by plant pests; they are not suitable.
To maintain the environmental friendliness of the area and not harm the trees, it is better to collect fallen branches or use branches after pruning trees.
How to learn to carve figures from wood: basic principles and rules
Each carver determines the main points for himself, but several universal rules should be followed, especially at the beginning of his creative journey:
- The workplace must be kept clean.
- It is not recommended to buy ready-made tool sets. To get started, a few chisels will suffice. As professionalism grows, the carver acquires additional tools.
- Chisels and knives should be sharp and ready for use.
- In order for the result to meet expectations, the room must be light.
- It is necessary to observe safety precautions when working with sharp objects.
Important : you need to approach the process creatively, under no circumstances rush, and every movement should be precise and unhurried.
Preparatory stage
Despite the fact that wood carving is a creative process, some beginners start working without preparation. As a result, nothing works out, mistake after mistake, the mood drops and you no longer want to pick up a chisel and knife. To avoid negative consequences, prepare in advance: buy everything you need, decide on a sketch, reserve time and patience.
Before the work itself, you need to make a blank (they are called blanks), and then level its surface, removing defects, chips and excess relief.
List of tools
The basic equipment of the cutter includes:
- Sturdy and level work area. A thick tabletop, and ideally a workbench.
- A carpenter's pencil to transfer a sketch from paper to wood.
- A pocket knife and a blunt knife are one of the main tools.
- Chisels with different angles and blade thicknesses.
- Directly the board from which the product will be cut.
Basic tools
To get started, buy a pocket knife, a blunt knife, chisels and wood. Well, in order to cut out more complex and interesting things you will need:
- Saw – can be transverse, universal, longitudinal. The saw can be purchased both in a specialized store and in a hardware store.
- An ax if you decide to take up sculpture carving.
- Adze - this tool will be useful when creating shaped, not flat, products.
- A plane is necessary for removing the filings and polishing finished masterpieces.
- A file for polishing a product.
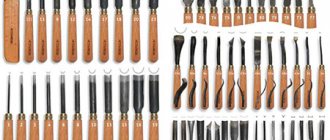
- Chisels. You will need a lot of them. Let's look at the types of chisels below.
- A spoon cutter is a tool for professionals that is used for cutting wooden spoons.
- Sandpaper – for cleaning wood and sharpening some tools .
- Varnish, wax, stain. Used at the end of work to give the product a finished look.
The list is not final, and with experience you will be able to create your own list of necessary tools that will suit you specifically. In the process of work it will be supplemented depending on the complexity of the products and your preferences.
The basic set is always assembled before starting work.
Chisels
Chisels are needed in order to correctly cut out the required pattern.
- Hammers or corner chisels are included in the carver’s basic kit. They are made in the form of an angle, and when used, “grooves” often remain on the workpiece. Most often used in contour carving.
- Straight chisels with a straight blade. Will be needed for leveling some areas of the workpiece and cleaning before starting work.
- Semicircular or radius chisels with a long blade and a strong bend. They are often used for three-dimensional carving or for cross-relief techniques.
- A crimp or curved chisel is used to cut out large convex shapes. Sometimes used for background processing.
Chisels also come in narrow, medium and wide. It is worth remembering that different types of chisels are used for different types of wood. Tools that work easily with aspen are useless when working with juniper and vice versa.
Which tree to choose
Beginners should try their hand at birch, pear or linden. These wood species are soft and pliable, practically do not deform, so they are pleasant to work with. Spruce species are used less frequently, since the wood there is hard and if you are not used to it, you can easily get injured.
Wood that all carvers use:
- Birch. A common wood species in our country. Relatively low price, optimal density.
- Linden. The perfect tree for beginners. Soft wood allows you to hone your skills.
- Pear. Delicate works are created from this fruit tree.
- Alder. The characteristics of the wood are excellent, but the high cost repels novice carvers.
- Oak. Not everyone can handle this tree. Solid but malleable oak wood serves as a source for creating works of art. Unique furniture is made from oak.
You need to choose wood specifically for the product you plan to create.
Workplace requirements
Check your work area before starting work.
- The home table should be clean, and the surface on which the wood will be fixed should be perfectly smooth.
- Take care of lighting in advance. If there is not enough sunlight, a shadow may appear when working with small details and the entire composition will have to be redone. It is better to additionally equip your workplace with a couple of powerful lamps.
- All tools should be at hand.
Take care of first aid so that you can quickly treat an accidental cut.
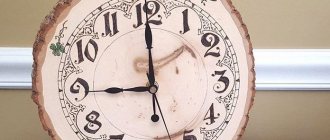
Blanks: selection and purchase of wood
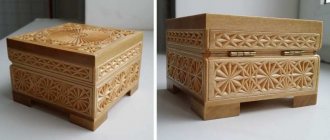
In addition to tools, a novice carver should think about choosing a wooden blank. In processed form: nesting dolls, boxes, circles, spoons, piggy banks, etc., blanks can be purchased relatively inexpensively in craft stores.
The Masters Fair offers wooden boxes, boards, figures - in skillful hands, these clean but faceless canvases will turn into real masterpieces.
For example, these.
And yes, this is a wooden box painted to look like metal.
The cost of blanks varies - from 100-300 rubles. for small ones (matryoshka dolls, barrels) and from 500 to 1000 rubles. beyond the frames, boxes. For a nominal 50 rubles. You can buy the simplest board, which will be enough for your first attempt at writing.
In addition, you can purchase small blanks at construction stores that sell parquet boards. There is always a large selection of wood (including valuable species) and its sizes.
Among non-traditional sources, we can note packaging wood, which protects large goods during shipment; various pallets and even scraps of wood from furniture shops. These materials are easy to find or can be bought for literally pennies. Carpentry shops sell scraps for firewood, and, by the way, mahogany bars are often found among them.
Of course, such wood is not acquired immediately, and before the desire to work with mahogany, the first goal is to learn how to cut. That is why we have gathered here.
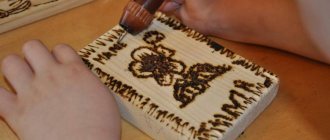
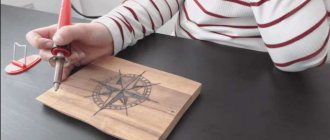
Step-by-step schemes for beginners
It's better to start with some geometric pattern, it's easier to fix.
- Before starting work, select a sketch, print out the design you like and use carbon paper to transfer it onto the wood. Take your time.
- Secure the wood to a table or workbench using clamps or a vice.
- Trace the outline gradually, do not make sudden movements.
- The carver must feel the wood, independently determine the pressure force and the angle at which the chisel should be held.
Work while standing, then the viewing angle will not be blocked by anything and the composition will be visible from all sides.
Strengthening devices
If you are holding a workpiece in a vise, select a tool that will not leave marks on the workpiece (or insert some material between the workpiece and the vise). I often use a 6mm capercaillie and a wing nut to secure the workpiece to the workbench. If you are a beginner, you can wear a steel wire glove to protect your hand.
I have an old friend, also a carver, who wears a heavy leather apron when working toward the chest. When finishing or dyeing a product, you can use an awl or a paint stick.
SUPPORT
In order for the workpiece to hold better when you cut wood with a snake saw, I advise you to use a support - an ordinary board that supports the wood during sawing. Simply attach it to a workbench or table and hold the saw vertically in the V-section as you cut the workpiece.
BENCH VICE
If you are planning to do relief carving, I suggest you also make a simple bench vise. One clamp holds the vise at the bottom in a stationary position, while the angle formed by the other two at the top prevents your workpiece or workpiece from slipping out of your hands while you work. Place a bench vise on your work surface.
Detailed instructions for creating a figurine: example
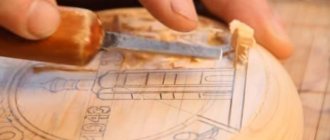
So, you have decided on the tree, placed the board on the workbench, and transferred the sketch. How to correctly mark the outline, cut out small parts and finish the job? If we are talking about cutting out an animal, then it is easier to cut out the outline with a 10 mm chisel with an inclination angle of 60 degrees.
You need to hold the instrument firmly with your left hand, and push forward with your right hand. If you do everything correctly, you will get a neat line. Make sure that the chisel does not slip off the outline.
The wood needs to be cut gradually. Recommended cutting depth is 1.5 -2 mm. The angle of inclination should be no more than 40 degrees.
The outline is cut, going beyond the pencil line, it remains untouched. The lines will be even and smooth. Take your time to cut off excess wood; periodically inspect the composition as a whole so as not to disturb the proportions.
To draw small details, use narrow chisels with an angle of 45 or even 35 degrees. The background is formed with a semicircular chisel. This element takes the most time. Make the furrows even, of the same depth and width.
When the work is ready, use a gravel to eliminate minor defects. Before finishing, wipe the board with a cloth soaked in solvent. The wood is covered with stain, wax or oil, depending on the wood.
Precautions during operation
Working with wood can be traumatic, so take care of your own safety.
- The workbench or work table must be stable so that it does not sway at the most critical moment.
- Sharp instruments should never be pointed at yourself. Keep them away from you or parallel to your chest.
- If chisels or knives slip off the wood during the cutting process, the tools have become dull, sharpen the blades.
- Always use safety glasses when sharpening.
- Check the sharpness of the blade not with your finger, but on an unnecessary block.
- Carefully secure all workpieces with fasteners.
- It is prohibited to smoke, light a stove or start any other fire near the workplace - wood shavings are highly flammable.
When working with wood, be extremely careful and never rush.
TOOLS
All beginning carvers ask: “What tools do I need first?” First we will need a small number of tools. Instead of buying a full set of cutting supplies, purchase tools as you need them. Usually, when you buy a set, you don't save a penny, but there are always things left that you hardly need. Buy the best quality tools you can afford; good, sharp, high-carbon steel tools will last you a long time and save you money.
Common Mistakes
To ensure that the end result is always pleasing, it is better to learn from the mistakes of others:
- Only dry wood can be used. Undried wood can lead to damage and the entire composition will fall apart.
- You need to cut the tree in different directions, otherwise the furrows will be uneven.
- Don't rush to go deeper into the tree. Too much pressure will cause the composition to be uneven, and the product will only have to be thrown away.
- Plan your work in advance: work out the sketch and carefully transfer it to the tree.
- Start with simple work, gradually mastering new techniques, tools and wood.
Effort alone is not enough; without knowledge, you will not be able to master the skill of wood carving.
Knives
You will need a good knife - one that is comfortable to work with. There are three types of knives - with a folding blade (pocket knife), with a fixed blade and knives with a replaceable blade. I prefer to use fixed blade knives because they are the safest. Knives also vary in blade shape and steel type.
I recommend a high-carbon steel blade with a hardness of 55 to 60 RC—it will stay sharp longer than a stainless or low-carbon steel blade. For finishing and creating shapes, I use a blade 4 mm thick and 3.8 to 5.1 cm long. A knife with a narrower and shorter blade is better for detail work. Some carvers prefer knives with replaceable blades because instead of sharpening the knife, you simply need to change the blade. Another advantage is this. that the handle of such a knife can be used with small chisels.
Application of skills in the interior
Not only figurines can be cut from wood, but also kitchen utensils, pieces of furniture, boxes, and you can create a unique decorative panel. The variety of options is endless. Most often, cutting boards, caskets and storage boxes are decorated with wood carvings. Twisted patterns look great on staircase balusters. And antique lovers are still hunting for carved furniture.
Wooden kitchen appliances are very popular - environmentally friendly and beautiful.
It will take a long time before you can learn wood carving at a professional level, but even as you learn, you will be able to create beautiful and useful work. And having mastered the craft completely, you will be able to create a unique design for any thing, bringing comfort, beauty and originality to your home. This useful hobby will help you discover your own talent and even find additional income.