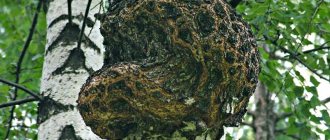
A burl is also called a “witch’s broom” - it is a small formation on a tree of a benign nature. Basically it has the form of a drop from which thin branches grow, collected in a bunch. In the cross section, you can observe a structure of striking knots. Processing the burl is not easy, although it can still be ground and polished. The result of the work has a very attractive appearance.
Some areas of birch burl may have a mother-of-pearl appearance. In industry it is not of particular value, but is quite expensive due to its beauty and uniqueness.
Sometimes burl can be used as a veneer for furniture, but most often it is burl from exotic trees. But birch burl is used to make beautiful boxes, small women’s jewelry or hairpins, and cigarette cases.
Birch burl has a high-quality texture, so a knife with a wooden handle is very beautiful and expensive.
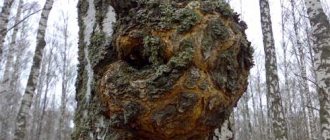
It is impossible to find two identical burls in nature; even the halves differ from each other. They can be seen on many different trees. In our latitudes, birch burl is highly valued. It does not grow large, the maximum diameter is like that of a large plate.
Due to the dense texture, it is difficult to make any design on the mouth guard, and there is no point.
So that the birch burl can be used for its intended purpose in the future, it is very important to assemble it correctly. To do this, we will provide you with detailed instructions:
Correct processing of birch burl
Very often, when sawing a burl, a unique and inimitable pattern is formed that the master will not want to change. In other cases, the burl after sawing is processed:
- Large burls are almost always sawn, since several items can be made from it at once. The burl is divided into several plates, the thickness of each depends on what kind of object you plan to make.
- In order to get an excellent drawing in the future, you should think about the cutting angle in advance. The more sleepers there are on the cut, the better.
- When the burl is fresh, the pattern appears weakly, but sawing is much easier.
- To ensure that the drawing appears in full beauty, the cap should be thoroughly steamed before making the item.
- You can steam the burl at home; fine sawdust is suitable for this. To carry out the procedure, take a container of the required size (it is recommended to use an old pan, since the dyes that will appear cannot be washed off). The sawdust is spread in a generous layer on the bottom, and a drip is placed on top. You cannot lay them tightly; there must be a gap of at least 0.5 centimeters. Sawdust is sprinkled on top in a thin layer.
- The placed cap is poured into a saucepan with well-salted water (mostly the bottom layer). The water should not completely cover the workpieces, but only touch them a little. Salt is taken at the rate of 1 tbsp. l. for 1 liter of water. If it’s a little more, it doesn’t matter.
- The prepared cap is covered with a lid and placed on low heat. As soon as the mixture boils, count for about 10 hours and allow the burl to steam well. To avoid troubles, look into the container every hour and add water if necessary.
- After a while, remove the container from the heat and leave to cool.
- After cooling, the workpieces are washed under running water and left to dry. To ensure they dry evenly, they should be turned over every few hours. The drying period lasts about 3-4 days.
- When the workpieces are completely dry, they are again steamed according to the above scheme and dried again. The procedure is repeated up to three times.
- If after steaming the bark does not fall off completely, it is carefully removed by hand.
- It is preferable to carry out the drying procedure outside. The first day they turn it over quite often, on the third day 1-2 times is enough.
- It’s great if it is possible to carry out final drying in a special oven several times.
- If the drip is very large (larger than a basketball), this type of treatment will not work. The drying or steaming process may cause cracks and other damage.
- Boiled as basically divided into parts. Solid growths on birch are processed like ordinary wood - by sanding and varnishing.
- When evaporated, the burl plates acquire the shade of the released components; it can be very diverse (yellow with a golden tint, brown, etc.).
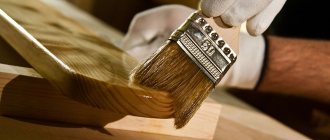
- After treatment, subsequent procedures can be carried out, for example, varnishing or painting.
- Before varnishing, the surface is sanded well using coarse sandpaper, then fine sandpaper. Wood dust is wiped off with a soft cloth.
- The design will appear in all its glory if the tray is treated with wax.
In fact, working with a burl is very painstaking, requiring attention and a lot of time. But what comes out of the work is certainly pleasing. Birch burl makes excellent souvenirs that have an individual and unique design.
Birch suvel, or, as it is often called popularly, tree bone, is a unique natural formation that is of great value to craftsmen. After processing this material, carvers make beautiful wooden products. In the article we will look at what birch suvel is and what it is used for.
Mouthguard fitting
As the temperature rises, the rubber softens. To fit it correctly, you need to remove it from boiling water, place it in cold water for one second and immediately fix it on the upper jaw.
There are several nuances to fitting a mouth guard:
- First the back part is fixed, and then the front;
- after the mouthguard is completely seated, it is pressed with your fingers to repeat the shape of the teeth and jaw;
- if a double-sided mouthguard is being adjusted, you cannot remove the plug from the holes until it takes the form of a bite;
- If it doesn’t work the first time, you can repeat the entire procedure.
If the mouth guard is correctly selected, it fits tightly on the upper jaw and does not require additional fixation.
There are two types of mouthguards - made of thermoplastic or silicone. The latter option does not require special adjustment and is easily fixed on the upper jaw, and no cooking is required.
Thermoplastic mouthguards are suitable for the classic brewing procedure. But you should always take into account the manufacturer's recommendations.
What it is?
Suvel (svil) is a rounded growth on the trunks of birch trees. May also occur in other breeds. It grows quite quickly. Consists of twisted or deformed wood fibers. Suveli can be located around the tree or in groups on one section of the trunk.
This material is usually harvested in windfall areas or at sawmills. The nature of the formation of growths is still not completely known. Some argue that this is due to an external influence on the tree trunk or a disease, as a result of which a hall is formed, which after some time becomes overgrown with fibers.
Wooden suveli: what is it?
Wood suvel (wood svil) is a round growth on a tree of both deciduous and coniferous species, which consists of twisted, deformed wood fibers. There are suvels girdling the tree around, or groups of several suvels on one tree.
Another difference between suvels and burls is that under the bark of tree suvels there is a smooth surface, sometimes with bumps, but large ones, not “pimples” like burls.
The density of suvels is slightly less than that of burls; therefore, they are a little easier to handle.
How are suveli formed on a tree? As a rule, this is the result of an external influence on the tree, as a result of which a fold is formed. Over time, the fold becomes overgrown with tortuous fibers. Suveli are found on trees much more often than burls.
Wooden suveli: texture
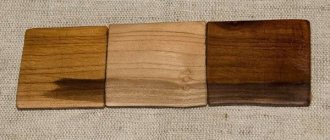
Suveli can have different textures, depending on the intricacy of the structure of the growth, but the predominant figures can be called waves, bends, spots, stripes. After sanding and polishing, the shine and shine of the wood appears.
The color of suvel can be yellow, brown, grey, pinkish or greenish.
Twigs can be stem or root - just like burls. Root suveli are more valuable because of their pronounced, intricately twisted annual rings and dark veins. Stem suvels do not have such a rich pattern, and their wood is lighter in color.
Craftsmen note that after proper processing, wood suvels begin to glow from the inside, like amber. The pattern of the suvels resembles marble.
What not to be confused with?
Beginners who are not very familiar with what birch suvel is may confuse it with burl. By the way, the second one is much less common and is considered more valuable. Their main difference is the presence of knots in a longitudinal cut, a clearly visible core, a fine pattern, and pronounced ornate layers. Moreover, there are no repeating burl patterns in nature; they all have a unique design.
The surface of the suvel under the bark is smooth, less often with large bumps. In burls, it is finely pimpled, and small branches grow from it. Suveli is not so dense and is easier to process.
Common mistakes
The process of brewing burls does not always go without problems. It is difficult to cook a mouthguard incorrectly, but this happens when the product is placed in water at the wrong temperature;
- the accessory becomes hard when it is placed in cold or insufficiently heated water, as well as if it is kept at high temperatures for a long time (about 100 degrees Celsius);
- pimples appeared - the product was in boiling water for too long;
- if a thin and cheap burl is brewed, it can literally melt; to prevent this from happening, you must strictly adhere to the established temperature conditions and the time the product is in the water.
Amazing phenomenon
When cutting a birch tree correctly, you can see amazing phenomena. To be more precise, the interweaving of wood fibers forms pearlescent areas with a unique pattern. They begin to emit a special glow when reflected from sunlight. The effect looks very beautiful in finished products, for example, in a stacked handle made of birch suvel.
The pattern and color are distinguished by their uniqueness; as a rule, it is brownish-ocher, soft pink, straw with a pearlescent sheen, and less often - dark brown with a marsh tint.
How to collect suvel?
People just walking in the forest, picking berries or mushrooms, don’t notice at all. If you purposefully look for burls or suveli, you can see them quite often. They can be located at the foot or at the top of the trunk, where it is almost impossible to reach them without a ladder. If we talk about the terrain, it can be a swampy lowland or a sand and stone plain.
Often rotting growths are found, giving the impression that the tree is trying to get rid of the strands. If you cut off any intact part, it will also rot after a certain period of time.
The slower a tree grows in unfavorable conditions, the denser the fiber plexus and the harder the material. It is impossible to predict the design of a suveli, but the more clumsy it is, the more beautiful the pattern will be. At the same time, it is possible to make a voluminous piece from it only in exceptional cases.
Due to the fact that the material is hard, it is quite difficult to cut it down the first time; the blade quickly becomes dull. From the second run things go much faster. When harvesting birch suvel, you need to try to ensure that the cut is even and runs parallel to the trunk. To prevent the tree from dying, it is advisable to treat the cut with a wound-healing solution. It can be purchased in the garden department of the store.
If the growth encircles the trunk, then it cannot be cut down, as the tree may die.
How to dry birch suvel?
The appearance of it, and then the finished product, depends on the method of preparing raw materials. There are several different initial processing methods. The wood can be left exposed to air in natural conditions for a year or two, or this process can be accelerated by other methods. Below we will describe a faster method.
To dry, the bark is removed from the workpiece, wrapped in newspaper in several layers, then placed in a black plastic bag. The paper prevents the material from heating up quickly; the bag creates a steam room effect. Black polyethylene quickly heats up from sunlight (when drying suvel on the street) or from a battery. The process occurs evenly, which prevents the wood from cracking. The bag needs to be tied, leaving a small opening. For the first 10 days, newspapers are changed twice a day for dry ones; for the next 15 days, once is enough. By the end of the period, the paper should remain almost dry. In general, the process takes 25-30 days, the wood retains its natural color and does not crack.
How to cook correctly?
This method is used by many masters. While cooking the material in one way or another, you can give the wood the desired shade, speed up drying, or reveal the existing pattern. The appearance of the birch suvel product will depend on this.
The process goes like this:
- The blanks, previously cleared of bark, are placed in the pan. Next, pour water so that it covers the wood by 2-3 cm. Then add 2 tbsp. spoons of coarse salt per liter of water and put on fire. In addition, coniferous, birch or alder sawdust is added to the solution. They give the souvel a color from dark amber to golden.
- After the water boils, turn the fire to low and cook the material for 4 hours, if the workpiece is large - 6 hours. Then the liquid is drained and the wood is left to dry. On the second and third days, the process must be repeated. The result should be 12-18 hours of cooking over 3 days.
- Cooking in a saline solution is caused by a simple physical reaction. The tree contains sap, the density of which is lower than the brine solution. During cooking, the liquid penetrates the material and dehydrates it. This occurs by displacing tree sap and absorbing the salt solution. As a result, liquid diffusion occurs and the suvel dries. After cooking, the wood is wrapped in newspaper and packed in a plastic bag. The next day, the paper should be slightly damp; the suvel can be left to dry in natural conditions. If desired, you can dry the material for another day using newspaper.
Cooking technology
Having chosen a mouth guard for boxing, you then need to independently carry out the procedure of cooking it, or rather boiling it. The whole process is simple to perform, just follow the following sequence of actions:
- Boil water in a kettle or ladle.
- Take two containers and pour boiling water into one, and fill the second with clean cold water.
- First place the product in a vessel with boiling water and leave for exactly one minute. There is no need to overexpose it.
- After the specified time has passed, take out the mouthguard, place it between your jaws and bite down as hard as possible. While in boiling water, the rubber will soften well and easily take on the desired shape.
- Leave the tray in your mouth for about five minutes.
- After the specified time has passed, remove the mouthguard and place it in a container filled with cold water. This is necessary for the rubber to harden.
Roughing
Before starting work, it is important to decide on the type of future product. If a craft made from birch suvel is vertical (for example, a vase, a candlestick), then it is better to make a cut in this direction and immediately form the bottom of the product. When making a bowl, box, or dish, the inside is selected from top to bottom. Remove excess wood, moving from the walls to the center at an angle of 45°. The best option would be to use a semicircular chisel or drill.
Please note: do not make the walls too thin. When dry, they may become brittle or crack. As a rule, products with sufficiently thick sides look more beautiful, are more durable and last longer.
After preliminary shaping, the wood is left for another 1-2 days outdoors away from direct sunlight (or indoors, again wrapped in newspaper). After this, proceed to the next stage.
Rules for preparing mouthguard
Before you start cooking kapa, you need to carefully study the recommendations that will help you avoid common mistakes. There are several important rules:
- if the product has been overcooked, it must be thrown away immediately;
- When placing a product in hot water, it must not be completely immersed - it is important that it floats on the surface of the liquid;
- When squeezing your teeth to give the mouthguard the desired shape, you cannot move your jaw; it is important to firmly fix the product and hold it.
When the mouthguard is prepared correctly, it:
- has clear prints;
- holds tightly;
- does not create discomfort during use.
Question to an expert
Which mouth guard is best for a beginner?
The ideal choice is a two-jaw mouth guard. This model is suitable for both beginner athletes and women. The product provides maximum jaw protection at the initial level of training.
Finishing of the product
Since each piece of material is unique in nature, it must be carefully inspected before finishing. Perhaps the knot that you initially wanted to remove will be the highlight of the finished product, for example, handles made from birch suvel.
During finishing, the angularity of the material’s shapes is removed in order to bring it closer to the finished look and reveal the structure of the wood. If during the processing process natural defects or small cracks are revealed, they will have to be repaired with a mixture of sawdust and glue. In the worst case, you will need to deviate from the original idea and modify the product.
After completing the internal and external processing of the suvel, they begin to clean up the roughness. This can be done with a scraper, wire brush, or rasp. Movements should be frequent and small so as not to spoil the material. Finally, grinding is performed with a drill with special attachments. If there is none, it is processed manually with sandpaper; the second option is even more welcome. You need to start with a coarse one (five), then move down to the finest grain size.
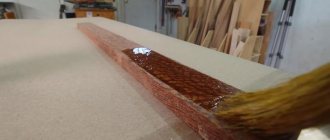
The finished product is cleaned of dust and tinted if necessary. If desired, you can varnish the wood, rub it with wax or hot drying oil. The process of working with willows is very long and labor-intensive, which is why products made from it have a high cost. The price of birch suvel varies from 100 rubles. for a processed block measuring 120×40×30 mm up to 200 rubles. per kilogram of sawn raw materials.
Features of mouthguard care
This is an important part of using this accessory. It’s easy to care for your mouth guards by following these tips:
- need to be stored in a special container that will protect from dust and dirt;
- after the mouthguard has been removed from the jaw, it must be rinsed with plenty of running water;
- if necessary, it is allowed to periodically clean the product with toothpaste and a brush;
- Boiling water cannot be used for sanitization; for this purpose, special pharmacological agents are used, which are available in a wide range in pharmacies.
What can be made?
The beauty of suvel allows you to make a variety of objects from it, it all depends on the imagination of the master. Very often you can see original jewelry made from this wood material: earrings, pendants, bracelets and rings. In ancient times, carvers used it to make dishes, mugs, spoons, and bowls. All this was used on the farm for its intended purpose. For example, the Finns make their traditional Scandinavian kuks from this raw material.
However, most often the birch souvel is used on the handles of knives. The constant qualities of the material, such as density, ease of processing, hardness, amenability to polishing, beautiful texture, interweaving of fibers and shine, played a role in this.
Thanks to the natural pattern on the wood, figures of animals and birds are carved from suvel. The pattern successfully imitates plumage, wool or leather. The smooth curves themselves suggest what can be made from it, all you have to do is remove the excess. Often, a framed wood pattern serves as a decorative panel or other art objects.
If we talk about functional things made from birch suvel, knives come first here. More precisely, their handles. Next are boxes, frames, mouthpieces and pipes, reed and instrument bases, office supplies and much more. Such items not only fulfill their function, but also speak of the good taste and status of their owner.
Cap and suvel. Native exotic.
Sooner or later, when you get involved in the fascinating business of making knives, you want to use something more beautiful on the handle than your native beech, walnut or cherry. Catalogs of stores for knife makers are full of exotic names and photographs of extraordinary beauty and design of pieces of wood. All these “Amboina Burly” are not so cheap...
But even in our northern forests, you can find wood that is hardly inferior in beauty to Australian exotics. We will talk about KAPA and SUVELI.
First you need to decide what is what? Some sources claim that burl and suvel are one and the same. I don't agree with this.
So - cap.
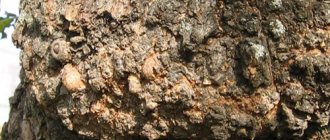
Burl is a rounded growth on a trunk or branch formed by small woody nodules of adventitious and dormant buds. On the surface there can be, and more often than not, many small shoots and twigs. Burls are found mainly on deciduous trees: oak, walnut, maple, poplar, but most often on birch. In the future, this is what we will talk about.
If you're lucky, you can find a branch burl - a kind of ball growing on a thin branch. It is small, like all mouthguards, and, unlike suveli, it has a “needle-like” structure and a very small, pronounced pattern in the form of dots and dashes.
Growths on trunks are more common.
And even more often - the basal burl, the “kaporoot” - it can be very large, but the pattern of this “giant” is not so pronounced and contrasting.
Under the bark of the growth, the surface of the tree is uneven, there are many protrusions in the form of spines and tubercles.
Burl wood is 50 - 70% denser than the wood of the tree itself, the fibers are interwoven, multidirectional, plus a large number of darker inclusions formed by “sleeping” buds, so burl is unusually beautiful both on crafts and on knife handles.
It is difficult to process due to its “twisted” structure, but this gift of nature is worth it.
According to some estimates, 1 tree with a burl accounts for, on average, 3000-5000 ordinary trees without a burl.
Therefore, finding a “worthy” mouthguard is quite difficult... Unlike suveli.
Suvel.
Suvel is formed by overgrown annual rings of a tree. The structure of the growth, as the name implies (also called svil), is twisted, caused by twisted annual rings.
Reaches enormous sizes. In the Vatican there is a font carved from one growth. But, according to my observation, the smaller the suvel, the more saturated its pattern. Under the bark of the growth, the surface is lumpy, but without “spikes”, like on a burl, but in the form of large, smoothly flowing depressions and “hills”. Suvel is well polished, and polished wood impregnated with linseed oil, for example, is very beautiful - it seems to glow from within, the pattern is multidirectional, with a mother-of-pearl tint.
It is also difficult to process, but easier than cap.
IT IS PREFERABLE TO CUTT OUT THE GROWTH DURING THE DRY TIME OF THE YEAR, IDEAL AT THE END OF AUGUST, THE BEGINNING OF SEPTEMBER, BEFORE THE COMMONATION STARTS.
The cut area must be protected - painted over with paint or thick lime.
Craftsmen who create amazing crafts from these gifts of nature know exactly how to dry birch suvel. But you can go into the forest yourself in search of suvel and make an exclusive thing with your own hands.
You need to learn how to dry birch suvel in order to create a wonderful thing from the gifts of nature with your own hands.
Processing burl and suveli
You can often see thickenings or growths on the trunks and roots of birch, maple, oak, spruce, pine and some other tree species. These swellings occur as a result of local tissue proliferation. Typically, a distinction is made between beads with a smooth surface (suveli)
, the texture of which on the cut is similar to the texture of Karelian birch, and beads
with an uneven surface (burls)
, the texture pattern on the cut of which is very beautiful and is an intricate interweaving of annual layers with concentric ones scattered here and there circles of the cores of dormant buds. The nature of the formation of both burls and suvels has not yet been clearly defined, but for the master these burls are the most valuable material for work. They are harvested from fallen trees in windfall areas or at sawmills. It is clear that it is easier to separate the influx in the form of a growth from the tree, so in the future we will talk about processing the growths specifically. The latter are cut off with part of the stem wood - then it will be clear what to remove and what to leave. The workpiece is freed from all excess (bark, unnecessary knots), and tar and rot are also removed. Then the workpiece is boiled in a 5% solution of table salt. If the diameter of the workpiece does not exceed 10 cm, boil it for an hour, the duration of such processing of large workpieces increases to 3...5 hours. Boiling is necessary so that the juice inside the wood warms up, is neutralized and the workpiece dries faster. (By the way, the resulting solution can then be used as a beige dye for yarn and fabrics, and by evaporating it, it is even possible to obtain a stain for tinting wood and bone products.)
Next, the workpiece is removed from the solution and, without allowing it to dry, is subjected to pre-treatment. Wet growth wood is quite soft and pliable, and it is also easier to remove any remaining bark from it. At the same time, in the process of drying the boiled workpiece, the likelihood of cracks appearing in its thin walls, if any, is reduced. Once dry, the wood will become hard and will be much more difficult to process.
When starting work, the master must first of all decide which “direction” product (horizontal or vertical) he intends to make from his workpiece. You can't cut from the shoulder here. If the craftsman is going to cut something vertical, for example, a “standing” vase, the workpiece will have to be “positioned”, forming a flat bottom for it. In this case, a workpiece made from a build-up of a typical shape (like a “hedgehog”) will most likely have to be cut across the grain. When working on vases, dishes, boxes, you have to carefully select the “inside” of the future product from top to bottom. Remove excess wood “on a cone” using a drill, an ax, and semicircular chisels. It is not recommended to thin the walls of the product too much, because wood does not like walls that are too thin; the walls, by the way, look even better when they are thick enough.
- Links and examples Examples of finished knives with burl or suveli handles
Introductory information
Many knife lovers or hunters make knives on their own, and most of them order the necessary components from online stores: a blade, a bolster, a butt pad, a block of exotic wood. It’s about the last one, that is, about the tree, that I want to tell you.
I have worked with different types of wood: bubingo, merbao, different types of walnut, beech, ebony... But here we are talking about a completely different type of wood. About our Russian birch burl and suveli. What is it and how to prepare wood yourself for subsequent processing and achieving the final result - a knife handle?
The harvesting method is not new, and I am not the author of the technology described. I gleaned some information from the Internet, and read some from books on artistic wood carving. I simply managed to systematize the experience gained and adapt the technology of drying burl and suveli wood to my conditions.
Suvel is a growth on a tree trunk with a bizarre, intertwined arrangement of fibers.
A burl is a suveli-like growth, twisted in the arrangement of its fibers, from which many small branches also grow. Thanks to this, the structure of the burl acquires not only curliness, but also beautiful rings, stains and wormholes.
With proper processing - drying and impregnation (which will be discussed below) such wood becomes not only extremely beautiful, but also viscous.
How burl and suvel are formed on wood, I cannot say for sure.
In different sources, respected people, experts in their field, put forward different theories, I read quite a lot of them. The first stage
The first stage is reconnaissance, and in the summer, my son and I, walking through the forest, noticed promising trees, from our point of view. The best time for harvesting is September - October
when the movement of juices slows down and almost completely stops.
Required tool:
- bow saw - I use Swedish blades specifically for quick cuts;
- small but very sharp hatchet (600–800 g);
- can of oil paint.
First , use a hatchet to carefully cut the tree bark in a circle.
, going a little onto the burl itself (the operations for preparing suveli are no different),
then we take a bow saw
and begin sawing off the burl.
Since the burl is very viscous, as I mentioned above, you have to cut in shifts and with rest. And this despite the special, very aggressive tooth of the blade, popularly called “wolf tooth”. I once tried domestic and Chinese canvases - summary: if you are not a sadomasochist and do not intend to use this process as a way to lose weight through extreme sweating, then it is better to never use such a tool! ( It’s less labor-intensive and time-consuming to use a chain saw
, but keep in mind that when cutting down a medium-sized piece of wood, the new chain becomes completely
dull. Editor’s note.
)
After the required piece has been sawed off, we position ourselves on a nearby stump and carefully chop off the bark. The main thing here is not to rush, so as not only not to spoil the workpiece, but also not to shorten your fingers in a hurry. The workpiece is spherical and quite nimble.
Cover the cut area on the tree with paint. We took what we needed from the forest, and there was absolutely no point in spoiling the tree.
Moreover, there may be more than one burl on one tree.
For several years we have been cutting down blanks from one tree as needed, and the tree is still alive. Second stage
You have two drying options:
- Natural – burl or suvel dries in natural conditions.
- Cooking in salty solution. This method has been used since ancient times to speed up the drying process.
I always boil my preparations, but here there are several options. You can do it at a fire, but you need to constantly monitor the intensity of the firewood burning (to put it simply, so that the fire doesn’t go out), but it’s better at home on a gas or electric stove. It is important to start cooking quickly. Thus, you will not only finish it earlier, but the workpiece will not crack. Take a suitable container and fill it with water. To begin with, dissolve about 100–150 table salt in water. It all depends on the size of the container and the workpiece (we selected it empirically for a 3-liter container). During the cooking process, which means for 4-5 hours, add water (it should cover the drip) and add two tablespoons of salt when it boils. The water should boil constantly.
During the cooking process, the workpiece must be completely saturated with saline solution. Otherwise, cracking of the wood is inevitable, and all the work will go down the drain. There must be at least 4 cooking sessions at intervals of 24 hours. The fact is that in one cooking session our workpiece cannot be saturated with saline solution. When drying, salt displaces sap and moisture, which is how the wood is express-dried without cracking. In the intervals between cooking, we wrap the caps tightly in newspaper, which we change as it absorbs moisture from the workpiece.
We do the same after the last cooking.
The preparation remains in the newspaper for another three weeks (for those who are itching), or better yet, a month. In the last few days the newspaper will be almost dry. And now our cap is ready. The third stage
is sawing into dimensional pieces, for which you will need a hacksaw with a fine tooth for a “clean saw” and a pair of carpentry clamps. We mark the burl, secure it with clamps and saw it.
You need to secure it thoroughly, because the cap will most likely move slightly after drying. One medium-sized burl produces 3–4 blanks for knife handles. The trimmings are used for the handles of cutlery in the “hunting” style.
A small but important detail.
We dip the ends of the sawn blanks into 2–3 cm of molten wax. This is necessary so that during final drying the blank does not crack, and in the middle part the remaining moisture finds a way out.
The last stage
Well, the last one. There are many ways to impregnate the final product (I mean a ready-made knife with a mounted handle). But in my experience, the best way to impregnate a burl or suvel handle is cooking in a steam bath
in natural beeswax over low heat. I also tried the newfangled carnauba wax, but it can’t compare with our beeswax. With this method, hot wax saturates the handle completely and not superficially within about an hour. The tree acquires transparency, begins to glow from within, and durability.
To emphasize the beautiful grain of the structure, I recommend lightly tinting the wood with a special
stain BALSIN SCHAFTOL from BalistolKlever. This must be done, of course, before cooking in beeswax. The final polishing and gloss is applied with a special wood oil, Danish oil, from Rustins. Three times per day with intermediate drying.
With this treatment, the handle of the knife will serve you for a long time, pleasing the eye and warming the soul - after all, I myself made such beauty
- long years!
Links and examples
Alexander Lopukhov, Prorez magazine No. 2, 2008.
If wood is the most beautiful and most popular natural material, then burls and suveli are a concentrate of this beauty. What an irony: what foresters call “a defect in the shape of a tree trunk” becomes a lucky find for skillful hands that turn suvels and burls into real masterpieces.
How to dry birch: suvel and drip
Suvel (the second name for svil) is a special growth on the trunk of some trees. It grows faster than the tree itself and sometimes grows to enormous sizes. It received this name because of the interesting twisted patterns that are unique, like human fingerprints or frost patterns on windows, and therefore valuable.
Birch burls are also growths, but they differ from suveli in shape. Suvel has a twisted structure and a relatively smooth surface, and the cap (another name is witch’s broom) grows in the form of a spherical growth of fibers intertwined inside.
Such growths, after preliminary preparation, are used to create jewelry, amulets and medallions, key rings, decorative interior elements and tableware.
You should go into the forest to hunt for exclusive material at the end of summer - beginning of autumn. The best months for this are August and September. There are no recommendations for searching; you need to inspect all suitable trees on your way; “trophies” of this kind go to only the most attentive.
When you find what you're looking for, don't rush to reach for the saw. Look where the growth is located: if it is on the root or wrapped around the perimeter of the trunk, cutting can seriously damage the tree. In this case, it is worth looking for another copy.
Tree burls: what is it?
Wood burl is not only an amazing material from an aesthetic point of view, but also from a botanical point of view. A group of hundreds or thousands of dormant adventitious buds, shaped like tubercles or needle-like growths with a rudimentary ring structure around them, is the cap. Externally, it has the appearance of a rounded growth, or ringing the entire trunk, covered with bark. Sometimes “sleeping” buds can wake up and escape from the burl.
Suvel (left) and cap without bark
Wood burls are characteristic of deciduous trees - linden, birch, oak, aspen, walnut, elm, but in our latitudes the birch burl is most often found. Perhaps the birch burl has the most beautiful structure. It is rare to find burl from coniferous trees.
As for the size of the burl, they can vary from barely noticeable on the trunk, the size of a nut, to one meter and even two meters. Wood burl is a very rare phenomenon, much less common than burl. Although sometimes two or even several burls can form on one tree. The burl grows for a very long time – we are talking about tens of years.
The burl that forms near the root is called basal, or caporoot; that burl that grows on a trunk or branches is a stem burl.
Why does a burl appear on a tree?
A very interesting question to which it is impossible to give a 100% correct answer. – like Chuk and Gek, they are almost always pronounced in pairs. However, they have completely different natures of education.
Option 1.
An adventitious bud appears under the bark, but the tree bark is so hard that the bud does not have the strength to break through it. But the growth mechanism has already been launched; plant hormones and nutrients rush to the site of potential germination, which assist in the appearance of many new buds, which also do not have the strength to break through and, thus, the burl grows.
Maple burl texture
Option 2
. An adventitious bud appears under the bark, but due to mechanical damage - a hurricane, a human hand, an animal - it cannot develop normally. And it develops abnormally, with deformation of the wood structure.
Option 3
. An adventitious bud appears under the bark, but due to spring frosts, viruses, bacteria, fungi, insects, and the specific mineral composition of the soil, the tree feeds not the shoot, but the burl.
Be that as it may, the most interesting thing about wood burl is not its origin, but its texture. Let's talk about her.
Wood burl: texture
The main way that burls and suveli differ from each other is the presence of “eyes” of knots in the burls when viewed in a transverse section. The pronounced core of small branches, together with a curled complex texture, pronounced twisted annual layers, give an incredible, fairy-tale pattern. Moreover, in nature there are no two completely identical mouthguards - neither in shape nor in design.
On a fresh cut, the texture of the burl is faintly visible; it appears after processing - grinding, polishing, toning. At the same time, the texture of the stem burls is thinner and more refined than the root burls.
After processing, the burl resembles stone more - marble, malachite - than wood. At the same time, the material acquires a muted shine and pearlescent shine.
The color of wood burl largely depends on the type of wood and where it was formed. The predominant colors in the burl texture range are brown, milky, pinkish, greenish.
Due to the large number of knots and curls, the burls are difficult to process, but they lend themselves well to grinding and polishing.