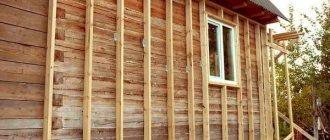
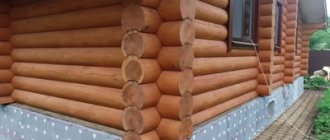
Veneering is done when they want to restore aged furniture or try to give it a new design. The doors may develop cracks, scratches, or dents. The paint may fade, and the varnish may crack due to mechanical influence.
The doors are veneered so as not to waste money on buying a new sheet. In order for the veneer to last long and reliably, you need to properly prepare the surface for gluing and select high-quality glue.
Useful tips and tricks
To ensure that the user is pleased with the result of self-gluing veneer, you need to follow the advice of professionals:
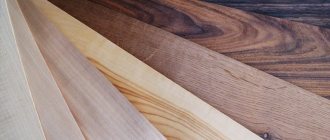
- veneer textures allow you to create interesting patterns; you can even join different types of wood on one sheet;
- Pre-grinding of the blade begins with sandpaper with a coarser grain and ends with “zero” sandpaper;
- sanding is carried out only along the wood fibers;
- when ironing the material with an iron, apply a layer of cotton fabric on top;
- You cannot stop while ironing; you must continuously move the iron over the surface, otherwise scorch marks will quickly appear on the veneer;
- if black marks do appear, they can be carefully removed with a sharp knife;
- It is most convenient to heat the corners and edges of the veneer with a soldering iron (if the hot gluing method is used).
Immediately after finishing the lining of the canvas, it must be covered with a layer of varnish.
The fact is that new veneer strongly absorbs moisture, it is important to protect it from excessive swelling. This will help the product serve faithfully for many years.
Additional recommendations
To glue veneer to MDF or wood, you should adhere to the following rules:
- Prepare the canvas for work.
- When ironing the material with an iron, it should be covered with a layer of natural fabric.
- You need to operate the iron continuously.
- If scorch marks appear, they must be removed with a sharp knife.
Materials such as veneer can be glued in various ways. Thanks to the correct choice of fixing compounds, it will be possible to achieve excellent adhesion to the coating.
How to glue correctly at home
To achieve a strong and reliable fixation, you must properly prepare the surface and strictly follow the technology for applying the substance.
Surface preparation
Fixing veneer is considered a simple process that requires strict adherence to instructions. Otherwise, the lining may come off. First, the surface must be carefully prepared. It is worth considering that the material is not glued to untreated canvas.
To prepare a door or other product, it is recommended to perform the following steps:
- Remove the fabric from the loops. This is done using a screwdriver or pry bar.
- Place the product on the floor.
- Remove fittings - decorative elements and handles.
- Remove the old coating with a sharp spatula. It can be heated with an iron or a hair dryer.
- Sand the coating with sandpaper or a special machine.
- Cover holes and defects with a special putty designed for wood.
- Apply wood glue.
How to prepare and cut the material
To carry out the work you will need the required amount of material. Veneer is usually sold by the meter. The purchased material needs to be cut. First, the rolls should be straightened to level the veneer. Thanks to this, it will take on a natural shape.
It is recommended to carefully measure the canvas. After this it is permissible to cut it. There should be 5 centimeters of allowance left on each side. This will prevent problems due to erroneous measurements. To cut the material, you should use a plywood knife or plunge-cut saw. It is recommended to use a professional electric tool. This will help you get accurate and beautiful cuts. Scissors cannot be used. They will lead to the formation of cracks in the material. It is recommended to select veneer in the form of boards or strips according to the pattern. After this, you need to glue the sheets with glue. This is done along perpendicular lines and joints.
Gluing methods
When using two-component glue, it is necessary to mix the components. The fixation can then be carried out in the optimal way.
Cold contact method
This is a rather complicated method. To carry out the procedure, you need contact adhesive designed for veneer. This product is characterized by a minimum exposure time, which helps the glue to set quickly. This method is not suitable for inexperienced craftsmen, since it does not allow them to correct errors in their work.
Hot gluing
This is an easier way. First, both surfaces are treated with a layer of glue, which should dry for a quarter of an hour. Then the veneer is applied to the main sheet and ironed with a hot iron. It is also permissible to use a lapping hammer.
The device helps to heat the adhesive layer. Thanks to this, it melts and ensures reliable fixation of the veneer and base. In addition, during the procedure all air bubbles are released. This helps increase the quality of the coupling. This method will require thick glue. If the surface dries too quickly, the base should be lightly sprinkled with water. Large swellings are carefully pierced or incised. Then they should be ironed again.
Cold gluing with pressing
For this type of procedure, it is worth using the Titebond adhesive composition. They should treat both surfaces and level them with a spatula. After this, it is recommended to attach the veneer to the base. Then carefully adjust the position of the material and secure it with a clamp. The fixing elements must remain until the glue has completely dried. After which they should be removed and the reliability of the fixation assessed.
Surface preparation
How to glue veneer? The process is simple, but requires strict adherence to the instructions, otherwise the lining may come off over time. First, you need to properly prepare the work surface: you cannot glue the material onto an untreated old canvas.
You need to work with a door or other product as follows:
- remove the canvas from the hinges using a pry bar or a screwdriver (whichever is more convenient);
- place the product on the floor, chairs;
- remove all fittings - decor, handles;
- remove the old coating using a sharp spatula, you can also put it under an iron or heat it with a hair dryer;
- sand the canvas with sandpaper or a sanding machine;
- Fill cracks, holes, and defects with special wood putty, then go over them with wood glue.
Veneering: types
There are several main types of veneering, let's take a brief look at them.
— Hot veneering. With this method, the veneer is glued to the base using adhesives. The most accessible method for home conditions, it will be discussed in the article.
— Cold veneering. Here the veneer is pressed onto the base. We are talking about pressing machines or screw clamps, which not every home owner has.
— Membrane veneering. An industrial method used for veneering complex surfaces. Membrane veneering is based on vacuum joining of veneer and boards - both smooth and textured.
How to choose glue for veneer: gluing rules
In order to update some interior details, you don’t always need to spend a lot of money; it’s enough to simply cover them with veneer. This applies, first of all, to shelves, doorways in the form of an arch, cornices and much more. It is important not only to choose the right quality finishing material, but also the adhesive composition. Next, we’ll look at what glue to use to glue veneer, as well as how to do it correctly at home.
Wall veneer covering
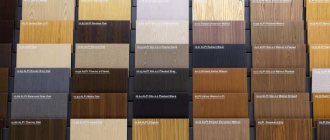
Which glue is better?
It is very easy to get confused among the variety of adhesive solutions. What glue is best for gluing veneer to plywood or other similar material (see photo). Very often, when gluing sheets tightly, ordinary PVA glue is used. But it is only suitable for flat surfaces. More complex elements can only be made using more reliable compounds, for example, Titebond adhesive solution for wooden surfaces. But it is worth noting that it does not cost that little. In addition to the above compounds, veneer can also be glued using polyurethane, epoxy, as well as soluble hide or liquid hide glue.
It is best to start sanding the base for veneer with fine construction sandpaper and finish with fine sandpaper.
The color of the veneer sheets must be selected so that they harmoniously combine with wallpaper, furniture, etc.
The patterns left from sheets made from various types of wood are very interesting.
With the cold dyeing method, the coating of sheets at home turns out to be more uniform and stable.
After staining the veneer, it must be washed under running water and then dried in a warm place, but away from direct sunlight.
In simple terms, veneering is gluing thin plates of wood with a beautiful structure (actually) onto a wooden base - be it a table, wall or door - of lower decorative qualities. It turns out that veneering furniture means dressing it in beautiful clothes.
Veneering is more correctly called veneering
. But it just so happens that the slang word “veneer” is more familiar to the average person’s ear than “veneer.”
How to properly glue veneer to the base?
A fairly simple way to imitate solid wood species using only glue, veneer and wood-based material (chipboard, fiberboard, MDF, plywood).
Although veneer of valuable wood species is used here, and the work itself requires attentiveness and precision of the eye, this work can be done even at home. But there are several features that must always be remembered and observed during work. Veneer should only be glued onto a very flat surface, slightly rough, but without visible notches. If I may say so, the surface of the base must be velvety, the veneer must be glued across the direction of the base fibers, but not along, otherwise cracks may appear that will only spoil the surface. They arise due to different shrinkage of the veneer and the base. If you use expensive veneer and glue it onto a particle board, be sure to glue an intermediate layer of cheap veneer or cotton fabric.
When using burl or high-grain wood veneers, select a base of thoroughly dried wood to prevent cracks from forming later.
First of all, you should paste over the side edges of the product so that later the end of this plate is not noticeable from the front side.
Particular attention should be paid to the joints between the span plates. In order to avoid gaps, which you then have to fiddle with for a long time, first glue 20-30 mm plates along the edge of the joint, and then, when this operation is done and the seam is invisible, dry the plate with a hot iron, practically without pressing. If this is not done, the veneer will shrink and a gap will appear at the joint. If the gap cannot be avoided, the veneer plate can be carefully heated and lifted from the surface of the base using a knife or spatula, and then re-glued to a new place.
Leave a 10 mm veneer allowance along the edges of the product; when finished, it will need to be cut and sanded. You need to chamfer 2x2 mm from the top and bottom so that the edges of the veneer do not protrude beyond the dimensions of the product.
To glue veneer on small surfaces, use PVA glue, and on large surfaces, use wood glue. This will help you make the pasting better.
Just like gluing, gluing is carried out in two ways: pressing and lapping. Both methods are performed in the following sequence: First, apply a layer of glue to the base, then put veneer on it, iron it with a clean cloth, thereby removing all air bubbles from under it. After this, for a better connection, moisten the top of the veneer with a sponge and warm water. After 1-2 hours, when the glue begins to thicken, rub the veneer in the direction of the grain, being careful not to pick up the edges. To do this, all movements must be directed towards the edges or diagonally towards them;
Before leaving the structure until it is completely glued, place sheets of white paper on the seams. Now all this can be left as it is, or you can put it under a press, placing paper on top of the veneer, then a gasket, and only then clamp it with clamps;
Sifted and heated sand can be used as a press for parts with an uneven, curved surface. First place a sheet of paper on the surface, thereby protecting the veneer from contamination, and then a canvas bag with sand. The more sand, the more pressure will be exerted. But it should not be excessive so that the veneer does not deform. The optimal pressure will be exerted by a layer of sand of 9-11 cm. The surface can be freed from such a press only after the sand has completely cooled, so that the veneer does not “bubble”.
Sanding is done with No. 3 sandpaper and only along the grain of the glued veneer. Electric grinders should never be used, because the resulting transverse scratches under the varnish will be very noticeable and it is almost impossible to hide them. All grinding work is done by hand; it is not at all as difficult as it seems at first glance.
When the pasted surface has already been cleaned and sanded, a layer of varnish should be immediately applied to it, because veneer, like any thin slice of wood, has the property of instantly absorbing moisture and peeling off. To process veneer, it is better to use furniture nitro varnish; it dries quite quickly and within 10-15 minutes after applying the first layer of the product, you can turn it over and continue working on its reverse side.
Now let's talk about the disadvantages that may arise when gluing veneer to a base. First of all, this is the formation of so-called “siskins” - places where the layer of glue was insufficient, and the formation of air cushions occurred. The simplest tapping will help you detect such areas - empty places will sound dull under impacts. The “siskin” should be cut with a joint knife, then carefully lift one edge and use a pipette or syringe with a large-bore needle to pour a few drops of glue into the void. After this, using a rag, stroking the surface in a circular motion, spread the glue inside the former “siskin” and iron the seam, onto which you then need to apply a paper strip.
Then, this place must be ironed with an iron heated to a temperature of 100-110 degrees.
You can experimentally select the optimal iron temperature. To do this, place it on the surface of the veneer for 20 seconds, after which the presence of scorch marks is checked. The iron should be as hot as possible without burning the veneer. This temperature will be sufficient for work, because the adhesive layer applied to the veneer heats up within 8-10 seconds and cools down within 5-6 seconds after the iron is removed. Air bubbles formed due to uneven grinding most often have a convex shape. Such a bubble also needs to be cut, slightly soak the veneer around the bubble, then pour in a few drops of glue from a pipette or syringe and rub it with a warm iron through the paper.
Pasting methods
The base on which the sheets will be glued must be degreased, after which it is covered with glue for gluing the veneer. The most popular method of gluing sheets is tightly. The glue for it is made thick and applied hot. You need to make sure that it dries on the base, because otherwise the adhesive solution may appear on the surface, especially if the veneer is very thin. After the contact adhesive for the veneer has started to set, it’s time to lap the sheets. This is done using a special lapping hammer, which is constantly moved in the direction of the fibers.
The grinding process begins in the middle of the sheet, gradually moving the tool heated to 85°C to the edges, while removing excess glue. It is advisable to moisten the veneer with warm water during operation. This is done so that the adhesive solution does not have time to dry too quickly. If it happens that not the entire base was covered with veneer glue, bubbles may form, to eliminate which you will have to cut the sheet with a blade and introduce a small amount of adhesive underneath it. After this, the veneer is processed again with a lapping hammer or a warm iron. Thus, you can quite easily glue veneer at home.
Recommended brands of adhesive composition
To glue the material, use the following veneer adhesives:
- PVA - used for fixing flat surfaces.
- Tightbond is a professional solution that is highly resistant to moisture.
- Epoxy resin - used to bond plywood and thin wood.
What mistakes are often made when working like this?
The most popular mistakes made by craftsmen when gluing
When fixing veneer, inexperienced craftsmen often make mistakes such as choosing the wrong adhesive composition, violating the technique of using the substance, and neglecting to prepare the surface for fixing.
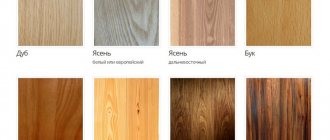
What is veneer and what types does it come in?
Veneer refers to thin sheets of wood, the thickness of which is from 0.5 cm to 1 cm. They are glued to a base material, for example, wood or MDF. This process is called veneering.
Veneer is divided into several types according to cutting and manufacturing methods, and the use of wood species.
By cutting methods
- Tangential - the tree trunk is sawn at a certain distance from the core to obtain an individual blade pattern and texture;
- Radical - the cut passes clearly in the middle of the trunk, and allows you to obtain a high-quality homogeneous blade that is resistant to various influences.
By processing method
- Planed fabric is made on a horizontal machine using a running knife. At the same time, the tree trunk is securely fixed, and the canvas turns out to be very thin. Furniture and facades are decorated with this veneer.
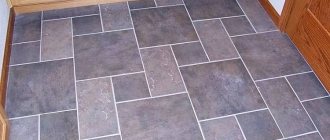
- Sawn - made on a machine with high precision and 20 saw blades. The sheets are smooth and have high wear resistance. The material obtained by sawing is used to decorate multi-layer doors and parquet.
- Peeled - when making canvases, a special machine is used that peels short pieces of wood. The resulting sheets are used for cladding and veneering. Special knives allow you to get an original design.
Preparation and cutting of material
Next, you need to buy the material (usually veneer is sold by the meter) and cut it. The rolls must first be straightened so that the veneer becomes smooth and takes on a natural shape. For faster straightening, you can moisten the sheets with a wet sponge and place them between layers of drywall and plywood.
The fabric must be measured carefully. Then you can cut, leaving a 5 cm allowance on each side. This will help avoid problems if the measurement was incorrect. Cut the material with a plunge-cut saw or plywood knife. It is best to use an electric professional tool, so all the cuts will be accurate and beautiful. It is forbidden to use scissors: they provoke the appearance of cracks in the material. Veneer in the form of strips, planks must be selected according to the pattern, the sheets must be glued with adhesive tape along the joints and perpendicular lines.
Gluing methods
Before starting work, you need to mix the glue if it is two-component. Next, you can carry out gluing using the chosen method.
Cold contact method
This technique is much more difficult. To implement this, you will need contact adhesive for veneer, which sets very quickly due to the minimum exposure time. This technique is not suitable for beginners, because there will be almost no opportunity to correct inaccuracies in the work. After applying the product to the base, you need to firmly press the veneer onto it.
What is important is a strong clamping force in the first seconds, which allows you not to use the press in the future. Typically, the technique is used for gluing small products.
Hot gluing
Veneering is easier this way. First, a thin layer of glue is applied to both surfaces, which dries within 10-15 minutes. Then the veneer is applied to the main sheet, melted with a hot iron, or a lapping hammer is used. Since the tool heats the adhesive layer, the latter melts and tightly grips the veneer to the base. In addition, all accumulations of air bubbles are released, and the quality of adhesion improves.
For this technique, it is important to use glue with a thick texture. If it is noticed that it dries too quickly, the base is first sprayed with a little water.
Large swellings will have to be carefully pierced, cut, and then ironed over them again.
Cold gluing with pressing
For this method of veneering, Titebond glue is most often used. It is applied to both surfaces, leveled with a spatula, and the veneer is applied to the base. Afterwards, carefully adjust the position of the material and fix it with a clamp (clamp). Do not remove the clamps until the glue has completely dried, then remove them and check the strength of the connection at the ends of the canvas.
Common Mistakes
Beginners often make offensive mistakes by choosing a gluing composition that is too liquid; the excess gradually seeps through the wood structure and stains the furniture. Partial peeling of the material also occurs due to the fault of the master, who unevenly distributed the glue.
The formation of bubbles is fraught with swelling of the surface and rapid damage to property; such errors occur due to greasy stains on the workpieces; you need to work on the base first.
Gluing methods
After the canvas has been prepared, the material has been cut to size, and the glue has been selected, you need to learn how to glue veneer at home. There are three ways to do this.
Cold contact method
It is considered the most difficult method of gluing wood to a treated surface. Involves the use of contact adhesive. The difficulty is that the binder sets quickly. This will make it extremely difficult to correct inaccuracies when mating surfaces are placed incorrectly.
In order for the gluing to be reliable, it is necessary to create a strong pressing force in the first seconds of contact between the materials (press with your hand or a weight). Experts do not recommend using it for gluing large surfaces.
Hot gluing
A layer of glue is applied to the surfaces to be glued, which must dry for a certain period of time. After this, it is necessary to attach a sheet of veneer exactly to the dimensions. Using an iron, the sheet begins to be smoothed from the center to the edges. The adhesive composition melts under the influence of high temperature and glues the two materials together.
For the contact hot gluing method to work, it is necessary to use an adhesive with a thick consistency. To prevent the glue from drying out too quickly when using an iron, you need to moisten the veneer surface with warm water. In places where there are swellings, punctures or cuts must be made to release the air.
Cold gluing with pressing
A classic gluing method that requires securing clamps to the glued surfaces. The holding time is indicated on the packaging of the composition used. After drying, it is necessary to remove the clamps and check the condition of the door ends.
Now you know how to glue veneer
In order for the work to proceed without difficulty, it is necessary to take into account the recommendations and advice of the veneerers:
- When using veneer made from expensive wood species (oak, ash), it is necessary to apply a layer of cotton fabric to the canvas.
- The new surface can only be sanded along the grain with sandpaper.
- Since the new coating absorbs water well, immediately after gluing it must be covered with a layer of varnish.
- When using an iron, you need to constantly move it across the work surface. It is forbidden to hold a heated metal surface in one place. If scorching occurs, it is necessary to remove the blackness with a sharp knife or blade.
- To secure a long strip of veneer to an edge, you need to secure one of the edges using an iron or hair dryer. It is convenient to use a soldering iron to secure edges and corners.
- Covering radius doors should be entrusted to old furniture veneerers.
- Joint veneer panels made from different types of wood look unusual.
- At the ends located at the bottom and top of the blade, it is necessary to cut off 2 mm chamfers on both sides. The sash will not cling to the frame after gluing the new wooden covering.
- When cutting a sheet with a knife, it is recommended to do so across the grain. If the sheet is cut lengthwise, it is necessary to make several movements with the blade. Otherwise, the cutting part of the knife will slip and ruin the sheet.
By following the basic rules, you can carry out the work without difficulty.
The skill of veneering can be useful not only for restoring door panels. With the help of new wood sheets you can change the design of wooden furniture. It can be coated with any color of paint for wooden surfaces. The main thing is to apply varnish or plastic film to protect the veneer from the damaging effects of moisture.
Restoring polishing
Restoring a layer of varnish is a complicated matter. Any furniture restoration begins with cleaning and degreasing, and repairing the varnish coating too. We use dishwashing detergent diluted in water: safe and reliable. After drying, we proceed to refinishing the polish.
Scratches are painted over, then the coating is restored
You can simply refresh the faded polish on furniture using mixtures you prepare yourself:
- Two parts each of linseed oil and turpentine and one part vinegar. Mix everything, apply with a swab, wait until it is absorbed and polish.
- Mix oil and beer in equal parts and wipe the furniture with this mixture. After it has been absorbed, rub.
- The surface will be more shiny if you boil beer with a piece of wax, cool it and apply it slightly warm to the furniture. When the composition is absorbed, the surface is rubbed until shiny.
First of all, you need to inspect in detail the surfaces being coated and remove all irregularities, potholes, chips, as well as other damage and defects. It is better to sand the area.
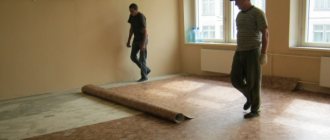
Which is better: heated floors or radiators?
Warm floorBatteries
To level the surfaces of the base, it is possible to use putty of the following composition:
a) rosin - 60 segments zinc white - 30 segments wood flour - 10 segments Rosin must first be melted; b) urea glue - 67 segments, wood flour - 33 parts.
For gluing veneer, it is best to use protein glues - flesh or bone.
If the glue is too thick, the glue slides off the stick slowly, in clumps, or does not flow at all. You can't use this type of glue either. It will lie unevenly on the surface.
To obtain glue of the required thickness, add solid particles of glue in the first case and water in the second. Heat the glue in the glue bottle again to the desired state.
In production conditions, veneer is usually glued in special heated hydraulic presses.
At home, you will have to use the manual “squeeze” method. Its essence is as follows: a thin layer of glue is applied to the prepared surface with a hard brush along the grain of the wood, making sure that no lumps form and there are no uncoated areas.
After applying the glue, wait a short time for 3-4 minutes and apply veneer sheets.
Having placed the veneer on the base, you need to smooth it with a dampened rag, and then start lapping, and the lapping hammer or iron should be heated to a temperature of about 150-200 ° C, so that during lapping, the glue located under the veneer warms up again and gains stickiness. The veneer should be ground along the grain, from the middle to the edges.
It is very important that during lapping, excess glue and remaining air are squeezed out. Grinding is carried out until the veneer sheets are completely glued. Immediately remove any squeezed out excess glue with a damp cloth.
Sometimes veneer gluing is done as follows: a layer of glue is applied to the base and remains there until it dries. After about an hour, the surface of the glue is moistened with a dampened rag, veneer is applied and rubbed in with a heated iron. The veneer is glued very quickly and reliably.
Before gluing, you can assemble small sheets of veneer into a set of the required sizes. To do this, the veneer sheets are laid out according to the selection, face up, the trimmed edges are carefully joined and secured with adhesive tape. The set is turned over and can be applied to the surface to be tiled.
The main difficulty when veneering with individual sheets may arise due to the fact that moistened veneer has the ability not only to curl, but also to expand across the grain. And therefore, after you have lapped the first sheet of the set and glued the next sheet next to it along the joint parallel to the grain, a fold will form from the expansion of the veneer.
Expert opinion
Strebizh Viktor Fedorovich, leading construction foreman
Without the skills to feel how to properly glue veneer, it is advisable to start with surfaces that have small dimensions and are not façade, for example, shelves. If you want to clarify something, please contact me!
Bonding methods
The quality of the veneer material and its strength directly depend on how carefully and accurately the veneer is glued to the plywood blank. There are 3 types of veneer fastening methods.
Cold contact method
This is considered to be the most difficult method of gluing veneer. To implement it, an adhesive composition is used that can quickly polymerize. This rate of hardening has its pros and cons. The fact is that due to rapid adhesion, defects in the location of veneer on the workpiece may not be noticed and corrected in time, and after polymerization it is no longer possible to change anything.
For this purpose, the workpiece is placed under a special clamping press, or pressing is performed manually. In this way, it is recommended to process workpieces that are small in size.
Hot gluing method
The essence of this method is that the surface of the workpiece and the surface of the veneer are separately treated with glue. The adhesive composition should dry a little, after which the veneer is applied to the workpiece. Next, the veneered surface is treated with a hot press or iron if the work is done at home. In order not to spoil the finish, you need to iron the veneer through a layer of clean paper. At this time, under the influence of high temperature, the adhesive composition will melt and create high adhesion.
To perform this finishing method, a thick adhesive composition is used. If air bubbles or irregularities appear during gluing of materials, the situation can be corrected. The adhesive composition, which in the form of excess has gone beyond the workpiece, is removed with a damp cloth.
Cold joining method with pressing
The method is based on the use of compression devices called clamps. Compression of the bonded surfaces is carried out until the glue is completely polymerized.
When choosing one or another type of veneering, it is important to complete the subsequent stages of work. After the glue has dried, I sand the workpiece a little and coat it with a clear, quick-drying varnish.
Already 24 hours after veneering, the product can be used.
When working, you may encounter the following problems:
- If the glue is liquid, seepage onto the surface is observed. The ability to remove a defect depends on the type of glue.
- Uneven application leads to peeling. Lift the peeled fragment, coat it with glue, level it, and dry it.
- Insufficient adhesive or careless cleaning of the surface may cause bubbles to form. Cut the veneer, being careful not to damage the design, inject glue using a syringe, and iron it.
Most errors are associated with improper surface treatment or insufficient glue.
The need for veneer finishing
Plywood is a type of laminated lumber made from natural wood. But, despite its natural origin, the raw materials for the production of plywood are inexpensive wood species with an inexpressive fiber texture and an insufficiently attractive color.
In order to refine inexpensive material, rare or even valuable species are glued on top. As a result, the price of lumber increases slightly, while the aesthetic design improves significantly.
Finished veneered plywood and products made from it look as if they were made entirely from rare wood. However, along with a more attractive and solid appearance, as a result of veneer finishing, plywood acquires improved technical and operational properties.
Main types of veneer
Veneer is a thin layer of wood. The substance is an absolutely natural material, which has several varieties:
- Standard - made from oak, cherry, walnut. Other types of wood can also be used.
- Special – made from rare and valuable wood species.
- Root cuts of interesting species - this material is not suitable for furniture production, but it has an interesting texture. This category includes myrtle or eucalyptus.
- Exclusive – characterized by an unusual texture and non-standard sizes.
The material may also differ in the cutting method and processing methods. Most often it is used in the furniture industry. Often the substance is glued to wall or facade panels. Veneer doors look trendy. This substance is characterized by excellent appearance. It can be fixed on various wooden surfaces. Moreover, the substance has an affordable price. Therefore, it is often used to decorate the interiors of residential premises. The main advantages of veneer include the following:
- long period of operation;
- moisture resistance;
- environmental friendliness;
- high strength.
By cutting method
Depending on the cutting method, veneer can be radial or tangential. Each option has certain features.
Tangential
This material is obtained by planing the trunk parallel to the center. This helps create a ring effect on the surface.
Radial
This coating is obtained by planing at an angle of 90 degrees to the growth rings.
By processing method
Depending on the processing method, veneer has several varieties. Each of them has a number of features.
Peeled
This type of veneer is obtained by rotating logs. During the procedure, a thin strip is cut from them. The saw of a special machine cuts the wood parallel to the grain. This material is obtained from oak and alder. Pine and birch are also used for its production.
sawn
This veneer is made from coniferous trees. These include Siberian cedar and fir. As a result, it is possible to obtain boards with a thickness of up to 12 millimeters. The material is usually used to make musical instruments. It is sometimes used in the furniture industry. This type of veneer is considered the most valuable.
Planed
This material is made exclusively from hard wood. It can be obtained from oak or mahogany. It is distinguished from other types of veneer by the method of cutting wood. First, the trunk must be cut into bars. After which its layers are cut off. This is done perpendicular to the fibers.
Pro Tips:
- Do not use scissors; the material may crack.
- Use carefully dried wood and veneer for work so that cracks do not appear on the surface.
- Position the finishing material so that the direction of the grain of the workpiece and the veneer coincides.
- Minor errors can be corrected by selecting inserts that match the pattern and color.
The WoodNeva company offers residents of St. Petersburg and the region veneer from European oak and other tree species - beech, white ash, as well as American walnut veneer. The thickness of the material is 0.6 mm, 1.5 mm, 2.5 mm, width - from 140 mm, length - from 2500 mm. We offer quality products, help you make a choice, and arrange delivery.