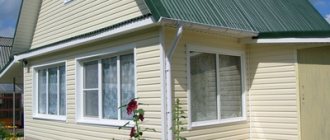
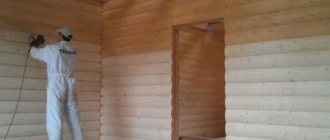
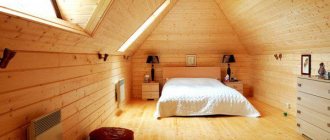
Hi all! Today we’ll talk about how to sheathe a house with overlapping boards, and also what you need to know to do such work with your own hands.
The board can also be mounted vertically. But usually this is done horizontally, using edged and unedged wooden boards.
If you study the cost of specialist work, the price will scare many. And they decide to take everything into their own hands.
Don't rush to conclusions. First, study the technology, all the nuances and complexities, and then make a decision.
How to mount everything
Typically, finishing the facade of a house with unedged boards begins with applying waterproofing compounds to the walls. This will protect the walls from moisture and you won’t have to think about the condition of the base surface after decoration. Next comes the insulation operations - if necessary, it is at this stage that an additional layer of insulation can be installed on the outside of the buildings. Only after all this work does the actual finishing begin. It is performed in the following sequence:
- Slats or bars are attached to the walls, which will serve as lathing for the outer covering. You can place them horizontally or vertically, depending on the orientation of the decorative covering strips.
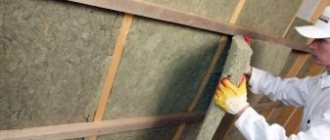
- Insulation is installed if necessary and covered with protective membranes.
- The wall is sheathed with planks from bottom to top in the chosen method. The choice of covering option will be influenced by two factors: ease of installation and preference for appearance. If you cover the wall with overlapping strips, you will need a little more planks, but everything will be easier to do. Installation with a herringbone pattern will require more effort, but the appearance of the coating will be more attractive. However, this is a matter of personal preference.
- The joints of the boards are sealed with sealant and the final design of the wall is carried out.
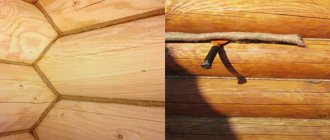
There will be two cladding methods - overlapping, checkerboard or herringbone. The first option involves placing the boards in such a way that the upper one covers the edges of the lower ones on both sides. The second option is similar to a siding plane - the lower edge of the upper plank overlaps the top of the lower one. In both cases, the overlap must be at least two centimeters to ensure maximum aesthetics of the structure and to prevent the formation of large gaps between the dies.
Installation work
You should always start by treating load-bearing walls with protective compounds that will prevent mold, fungi and pests from appearing under the cladding. Then the following work is carried out:
- Marking of vertical lines is created along the entire perimeter of the facade;
- Using the created markings, the wooden planks are secured using self-tapping screws;
- A casting is made on the upper part of the base;
- A beam is installed above it, the thickness of which is equal to the thickness of the lining. This element will provide the skin with the required level of inclination;
- From the bottom corner they begin to fasten the boards with nails. When attaching the boards, you need to step back 2 cm from the side end. Nails are nailed on top and bottom of the wooden block.
Plan for fixing overlapping boards on the façade
After completion of construction work, the joints at the corners of the facade are closed with typesetting elements. They will protect the cladding from premature destruction and give the facade a complete and neat appearance.
We began sheathing transportable bathhouses with overlapping or herringbone boards (linings) in 2014. And these were barrel baths, which we then called “Exclusive”. Despite the fact that “American” (and this is precisely the name given to this facade finishing technology) has been known since time immemorial in the States, Canada, and Scandinavia, it became widespread in our country not so long ago.
The technology is simple, proven, and the result looks impressive. Suitable for exterior decoration of houses, bathhouses, and any other buildings.
Here's what it looks like live:
Article navigation
Technology of cladding boards for façade elements of a private house
There should not be any difficulties when installing façade boards. Following the manufacturer's recommendations and basic skills will help you build a facade without the involvement of specialists. The material is lightweight and can be changed in size.
Depending on the choice of lumber, finishing is done with overlapping boards or joint-to-joint. When sheathing a house with wood-panel boards, they often resort to the overlap finishing method:
- The wall is marked, and the frame for the guide rails is attached using the markings.
- If additional thermal insulation is intended, at this stage insulating material is placed in the cells of the frame.
- The next step will be attaching the façade boards. This happens from the bottom up. All elements are leveled and secured horizontally with self-tapping screws or nails. It is better to fasten in a staggered manner so that the cladding does not move during natural deformation.
- With a plank width of 100 mm, the overlap should be at least 20-27 mm on each side. These proportions must be maintained over the entire cladding area.
- The lengthwise joining of façade elements is covered with even strips.
With the vertical method of finishing facade boards, a tongue-and-groove joint is used.
- First of all, guides are installed according to the markings. Under the vertical cladding, the guides are leveled strictly horizontally.
- Thermal insulation is being installed.
- The boards are attached vertically to the frame with self-tapping screws or nails, in hidden or open ways.
- For better adhesion of the tongue-and-groove lock, each cladding element is tapped with a wooden hammer.
- The joints of the boards are covered with cash strips.
Flashings can be wooden slats that are installed behind the two main sheathing boards, forming a gap between them. This creates internal ventilation of the system. If the main sheathing board serves as flashings, this type of installation is called staggered finishing. The same principle applies when facing with unedged boards.
Sheathing with open seams
For special ventilation of the façade system, they resort to finishing-cladding with open seams. The board can be installed both vertically and horizontally. The basic rule for this type of installation is to install UV-resistant windproof membranes under the main planks. The size of the gaps between the boards can vary from 3 mm to 5-6 mm, but not more than 15-18% of the total sheathing area. A facade with open seams is convenient in practical terms. A separate element is easier to replace in case of damage.
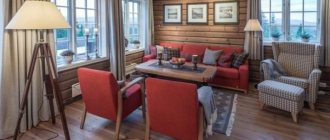
Scandinavian style involves the use of wood and stones. Straight, laconic shapes, natural colors in the decoration. Facade panels, both natural and using composites, can easily cope with all these conditions. The exterior is decorated with clear geometric lines, contrasting colors, in brown, beige, red and gray tones.
Figure 4. Finishing the facade with unedged boards.
Short description
Facade board made of WPC: the cut shows how it will be attached
Wood-polymer composite is a modern material from which panels are made for finishing the facades of industrial and public buildings, as well as cottages.
Consists of finely chopped wood fiber and polymers like polyvinyl chloride.
The main components are mixed and then pressed under high temperature. Thus, a textured, durable material is obtained in the form of facade panels.
The successful symbiosis of organic and inorganic components gives it unique characteristics.
Scope of application
Facade boards made of WPC are successfully used in finishing works outside and inside the premises:
- Cladding of building facades. Main area of application. Acts as the main material.
- Finishing verandas and terraces in country houses. Can be main or additional material.
- Cladding of internal walls of dressing rooms, hallways, rest rooms.
- Installation of fences. An alternative to a regular wooden picket fence.
Engineering board Bauwerk (Bauwerk)
No less high-quality engineered boards are produced under the Bauwerk brand - it is this Swiss company that continues to rank manufacturers. Many years of experience and high-tech equipment allow us to produce products that meet the most stringent operational requirements.
The reliable two-layer design of the lamellas is the key to stability. As in most cases, the first (bottom) layer is a moisture-resistant plywood or wood fiber base, and the top (decorative) layer is a cut of valuable wood.
To make the useful layer, oak, American cherry, ash, beech, Canadian maple, smoked oak, acacia, jatoba, etc. are used.
Bauwerk engineered board has the following advantages:
- Resistance to temperature and humidity changes;
- Geometric stability, eliminating the possibility of warping or swelling;
- Reliability, strength and durability. The service life can reach 50 years due to repeated grinding.
- Originality of execution, variety of sizes, breeds and decors;
- Compliance with European quality standards;
- Possibility of laying on heated floors;
- Safety;
- Affordable prices for some models.
Flaws:
- High cost of individual collections;
- Presence of counterfeit products on the market.
This is how the best manufacturers of engineered boards look today based on consumer reviews.
| № | Brand name | Grade |
| 1 | Bolefloor (Boleflor) | 8,8 |
| 2 | Marco Ferutti (Marco Ferutti) | 8,6 |
| 3 | Global Parquet | 8,5 |
| 4 | Bauwerk | 8,2 |
Requirements for cladding materials
The determining criterion for choosing a material for cladding the external walls of a frame structure is considered to be mechanical strength, which is necessary and sufficient to impart a given rigidity to the frame structure. It is this property that developers are guided by when purchasing oriented strand boards and cement-bonded particle boards (OSB and CSP) for façade cladding. These materials are able to take on part of the frame loads in compression and bending.
The use of rigid outer slabs makes it possible not to use additional jibs and struts in the frame, which greatly facilitates the independent construction of a frame house.
Other necessary properties for façade cladding boards and panels:
- No or minimal shrinkage during operation;
- Resistance to temperature changes and natural atmospheric influences;
- Resistance to the destructive influence of microorganisms;
- Simplicity and accessibility of manual processing and use of fasteners;
- Light weight;
- Durability.
How is a house covered with other types of boards?
Diagram of the connection between the sheathing and the roof.
This option for finishing the façade of a building is not the most economical. You should know that only specialists can carry out high-quality cladding of a house with boards.
The cladding of the front part of the house can be done in the form of lining using smooth or rough boards. The elements are laid overlapping. This can be done by using special boards that have tongue-and-groove or quarter joints. This type of cladding is used for finishing work on walls made of bricks or blocks.
This type of cladding combines decorative and heat-insulating functions. The latter option is used in the case of insulation using the “dry” method.
Cladding the facade of a private house with boards: technology
Wood is an organic material, as a result of which it rots in a humid environment. Therefore, the cladding of the façade with boards will need to be done with ventilation on the reverse side. In order to create such ventilation, it is necessary to install a wooden sheathing on the wall.
Scheme for finishing corners.
When installing ventilated facades, a windproof film is used, which is laid as insulation or directly on the base of the wall.
In this way, it will be possible to prevent the weathering of fibrous insulation materials and provide additional heat resistance to the wall. Such a film will block water, but will not prevent steam from escaping from the building.
The gap for ventilation between the wall and the wooden sheathing should be 4-5 cm. A flow of rising air will form in it, which is capable of removing moisture.
In the lower part of the facade, you will need to provide gaps for free access of air, as well as its subsequent exit under the roof. The holes at the bottom can be covered with a metal mesh to protect against rodents.
The sheathing is made of wooden planks with a square or rectangular cross-section.
Scheme of a wooden house sheathing for planking.
To reduce water absorption, they need to be impregnated with an antiseptic and special compounds - impregnates.
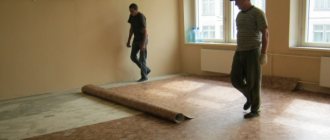
If the cladding is carried out without the use of insulation, then the frame strips must be filled vertically, observing a step of 50-60 cm. If the board is installed vertically, then a double frame must be made.
This can be done by installing horizontal strips on top of the vertical ones. If the wall is uneven, then it must be leveled using pads made of impregnated plywood.
How to strengthen a facade made of boards with your own hands?
The tree will be exposed to environmental influences, so it will need to be protected. The wooden facade will need to be varnished, painted or treated with decorative impregnates. Before applying a protective coating, the wood will need to be coated with a fire retardant compound.
Methods of painting a wooden house facade.
The only exception may be the case when the facade is painted with special fire-resistant paint. This composition will prevent the boards from igniting even in the event of prolonged contact with fire. Ventilated wooden facades will definitely need to be treated in a similar way.
Covering the facade of a private house with wood has a large number of advantages. But there is also a drawback, which is that the boards require updating the protective surface every few years. If tree species are used for cladding roads (for example, cedar or teak), then you don’t have to think about the problem with subsequent painting. In addition, these types of wood will practically not be subject to deformation over a long period of time. Today on the market you can find a fairly large number of boards for sale that have already been processed and painted.
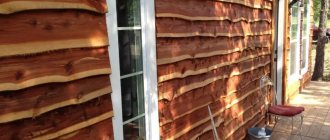
Vertical wall cladding with unedged boards looks more beautiful in interior spaces. For external coverings, horizontal cladding with unedged boards is most often used, which has an original appearance when secured with an overlap. Combined cladding can decorate a building inside and out - all you need is diligence and imagination.
https://masterfasada.ru/youtu.be/oFoeOfyiJFY
The finishing of facade elements with wood using boards of various sections is carried out by carpenters and joiners. To sheathe a private house yourself, you need to have relevant work experience and a certain set of electrical tools.
Other methods of finishing the facade of a wooden house
There are some materials that are not so often used for cladding the walls of a wooden house, but they are still worth considering as a cladding material. First of all, this applies to materials such as corrugated sheets and facing bricks.
Facing brick
The brick facade of a wooden house is now a rarity. But it has the right to life, thanks to its exceptionally high strength, frost resistance, and decorativeness. But when installing a brick facade, it is necessary that the wooden house stand on a concrete foundation - the weight of a wall even half a brick thick is quite impressive.
Installation of a brick facade is carried out only after complete shrinkage of the wooden house, otherwise damage is inevitable. A ventilation gap of at least 5 cm between the finish and the wall is absolutely necessary. The attractiveness of a brick façade also lies in the fact that it requires absolutely no maintenance. The natural appearance is preserved for many decades.
Profiled sheet
In addition to special facade materials, the walls of a wooden house can be sheathed with ordinary corrugated sheets. The corrugated sheet is made of galvanized steel coated with a polymer protective coating. Typically this material is used for finishing technical structures. But thanks to a wide range of design solutions, today we produce corrugated sheets that imitate wood, stone or brick. Therefore, it can be used with complete success for finishing walls or individual fragments of the facade of residential buildings. The advantages of this material include: absolute resistance to negative environmental factors, no requirement for additional protection and maintenance, and non-flammability.
The main disadvantage of the material is its inability to pass steam. That is why it can only be used for cladding ventilated facades. In addition, when the material is exposed to strong mechanical loads, it can bend. At the same time, it is almost impossible to bring the material to its original smooth state.
Lining
This facing material has long been well known to almost everyone. It is a wide panel, the thickness of which is 12-20 mm (depending on the purpose). The tongue-and-groove fastening system allows you to easily, reliably and hermetically connect parts of the cladding together.
The main advantages of lining include environmental friendliness, thermal insulation properties, aesthetic appearance, ease of installation and reasonable cost.
Useful tips
When covering a house with wooden boards, experts advise adhering to certain rules that will ensure a beautiful and durable finish:
For work, it is best to take a board that is planed on one side and not on the other. The rough side of the material is mounted outward. Then the primer, and then the paint, will last much better and longer, and the appearance of the house will be more attractive. The boards do not need to be nailed only at the bottom and at the top, since the material will easily split and absorb moisture.
It is necessary to use the staggered fastening option, when the boards are fixed on the surface of the facade in increments of 30-45 cm, i.e., in a checkerboard pattern. Wood of various species can be used for cladding the house.
It can be cedar, pine, spruce, mahogany. Based on their experience, it is best to use cedar planks. They are not only durable, but also easy to process and have a beautiful appearance.
Mahogany is difficult to process; it is difficult to drive a nail into the surface, although it does not warp over time. Pine has numerous beneficial properties, but it is not very good for external use, as it easily warps and splits. Spruce is rarely used for exterior work on facades, although its performance is much better than that of pine.
Spruce boards are full of knots, and this does not have the best effect on quality. Sheathing a house is best done using ordinary steel nails, not galvanized ones. The problem is that the galvanized layer is easily peeled off during installation, and when exposed to moisture, the nails quickly rust. Stainless steel is much more expensive, but the quality of finish is higher.
Sheathing a building with edged boards is an attractive and simple option for any country house.
This facade is not only stylish, but also environmentally friendly. After installation, the board can be varnished, painted, or impregnated with oil. It all depends on the imagination of the owner of the house and the general style of construction.
https://youtube.com/watch?v=Wdr_IUPgInkrel%3D0%26amp%3Bcontrols%3D0%26amp%3Bshowinfo%3D0
- str-industria.ru
- masterbrusa.ru
- 1poderevu.ru
- dekormyhome.ru
Coating
Coating with protective oils in production conditions costs +1200 rubles/m2. The service includes: sanding, coating the bottom side in 1 layer, coating the front side in 2 layers. We use only proven materials Kreidezeit and Leinos, in our assortment there are more than 50 possible shades to choose from.
Thermal ash
Thermal pine
Any natural wood must be protected with high-quality tinted oils from:
BURNOUT. When exposed to sunlight, the wood begins to fade and over time acquires a dirty gray tint. At the same time, ONLY tinted oils protect against burnout. DIRT AND DUST. When various particles of dirt and dust fall on an unprotected surface, they begin to destroy it. Also, contaminants can be deeply absorbed into the porous surface of the wood and leave unpleasant stains that will be very difficult or impossible to sand off. CRACKS. When water hits a surface unprotected by oil, it is instantly absorbed into the porous surface of a living tree. When the temperature drops, moisture crystallizes and cracks appear on the surface of the wood, which spoils the appearance of the decking. It is also necessary to protect the ends, this is the weakest point of a living array.
We recommend covering the planken not only on top, but also on the bottom. Below you can use any cheap compounds. This inexpensive symbolic layer on the back of the deck will provide additional protection.
Ways to replace a damaged board
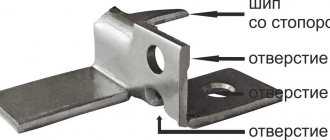
When using natural wood siding, you need to be prepared for the fact that the lower elements will sometimes have to be replaced. The easiest way to replace the bottom board secured with a screwdriver is to simply unscrew the fixing screws and carefully release the top edge from the groove of the top element. When working with boards on clamps, the difficulty lies in determining the location of the fasteners.
If the damaged element is in the middle, then it must be removed without damaging the fastenings of the lower and upper elements. Perhaps damage to the board will contribute to its release from the general sheathing fabric.
If this cannot be done, then you will have to gradually remove all the boards from below or from above up to this board. It is better to number the elements in the order in which they were joined previously. This will simplify reassembly, because during the operation of the house, natural wood is subject to deformation.
Working with siding does not require special knowledge. Using metal or polyvinyl chloride material to cover the facade of a building, no difficulties should arise.
It is a little harder to work with siding made of natural wood due to its heavy weight. But the result is worth it, the building will not only acquire a wonderful appearance, but also additional protection from heat loss indoors.
- Advantages and disadvantages of siding: author's assessment... The use of siding
for cladding a house has become fashionable relatively recently. But, as the sales rates of this building material show... Read more - Exterior siding is deservedly widespread...
Have you decided to clad the outside of your home?siding- this is a good decision. After all, in addition to the external transformation of your home, from moisture... Read more
- Sheathing for metal profile siding
The construction industry is developing along the path of simplifying and speeding up work, as well as improving the quality of building materials. Read more - How to cover a house with siding yourself
The question of how to sheathe a house yourselfsiding, concerns many property owners. Despite the apparent simplicity of the work... Read more
- Types of siding for finishing the outside of a house
The use of siding panels for cladding private and country houses has recently been very popular. Read more - A selection of photos of houses made from siding
Many people wonder about cladding their home.siding.
Siding
looks interesting and, despite its popularity, does not lose its relevance to this day. Read more
Disadvantages of the solution
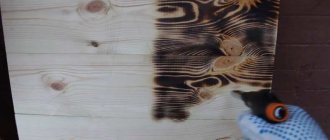
The main disadvantage of wooden structures will always remain poor fire resistance and ability to maintain combustion. However, the modern chemical industry offers quite a lot of means for treating wood, after which it burns much worse. There is another option - burnt planks. It is extremely difficult to set wood on fire after firing if its processing was carried out by professionals. The combination of impregnation and firing will create a virtually non-combustible façade.
At the same time, the material ceases to be of interest to various pests. If the finishing of external walls is done with other materials, for example, decking, then it can also be protected from pests using various primers and impregnations. In general, protection from various external factors is easy and does not cause any difficulties.
If we talk about other disadvantages, then the only point worthy of attention will be the need to regularly carry out surface maintenance. This procedure consists of reapplying protective layers or painting the structure. If there is damage, it can be removed by sanding, using wood putty, or simply painting over it.
Sheathing the house with overlapping boards. How to do it right?
Sheathing a house with overlapping boards
Sheathing a house with overlapping boards is an excellent option to decorate the facade of the house and give it a beautiful and individual appearance. In terms of cost, cladding a house with boards is perhaps the cheapest option for finishing external walls.
As for the durability of such finishing of the external walls of the house, much depends on how the board for cladding the house was processed and how well it was protected from various negative external factors.
Before you take on the task of sheathing a house with boards yourself, read information on this topic, ask your friends and watch a video on the Internet about how to properly sheathe a house with boards. All this will help to avoid mistakes in the process of finishing a house with lapped boards and will allow the lined surface of the walls of the house to last for the longest possible period of time.
Sheathing a house with overlapping boards - instructions
It is probably not worth saying that all boards for cladding a house must be thoroughly dried and treated with antiseptics before installation. Also, in order to sheathe a house with overlapping boards, you will need to assemble a frame. To assemble it, it is better to use wood in the form of small cross-section bars.
Tools for cladding a house with boards you will need:
- A screwdriver if wood screws will be used to fasten the boards.
- Wood saw.
- Hammer, nail puller and pliers.
First, the frame is assembled for mounting the boards. All work on fastening the frame is carried out according to pre-made markings. After the frame is assembled, you can cut the prepared board according to the existing dimensions in order to sheathe the walls of the house with an overlap.
To do this, it is necessary to mark the overlap on each cut board. In this case, the work of covering the house with overlapping boards will go quickly and without complications. Before you start covering your house with boards, you will need to choose one of the available installation methods.
There are several ways to plank a house:
- Sheathing the house with rustic boards or with a tongue and groove bevel;
- Paneling with semi-rustic and quarter-bevel boards;
- Glue-on planking;
- Sheathing with boards in tongue and groove and in straight quarter.
After marking and preparing the boards, you can begin to independently sheath the house with an overlap. In the process of performing this work, the craftsmen recommend adhering to the following tips.
Tip one: Do not nail the boards or screw them with self-tapping screws only from the top and bottom. It is better to do this staggered, because this way it will be better to fix the material. At the same time, during the operation of the wooden facade of the house, the board will not absorb moisture and split.
Tip two: In order to sheathe a house with overlapping boards, it is better to use ordinary steel nails rather than galvanized nails. The galvanized surface of the nail is still peeled off during installation, after which such nails begin to rust very quickly. The ideal option when covering a house with overlapping boards is to use stainless nails, but such fasteners are quite expensive.
So, when sheathing a house with overlapping boards, it is very important to properly prepare the material, make the sheathing and choose from the methods of attaching the overlapping boards, after which you can safely take on this work
FSF plywood painted to look like half-timbered timber on a frame house
A budget-friendly, new and quite interesting version of the frame façade. You need to read the reviews, since this type of decoration for a frame house appeared quite recently, has not stood the test of time, but looks quite promising.
You may read reviews of this technology on the forum; topics appear quite often.
FSF plywood is attached to the frame and painted with 3 layers (primer + 2 layers of topcoat). The inner side is covered with one layer of soil.
And here is the estimate for the facade of a frame house in the photo: Coniferous plywood FSF 9 mm, 1220x2440 mm, grade 2/3, NSh - 56 pcs - 35,784.00 Tikkurila Pika-Teho paint, white, matte, - 18 liters - 9,908, 00 Tikkurila Valtti Phyuste primer composition - 18 liters - 7,508.00 Galvanized self-tapping screws 4x50 3 kg - 615 Paint brush 1 pc - 90.00 Sealant gun 1 pc - 106.00 Frost-resistant silicone sealant 5 pcs - 540.00 Total 54 006.00 (at 2022 prices)
Price per sq.m. it turns out to be only about 300 rubles .
You can view and read about this frame frame with FSF plywood trim here.
Thermal board
Sometimes sellers offer thermal boards as cladding. In fact, this is not any separate material, but a method of processing wood in order to give it special durability and strength.
Most often, larch wood is used to make thermal boards, which is treated at high temperatures. The texture of the wood is completely preserved.
But at the same time it acquires previously unusual characteristics:
- high density;
- resistance to moisture;
- lack of thermal expansion and swelling;
- Possibility of use without additional treatment with protective impregnations.
Engineered board Bolefloor (Boleflor)
Perhaps the most unusual floor is produced by the company Boleflor. It was this brand that was the first in the world to demonstrate a completely different vision of seemingly standardized panel forms and present boards with natural wood lines to customers.
That is, the longitudinal edges of the products are not straight, but an uneven, wavy line.
Each lamella is as unique as the cut of the tree and its pattern. It is almost impossible to find two identical planks. The produced panels receive their own individual code, which makes it easy to restore it later with the same parameters, design and shade.
It is also noteworthy that the length can reach 3 m, and upon individual order, options up to 6 m are possible. The joining method is tongue-and-groove, the optimal installation method is with glue. In addition, the plant produces material both with and without grooves, as well as combining them.
The Bolefloor engineered board has almost the largest cross-section of the decorative layer of valuable rock - the thickness can reach 6 mm.
Advantages:
- Moisture resistance that does not limit the scope of application;
- Reliability and strength;
- Wear resistance to mechanical and impact impacts;
- Long service life – at least 20 years;
- Resistant to temperature and humidity fluctuations;
- Possibility of laying on a “warm floor”;
- Availability of panels with non-standard parameters;
- Form stability;
- Environmental friendliness and safety;
- Unusual appearance with the presence of small knots, sapwood, etc.
Flaws:
- Very high price, perhaps the highest among premium coatings;
- Some limited color range.
Installation of internal board
Sheathing the house with overlapping boards.
Covering the house with boards is carried out according to pre-made marks; a frame for fastening the outer board is required. During work, it is recommended to use a regular hammer; a special nail gun is not used. It is this feature that makes the work of cladding a house with wood so long and requiring patience.
If you will use self-tapping screws to attach the inner board, you can purchase a screwdriver. This will speed up the work and make it better, but the inner row will still have to be fastened with nails; they should be 80 mm long.
Before you start attaching the board, you must first treat it with an antiseptic and dry it. After this, each element is cut to obtain the required length. The front side of the board is placed outward, the bend should be directed upward.