- Features of the material
- Preparation for installation
- Installation of sheathing
- Methods for attaching imitation timber
- Video on installation of imitation timber
- Treatment
- Adviсe
Plastic panels that were used to decorate office premises and houses are a thing of the past, giving way to environmentally friendly finishing materials made from natural wood. Today, when finishing houses, imitation timber is more often used, since this material allows you to create an elegant interior, giving the facades an attractive appearance.
Design
Finishing for imitation timber can be of two types: monolithic and combined. It depends on the design idea.
- Monolithic finishing is a complete covering of the room with imitation timber. In this case, they can cover the walls, floor and ceiling. The panels fit together very tightly, forming a single composition.
- Combined finishing includes various materials. The basis is an imitation of timber, and certain areas of the room can be covered, for example, with tiles or wallpaper. The main thing is to ensure that the finishing is done in the same style and color scheme. You can also implement original design solutions by combining different types of wood.
Regardless of the type of finish, along with imitation timber you need to purchase additional decorative elements. These can be corners, moldings, giving individuality and completeness. They can be made not only in the color of wood, but also in any other shade: white, black, chrome and others. These parts are presented in a wide range on the construction market.
Finishing the bath with warm plaster
An alternative option for finishing the facade of a bathhouse is warm plaster, which is a solution based on cement, expanded clay chips, perlite sand, powdered pumice and granulated foam.
Facade plaster has many advantages:
- high sound and heat insulation characteristics;
- good adhesion to any type of base;
- installation without the use of reinforcing mesh. Exceptions include deformed areas of the façade;
- resistance to rotting, burning, mold formation, infestation by insects and other pests;
- does not require preliminary leveling of the surface.
The disadvantages of the material include the following:
- impressive weight;
- high price;
- limitation on the thickness of the decorative layer - permissible thickness no more than 5 cm;
- the need for finishing primer and painting;
- the need to strengthen the foundation of the building.
The plaster is applied to the cleaned surface manually or by machine. Each subsequent layer is applied after the previous one has completely dried.
Preparation of lumber
Finishing the inside requires special attention to the material. Imitation for interior work should be:
- Made from high-quality wood (classes A, AB and Extra)
- The width of the board is from 10 to 15 centimeters. Boards that are too thin will not look like false timber.
- The thickness of the board is less than 3 cm. A board that is too thick is not suitable for use for decorative cladding.
In an unheated room, use any type of wood. The main condition is treatment with antiseptic and moisture-resistant solutions, as well as solutions that reduce flammability.
The reason for refusing to purchase is a dent on the packaging or wear and tear on the information. The packaging states how the wood was treated, storage conditions and whether the boards require additional sanding.
The desire to save money will not help. Abnormally low prices for products indicate appropriate quality. For the sake of high-quality repairs, choose high-quality materials.
No less important information on the topic: Lining walls
After purchase, the boards are stored warm and dry. If excessive moisture is detected after opening the package, the buyer has the right to return the material to the store. Before starting work, the finishing material is transferred to the room where it will be applied for a couple of days (or better yet, weeks). Before exterior finishing, it is enough to keep the workpieces in the open air for a couple of hours.
All lumber is processed after making the sheathing onto the installation surface. Coating with varnish and other substances occurs after.
No less important information on the topic: Planken on the facade
Kinds
Lining for timber has many varieties, which differ not only in size, but also in quality. Quality primarily depends on the material used to make the panels.
Lining for timber is divided into three main classes:
- “A” – this class includes boards of the highest quality. There are no defects on the surface of such panels.
- “B” – there are minor defects on the surface of the lining of this group. In appearance, such materials are inferior to class “A” panels, but cost significantly less.
- “C” is the most budget option for panels for timber. The material is not of the best quality and has defects on its surface. Often such panels require additional sanding.
Material
The material used to make the lining for the timber will determine its cost and some characteristics.
The following types of wood are most often used to produce such panels:
- pine;
- spruce;
- cedar;
- larch.
Pine and spruce are highly resistant to rot. In addition, this wood has a wonderful resinous smell. Compared to pine, spruce is not as durable and resistant to external negative factors.
Cedar can be called both a durable and soft material. This wood has antiseptic properties and purifies the air from bacteria. Cedar lining has a light shade and beautiful texture. Since the material is a coniferous tree and contains a lot of resin, it has good resistance to putrefactive processes.
Panels and larches are perfect not only for finishing a house, but also a bathhouse. Such wood is considered a fireproof material: the panels do not heat up when exposed to high temperatures and you cannot get burned on them.
Size
As noted earlier, panels for timber have more impressive dimensions than classic lining. The length of the boards can reach six meters. The width of such products varies from 6.5 to 20 centimeters. On the construction market you can also find products with a width of 25 centimeters, but since the demand for such panels is low and the price is quite high, they can rarely be found.
As for the thickness of the panels, the most common options range from 1.8 to 3.4 centimeters. The quality and strength of the finish largely depends on the thickness. Some companies can make custom-made lining according to individual parameters.
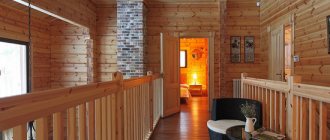
Execution of internal cladding
There are many types of finishes, among which it is sometimes difficult to choose. It is usually used for ceilings and walls. There are two types of cladding used in the house - monolithic and combined.
In the first case, the entire area of the ceiling and walls is covered with panels in compliance with all technologies. In the second option, partial processing of wood is carried out, a combination of imitation timber with textiles, wallpaper, and glass.
Bright and beautiful dining area
Wall decoration
Before finishing the walls with imitation timber, you need to wait for shrinkage (when covering a new house). At the preliminary stage, preparation is carried out with antiseptic treatment, vapor barrier, and laying of sheathing. After this, the panels are installed.
Using this material you can create original, unique interiors in rooms of different functionality. Panels up to 100 mm wide are suitable for narrow rooms, which will visually expand the space.
Tip The panels themselves are mounted horizontally. For larger rooms with low ceilings, it is better to mount the planks vertically.
Bathroom finishing
Ceiling
The ceiling surface must be sheathed after finishing the walls. In this case, narrower panels are purchased, attached to the sheathing in increments of 50-60 cm, placed along the length of the room. They start working from the window.
To calculate the area of the ceiling surface, multiply its width by its length. The resulting figure is divided by the area of one beam. The result is the number of panels required for the cladding. It is not difficult to calculate the fastenings: the total number of planks is multiplied by the number of parts needed to fasten one board.
Living room in Provence style
Before attaching to the surface, the panels need to be kept indoors for 4-6 days and adapted to the microclimate. First remove dirt and unnecessary parts from the walls and ceiling, cover them with impregnations and antiseptic solutions. Then the vapor barrier and sheathing are attached with a construction stapler (self-tapping screws are used at a distance of 70 cm).
When performing complex cladding of a ceiling with walls, first the walls are finished and the planks are secured with clamps. To fix the plastic to the ceiling, use self-tapping screws or small nails. Connections in corners are made with internal and external corners. At the final stage, sanding, tinting or painting is carried out. Processing imitation timber increases the wear resistance of the boards.
Material calculation
Panels for the internal cladding of walls, floors, and ceilings of a private log house can have different thicknesses.
The optimal indicator is 20 mm. The width also varies and is selected by the owner of the log house to his taste. When the width of the panels is determined, you can calculate the actual amount of material for a particular room. To do this, you will need to take measurements of the room: the area of each wall, from which the area of doorways and windows is subtracted. Next, the obtained values are divided by the area of one panel in order to understand how many of them will be required for a specific area.
The average cost of work on cladding a log house with siding from the inside with your own hands is shown in the table.
| Nature of the foundation | Type of work | Cost of 1 sq. m., rub. |
| Walls |
|
|
| Ceiling |
|
|
How to fasten timber indoors
Boards under timber for internal cladding can be attached in several ways:
- fastening into the groove. The method differs in that the heads of the hardware are in a hidden position. The screws are screwed into the base of the tenon at an angle of 45°. When installed correctly, fasteners screwed flush with the beam will be securely hidden;
- driving in elements from the outside. The nails should be driven on top of the board. To do this, it is recommended to use decorative hardware with original caps, or use special plugs, sometimes putty with shavings is used.
- use of clamps. The most optimal method of fastening panels. More details in the video below.
Installation using clamps can be done on walls, but most effectively on the ceiling. Galvanized clamps in the form of brackets are attached to the board; they are the connecting elements between the panels. Fastening with clamps is used most often.
Preparation of lumber
The material for interior finishing must meet the following parameters:
- wood quality class must be at least B (A, AB or Extra);
- the optimal width of the board is 10-15 cm. Narrow boards will look more like lining than timber, and too wide ones “steal” the space of the room, which is especially ineffective for small rooms;
- using a thick board is not advisable: the best option would be a 21 mm board (or even thinner).
In addition to the size, you should pay attention to the wood from which the board is made. For an unheated room, you can use wood of any species, the main thing is that the board is treated with protective moisture-resistant and antiseptic compounds
For a warm room, it is recommended to use mainly deciduous wood. Due to the presence of resins in coniferous wood, the release of pine resin and the corresponding aroma is not always appropriate indoors, especially if the residents are allergic.
For steam rooms or baths, it is advisable to use a linden timber finish.
IMPORTANT! The durability and appearance of the finish depends on the quality of the material and wood.
You should not skimp on materials, since high-quality timber panels can last for many years without additional maintenance.
The boards must be well dried and stored in a dry, heated room. Before installation, the boards should be unpacked and moved for several days to the place where they will be installed so that the material adapts to the environment of the room. Some types of lumber require additional sanding and treatment with special impregnations. It is advisable to carry out the treatment of the boards before installation, and then cover them with varnish or a special stain.
What it is?
Imitation timber is also called false timber. This is a material that can be used for cladding both outside and indoors.
Today, there is an artificial imitation of timber made from wood waste with the addition of plastic, as well as a solid wood option, which is especially popular among consumers. It is worth considering in more detail.
It is a planed board, processed on 4 sides, and made in the form of a processed wooden beam. The thickness of this material is up to 35 millimeters, and the width can reach 260 millimeters. The manufacturing material is coniferous and deciduous wood. The profile in this case is a trapezoid, and due to this, the smoothness and evenness of the base is achieved.
For the best joining, the edges are processed in a special way, this allows you to reliably protect the insulation from the effects of negative climatic conditions and humidity. The fact of what material the product is made of determines its density and characteristics.
Video description
An example of interior decoration of a house using imitation timber in the video:
And then there are a few more interesting solutions:
Combination of timber and plaster finishing
As practice shows, facade cladding can be done with different types of finishing. For example, imitation timber and plaster. The appearance of the house is distinguished by smooth lines, severity and elegance, and the resulting “striped” pattern will visually increase the height of the building.
Combined finishing of a two-story houseSource betonicum-stroy.ru
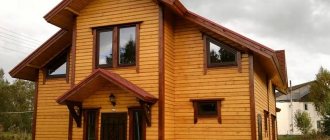
Full exterior cladding of the house with imitation timber
Anyone can become the owner of such a wooden tower. The layout of the house is suitable for both active recreation and year-round living. Finishing with false beams can be done not only outside, but also inside, then your guests will definitely be able to find themselves in an old Russian fairy tale. The main thing is that the interior design matches this.
Finishing with imitation timber for a 9x9 house Source www.hmkmos.ru
Timber and stone
Wood and stone go well together in decoration. This can be seen in the following project. Moreover, if in the first option the ratio “wooden covering - plaster” is approximately 1:1, and they are equally responsible for the appearance of the building, then in this case the “stone” decorations are minimal and are designed to emphasize the naturalness and superiority of wooden compositions.
Timber and stone in home decorationSource zillow.com
House with attic
Wood always remains the most environmentally friendly material. Many people strive to make it a cozy home or cottage. Here is an option for a small cottage with an attic floor. It looks like an ordinary house, but to add color, the imitation timber is painted with stain, wrought iron railings give it an intriguing look, and finishing the foundation with a stone finish completes this ensemble. This is how even an ordinary house can be turned into a small miracle of design by adding a couple of highlights.
Combination of false timber, stone and forged elementsSource woodeco.org
Imitation of log walls
At first glance, it seems that the house is made of rounded logs, but, as in previous versions, this is just finishing with imitation timber. A simple way to replace expensive rounded wood, while maintaining the naturalness of the materials used, without compromising the quality of the construction project.
Project of a house with rounded wood trimSource profibrus.ru
The cost of finishing with imitation logs depends primarily on the price of the lining that will be used for the cladding, plus the geometry of the house - the simpler it is, the less labor costs.
Cladding houses with imitation timber allows you not only to save money, but also to get a full-fledged wooden house, feel the coziness and comfort of natural materials, and become the owner of a unique interior, which is the key to the beauty and grace of the entire building as a whole.
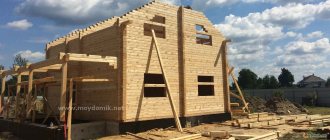
Assembling the basic frame and insulating the walls
Panels of imitation timber are always installed only horizontally.
In order to install timber on the facade of a house, or rather its imitation, it is not necessary to insulate the walls. However, it is better and more expedient to take care of thermal insulation right away, even if the walls do not seem too cold. As practice shows, insulation is never superfluous, and thermal insulation made from the inside is less effective and takes up useful living space, so we will consider how to sheathe a building with false timber with preliminary insulation.
Imitation timber panels are always installed only horizontally. Therefore, the counter batten slats should have a vertical direction, and the base sheathing bars should have a horizontal direction.
Let's move on to practice and consider the sequence of work operations using the example of one of the walls of the building.
- We cover the surface of the base wall with a vapor barrier membrane. It is needed in order to protect the basalt insulation from steam penetrating from inside the house.
- At the corners of the wall we install pins, between which, along a plumb line or level, we stretch vertically the threads corresponding to the outer surface of the main beams.
- According to the threads, we install the beams in increments corresponding to the width of the insulation mats (usually 60 cm).
- We lay basalt thermal insulation, making sure that there are as few gaps as possible between the mats, which are cold bridges.
- The next step is windproof film. We roll out the canvas from top to bottom and attach it to the beams with a stapler. The next canvas overlaps the previous one by at least 15 cm.
- We install counter-lattice slats on top of the base horizontal beams, pulling them to the guides with hardened (black) wood screws. The length of the screws is 55-60 mm with a strip thickness of 30 mm.
Calculation of the amount of imitation timber
Before purchasing building material, it is necessary to calculate the quantitative indicators of the purchase. The parameters of a room, for example a room, are taken as initial data. The area of the walls intended for cladding is determined. The area of windows and doors is subtracted from the overall result, and the dimensions of the selected false beam are set. There are calculator programs that give the potential buyer the result in pieces of the product and their total weight and volume. The figure below shows an example of such a calculation. The parameters of the room and the timber are approximate. The program is freely available on the Internet at https://www.alyansles.ru/calc/imit/.
PHOTO: alyansles.ru Calculation of the amount of false timber for finishing one room
Assortment - characteristics of different classes of imitation timber
Even at the production stage, the imitation is sorted and divided into several classes (grades), the lower the class, the cheaper the material, but such a board also looks accordingly. Minor surface flaws do not affect the technical and operational parameters, and the gradation into classes occurs precisely according to the appearance of the boards. The main criteria for division are considered to be defects and surface defects (quantity) and the presence of mechanical damage caused during production. Imitation timber comes in several classes.
Extra class is the highest grade, but due to the lack of production in the country capable of producing imitation that fully corresponds to the varietal characteristics, class A is often sold under its guise. Extra class boards are characterized by an ideal degree of processing, ideal geometry, ideal surface, without knots and even the slightest damage. The cost of the material elevates it to the premium cladding segment, inaccessible to most comers.
Class A - with excellent geometry and a high degree of processing, without cracks and without mechanical damage, but up to two knots per linear meter are acceptable. Also acceptable are resinous areas (from the back) and even fragments of wane, again, from the inside.
Class AB - in addition to “pure” classes, mixed ones are also common in imitation; in this case, the quality of the board is slightly inferior to the previous category, but there are still errors. These include resin pockets with knots, up to three per shoulder strap, microcracks, and traces of pest activity (back side). Uneven color and individual growths are also possible. The stitching can only be on the back side or along the knots.
Class B - minor deviations in shape, roughness or abrasions on the surface resulting from omissions during grinding are acceptable. There are more than three knots and they are on the front side (up to 10 mm), in tandem with knots and resin pockets, in any quantity, and resinous areas on the front side. Minor chips and shallow cracks (up to 0.5 mm), and other mechanical damage are also possible. The coloring can be not only uneven, but also with obvious transitions to blue-red, and fused growths are not uncommon.
Class BC - there is already mechanical damage, and knots with pockets in abundance, including those that have fallen out, and uneven ones with different colors, and traces of borer larvae on any side. Plus defects on the tenons and grooves and cracks deeper than 0.5 mm.
Class C - everything listed for class BC, but in even greater quantities, often the proportion of defects reaches 70% and before installation the boards will have to be sanded again, the resin pockets opened and knots sealed. But the price of the issue is the most affordable, and with due diligence, the finished cladding will look quite presentable.
In general, as always, think for yourself, decide for yourself. Is it worth overpaying the quite noticeable difference and closing the façade without additional manipulations, or can you tinker and save money.
Varieties
All wood products are divided into grades according to quality, depending on the number of knots, the presence and size of cracks, resin pockets, growths and wane.
The main varieties are, in decreasing order of material quality:
- Extra;
- ;
- B;
- C.
There are also mixed varieties:
- Prima (between Extra and A);
- (between A and B);
- BC (between B and C).
Comparison table for imitation timber varieties
| Name of wood defects and processing defects | Front surface | |||
| Variety "Extra" | Variety "Prima" | Grade "A" | Variety "AB" | |
| Healthy, dark fused knots | Not allowed | Tolerance Ø up to 1/3 of the width not ≥ 1 pc. by 1mpg | Allowed | Allowed |
| Partially fused healthy knots, incl. with cracks, eyes | Not allowed | Tolerance Ø up to 1/5 of the width not ≥ 1 pc. by 1mpg | Tolerance Ø up to 1/4 width not ≥ 2 pcs. by 1 mpg | Allowed |
| Unmerged knots | Not allowed | Tolerance Ø up to 10mm not ≥ 2 pcs. on the product (if there are no other knots) | Tolerance Ø up to 1/5 of the width not ≥ 1 pc. at 2mpg | Allowed |
| Holes from fallen knots, rotten, decayed, tobacco knots | Allowed on the edge of the tenon - during assembly they are covered with another part | Allowed on the edge of the tenon - during assembly they are covered with another part | Allowed on the edge of the tenon if it is covered with another part during assembly | Not allowed. holes from fallen knots, the rest is tolerance. |
| Sprout, core, blue, wane, fringe, rot, cancer, stepson | Not allowed | Germination tolerance. up to 2x20mm not ≥ 1 pc. on the product, the rest is not permitted. | Germination tolerance. up to 5x50mm not ≥ 2 pcs. on the product, the core is not allowed. on the floor board, approval. | Germination tolerance. up to 8x70mm not ≥ 2 pcs. for the product, approval. blue is 30% of the product, the core is acceptable, the rest is not acceptable. |
| Resin pockets | Not allowed | Tolerance up to 3x50 mm not ≥ 1 pc. by 1 mpg | Tolerance up to 5x70 mm not ≥ 1 pc. by 1 mpg | Allowed |
| Fungal heart stains, browning, sapwood, false heartwood | Not allowed | Tolerance in the form of spots and stripes up to 30% of the product area | Tolerance up to 30% of the product area | Allowed |
| Non-through cracks | Not allowed | Allowed up to 1x100mm | Allowed width up to 1mm, total length up to 1/3 of product length | Allowed |
| Mechanical damage (tear, snatch, gash, dent, chip, scuff, gouge) | Small tears up to 1mm or chips 5x7mm deep are not allowed. up to 3mm, quantity 1 piece per product | Small tears up to 2mm or chips 5x15mm deep are allowed. up to 3mm, quantity 2 pcs per product | Tolerance sizes up to 5x10mm and depth. up to 3mm, no more than 1 piece. by 1 mpg | Tolerance sizes up to 10x20mm and depth. up to 3mm, no more than 3 pcs. at 2 mpg |
| Neprostrog | Allowed on the edge of a tenon with a width not ≥ 3mm and a total total length of 25% of the length of the product | Allowed on the edge of a tenon with a width not ≥ 3mm and a total total length of 25% of the length of the product | Allowed on the edge of a tenon with a width not ≥ 3mm and a total total length of 25% of the length of the product | Up to 10% of the product area is allowed |
Also, with any imitation timber, regardless of the type, the following is not allowed:
- Through holes in the lamellas resulting from fallen knots;
- Wane in places where it will be visible after installation;
- Mechanical damage (chips, dents) on the front side of the product;
- Resin pockets larger than 7mm;
- Fringe around the edges, noticeable after finishing;
- The humidity of the boards is more than 13%.
Features of timber installation
When building a frame, you often have to decide how to attach the timber sheathing to the concrete. To do this, you need to choose the right fasteners.
When making flooring, the following are used as fastenings for joists:
- Metal anchors. Holes are drilled in timber and concrete - the required number. Moreover, the hole in the joist is widened from above to hide the bolt head. Then the anchor sleeve is inserted into the hole and driven into the concrete base. The height of the logs is adjusted using wooden wedges or fiberboard linings. Having aligned the logs, tighten the bolt.
- Self-tapping screws. A hole is prepared in the concrete for a plastic dowel. Make a hole in the joist for the self-tapping screw. Drive a dowel into the concrete floor and screw the joist with a self-tapping screw.
- Corners. Special corners are used if you need to raise the floor by more than 10 cm. They are attached to the concrete with dowel nails, and to the joists with self-tapping screws.
If you need to fasten the sheathing beams to concrete, the following are suitable:
- metal anchors;
- dowel-nails.
Imitation timber is a high-quality and durable material from which you can make exterior and interior decoration of your home. If you choose the right type of fastening and installation method, the cladding will last for several decades.
Do-it-yourself selection and installation of lathing
The choice of lathing is made based on the material from which the house is made. If the house is wooden, making a “frame” of wooden slats would be a reasonable solution. If the walls are made of concrete or brick, or covered with plasterboard, use a metal profile.
The guides are installed in the direction of the beam - perpendicular; if the simulation goes horizontally, then the guides are located vertically. The pitch is from 60 to 80 cm. There are two guides along the edges (in the corners).
The wiring is carried out between the slats; corrugated tubes are used for this.
All that remains is to cover the surface with wooden panels.
Stages of work
The first step is to attach the waterproofing. Glassine or other similar material is fixed to the wall using aluminum tape or any other suitable fastener. The edges are overlapped.
The waterproofing is pressed on top with a lathing made of dried square timber. The intervals between the racks must correspond to the width of the insulation sheets.
The next stage is thermal insulation. In the spaces between the sheathing bars, a layer of insulation (foam plastic, mineral wool or any other material) is laid. This prevents condensation from forming inside the wall and helps keep the room dry.
A second layer of waterproofing is laid on the insulation, which is attached in the same way as the previous one.
For interior decoration it is not necessary to use insulation and vapor barrier. In this case, the imitation timber is attached directly to the grating. After completing all the preparatory work and acclimatization of the material, you can proceed directly to the cladding.
Installation of boards begins from the bottom. The first one is fixed exactly according to the level, and all subsequent ones are leveled according to it. The panels must be laid out so that the groove is on top - this prevents the accumulation of moisture. To prevent the sheathing from warping, gaps of 1-3 mm should be left between the boards.
Treatment
Before installing imitation timber, the panels must be processed. To do this, the boards are sanded, after which an antiseptic is applied to them, and then a primer. When using water-based paints and varnishes, the surface of the panel will dry quickly and acquire the desired shade. It is recommended to apply the coating in two layers; the second time the paint must be applied after the first layer has dried well.
Form of false beam
Unlike a convex blockhouse, with which false beams are often compared, it has a flat surface. Chamfers are cut along the edges at an angle of 45°. After connecting adjacent planks, barely noticeable seams remain, but not the same as with eurolining. Rather, they resemble “calm” lining.
Block house on the cut
From the back side, 1 to 3 ventilation ducts are cut out, which run along the entire length of the beam.
The false block has the same lock as other types of lining
The edges of the lamellas have a spike on one side and a groove on the other. These are the connecting elements of the timber. The tongue-and-groove lock solves several problems at once:
- makes the cladding windproof;
- increases sound insulation properties;
- strengthens the skin.
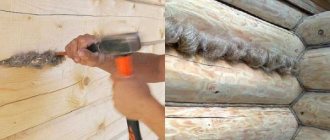
Nails and self-tapping screws do not hold the planks well and prick the imitation timber
First of all, you need to pay attention to selecting the length of the fasteners. According to the unwritten rule, the length of the hardware should be twice the thickness of the part that is under load
To fasten the sheathing (such as imitation timber), nails or self-tapping screws 50-60 mm long are suitable.
To prevent hardware from pricking the imitation timber strip, you should use nails/screws designed specifically for fastening sheathings. For example, these should be so-called “finishing” nails, which are equipped with a relatively thin shaft with a relief knurl and a very small head that can be easily sunk into the material with a hammer.
There are also special finishing screws that have a small head, a thin shaft, and a special thread and tip shape. The well-known “black” screws are not suitable for such purposes. In any case, fasteners must be selected with corrosion protection, for example, galvanized, copper-plated or galvanized.
It should be noted that the supporting frame must also have sufficient holding capabilities. If you use a very wet block to create the sheathing, then when it dries out, the fasteners will not have the same performance characteristics as before. Therefore, lumber for a frame for imitation timber should be at least atmospherically dried, and the ideal option is well dried in a chamber to 12-15 percent.
Fastening imitation timber - with what and how?
There are several ways to attach imitation timber, which differ in both labor intensity and cost, as well as the aesthetics of the result. The simplest solutions involve fastening with nails from the front of the board. More complex and interesting options include installation in a groove, tenon or in the front part, made “hidden”, when the fasteners are invisible. In some cases, you can use so-called clamps to fasten imitation timber.
Fastening imitation timber with nails
The cheapest and easiest way is to nail the imitation from the front part with ordinary construction nails: one fastener to each sheathing bar. Nails must be galvanized, and their length must be at least the thickness of the finish + ? thickness of the sheathing bar. The solution is unaesthetic (the hats are conspicuous) and will not allow you to fully achieve the effect of simulating timber.
You can use finishing nails (also galvanized). They are distinguished from construction nails by their miniature heads, which are completely embedded in the wood during installation. Such fasteners are driven into the tenon or groove of the board at an angle of 45 degrees. Screw nails are also suitable for these purposes, which guarantee protection of fasteners from extrusion during the process of changing the linear dimensions of materials.
Fasteners for simulating timber - self-tapping screws and self-tapping screws
For high-quality installation of the imitation, it is recommended to use galvanized universal screws and self-tapping screws that provide hidden fastening. Fastening is carried out in a tenon at an angle of 45 degrees or in the front part with preliminary drilling of holes for plugs. After fastening with screws or self-tapping screws, the latter are covered with glue, sealed with wooden plugs and sanded.
An alternative solution is to use so-called Spax screws or fasteners for solid floors. You can read about their advantages on the sellers' websites. Let us only note that they are more expensive than ordinary self-tapping screws, but it is worth it if imitation extra timber is used for finishing.
Clamps for installing imitation timber
For interior work, you can use so-called clamps to fasten imitation timber. They are stamped steel products that are mounted on the sheathing. The finishing board is simply “hung” on the clamps. Manufacturers position such fasteners as simple and reliable, but in reality it turns out that their use is expensive and not always ineffective - this is evidenced by reviews of imitation timber and recommendations from people who independently dealt with the issue of its installation.
Cost of installation of imitation timber
If you decide to entrust the installation of imitation timber to third-party workers, then it is worth considering that in this case the price for the work is usually the same as the price of the materials used. You can find approximate prices for individual stages of installation work in the table below.
Specifics of wood species
For interior decoration, coniferous wood species are often used: pine and spruce. Inexpensive in cost, fairly hard according to the Brinell scale, with an attractive cut texture - these are traditional materials in wooden construction. Despite the high natural resin content, these rocks are susceptible to decay, which imposes restrictions on operating conditions. Therefore, cladding the inside of a house with imitation timber made from these species (even taking into account antiseptic treatment) is best done in case of year-round use.
The elite category includes larch and oak - they have higher strength, good resistance to high humidity and a beautiful wood texture.
Hardwood species such as linden and aspen, which are used for cladding the interior of a bathhouse or sauna, are considered highly specific.
Some interesting ideas for using false beams
Nowadays, wood paneling allows you to create a room design in the style of a bungalow or chalet for hunters and wildlife lovers. Such material allows the use of ethnographic styles, which are especially popular now. Wood finishing creates an atmosphere of comfort and coziness, making the interior discreet and unobtrusive.
The surface of such panels is flat (compared to a block house), so they can be used to treat any room while maintaining usable space.
Wooden panels are most often attached horizontally, but the panels can be placed vertically or at different angles.
Beautiful country house design
Imitation of timber allows you to obtain an environmentally friendly interior at minimal cost.
There are several unique solutions for using timber:
- Combination of wood and plaster. The facade can be faced with different finishing options. For example, panels with a layer of plaster are suitable. The result is a house with straight lines, elegant and strict. Its height will visually increase thanks to the “striped” pattern.
- Combination of stone and timber. This is a good combination that can be made in equal proportions. Stone decorations will emphasize the naturalness of the finish and the superiority of wooden materials.
- Full wood paneling on the outside. Anyone can own such a house. The layout is suitable for permanent residence or active recreation. You can finish with timber inside and outside in accordance with the exterior and interior.
- Imitation of log walls. At first it seems that the house is made of rounded logs, but these are only panels. The technology is simple, it allows you to preserve the naturalness of the raw materials used, maintaining the quality of the structure.
Use of material for finishing the ceiling
The cost of finishing will depend on the price of the false panels, on the complexity of the geometry (the simpler it is, the lower the labor costs will be).
Interior options in the Hallway: 225+ Photos of Designs (stone/laminate/tile/fresco). Which wall color is best?
Interior color scheme
To preserve the natural texture and color of wood, when processing panels, preference should be given to impregnations, colorless varnishes, and wax. It is better to refuse paint. In this case, the color of the board will directly depend on the type of wood. The most common shades are light brown, brown-red, and coffee.
For clarity, let's look at some options (variety - color scheme):
- oak – from light brown to dark brown;
- beech – white with a yellowish-red tint;
- ash – from dark brown to light yellow;
- alder – red-brown;
- walnut – from light brown to black;
- pine - from pale yellow to reddish yellow;
- larch – from light yellowish to reddish;
- yew – yellowish-white.
Installation of wooden imitation
Before starting facing work, it is necessary to carefully prepare the base for finishing, purchase a sufficient amount of timber, and take care of the tools and materials for attaching the imitation.
What material should I buy for installation?
Interior finishing of imitation timber is carried out on the flat surface of the walls and ceiling of the house or on pre-installed sheathing. Work begins with preparing the base for cladding.
It is necessary to measure the areas where installation is intended. This is done in order to calculate the amount of material. You should purchase timber from the same batch so that they do not differ in shade and quality of processing.
The width of the board for interior decoration of the house should be in the range of 100-150 mm. If the indicator is higher, the decoration will make the room smaller. A width of less than 100 mm will make the timber look like a standard lining. The thickness of the board for interior cladding is no more than 21 mm. Materials can be compared by photo.
The purchased material must be brought into the room where the repair work will be carried out. Remove the packaging and leave it for 2 weeks to acclimatize. The tree must get used to the microclimate of the house: its temperature and humidity.
Before installing the interior cladding, all electrical wiring of the house is done. The wires are laid in corrugation. Communications will not be visible under the cladding. In the photo of the walls covered with cladding, no wires are visible.
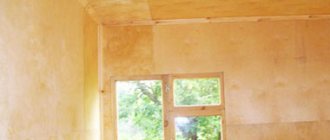
Preparing the base for finishing imitation timber
The advantage of installing the cladding on a flat surface without sheathing is that it will not make the room smaller. Large irregularities on its surface should be removed. You may have to make a cement screed. Differences of 1-2 mm will be covered by the internal lining. It is enough to clean the base, treat it with an antiseptic solution, a deep penetration primer, and apply a layer of plaster. Waterproofing material can be laid on the wall of the house.
The sheathing will require several centimeters of usable area. The room in the house will become smaller. The material you will need is 25*30 mm timber. If the house is built of brick, stone or blocks, then a vapor barrier film and insulation are laid on the base. Film is not used in wooden houses. It is capable of accumulating moisture, which can damage the building material.
The pitch of the sheathing should be smaller than the size of the slabs of thermal insulation material. It is necessary to leave a gap of 10 mm between the wall and the finishing material. This is necessary for air circulation. The sheathing is attached vertically. If the wall is a log house, then it is better to use nails for fastening. Dowels are installed in a concrete, brick or block wall. The sheathing bars are fastened with self-tapping screws.
All wooden elements for sheathing and finishing must be coated with protective impregnations: antiseptic, fire retardants, which will prevent the material from igniting and protect the material from exposure to open fire.
Execution of cladding
- The imitation timber is laid horizontally, starting from the floor with the groove down.
- The first board must be installed according to the markings. It must be in a strictly horizontal position. The level of all boards in the finishing depends on this.
- The second and subsequent boards are laid with a gap of 2 mm. This is a deformation gap.
- Strengthen the imitation timber finish to the sheathing with self-tapping screws, nails or clamps. Self-tapping screws can leave cracks in the material. If you hammer in nails, the hammer mark will be visible. Builders prefer clamps.
- The board is attached on the tongue and groove side. Use a drill to make a hole, insert a dowel with PVA glue into it and screw in a self-tapping screw. In this case, there will be no cracks on the timber.
- To make a corner joint, a 45-degree undercut is made at the ends of the beam. Corner seams should be staggered. They will be invisible in the finishing, but for greater camouflage you can install platbands.
- If the length of the surface is large and there are not enough boards, then they are connected, just like the seams, by filing the end of the beam at an angle.
- When the finishing of the house is ready, the boards are primed and covered with a protective layer: paint or varnish. The photo can be viewed in more detail. The coating will protect the finish from moisture and it will last longer. In addition, it is easier to care for.
In which rooms can it be used?
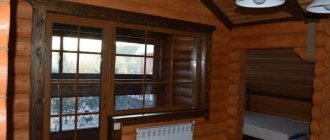
Imitation timber is used for finishing walls and ceilings. This is a textured living material that has a number of advantages. It allows you to create the feeling of a wooden house in the interior of one or all rooms. Wood allows the coating to breathe; some varieties even purify the air.
False timber is used to decorate the interior space of apartments, country estates, and private cottages. It will perfectly complement the corridor, living room, bedroom, nursery, office. Some breeds can be used in the bathroom, kitchen, balcony, loggia. In general, the material is universal and compatible with absolutely any room.
In the kitchen, using imitation timber, you can cover both the walls and the kitchen apron, but additional wood processing will be required. Different colors will highlight the severity or warmth of the space.