When to start
On a “fresh” log house, you can begin finishing work no earlier than the main shrinkage has passed. If the log house is made of laminated timber, it should take 3-4 weeks. For all other types of wooden houses, the period is calculated in months, and sometimes years. The exact shrinkage time depends on the initial moisture content of the raw materials, climate zone and construction time. That's how difficult it is. In any case, it’s not worth starting finishing sooner than a year later, or at least 10 months later. During this period of time, active shrinkage of the wood occurs, logs and beams decrease in size, and the insulation laid between the crowns is crushed. If you attach the trim before the main processes have completed, it will fall off or become warped. Everything will have to be removed and redone. So there's no need to rush. Moreover, there will be enough work: you need to achieve tightness of the joints, and this is not easy. Careful competent caulking is needed.
Before starting finishing work, it is tedious to caulk a log or timber frame
Typically, the main caulking of a log house takes place in two stages. Primary - a few weeks after installing the log house, and secondary - after about six to eight months. Each time the cracks are clogged with insulation - jute, tow, sometimes moss. It is done immediately both outside and inside, otherwise the house will warp. Therefore, they walk around the perimeter of the building, caulking alternately, each crown, now from the outside, now from the inside. Work begins from below, from the lowest row of logs or beams.
With each caulking, the frame rises by 5-7 cm. Then, under the force of gravity, it gradually settles. The compacted inter-crown insulation reliably covers the cracks. The quality of this work is very important: it not least determines how warm the house will be.
Finishing work begins inside the wooden house after the frame has settled after the second caulking. To determine whether the process is completed or not, the height of the walls is periodically measured. If there are no significant changes within two to three months, we can assume that the main processes have passed. It's time to start decorating the inside and outside of the house.
Read how to build a house from timber here.
To insulate or not?
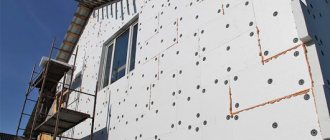
Scheme for installing siding on the sheathing.
- In the summer, the siding will begin to absorb all the sunlight, and an air cushion will appear between the log house and the cladding, which will be well ventilated. The house will be cool and comfortable.
- In winter, if this is a country house where you visit only once a week, insulation is probably not advisable. And even if you permanently live in a house, but it is heated with network gas, the effect of insulation will be insignificant, and the costs will be considerable. Moreover, if you use mineral wool as insulation, then over time it will begin to deteriorate, and the smallest particles will enter the house through the cracks in the logs. Mineral wool contains phenols, which do not add health to the body.
If the log house is assembled “in a paw”, then it is necessary to insulate the corners of the house.
Types of wall decoration for a wooden house
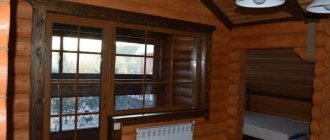
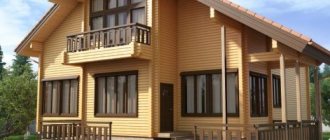
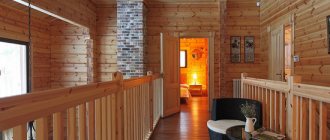
If the log house itself has an attractive appearance, it is rarely sheathed. In this case, it makes sense to reduce the cost of interior finishing: sand the log or timber and tint it. Only the floors should be varnished: the varnish will prevent abrasion of the wood. It is best to cover the walls and ceiling with tinting antiseptics or water-based paints. They do not paint over the texture of the wood, but only give it a tint, better showing the pattern. You will still have to use antiseptics to maintain the attractive appearance of the wood.
You will most likely have to use antiseptics, you can take them with a coloring pigment, at the same time highlight the beauty of the wood pattern
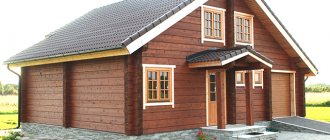
If the log or beam is normal, the caulking seam looks bad, it is sealed with a twisted cord, and the walls are finished in the same way - sanded and tinted. Everything also looks good, and the cord in the groove serves as an additional guarantee against drafts.
Ugly seams from caulk can be sealed with cord - it looks attractive, and even prevents drafts
How to cover the walls of a wooden house inside
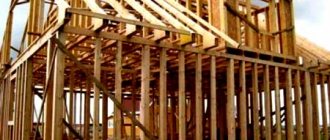
If the frame is so crooked or old that sanding will not help, you will have to make the interior decoration of the wooden house from lining, wall panels, drywall or other material.
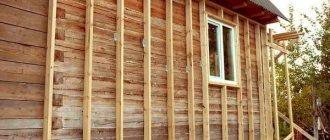
For any of these materials, it is better to make a lathing: this way you can level the surface of the walls. In addition, behind the sheathing there is space for free air circulation. In a wooden house, this is important, since only dry wood does not rot or blacken. Free air circulation between the finishing material and the wall will maintain their normal condition.
The sheathing in a house made of timber or logs is done in the same way: you need to remember that it must “float” so that the finishing does not fly off
The space behind the sheathing is also used for laying communications - electrical wiring, for example. In a wooden house it should be made in non-flammable pipes, so you need a fair amount of space for it. If necessary, you can put insulation there if your house is cold. If you spend little on heating and the house is warm, it is better not to use any additional materials: neither insulation nor vapor barrier. Wood itself does an excellent job of maintaining stable humidity in the house, and extra layers only upset the balance.
Not everyone likes attaching trim to the sheathing: if an animal or insects settle behind the sheathing, it is difficult to get rid of them. In this case, you can level the surface of the logs by removing the protruding parts and nail the finish to this surface. A perfectly flat surface is difficult to achieve, but possible. The gaps between the finishing material and the wall, which in this case still exist, were once covered with clay. It will both provide thermal insulation and protect against drafts. Technologically this is incorrect, but they do it too.
Whatever materials are used for cladding the walls of a wooden house inside, there should be a gap of at least 2-4 cm to the ceiling. For a “young” log house, this is insurance against shrinkage. For the old one - a gap to compensate for changes in the geometry of the wood. She breathes all her life: sometimes she gains moisture and swells, sometimes she dries out. The gap under the ceiling will allow the wood to easily expand or shrink, without consequences for the finish. If this is not done, then either cracks will appear or the finishing will bend/rip out. To prevent the gap from “hurting the eye,” it is covered with a ceiling plinth. It is only nailed to the stream, it is only leaned against the wall. In this case, all movements will be invisible.
Read about the interiors of a wooden house and methods of interior decoration in the article “Design of a wooden house inside in photos and videos”
The qualifications of the hewer are of great importance
If a worker who undertakes to build a log house does not handle the hatchet skillfully, gaps on the paw are inevitable and the assembly of the corners itself will have negative consequences. After some time, the tree will dry out, the house will shrink and warp, or even...
The only budget option is to notice in time, insert wedges (cut from wood of the same species) and caulk the cracked areas. This does not guarantee a beautiful exterior, but it will help resist drafts and dampness.
Cutting corners with a chainsaw
“Modern technology” of chopping with the paw. Very often, today's “masters” cut their paws with a chainsaw. And here there is a negative point that not many people know about. The saw cuts off the densest “old” wood on four sides. What remains is the core, which is always looser and therefore less durable.
The result is that the log sections going into the paw lock are open to the atmosphere and are subject to faster rotting. Conclusion: when choosing an ax or a saw, choose an ax. But it’s much more difficult to do the job with this “flying” tool; it will take a long time to get used to it... A chainsaw is without a doubt easier and faster.
Let's move on to the topic of how to insulate a log house, or more precisely, its corners. Without delving into the physics of the processes, I’ll say right away that proper insulation is always done from the outside, that is, from the outside. Moreover, it doesn’t matter what the house is built from (wood, brick, types of concrete, etc.). Any experienced heating engineer will confirm this. Let's move on to reviewing the materials.
Traditional - jute or linen, tow, moss. What to choose? Canvas based on jute or flax in the form of a twisted ribbon began to be used relatively recently. It is easy to install, and its twisted structure ensures strength. In addition, the seam looks aesthetically pleasing.
Cladding inside the house
Lining is a leader among finishing materials. It is used both inside and outside the house, only with different treatments (impregnations and paints are used for external or internal work). It comes in different types. It's not just about different types of wood or different board widths. There are also different profiles: smooth, wavy, imitating timber or log house. There are several options in the photo below.
The most popular types of lining for interior decoration of a wooden house inside
The interior decoration of a wooden house can also be made from lining with a non-standard profile
To decorate the inside of the house, use thin lining: 1.5-2 cm is enough. It costs less and will perform its functions. The slats can be placed horizontally, vertically, or at an angle. From combinations of all these directions you can get amazingly beautiful panels, but this is a labor-intensive task.
When nailing the sheathing or planks, you need to remember about the shrinkage of the log house and the ability of the wood to swell and shrink. Near the floor and ceiling, do not nail the trim and sheathing tightly; leave 2-4 cm to compensate for these expansions.
Both the walls and the ceiling are finished with lining. In both cases it looks more than decent, and such finishing is relatively inexpensive. It’s cheaper (and easier to do) to just cover it with plywood and stick wallpaper. This, by the way, is a popular option for decorating a country house inside an economy class home. With a sufficient level of execution, this method can be used to decorate premises not only in the dacha version. The only objection is the glue that is used to make plywood. But if you take it in emission class I (approved for use in children's institutions), then probably nothing terrible will happen.
Read how and with what to paint lining indoors here.
Mounting methods
Previously, they were not particularly worried and nailed the lining into the face (into the front surface) right through. At best, they used nails without heads or finishing nails (their heads are very small). Sometimes the caps were covered with wood putty and sanded, sometimes the screw holes were covered with pins. This is for the most fastidious and demanding of quality finishes.
Ways to fasten the lining
Today, even this method is considered not the most aesthetic: the traces can still be seen. To make sure nothing is visible, secret methods are used:
- nails or screws are driven at an angle into a tenon or groove;
- using clamps (clasps).
Both of these methods require patience and accuracy: thin, small nails are used, and they must be nailed in such a way as not to damage the front surface. To make it easier, you can hit not with nails, but with staples from a construction stapler. Staples are taken with a narrow back and long legs, made of stainless steel with sharpening. Although there are models of staplers that “shoot” nails with a very small head. For fastening the lining - just right. Self-tapping screws are also used. A comparison of the two methods is made in the video.
There is one caveat. If you bought the lining that was not chamber dried (its humidity is 7-8%), it will gradually dry out. Gaps will appear between the planks and you will either have to put up with them or re-nail all the planks. Sometimes two or three times. There is no way to avoid this. You can only choose a profile in which the cracks will be invisible (the “Softline” and “Standard” profiles in the figure in the previous section). In this regard, you need to think carefully about how best to secure the lining for the first time: it will have to be removed. Therefore, it is advisable to make it so that it is not difficult and so that it does not collapse. Here everyone decides for themselves: for some it is more convenient to work with self-tapping screws, for others with nails. Both methods are not ideal (it is difficult to pull out nails, and you need to drill a hole under the head of the screw), but both are acceptable.
Sometimes it becomes necessary to connect the lining to a wall made of logs. Difficulty may arise due to the fact that the wall has a non-linear shape. You can outline it using a small piece of lining, to which a simple pencil is attached. Having placed the plank and moving it along the wall with a piece of clapboard with a pencil, transfer the shape of the log onto the plank. By carefully cutting along the intended line, you can achieve an almost perfect match.
You might be interested in reading about how to lay laminate flooring.
Choose wisely
Jute or linen fabric. When purchasing, look for insulation made from primary natural fibers of jute and flax. “Which fabric is considered natural? The one that is obtained after primary processing of plants and without third-party additives.”
We noticed that the fibers are very short or contain thread trimmings of a different color - a product made from recycled materials (usually recycled sack containers or rags). Don’t be shy to ask for a certificate, which should indicate the raw materials, the presence of impurities and additives, and most importantly, their proportions (in %).
For information: all jute and linen fabrics are produced using the same technology, which, by and large, has not changed for the last hundred years. Equipment and costs are also comparable. Therefore, a reduction in the price of finished products is possible due to low-quality raw materials (for example, recycled) or due to a decrease in the total mass of raw materials (this means lower density, strength and durability). This will affect the quality parameters of the insulation, and therefore the comfort of life in the future home.
“When there are several options for purchasing jute or linen, do not try to buy cheaper. A low price is usually a sign of unnaturalness or low quality.”
Moss. Moss insulation is perhaps the oldest. The ancestors noticed that, unlike tow, birds do not pluck it for nests. In addition, it is a natural antiseptic, “not friendly” with fungus, does not rot, and rodents and insects do not revere it. But there are three "Don'ts".
- Not all moss is applicable. Preference is given to long-fiber flax (red flax, cuckoo flax, sphagnum).
- Not all builders know how to lay correctly. It is better to attract those who work with him constantly.
- Fragility. Moss dries out over time, turning into dust of little use.
Wall panels for interior decoration
Decorating the inside of a wooden house with wall panels gives a completely different stylistic result. This finishing material is made from different materials with different textures:
- wood;
- bamboo;
- MDF (laminated and veneered);
- glass (smooth with photo printing, embossed, colored, transparent, matte);
- plastics and plastics;
- skin.
They come in typesetting or panel form. Stacked - long thin elements connected to each other according to the tongue-and-groove principle. Lining is essentially also wall panels. It’s just that it has long been used as an independent category of finishing materials. Panel wall panels differ in geometry - they have comparable length and width.
Everything is usually assembled onto a sheathing (like lining), the bars of which are filled taking into account the dimensions of the chosen finish. This material is loved by designers: the materials, texture and color solutions allow you to realize a variety of ideas. Such interior decoration of a wooden house can be very expensive - made of leather - or cheap - MDF panels. But the appearance is quite decent.
If, according to the technology, wall panels must be laid with glue (gypsum, for example), then backing boards - plywood, gypsum fiber board, etc. - are attached to the sheathing (you remember that in a wooden house it needs to be made floating). The slabs are installed on this substrate with glue. An example is shown in the video.
Read about the interior design features of a wooden house here.
Floor
The texture of the flooring should also be in harmony with the rest of the finish. A wooden board, parquet or engineered board, or cork flooring is suitable for this.
Design: Olga Starikova. Photo: Mikhail Pomortsev. Style: Irina Chertikhina
As an alternative to natural wood, you can consider other materials with an excellent imitation of this pattern. For example, laminate or quartz vinyl.
Stone or marble tiles go well with wood texture. It is usually used in wet and dirty areas: hallways, bathrooms, kitchen. Imitation of concrete would also look appropriate in an industrial style, and patchwork in a country style.
Design: Evgenia Filatova. Photo: Mikhail Chekalov
Instagram @interio_lana
Instagram @natallia_shalnova
Instagram @kisil_ira
Instagram @interio_lana
Design: Olga Starikova. Photo: Mikhail Pomortsev. Style: Irina Chertikhina
Design: Olga Starikova. Photo: Mikhail Pomortsev. Style: Irina Chertikhina
Design: Olga Starikova. Photo: Mikhail Pomortsev. Style: Irina Chertikhina
- Floor
Top 10 modern types of flooring
How to sheathe the inside of a wooden house with plasterboard
The technology for working in a house made of wood or another material is no different: the frame is assembled, and drywall is attached to it. Only, as in the case of sheathing for lining, you need to leave gaps near the floor and ceiling. The only condition: this type of interior finishing of a wooden house is possible only after complete shrinkage (at least several years must pass and the house must be heated). Gypsum is a fragile material and with significant changes it will simply tear. The only option that will allow you to ignore them to some extent is to make a floating frame, attaching the profiles to the walls not rigidly, but leaving freedom of movement. Then the frame will settle on its own, and the drywall will remain in place.
Using what and how to make a floating sheathing for fastening hard finishing materials (plasterboard, base for ceramic tiles, etc.), see the video.
Another feature of finishing a wooden house with plasterboard: all joints, seams and corners must be glued with a polymer reinforcing mesh. It will prevent the formation of cracks in the most problematic areas (or slow down their formation). If you need to line a house made of timber with plasterboard inside, but you really don’t want to lose precious centimeters of space due to the installation of profiles, you can do it as in the next video. There are some good tips.
The interior layout of a country house is described here.
Installation of sheathing: nuances
Layout of sheathing for siding.
The main task of the lathing is to prepare an ideal plane for the subsequent installation of siding. The sheathing slats are installed perpendicular to the direction of the siding panels. The decision to sheathe the house vertically or horizontally must be made at this stage.
For preliminary marking, you will need such necessary tools as a building level, a laser level, or at least a plumb line. It is necessary to make vertical markings along the wall of the house in increments of 30-40 cm. The hangers are attached using the markings. The sheathing will be attached to them.
It is better to assemble the lathing first on one wall, and then move on to the next. Installation begins with setting the slats on the left and right corners of the house “to zero.”
Siding installation diagram without sheathing.
- The first option is using construction cord. The first point of attachment of the cord is selected at the top on one of the fixed slats. The second point is at the same height on the other staff. The third point is selected in the middle of the first staff. The fourth is in the middle of the second rail. The fifth is at the bottom of the first rail and the sixth is at the same height of the second rail. The result will be a zigzag. This is a general approach; you can place the cord attachment points more often. The remaining slats are installed according to the marked level; if adjustment is necessary, you can place blocks of different widths under the slats (if the sheathing is assembled from wooden slats).
- The second option is to use an auxiliary rail. It is attached at the top between the slats installed in the corners. The rest of the sheathing slats are attached to it with a free suspension, opposite the installed brackets. This option is more suitable for installing profile sheathing. After this, all that remains is to carefully attach them to the hangers.
After completing the fastening, the auxiliary rail is removed. The limitations in the use of this method are clear: it can be used if the distance from corner to corner of the wall is not very large, otherwise the auxiliary rail will bend greatly under its weight and the profiles suspended on it. Of course, you can install additional fasteners at one or several points and then dismantle them along with the rail itself.
Upholstery with siding is carried out according to the usual scheme:
- marking the line for attaching the starting profile;
- installation of the starting profile;
- installation of corner profiles;
- fastening J-profiles or trim around window or door openings;
- installation of siding panels;
- installation of the finishing profile;
- installation of gables.
Features of the interior decoration of an old wooden house
If a house made of timber or logs has stood for several decades, first of all you need to assess the condition of the wood. To do this, remove all the trim and “pick” at all suspicious spots - darker or lighter in color, different in structure or texture. This can be done with a screwdriver, chisel, even a knife. If the wood is dense throughout, there are no signs of destruction, everything is fine, you can begin finishing. You may need to first impregnate walls and other structures with a protective impregnation to protect the wood for several more decades. But not all owners of wooden houses agree to chemical treatment, so it’s up to you to decide.
If the wood crumbles due to your efforts, you need specialist advice. It is necessary to determine what caused the damage - insects, fungi or microorganisms - and what measures need to be taken. Then the damaged pieces or elements are replaced, paying special attention to treating the adjacent areas with antiseptics and protective impregnations.
After assessing or “treating” the wood, you can begin to update its appearance. The interior decoration of an old wooden house is no different from those described above. The only reason is that shrinkage is not worth taking into account: there is no longer any significant progress. So from this side everything is somewhat simpler.
What happens if you don't close the corners
If you ignore the stage of insulating the corners of the log house, in addition to the lack of comfort during your stay, there is guaranteed to be a distortion of the shape of the structure, which will become askew over time, dampness and elements of rotting wood will appear. What happens if you don't close the corners from the outside? External insulation allows you to more effectively maintain comfort in the house compared to internal insulation, and therefore is more important. If you cut a corner of logs or beams without sufficient experience, then there is a high probability of defects appearing after construction, in particular large gaps during shrinkage. The situation is corrected with the help of wedges. They are cut from the same type of wood as the log house. Mistakes when sealing corners will also lead to serious problems. For external insulation, you cannot use polyurethane foam, which will accumulate moisture over time and cause dampness in the wood. When choosing sealants, you should not use silicone or acrylic types due to the high likelihood of peeling or cracking. You should pay close attention to the internal and especially external corners, since they become the paths for cold penetration if the insulation is improper.
Insulation of a wooden house using Warm seam technology
Our website presents a number of log house projects, for example: Or you can see all prices for log houses. You can calculate the house or bathhouse you need with maximum accuracy using our log house cost calculator. To order and buy a log house, call:
Comments
No comments yet.
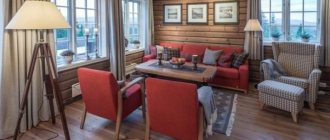
Country textiles
The textile design gives the home a special charm and coziness with a rural flavor. Various types of products made of fabric and soft materials (curtains, decorative pillows, removable furniture covers, carpet runners, voluminous knitted rugs) are used in different versions of rustic design.
| English country cottage | Country style house | Russian hut |
| Upholstery fabrics with small flowers Lace knitted napkins on the headrests of chairs and the backs of sofas Lace or thin cotton curtains | Light thin material (cambric, muslin) or dense fabric in a checkered pattern or with floral motifs for curtains. Curtains are decorated with tiebacks | Canvas fabrics for decorative pillows Lace valances on beds Embroidery with cords, bright woolen threads, satin stitch and cross stitch Homespun rugs |
Removable fabric covers are a convenient way to diversify your home decor for each season and fill your home atmosphere with a new mood.
Most textile design samples can be made with your own hands if desired. A specialized hobby (sewing, embroidery, fabric painting, knitting in various techniques, lace making) is a great opportunity to decorate a house in your own way and emphasize its individuality.
Start of the process
Finishing is possible after the end of the active stage of shrinkage. This rule applies to a new, newly built house. If you have to process an old structure, you can start immediately
It is important to consider the following:
- If the base of the house is a log and ordinary timber, then ideally the finishing starts no earlier than a year.
- If the base of the house is dry profiled or laminated veneer lumber, you can start in 1-2 months.
It is necessary to take into account climatic features, average temperature, humidity indicators. Finishing the interior of walls made of logs and ordinary timber is allowed after caulking is completed.
The work involves two stages:
- First, the caulking process is carried out several weeks after the walls are assembled.
- The second part begins at least 6 months later - after shrinkage.
To caulk walls, you need a material with heat-insulating and sealing properties. Tow and jute meet all the criteria for high quality. They are widespread due to their affordable cost, unpretentiousness, and durability. It also happens in practice that some people use moss as a material for caulking because... there were no more modern substitutes.
Work is carried out from the outside and inside at the same time; you need to start from the bottom. As soon as the crown is ready on one side, it is worth moving to the other side - this will help avoid distortion.
When the work is completed, the object will rise a few centimeters, but soon the inter-crown filler will become more dense and the original height will return. Drafts will practically not make themselves felt due to the tight fit of the timber or log; this will significantly increase the thermal insulation performance.
Caulking wooden walls is a special type of activity that involves its own technologies and nuances; you can find out more about this in the article. As soon as the second caulking is completed, you need to measure the height of the walls from time to time. If the data has not changed within a couple of months, it means that the shrinkage has ended and finishing can begin.
How to seal seams using acrylic sealants?
The “warm joint” method of sealing cracks and joints is also growing in popularity; sealants based on acrylic resin are used for it. These insulation materials withstand the effects of all factors that cause harm to a wooden house. The advantage of acrylic sealants is their elasticity, which allows the material to compress and expand depending on the situation. Due to the flexibility of the sealant, insulation of a wooden house is carried out only once, because the service life of the material is very long. The beautiful color of the sealant (beige or cream) will harmonize perfectly with the wood of the log house. To work on sealing cracks and seams you will need to purchase and prepare:
- acrylic sealant;
- stapler with staples;
- mounting gun;
- polyurethane sealing cord;
- scissors;
- roulette;
- putty knife;
- water spray;
- clean soft cloth.
If you plan to insulate the seams of the logs of a wooden house, which were previously caulked with moss or tow, then you will first need to remove all the old caulking. Next, you will need to lay a polyurethane cord in each horizontal and vertical seam to a depth of 5 mm in its center. It is needed in order to reduce the consumption of sealant and make its application more accurate. The cord is laid along the seam line and secured between the logs using staplers every 12-15 cm. After this, the seams are sealed with a mounting gun filled with acrylic sealant. Acrylic is carefully applied to the seam along its entire length. The seam can then be smoothed using a spatula. For convenience, the seam is moistened with water from a spray bottle. If sealant gets on the top and bottom of the logs, it can be easily removed from them with a damp cloth. The result is a neat and beautiful seam. Sealing the seams with rolled tow, rope cord or acrylic sealants will guarantee that a wooden house will delight its owners with warmth, reliability and a beautiful appearance.
Material selection
Lining
The first material we will describe is lining. It is good because it consists of wood, which means that it will go well with wooden walls. The lining consists of processed wooden boards that are varnished and have special grooves so that they can be joined to each other. You need to use lining in places where there is no high humidity and temperature changes, it does not tolerate this well.
https://youtube.com/watch?v=q1PHrG_WugY
A small minus of lining is the price, which is slightly higher than other materials. The lining is distinguished by the fact that you can choose the type of wood from which it will be made, and the method of processing this wood. the use of lining will not spoil the smell and appearance of the wood, but on the contrary, it will complement the wooden walls. But lining is used very often for wall cladding; you can see it in almost every house, so if you want to diversify your interior design, then this option is not suitable for you for wall cladding.
The lining is installed in the same way as drywall. To place it, you need to make a frame from a metal profile or wooden slats. The frame is covered with clapboard after the insulation is placed inside it, but it does not need to be placed. As you can see, the lining allows you to hide the unevenness of the wall, as it is installed on the frame.
A more modern option for wall cladding in a house is the use of block house panels. This is one of the varieties of lining, which has the shape of a cylindrical log, which gives the walls a slightly unusual “village house” look. But if you want to create just such an atmosphere, for example, for a summer residence, then using a block house is preferable for you. It is installed in the same way as the lining, that is, on the frame.