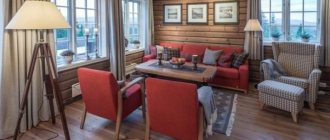
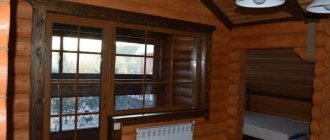
External restoration of a country house is about creating a strong foundation. The next stage requires an emphasis not only on reliability and durability, but also on the aesthetics of the result. After all, it is the interior decoration of the house that creates the atmosphere, makes the living space cozy and special. Here is the story of the creation of a multifunctional house of 25 square meters.
Repairing the walls of an old house
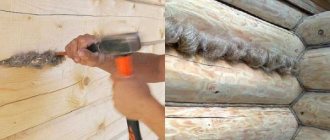
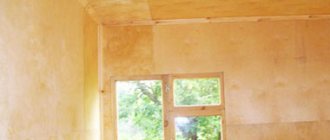
Before us, the brick walls of the house were plastered for restoration. In some places the plaster fell off, in some places we tore it off, in some places it sat as if chained and nothing could dislodge it from its place.
We decided that leveling the walls, in our case, was too expensive in terms of finances and labor costs, and it would also steal several centimeters from the walls.
This moment most clearly reflected our approach to repair work: environmental friendliness, efficiency, simplicity.
In the process of restoring a private house, it was decided to clean the walls, apply a thin layer of gypsum plaster and paint with water-based paint. When we started applying the gypsum mixture, we tried to coat the walls with our hands, without a spatula, and it turned out that this way the appearance of the brickwork would be preserved. This made us happy, especially because the vaults that we were unable to save when repairing the windows now delight us with their designs.
The absence of a stereotype about the evenness of walls and the desire not to create problems for ourselves with interior decorative decoration helped us preserve the ancient beauty of our home.
Strengthening the foundation
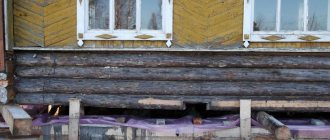
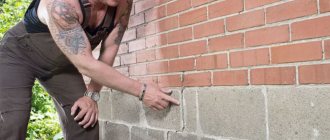
Often it is the foundation that is the weak point of old wooden houses. Tens of years ago, during construction, a lot of requirements and standards were not taken into account, so it is not surprising that many wooden buildings sag and sink into the ground. Most likely, a strip or column foundation was built under the house. Since no calculations have been made, it may be located above the freezing level of the soil. But even this is not the worst thing. It happens that there is no foundation at all - the base stands directly on the ground.
If the old foundation is a little “tired” in places, but overall still strong and reliable, then you can get by with restoring it. Otherwise, you will have to build the foundation again. Of course, you can’t handle this on your own – you need to turn to a team of professionals.
Using jacks, the frame of the house is raised to a height of approximately 0.5 m. If there was no foundation at all, it is better to choose a columnar or columnar-strip foundation. If there was already a columnar base, then it is reinforced with additional supports so that the weight of the structure can be redistributed.
DIY stove restoration
We were lucky; in our house there was a Russian stove with a flood, although it was not in the best condition. The stove was missing, the ash door was missing, the bed was slightly dented, and there were two rather frightening cracks. The cracks appeared because the previous owners of the house, trying to make an underground floor, dug a hole right next to the stove; due to the instability of the soil, the back wall began to collapse. In the street part of the chimney, the upper rows of bricks had crumbled due to age and the fact that the stove was heated for many years only in the summer when making jam, that is, very rarely. In addition, the space between the chimney and the roof was not sealed, water flowed, destroying everything in its path.
Initial view of the stove
The slab near the firebox was cracked and moved, the bricks fell through
We lit the stove for the first time after cleaning the chimney and wells to check the draft.
The stove maker advised us to clean off the old plaster, open the seams by 0.5 cm, buy clay mortar and cover the cracks with it. Then re-plaster.
Our actions for the restoration of the Russian stove were as follows:
- We cleaned the stove and sewed up the seams. We did this for four days to the accompaniment of Figaro's aria, which relieved the melancholy a little. Repairing a stove in a house with your own hands is a very tedious and dusty job.
- Next is the chimney. Re-folded the top rows of crumbled bricks
- In the attic, the chimney was plastered with clay mortar, using fiberglass mesh for reinforcement
The final result after the restoration of the stove:
We closed the cracks with the same clay mortar; by the way, we did not buy it. It turned out that in our area it is possible to dig up white clay. With the help of the knowledge of our good neighbor, his book “How to fold a stove?” and stove maker forums, we identified the individual ratio of parts of the solution. To do this, we had to conduct several experiments and draw conclusions. True, making the solution yourself turned out to be a whole story; in addition to experiments, it is necessary to grind the accumulated clay through a fine mesh, which requires a lot of time, patience and fingers. The sand for the mixture is sifted through a fine sieve, it is also washed with water to remove fine organic matter, but we decided that this would be too good. The solution turned out to be successful, the seams do not crumble, no cracks have appeared in two years.
We installed the slab somehow intuitively, on the same clay mortar, trying to keep it level. Same thing with the blower, secured with wires and covered with mortar.
They primed it so that nothing would fall off. The metal elements were painted with heat-resistant paint. At this stage, the restoration of the Russian stove was completed.
We did not plaster the stove; we wanted to preserve the appearance of the brickwork. This added another interesting texture to the interior, natural and natural.
After the restoration of the Russian stove, we also used it as a fireplace!
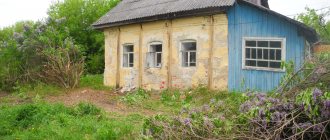
How they found this house: “You don’t tell the owner, but this is a haunted house”
Tatyana decided to slow down the pace of life in Minsk and began looking for a house in the village for this. In an attempt to find “the one,” the architect visited more than 100 places.
Tatiana Sinitseva
architect, author of the Bosikom.concept project
“Almost every day after 6-7 pm I went to look at houses,” Tatyana recalls. – It was difficult to choose: I wanted a hilly area, an apple orchard on a mountain, and not in a lowland.
For me, a country house is very important. Firstly, this is our past. When I was looking for houses, it was sad to see them get old. Nobody notices the beauty in these windows and decorations. Secondly, I spent my childhood with my grandmother in the village - this is a special memory for me.
Tatiana searched for a house for about six months. The choice fell on a traditional house 60 kilometers from Minsk. According to the architect, it was built in the 1940s. During this time, he even managed to acquire legends.
– The house was being sold by the grandson of the former owners. His grandparents previously lived in the village of Ermolich, which was partially flooded by the Vileika Reservoir in the 1960s. They looked for a replacement for a long time - grandma was exhausted in searching for something worthwhile. When she was offered another option, she said: “If it really suits, I’m ready to pay twice as much.”
The house was then being sold because the former owner hanged himself in the barn. The couple was dissuaded and told about the constant noise. But the father of the family (a brutal hunter) said: “We should be afraid of the living, not the dead! And if anyone pokes his head in, I’ll shoot him a couple of times and he’ll be dead.”
The house was sold to Tatyana with the belongings of the previous owners.
The story of ghosts in the village is still remembered today. Tatyana tells how an elderly neighbor told her builders: “Don’t tell the owner, but this is a haunted house.”
-Have you met these ghosts?
- No, I didn’t see them. But if they appear, we will make peace with them (laughs).
DIY wooden floors in a private house
The dismantling of the old floor happened quite quickly, the boards rotted into dust due to excess moisture, since the floor was not ventilated, because it was covered with linoleum and the vents were closed.
How did we arrange the “cellar”?
They removed the fertile layer of soil, leveled the ground, and dug a hole for the “cellar.” They placed a wooden box there, tarred the outside, and filled the bottom with concrete.
How did we waterproof the subfloor?
Thick film was spread over the entire area. It cuts off excess moisture from the ground; a 5-centimeter layer of sand was poured over the entire area.
What to put the logs on?
When dismantling the old floor, we discovered columns made of oak logs. These posts rotted into dust, so we didn’t want to use wood, and initially we didn’t want to mess with bricks, it was a lot of hassle. It was decided to use used car tires, since we are always for saving resources, financial and natural.
Why tires? They do not rot, do not allow moisture to pass through, excellent formwork, and cost absolutely nothing.
The tires were set up. We filled them tightly with sand, compacted them well, poured a 5-centimeter layer of concrete into the tires
How to make a subfloor?
After placing the logs according to the level. Transverse joists were secured in them and everything was worked off.
Next, the skull blocks were filled and the subfloor was laid. It was made from old boards left over from the veranda, which had been dismantled by that time. They were treated with iron sulfate.
How to insulate a wooden floor in a private house?
Lay glassine for waterproofing. The cells were covered with a 10-centimeter layer of sawdust, which was mixed with lime, ash and salt (from mold and mice). Let the sawdust dry thoroughly.
How to make a floor from planks?
Finished floors were laid from 25-gauge natural-drying edged boards. Next is sanding the wooden floors with a grinder. How to cover a wooden floor in a house? To be cheap and environmentally friendly? We used linseed oil and did not regret it. It is perfectly absorbed into the wood and polymerizes the coating, leaving no greasy marks. The only thing they would do differently now is add a coloring pigment to the oil to make the floors darker. Still, light wooden floors are not easy to care for.
Laying pine flooring
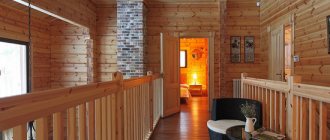
At this stage of interior decoration, we moved into our house. Where there were only floors and a stove.
Project and estimate
When the reconstruction project is ready, it is necessary to obtain permission from government authorities. First you need to contact the local executive committee, which must obtain design permission, a technical passport and permits from the architect, sanitary, environmental and some other services from the local construction and architecture authority. You may have to collect all these permits personally. As a result, the developer receives permission from the executive committee along with an architectural and planning assignment and a conclusion, on the basis of which a developer’s passport is issued. Only with these documents can we assume that all work will be legal.
If, for example, you installed water supply and gas into your house, but do not have contracts and relevant project documentation, then the communications will be considered illegal, i.e. you can get punished. It is possible that the work being carried out will not change the layout, design and communications in the house. In this case, you won’t have to complicate your life by obtaining a ton of papers, but state examination of the project may be necessary.
When the reconstruction is completed, you need to contact the BTI, whose employees will record the new parameters of the building, develop a floor plan and issue a technical passport.
In villages remote from civilization, the reconstruction of wooden houses is usually done independently, borrowing the experience of generations and advice from neighbors. Considering that wood can rot and swell, and the cheapest materials are used to repair a building, such reconstruction can lead to dire consequences. It is better to contact professionals who will draw up a reconstruction project taking into account all your wishes and carry out all the work efficiently.
During reconstruction, it will be possible not only to make the house more reliable and stable, but also to significantly increase the comfort of the structure. You can increase the area by building extensions and superstructures, you can build a terrace or garage, install communications, install a fireplace, insulate the building and equip the facade. The company that will carry out the reconstruction will prepare a project, create three-dimensional models, and calculate the cost of work and materials. Keep in mind that it is better to buy 5-10% more building materials than calculated.
Ceiling repair with beams
The ceiling in our house is made of planks of five and insulated with a 15-centimeter layer of sawdust. The inside was covered with wallpaper (such interior decoration is a common occurrence in old houses), but the paper came apart at the seams and sawdust was already pouring into the room between the boards. The roof of the stove was leaking and the boards around the chimney simply rotted. Otherwise the ceiling was fine.
Roof restoration
Another weak point of old wooden houses is the roof, which usually leaks in several places. If construction is being completed, the old roof must be dismantled in any case. When installing roofing material on an additional floor, all modern requirements are taken into account, including high-quality insulation.
If completion is not planned, then a thorough assessment of the condition of the roof is carried out, paying attention to both the roofing material itself and the rafters. It is best to completely dismantle the old roofing material and install new one. There are many options - from metal tiles to ondulin. The decision depends on the budget, aesthetic qualities of the material and its weight. It is very likely that you will have to dismantle the old rafters. It is also important to take care of roof insulation and drainage organization.
Facade works
| Type of work | Unit changes | Qty | price, rub. | Sum |
| Sanding walls made of profiled timber or logs | m2 | |240| | from 240 | |sum| |
| Painting or impregnation of walls (price for 1 layer) | m2 | |60| | from 60 | |sum| |
| Installation of platbands (removal of decorative chamfer) | m.p. | |150| | from 150 | |sum| |
| Painting of platbands (price for 1 layer) | m.p. | |70| | from 70 | |sum| |
| Installation and subsequent dismantling of wooden scaffolding | m2 | |65| | from 65 | |sum| |
Exterior finishing of wooden houses
Roofing
| Type of work | Unit changes | Qty | price, rub. | Sum |
| Installation of the rafter system | m2 | |320| | from 320 | |sum| |
| Dismantling and installation of roof sheathing | m2 | |90| | from 90 | |sum| |
| Insulation of the rafter system in 1 layer | m2 | |45| | from 45 | |sum| |
| Installation of metal tiles | m2 | |230| | from 230 | |sum| |
| Treating structures with a protective compound from a spray gun | m2 | |40| | from 40 | |sum| |
| Covering roof overhangs with soffits | m2 | |350| | from 350 | |sum| |
| Lining roof overhangs with imitation timber | m2 | |520| | from 520 | |sum| |
Walls, floors
What do I need from you to get started?
A video about what materials need to be provided (for reconstruction, extension or construction) so that I can start working on your project as soon as possible.
My other videos
More than 70 clients have entrusted us with the construction of houses due to the fact that we have our own production in the Vologda region
We harvest wood in winter, which allows us to preserve the properties of the material, and we can guarantee the service life of the house for at least 50 years.
Our production is a full-cycle production, namely sawing round timber, sharpening timber on four sides in one pass, cutting crown joints according to the project.
We have a strict quality control system at all stages of the production and technological cycle.
We can erect a structure from timber according to a ready-made standard design in the shortest possible time.
Our wood is an environmentally friendly material. It is safe and capable of creating the correct microclimate indoors. There is no doubt about the correctness of the choice.
Thanks to our own production, we can complete even the most complex and large-scale projects of wooden houses made of timber in the shortest possible time!
We harvest timber, dry it, produce regular, planed and profiled timber of various sections, carry out control assembly of houses and bathhouses from timber with markings
Thanks to German technological equipment, the influence of the human factor on quality is eliminated as much as possible from the production process, and the high level of automation makes it possible to speed up even very complex and urgent work.
Our own production allows us to build frame houses from high-quality boards with the correct dimensions, according to GOST.
We have already rebuilt more than 270 houses. Each of our clients saves at least 30,000 rubles
Get an honest remodeling quote and expert advice with 17 years of experience. I will calculate the cost and give you really useful advice
It's free and doesn't obligate you to anything!!!
How I work
Call
Call or write by email The email address is being protected from spambots. Javascript must be enabled in your browser to view the address. — WhatsApp
It is advisable to have a photo, dimensions and a brief description
Price
We determine the cost and scope of work, approve everything
MEETING
I will visit your property for an assessment.
Departure costs 5000 rubles. (if the departure is related to reconstruction), the amount is a deposit and is deducted upon concluding the contract.
Start
We sign the contract and start work
Approximate cost of reconstruction
Roofing
Heating system
The heating system must be checked with special care. If the old stove has fallen apart, you will need to get rid of it. It is possible that the heating system will have to be completely changed.
To connect to gas, you need an adapter with certain dimensions, the width of the chimneys should not be very large, cast iron batteries should be replaced with modern radiators.
Heating regulators must be installed in the heating system.
Note!
Ventilation of a private house with your own hands: detailed tips for creating a full-fledged system (99 photos + video)DIY sliding gates (57 photos) - types, features, installation instructions
Do-it-yourself roof: rafter system, attic, installation of tiles. Tips for repair and installation (92 photos + video)