Restoring furniture with your own hands at home is a fun and creative activity that allows you to give new life to your favorite items. At the same time, self-restoration helps you save a lot of money, because the services of professional furniture makers can be so expensive that it would be easier to buy a new cabinet, armchair or sofa.
You should only contact specialists when you want to restore expensive furniture or valuable, antique interior items - here, independent restoration by an inexperienced craftsman can only do harm. You can restore old furniture or something that was bought in a regular furniture store with your own hands - below we will talk about some of the tricks of this process.
DIY furniture restoration
Advantages and disadvantages of restoration
First, it’s worth noting for yourself the pros and cons of restoring old furniture yourself. Before you start working, you need to figure out whether you need to do it yourself or take your favorite item into the hands of a master.
The main advantages are the following factors:
- Saving. At this point you save as much as three times. Since in addition to paying for the work of a furniture maker, you may also have to pay for transporting furniture to the right place, as well as the work of loaders.
- Control. You become the head of the operation and can monitor everything from the quality of the materials you will use to the accuracy of the steps. As a result, you will receive quality work.
- Creation. While working on the interior item yourself, you can add or remove any details. For example, if you painted an object that you are restoring, and after drying the color does not seem to match the interior of your room, you can easily paint it again to achieve the desired result. You don't need to coordinate this with anyone.
The main disadvantages are the following factors:
- Due to lack of experience, a beginner can permanently ruin the appearance of furniture by approaching complex work incorrectly. Antique furniture should still be entrusted to a professional.
- Large time costs. If you decide to restore the furniture yourself, it will take quite a lot of time. You will do this either in the evenings after work or on weekends. In any case, this process is quite energy-consuming, while if you give the furniture to a restorer, you will simply accept the finished result.
This type of work involves the appearance of dust and clutter in the space. So you need to choose a place where people do not live. For example, a balcony or a garage. Such places have enough space and the smells of chemicals will not bother you.
Self-adhesive film
This is one of the easiest ways to repurpose old furniture and doesn't require any special skills.
In construction and online stores you can choose any suitable canvas - with imitation wood texture, plain, with a pattern. A rich assortment will allow you to update your nursery, living room, bedroom or even kitchen. Its main advantage is moisture resistance, which makes cleaning easy. The film is easy to stick if you follow the instructions; it is resistant to temperature changes and even detergents. But this material lasts no more than 5 years, and fades in sunlight and in places of active friction.
Before purchasing film, it is important to take measurements and add a small margin. The surface requiring renewal must be leveled, cleaned, degreased and primed. Then apply the markings. When gluing facades or tabletops, you need to apply the film on top and gradually remove the paper layer. The canvas should be smoothed with a rubber spatula. If air bubbles form after gluing, make miniature cuts in these places and press the material to the base.
Materials for furniture restoration
Undoubtedly, the materials and tools purchased directly depend on the type of work being carried out and the furniture itself. But there are also universal restoration kits that will undoubtedly be useful for any type of work.
The necessary items can be asked in advance from friends for a while or rented from specialized establishments.
It’s worth thinking about professional tools; some of them may already be in your apartment; they will not only save your time, but also give a better result.
The following list of tools will undoubtedly be needed by those who are not afraid of difficulties and still decide to make furniture themselves.
- Jigsaw
- Grinder
- Screwdriver
- Construction hair dryer
- Construction vacuum cleaner
Undoubtedly, not only electrical appliances will be needed to perform this type of work, but also equally important materials that should be purchased in advance, they are more related to painting and varnishing: brushes, spatulas of different sizes, sponges, sandpaper, all this, as mentioned above, is better to purchase in advance.
You should also worry about personal protective equipment. For example, thick and necessarily comfortable gloves, masks and respirators, clothing in which you will work.
Consumables are also necessary during the work process. A variety of varnishes, removers, sealants, enamels, paints, wax, putty.
Varnishes, like other finishing materials, can be easily found in any hardware store; they are in great demand and therefore easy to buy. But it will not be so easy to find materials directly for restoration. It is better to immediately look for everything you need in an online store, many of which offer home delivery to their customers, which will once again save your time.
What tools will you need?
To carry out quality work, you will need several important components. These include:
- Sandpaper;
- Construction spatula;
- A set of brushes of different widths;
- Roller;
- Paint and varnish compositions;
- Screwdriver for mounting accessories;
- Self-tapping screws;
- Screwdrivers;
- Hammer.
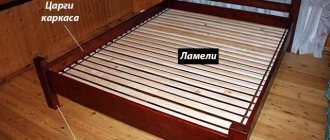
It is recommended to first inspect the frame of the furniture paraphernalia. If the structure has lost its original qualities, then the foundation is restored. To do this, dismantle the broken element and replace it with a new one. Thanks to this, it is possible to extend the performance of a household item.
Antique furniture requires the right approach. It is not always possible to restore a wooden frame at home. To do this, you need to purchase the appropriate type of wood and choose the right technique for processing its surface. For example, if the chest of drawers is made of red oak, then replacing some elements with pine parts does not make sense.
Noble woods have an unusual structure and density. Budget types of wood lose density during mechanical action. Deep dents, chips and large cracks appear on their surface.
Restoration work can last from 1 hour to several days. Paint and varnish compositions and finishing materials can dry differently. For example, putty requires from 30 minutes to 3 hours from the moment of applying each layer. Neglecting these requirements increases the risk of detachments and chips on the restored surface.
There are many ideas for do-it-yourself furniture restoration on the Internet. For decoration, you can use decoupage techniques and artificial aging. In this way, it is possible to transform an old item using small decor.
How long does furniture restoration take?
Repair and restoration can take different times depending not only on the size of the object, but also on the materials used during the work. The restoration time may increase due to the long drying of the layers of paint and varnish, but it is necessary to wait for them, otherwise the result may be unpredictable.
It is important to very carefully read and remember the instructions for working with various types of liquids covering the surface of the work and it is imperative to follow them.
You can also speed up the restoration process; to do this, you should immediately select compounds that dry quickly, but before purchasing, you should again turn to the help of various online sites to read reviews of the products that interest you.
In order to save time again and not go shopping several times, it’s worth thinking through everything well at the planning stage and making a list of the necessary materials and how much material you will need for the work. When you have all the necessary things at hand, the restoration process will noticeably speed up.
Using stencils
This is an ideal solution for those who want to decorate furniture with painting, but do not know how to draw. Templates for stencils can be made from thin plywood, cutting out patterns with a jigsaw, thick paper or film.
Before applying paint, the surface is sanded and degreased. The stencil is secured with masking tape (if the furniture is already painted, it is important to ensure that the adhesive trace does not damage the product). Aerosol or harmless acrylic paints are suitable for decoration. The finished work must be varnished for better preservation.
Restoration of wooden furniture
There is a mandatory procedure that must be followed when working with wooden furniture.
This is useful to know for a beginner who is only taking his first steps in this field.
- If you disassemble the furniture into individual components, it will be much easier to work with it. It is worth thinking about what parts can be disassembled as much as possible without damaging the structure.
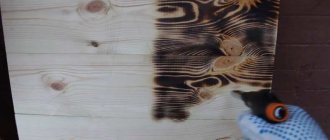
- Removing a varnished surface, there are several ways to remove varnish from the surface of furniture: sanding, a hair dryer, and washing. All three methods are effective and widely used. These methods can be combined with each other. The main thing at this stage is to achieve a smooth, clean, even surface.
- At this stage, the most important thing begins: masking small flaws. For this purpose, special putty, construction wax and other various kinds of materials are used. It is necessary to cover up all cracks, chips and scratches.
- The final coating occurs in several stages, firstly, before coating the surface with varnishes, it is necessary to go over the surface again with sandpaper to remove excess material and the surface becomes smooth again
Restoring the surface of a coffee table
We offer a detailed master class on restoring furniture at home. Surely each of us has a miniature coffee table. After some time, numerous microcracks and chips appear on its surface. We offer to restore its coating using simple finishing materials.
Note!
- DIY furniture made from pallets (140 photos) - step-by-step master class with diagrams and drawings, design ideas
DIY coffee table - manufacturing guide with a full description of the steps, choice of materials (120 photo ideas)
Do-it-yourself laundry basket (130 photo ideas): step-by-step master class for making it yourself, choice of materials, design options
To work you will need:
- Putty;
- Sandpaper;
- Putty knife;
- Stain;
- Medium thickness brush.
Restoration of an old cabinet
First you need to think about what the cabinet should look like once all the work on it is completed.
It will be most convenient to sketch out all the details on paper in detail and only then start working.
Next, as expected, you need to purchase material for the work.
- At the first stage, it is necessary to separate the parts from each other as much as possible (pull out shelves, drawers, etc.), then we clean the surface of the cabinet from the old varnish. It is better to use a grinding machine, it will save a lot of time, but if you don’t have this device, you can do this operation manually, it will just take a little more time and effort.
- The entire wooden surface on which you plan to apply paint must first be coated with a layer of primer. You should follow the instructions on the package and wait the amount of time recommended by the manufacturer.
- To protect areas that you do not plan to paint, cover them with masking tape. We paint everything else in one layer. After drying, if there are bald spots, cover the product with a second layer.
- We apply paraffin to those places that we are going to artificially age. This method allows you to remove the top layer of paint and expose what is underneath.
- Next, you need to cover the entire surface with paint several tones lighter than the base one. To obtain such paint, you can simply add a little white to it.
- The most interesting stage is decorating using the decoupage method. It's not difficult at all. Apply patterned napkins to the selected areas and gently spray with water. Next, smooth the pattern even more carefully with a brush. Then we cover it with a thin layer of glue and wait until it dries.
- The last stage is invariably coating the finished product with varnish. But one layer will not be enough. Therefore, we cover in two. But each of them must be dried according to the instructions.
Decorate with decorative elements
An old dining table whose top is swollen or cracked can be decorated with tiles or mosaics. To do this, you need to sand the base and apply wood impregnation, which will reduce the consumption of tile adhesive. The number of parts should be calculated in advance. To avoid cutting the tiles, the panels can be framed with wooden planks. Glue for ceramics must be applied at five points - in the corners and in the center. The tiles are laid one at a time and separated by crosses. After drying, the tile joints are smoothed with grout.
The photo shows a wooden table covered with tiles. This tabletop is not afraid of moisture and hot objects.
Old wooden furniture can be decorated with various fittings (rivets, original handles, belts) - this will give the product an unusual brutal look. Another way to turn a boring chest of drawers into a modern and stylish one is to stick mirrors on the fronts. It is better to entrust cutting of canvases and processing of edges to professionals, and you can do everything else yourself: paint the chest of drawers, fix the mirrors with special glue and attach suitable handles.
Photo of beautiful furniture restoration
Artistic painting
With the help of drawings applied to the furniture by hand, it becomes exclusive. It is important that the resulting work fits into the interior, becoming part of the whole composition. It is easiest to paint wooden or natural veneer products, as well as MDF facades coated with acrylic.
The photo shows a refurbishment of an old but sturdy cabinet. Hand-painted furniture fits perfectly into the rustic style.
Artistic painting is a painstaking work, as it involves drawing small details. The basis for painting is a primer. It is important not to neglect surface preparation - even the most talented painting can be spoiled by a defect or crack in the base. Acrylic paints are best suited for work, and matte or glossy varnish applied in several layers to protect the finished drawing.
It is not necessary to paint a chest of drawers or a closet on all sides: individual accents on the facades look more aesthetically pleasing.
Step-by-step instruction
Before updating furniture, it is necessary to carefully examine it and determine the nature of the defects. To get rid of polish and coating wear, you need to do the following:
- The coating must be thoroughly cleaned of dirt.
- A camouflage mixture is applied to the cracks; after it dries, a transparent varnish must be applied.
- When the mastic has dried, the surface is treated with polish.
If the furniture has traces of severe abrasions, it is best to completely sand it, and only then putty and paint.
Padding
This process is not complicated, but painstaking: you can reupholster an old chair, an armchair or a sofa. Dense natural fabrics are better suited for reupholstery. The first step is to disassemble the furniture and inspect it - this will help you understand how exactly the material is attached to the wooden frame.
If the upholstery is old, damaged or smells, it is recommended to remove it and strengthen the frame with metal plates. Sometimes the filler requires replacement. In the case of reupholstering Soviet armchairs that are popular today, we recommend adding foam rubber: the product will be softer, more comfortable and more solid.
Calculate the amount of fabric with a margin. It is important to fasten it tightly so as not to create folds. The material is fixed with a furniture stapler.
Craquelure
This is a type of artificial aging, after which the item acquires the appearance of antiquity. Craquelure looks great on classic furniture, which fits perfectly into Provence and shabby chic styles.
One-step craquelure looks like a cracked layer of paint, through the cracks of which the base of the product is visible. This is the easiest way to give an item a touch of antiquity. The furniture is coated with a special craquelure varnish, which must be dried. A second, contrasting layer of acrylic paint is applied to it, which cracks picturesquely under the influence of the varnish. The thinner the paint, the larger the cracks.