The rafter system is the “skeleton” of any roofing structure. The reliability, quality and durability of the roof directly depends on the correctness of its manufacture and installation. If desired, you can handle the arrangement of the rafter system yourself. Want to know how? Check out the following guide!
DIY rafters
Elements of the roof truss system
Types of rafter systems
There are layered and hanging rafter systems. According to statistics, layered structures are most often used. When arranging such a system, the rafters rest against the mauerlat. The function of the central part is performed by a simple ridge run. To increase the strength of the system, supporting beams are installed.
Types of rafter systems
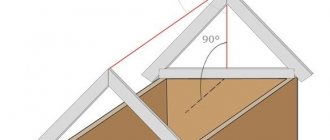
Construction of a gable roof rafter system
In the case of hanging rafters, the system design is equipped with additional racks that promote optimal load distribution over the entire area of the roof structure.
Types of rafters
The manufacture and installation of rafters of both types is carried out in a similar sequence, but taking into account the above-listed features and differences.
Video - Rafter system
Construction and types of roof made of timber.
For example, timber roofs.
The most important thing you need to know is that there are many types of timber roofs:
- single slope, with a slope in one direction. First of all, it is convenient for extensions or buildings with a small diameter;
- gable, most often used in individual housing construction, with the same or different slope angles;
- hip or hipped, typical for large buildings. Because of this, the ends of the covering are a triangle or hips.
Rafter system design
Construction of the rafter system
Any rafter system consists of the following main components:
- rafter legs. Mounted parallel to the slopes. Prevents deflection of the roof structure;
- run. It is a transverse beam installed longitudinally from above;
- beds and racks - support the purlins of the rafter structure;
- struts are components of a sub-rafter truss that provide additional stability to the rafters.
Rafter diagram
To calculate, use the rafter leg length calculator.
The most important characteristics of a timber roof.
Without a doubt, the main advantages of timber construction:
- environmental friendliness and hygiene;
- ease of implementation;
- light weight, allowing savings on load-bearing structures (walls, foundation);
- low cost;
- good heat and sound insulation, when combined with properly selected coating and insulation materials;
- ease of maintenance.
Of course, like all wood materials, timber has characteristic disadvantages:
- low fire and biological resistance. Because of this, impregnation with appropriate compounds is required;
- high demands on wood quality and moisture content.
What are the rafters made of?
What to make rafters from
Attachment unit to the beam
Most often, rafters are made of coniferous wood. This is a relatively inexpensive, fairly durable and easy to process material.
If you make your own rafters, it is best to use timber with a section of 10x10 or 15x15 cm.
Also, when choosing wood, you need to pay attention to its moisture content. The maximum allowable rate is 20%. At higher values, the material will shrink, which will lead to disruption of the configuration of the entire roofing system.
Prices for various types of timber
timber
Video - Roof construction mistakes
Types of roofing materials
It is preferable to choose the lightest and most durable roofing material. There are several options for roofing materials.
Ondulin
It is a fairly strong sheet of wavy shape, considered a more advanced alternative to slate, but more elastic. Lightweight, easy-to-install material with good sound insulation. Made from bitumen, cellulose fibers and mineral pigments.
Metal tiles
A strong and durable material that looks impressive, imitating the texture of ordinary tiles. A more expensive option than all the others, but the performance properties and aesthetic appearance fully justify the financial costs.
Corrugated sheets and galvanized sheets
Corrugated sheeting is considered a more economical option for metal tiles. It also has high strength and fire resistance, and for additional protection from the external environment, galvanized steel is coated with polymer paint. May corrode over time.
Other materials
A fairly popular material is soft (flexible) tiles. It is made of fiberglass or fiberglass. Unlike steel sheets, such a roof absorbs sound well and is not subject to corrosion. It is durable and looks beautiful. However, soft tiles are labor-intensive to install and have a high cost.
For houses made of timber, you can choose any roofing material - it all depends on the stylistic decision of the project and the personal preferences of the customer. Designing and installing a roof is a complex and responsible process that is best left to professionals. Holz House specialists will help you realize your ideas about an ideal house made of laminated veneer lumber and choose the most suitable project. You can find out prices and order construction from our managers.
Preliminary calculations
Roof rafter system
We calculate the optimal length of the rafters. The standard length of factory-made products is 450 or 600 cm. If necessary, the length of the rafters can be changed.
To determine the optimal cross-section of timber you need to know the following:
- rafter length;
- element installation step;
- estimated indicators of future loads.
The required information is shown in the following table.
Table 1. Selection of rafter installation step depending on their length and cross-section
| Rafter length, m | Distance between rafters, cm | Rafter beam cross-section size, cm |
| Until 3 | 120 | 8x10 |
| Until 3 | 180 | 9x10 |
| Up to 4 | 100 | 8x16 |
| Up to 4 | 140 | 8x18 |
| Up to 4 | 180 | 9x18 |
| Until 6 | 100 | 8x20 |
| Until 6 | 140 | 10x20 |
The remaining elements of the roofing system should have the following sections:
- Mauerlat - 10x10 or 15x15 cm. It is also possible to install a Mauerlat from timber with a section of 10x15 cm;
- diagonal rafter legs and valleys - 10x20 cm;
- puffs – 5x15 cm;
- purlins – 10x10, 10x20 cm;
- struts - 10x10 or 15x15 cm;
- hemming boards – 2.5x10 cm;
- crossbars – 10x15 or 10x20 cm.
Calculation of the load on the rafters
Knowing the length and cross-section of the rafters, as well as the step of their installation, you can easily calculate the required number of elements, focusing on the length of the building wall.
Calculation of the rafter system
Additionally, the rafters must be calculated for deflection. That is, you need to find out how much the rafters can bend before they break. For example, when designing an attic roof structure, the calculation of the truss must be done so that the deflection is no more than 1/250 of the length of the section that is subject to pressure.
Calculation of the rafter system
Based on the above, if the length of the rafters is 500 cm, the maximum permissible deflection value will be 0.2 cm. The indicator seems insignificant, but if it is exceeded, the deflection of the roof will be visually noticeable, and this will not have the best effect on the reliability of the structure.
Shed roof rafters
If possible, when designing a house, it is advisable to ensure that the length of the rafters does not exceed 6 meters
To determine the length of the rafters, use the Pythagorean theorem
The calculation of the cross-section of the rafters depends on the roofing material
Video - Calculation of rafters with your own hands
Roof options
The beauty of the architectural appearance largely depends on the shape of the roof. Beautiful houses are crowned with broken, complex structures with turrets, window openings, and arched elements. The construction of such structures requires engineering knowledge, special skills and experience.
There are several types of roofs:
- single-pitched, used mainly for outbuildings and garages;
- gable, the most common and not difficult to install;
- gable, gable, with a separate pointed element resembling a birdhouse;
- hipped, including hip ones;
- broken, multi-level with a residential interior, an attic.
Each type has its own options, for example, hipped ones can be hipped, half-hipped, or spire. Different types of roofing are used for all structures.
Important! A single-pitched type definitely cannot be used for a residential building; this will not only spoil, make it primitive, and simplify its appearance, but will also narrow the living space (there is no attic) and complicate the task of creating a high-quality microclimate necessary for comfortable living.
Look at the ready-made baths at the link; more often in such small buildings they use a sloping version. Which is more convenient to transport.
The advantages of a gable roof for a house made of timber are the compatibility of materials, simplicity of design, and relative ease of installation. It is possible to crown a house with a gable structure without the involvement of construction crews, and it is convenient and easy to insulate it. The attic space is quite spacious and can be used as a living space or as a warehouse. The budget is not large, especially if you build it yourself; in addition, the ability to use literally all existing roofing materials makes the gable roof the most popular. Disadvantages include difficult maintenance during operation and windage.
A hip roof is more convenient in terms of operation and repair. Four slopes provide high-quality snow and rain flows. The design is more reliable and durable than all others. Due to its low height, it has excellent wind resistance. The attic is large, it is easier to insulate the attic space inside, but it is much more difficult to arrange a hip roof structure. It will require calculations using formulas, precise measurements, careful and scrupulous. You can make a hip roof with your own hands, but you can’t do it without consulting with specialists.
Important! The roof of a house made of timber should not burden the load-bearing walls and foundation with great weight. The more complex the design, the greater the weight. Calculating the total roof load, consisting of its own weight, taking into account the influence of wind, is a paramount task.
We turn wooden beams into rafters
We are making a template with which further work will be performed. The rafters have the same design, so the template will save you time and effort.
Use a template to mark and trim rafters
Use a template to mark and trim rafters
We connect two boards along one edge with a nail. The result should be a design that resembles scissors.
Making a template
Template outline
We place the free edges of the “scissors” on supports at the points of future placement of the rafters. This will allow you to determine the slope of the roof slope.
We take an extra pair of nails and fix the angle set between the boards. The template is ready. Additionally, secure it with a crossbar. To ensure that the set slope angle of the roof slope does not change under the influence of loads, fasten the crossbar with self-tapping screws.
Be extremely careful when creating the template. Even the slightest deviations can cause the entire structure to deteriorate.
Next, we make a new template for preparing mounting cuts on the system elements. Use plywood 0.5 cm thick. For reinforcement, use a 2.5 cm board. Select the dimensions of the cuts taking into account the cross-section of the rafters used.
Using ready-made templates, we make cuts and begin to assemble the truss.
Marking the opposite end of the rafters
Marking the opposite end of the rafters
Full size rafter template
Video - Gable roof rafter system
Material requirements
The types of wood used for construction depend on local availability . But, as a rule, three main types of wood are used: spruce, yellow pine and red cedar. This timber can be strengthened by applying glue or by laminating thinner pieces glued together to form a beam with an oversized cross-section.
Before use, the beams are thoroughly dried: the moisture content of the lumber should not exceed 20%.
Important : it is permissible to use planks made of laminated veneer. Their length can be up to 5 times longer than a standard wooden beam.
In addition to wood, sometimes there are recommendations for installing metal trusses , the elements of which are made of construction grades of steel.
Despite the assurances of manufacturers, such rods are not an adequate replacement for wood, since they not only increase the weight of the entire structure, but also complicate the process of installing the rafter system.
Failures with steel structures are due to the fact that
metal is not a material that can withstand heat as effectively as wood .
The situation is even worse with corrosion and electrical safety. Therefore, to avoid problems in the future, it is better to choose wood instead of metal. Solid wood boards are used to make floor lathing and counter lathing. Coniferous species are predominantly used, with pine being better than spruce. A more expensive option is larch. These rocks are already naturally protected from rotting by the resin secreted. The boards are laid side by side to then be connected to the beams of the rafter system. The elements can then be securely fastened using nails or steel staples.
It is recommended to make the main lathing from boards with a rectangular cross-section 30x100 mm; the counter-lathing is often made from square beams measuring 50x50 mm.
Farm assembly procedure
For convenience, you can build scaffolding.
The structure includes supporting legs and connecting components. The farm resembles a triangle. Carry out the work in the specified sequence, and the finished structure will be able to adequately withstand all incoming loads.
Installation of the ridge beam and the first rafters
Use the calculator to calculate the height of the ridge of the rafter system.
The farm can be made on the ground with further rise to the top, or directly on the roof. The first option is simpler and easier to implement.
Another rafter in place
Type of installed rafters
We assemble the truss in the following order. First, we cut the prepared material to the required size, join the bars at the top edges and fasten them with screws. To prevent cracks from appearing at the fastening points, we pre-drill holes in the bars with a diameter slightly smaller than the size of the fasteners.
Installation of rafters
Ridge beams
We also use a crossbar to connect the rafter legs. We fix it half a meter below the top point of fastening the elements. Crossbars will help increase the rigidity of the structure and eliminate the risk of deflection. We fasten the crossbars in recesses previously prepared in the rafters by cutting down.
If necessary, the rafters are cut at an angle if this is required by the features of the roofing structure being installed.
Installation of timber rafters
Stages of installation of a gable roof made of timber
As you can see, installation can be done in two ways:
Firstly, this is ground assembly, lifting finished elements to the top. Because of this, long-span coatings will require a construction hoist or crane, the rental of which is quite expensive.
Secondly, assembly on the roof. For this reason, lifting of timber, boards, tools and fasteners will be required.
Mauerlat installation
A layer of waterproofing is laid on the upper cut of the walls - it can be geotextiles, bitumen-polymer roofing material; ordinary roofing felt is not suitable, as it has low durability. The Mauerlat is mounted on top of the anchor bolts, leveling along the inner edge of the wall.
Installation of supports and skates
When installing layered rafters on an internal load-bearing wall, a beam is attached to the anchor bolts along the waterproofing gasket, racks are installed on it with a given pitch, secured with nails or screws to metal corners. The ridge girder is laid along the racks, the fasteners are similar.
The hanging system requires the temporary installation of racks; the mauerlat beam is attached to the wall with metal ties, since it is the mauerlat that bears the main load.
Mounting methods
The method of attaching the rafters to the Mauerlat must ensure reliability and resistance to wind and snow loads. The rigidity of the fastening for layered rafters is ensured by metal corners or fasteners in cuts.
Installation of sheathing
The pitch of the lathing is chosen according to the recommendations of the manufacturer of the roofing material, since it is different for different types of metal tiles, asbestos-cement sheets, corrugated sheets, and for soft materials, such as bitumen tiles, ondulin, rolled bitumen-polymer, the sheathing must be continuous. In addition, the step also depends on the angle of inclination of the slope. In these cases, it is optimal to make the flooring from sheet materials - moisture-resistant plywood, chipboard, OSB.
When using sparse lathing at the ridge, on the eaves, at the attic windows, in places where pipes and communications pass, in valleys with a width of 350...500 mm, a continuous flooring is also performed.
Installation of a roof truss
Options for cutting rafters into beams
Measurements and marking of hip rafters
Installation of roof trusses is carried out in the following sequence:
- we install end trusses;
- we fix the central trusses.
When installing edge trusses, we adhere to the following important rules:
- we install the base of the triangle on the mauerlat or the upper frame in the case of arranging the roof of a wooden structure;
- first we make several holes in the base for its subsequent fastening to the log house;
- Be sure to check the straightness of the installation of the truss. To do this, we use a plumb line attached to the crossbar;
- We fix the base of the truss only after confirming the evenness of its installation;
- To ensure additional stability of the farm, we attach the jibs from the log house to the rafter leg. Select the length according to the situation, it is not of fundamental importance;
- Before tightening the jib with screws, we again make sure that its placement is straight.
Rafter system
Manufacturing of lower chords of roof trusses Assembling a roof truss Assembling a roof truss
Rafter trusses are installed in the design position
After completing the installation of the outer trusses, we proceed to fixing the central and subsequent structures, if their placement is provided for by the project. The optimal installation step for trusses is 100 cm.
To secure the central rafter triangle, we use temporary jibs. After the visor is installed, the jibs can be removed. Recommendations for fastening the central and other trusses are the same as in the case of the outer structures.
After installing all structural elements, we begin attaching the sheathing and further arranging the roofing system: moisture, heat and vapor insulation, as well as installation of the selected finishing coating.
House frame with rafters
Good luck!
Assembling a ridge truss
Installation of a ridge truss
Installation of rafters Installation of rafters
Prices for various types of fasteners for rafters
Rafter fasteners
Video - DIY rafters. Shed roof
System for houses with two internal load-bearing walls
If the house has two load-bearing walls, install two rafter beams, which are located above each of the walls. Beams are laid on the intermediate load-bearing walls; the load from the rafter beams is transferred to the beads through the racks.
Systems with rafter beams
In these systems, a ridge run is not installed: it provides expansion forces. The rafters in the upper part are connected to one another (cut and joined without gaps), the joints are reinforced with steel or wooden plates, which are nailed.
In the upper non-thrust system, the pushing force is neutralized by the tightening. Please note that the tightening is placed under the purlin. Then it works effectively (top diagram in the figure). Stability can be provided by racks, or joints - beams installed diagonally. In the spacer system (in the picture it is below) the crossbar is a crossbar. It is installed above the purlin.
There is a version of the system with racks, but without rafter beams. Then a stand is nailed to each rafter leg, the other end of which rests on the intermediate load-bearing wall.
Fastening the rack and tightening in the rafter system without a rafter purlin
To fasten the racks, 150 mm long nails and 12 mm bolts are used. Dimensions and distances in the figure are indicated in millimeters.
Methods of fastening rafters
In the lower part, the rafters can be connected both to the Mauerlat and to the floor beams. Sometimes, for example, during frame construction, they are fixed directly to the wall. And in the upper part, the rafter legs are combined with the ridge. Each designated node can be created in several ways.
Connection with Mauerlat
Rigid fastening of the rafters to the mauerlat ensures that there are no displacements of the assembly elements . It is performed by cutting in a certain sequence: 1. To speed up the work, a template is made from a piece of board or thick cardboard. A line is drawn on the workpiece, departing from the side edge at a distance equal to 1/3 of the rafter width, and then the point of contact with the mauerlat beam is marked, along which a second line is drawn, perpendicular to the first.
2. At the angle of inclination of the roof slope, the template is placed against the edge of the mauerlat, making sure that the point marked on the piece of wood is strictly opposite the corner of the beam. Two lines are drawn from it with a pencil - vertical and horizontal, as a result of which a triangle is obtained on the workpiece, which is carefully cut out. 3. The manufactured template is assessed for correctness by placing it on the Mauerlat in several places. If the groove made turns out to be smaller or larger than needed, then the pattern is made again, correcting the mistake. 4. The template is placed on a horizontal rafter. The triangle in the pattern is outlined with a pencil. The same is done with the other rafter legs. At the same time, make sure that the horizontal line of the groove in the pattern is in the same place in the rafters every time. Otherwise, the notches will be created at different distances from the ridge. 5. The triangles drawn on the rafters are cut out with a hand hacksaw. Use the tool slowly, so as not to accidentally increase the depth of the groove in the rafter leg. If you have the skills to work with an electric saw, you can make notches with this device. 6. Check the correct size of the grooves made with a template. If inconsistencies are found, the notch is corrected with a hacksaw. 7. The two outer rafter legs are placed at the top of the house. They are inserted into the Mauerlat using grooves, secured on the sides with metal corners or brackets. 8. A rope is pulled along the bottom edge between the two installed elements. Then the remaining rafter legs are attached to the mauerlat one after another.
To connect the main elements of the roof frame to the mauerlat with a stripe of a thrust bar, do the following: 1. First, rafters are installed on the roof, forming gables. They are fixed with metal corners for a while.
2. A fragment more than 40 cm long is cut from a wide board. 3. A piece of wood is placed vertically on the mauerlat close to the temporarily installed rafter. Looking at the other side of the rafter, determine how much needs to be cut from a fragment of the board. To do this, draw an inclined line between the rafters and the board. 4. A cut is made on a piece of wood along the line drawn with a pencil. The finished block is placed under the rafter to check whether it fits well into place. If no problems arise, then stop bars are created for all other rafter legs. 5. The gable rafters are freed from fasteners one by one. Previously made thrust bars are placed under them. On both sides, the connection of the rafter legs, short boards with a gash and the Mauerlat is fixed with metal corners. Additionally, the connection between the thrust bar and the rafters is strengthened by means of a metal plate.
Sliding method of fastening rafters
Thanks to it, it is possible to avoid deformation of the rafter structure and deterioration of the stability of the top row of logs, which replaces the Mauerlat. The choice of sliding rafters is justified only when a ridge beam is provided for the main elements of the roof frame, into which they could rest with their upper part.
When the rafters are fixed to the mauerlat using the sliding method, certain steps are taken: 1. In the store, they buy clamps designed specifically for fastening sliding rafters on both sides. These are called floating metal mechanisms or sliding rafter supports.
2. Temporarily, in order to see where the main elements of the roof frame come into contact with the Mauerlat, install gable rafter legs. 3. In order to increase the area of combination of two elements of the rafter system, an acute angle is removed from the mauerlat bars. If logs act as the base for a wooden roof frame, then the top layer is cut off from them so that the area for attaching the rafter legs is not round, but flat. If this condition is not met, the rafters will soon begin to push through the Mauerlat, which will entail deformation of the entire rafter system. The task does not have to be completed along the entire perimeter. It is enough to remove the corners only in the rafter support areas. There, at a distance slightly greater than the width of the board, two cuts are required. The wood in the resulting recess must be carefully removed with a chisel, leveling the surface.
4. The gable rafter legs are carefully placed on the treated areas and finally fixed with fasteners. They are installed in such a way that the rafters have the opportunity to lower in case of shrinkage. 5. A rope is pulled between the outer rafter legs along the bottom. It is perceived as a guide when installing the remaining elements of the roof frame.
Layered method
When fastening the rafters to the mauerlat using the layered method, do the following: 1. Determine at what length each rafter will stand on the mauerlat with its end. To do this, measure the angle of inclination of the thrust plane. Using it, a line is drawn on the rafter leg from the end to the side. If the width of the board allows, then closer to the edge of the rafters the direction of the line is changed, leading it sharply to the right. As a result of this, it will turn from inclined to vertical, and the cut will have a tooth that will prevent the rafter from moving forward. When it is not possible to fulfill this condition, then after installing the rafters, support bars 40 cm long are nailed to their bottom.
2. Along the marked line, cut off an extra piece from each rafter. The work is done with a hand hacksaw. 3. So that the layered rafters do not go sideways, after installation on the Mauerlat they are fixed with metal corners or brackets. You can also use nails for fastening, the main thing is that they are not large. Hammering thick nails can cause the wood to crack. 4. For the rafters, they are looking for fillies - special elements of the load-bearing structure of the roof, which will help to extend the rafter legs beyond the external walls of the building. Edged boards with a thickness of at least 3 cm are usually used as fillies. Their length is selected taking into account the expected length of the eaves overhang. The manufactured fillies are nailed to the rafter legs.
Alignment with floor beams
You can attach rafters to the floor beams only if you are sure that the walls of the building will withstand the pressure of the roof frame. In the absence of a Mauerlat, the load on the house is not uniform, but point-like. Without a doubt, the rafters are attached to the floor beams if a light mansard roof is being built. In this case, boards with a cross section of 5x15 cm are used as ceiling beams. The rafters are connected not to the Mauerlat, but to the beams of the attic, if they know for sure that they will withstand the pressure applied.
To securely fasten the rafter legs to the floor beams, perform the following tasks: 1. A notch with a tenon is made on the rafters, and they begin to cut the board, stepping back at least 2.5 cm from the edge of the end area. The cutout in the rafter should not be large. The best depth is 1/3 or ¼ of the thickness of the floor beam. 2. Small recesses are also created in the ceiling boards. They will come in handy to more firmly connect the rafters with the beams that replaced the Mauerlat. You can refuse grooves only when the boards are not made of hardwood, which is particularly durable.
3. The rafters are installed on the beams. Nails are driven into them at an angle. To strengthen the connection, metal plates are attached to the elements of the assembly.
Wall mount
If for some reason the rafters have to be fixed directly to the walls, then they will definitely need to be connected with a tie. It will relieve some of the stress transmitted by the rafter legs from the house. In no case should rafters be directly connected to the external walls of the building if they are built from foam or gas blocks. These materials easily transfer their moisture to the wood and are unable to retain fasteners. The rafters can be fixed to the wall using the sliding method, but this is not the most reasonable solution.
In order to securely fix the rafter legs to the walls, it is necessary to take the following measures: - Make a notch with one tooth on the rafters at the desired angle. — Place the rafters on the walls end-to-end and drive a nail 10–12 cm long into them. — If necessary, attach metal corners to the sides of the rafters.
Load on the rafters according to the diagram
There are three types of load:
- Constant . This is a value that will not change throughout the entire life of the roof. This category includes a lot of roofing material, insulation, hydro- and vapor barrier, sheathing, additional roofing parts, as well as interior decoration of the attic. That is, the summed value of the mass of the elements will be the expected load. Its average value is 40-45 kg/m2, but not more than 50 kg/m2. It is advisable to provide a safety margin equal to 10% of the total mass.
- Variable . This refers to the intensity of precipitation, load from snow and wind, which can vary significantly depending on the time of year or weather conditions.
- Special . This group includes extreme natural phenomena - earthquakes, tornadoes, strong winds. In these cases, the safety margin is made significantly larger than usual.
Methods for installing roofs over a log house
Building a roof over a built log house is not as easy as it might seem at first glance. Such work requires enormous skill, knowledge of materials and carpentry skills. Before you get started, you will need to practice. In this article we will look at methods for installing roofs over a log house and talk about the important stages of installation. Let's hope that the information will be useful for craftsmen and those who are taking on such work for the first time.
Flawless installation can only be achieved by taking into account the shrinkage of walls made of logs. You may need knowledge of ancient roofing technologies and modern installation methods. You need to understand that taking into account the characteristics of the material is not enough to correctly build a roof. There are components to which it is important to pay special attention so that the roof does not deform over time. It is necessary to choose the most rational method of construction. To do this, you should take into account the forces acting on each log and choose the right ways to dampen the action of these forces. Our company’s employees will develop a gable roof scheme taking into account all the features of this material and project.
A little theory
First, let's look at how the roof frame is constructed. The rafter legs connect the beams or mauerlat - laid on the longitudinal walls and securely fastened - with the ridge beam.
Schematic representation of the truss structure
Legs can be:
- Layered, that is, having an intermediate or central support. Under a mass of snow or with a side wind, they experience the least bending load, which makes the structure as a whole more durable;
Please note: in addition, when arranging layered rafters, the force pushing apart the longitudinal walls is minimized.
- Hanging. They connect the mauerlat or ends of the beams to the ridge without additional supports. Hanging legs experience significant bending loads and, under snow and wind loads, push the walls apart with great force. That is why in such systems they are always connected by a tie - a horizontal beam.
Different systems are limited by different maximum span lengths.
The attachment of the rafters to the ridge beam is always made motionless and as rigid as possible, but the connection of the legs with the mauerlat or the upper crown of the wooden frame is often left movable. In this way, the inevitable shrinkage of the house when drying logs or timber of natural moisture is compensated.
