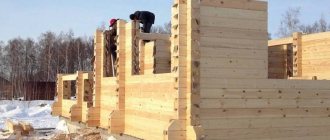
In our country, until recently, houses were mainly built from logs, brick or concrete, but now the time has come for new technologies, and frame houses have appeared in this segment. They are very popular due to their unique combination of high quality and low financial costs. But the main thing is the opportunity to make a durable frame house with your own hands without the use of special equipment. Therefore, we have made detailed step-by-step instructions for you.
The guide itself consists of 7 steps:
- choosing a location for a home;
- design;
- foundation installation;
- frame assembly;
- walling;
- thermal insulation;
- roofing.
The construction of a frame house has the main advantage over other technologies - the rapid pace of construction without the involvement of special lifting mechanisms. Inexpensive frames are put into operation in one season, but this speed in no way worsens the comfort and quality of living - these parameters are no worse than those of wooden and stone houses.
Choosing a location on the site
In accordance with the urban planning standards of the Russian Federation, your residential building must be located at a distance of at least 3 m from the official border of the site. Also, in most cases, local regulations regulate a 5-meter setback from the red line of the street to the house.
It should be taken into account that all frames belong to the IV and V degrees of fire resistance, therefore, in accordance with fire safety standards, the distance from your building to the house on the neighboring site must be at least 10 meters.
The remaining requirements for placing the house are presented in this image:
We are drawing up a project
According to the Federal Law, the developer is obliged to be guided by the project created by professional design organizations. The documentation drawn up must also be agreed upon by authorized officials of various services, where changes and/or additions may be made.
In fact, local authorities only require a preliminary design, including a general plan diagram, plans, section, facades and basic technical and economic indicators. Such a project costs no more than 10,000 rubles, and it can be ordered after construction and before commissioning.
However, for your convenience and saving on rework, we recommend choosing a suitable standard project or creating an individual one, taking into account personal preferences and wishes. In both cases, it is necessary to mark out all communications and include engineering systems in the plan.
Example of a typical preliminary design
Please note that standard projects are traditionally cheaper, while individual ones allow you to realize your own ideas. Individual drawings from the design documentation are drawn up taking into account the reference to the topography and other features of the site - only such scrupulousness can guarantee the long-term operation of the home without problems and major repairs.
Method 1. Use both dry and wet
One way out is to use partly natural moisture (NW) wood and partly dry wood.
When drying, the wood almost does not change its size along the grain - the length of the board remains unchanged. And the width and thickness of the board changes by ~5%.
A wet board can be used where changes in thickness and width do not matter. This:
- single racks
- strapping boards
- black flooring (insulation support, black floors)
We use a dry board for everything else:
- bridges (jumpers in Russian)
- headers
- floor joists
- frames of openings
Calculate everything for your project. It may turn out that the savings will not be significant.
Engineering systems
To build a frame house, it is necessary to include all utility networks in the project. They are laid in strict sequence, and you need to start from the foundation. If a concrete base is used, all technological holes for communication systems must be made at the time of pouring, so that after hardening you do not have to deal with complex drilling of holes.
The electrical system consists of a distribution board, electrical wiring, outlets and grounding. The distance between points for sockets should be no more than 4 m. Sockets with covers are installed near water sources. The ventilation system includes air ducts with holes. Is it worth reminding that the ease of access and use of taps, switches, as well as the functioning of drains and sewerage drainage depends on the correct layout of pipes and wires?
Fifth stage of construction: finishing
At the fifth stage of construction, the external and internal finishing of the house, installation of plumbing, connection of lamps, sockets, heating of the frame house and other work are carried out, which will make a real home for living or recreation from a simple box with walls and a roof.
Since the walls of the frame house are covered with OSB boards, it will not be difficult to carry out external and internal decoration even with your own hands.
You can read about how to do external finishing and choose the right materials in our article here.
External finishing with plaster
Interior decoration depends primarily on the preferences of the home owners, and can be done using tiles, wallpaper, liquid wallpaper, plaster, in particular decorative.
The walls can be painted, covered with clapboard, siding, the ceilings can be whitewashed, or suspended ceiling technology can be used.
The floor can be covered with tiles, parquet, laminate. In general, there is room for your imagination to run wild.
Interior decoration with block house
By this time, you should already have all the pipes for installing plumbing installed (they are removed during the construction of the floors, during the rough screed), and the electrical wires should be laid out.
Construction of a frame house from the first to the fifth stage takes about 3 months.
Foundation installation
The construction technology involves the use of a shallow strip, column or block foundation. The strength of the base is increased with the help of reinforcement and monolithic piping. It is possible to make a high-quality foundation only after conducting a geological analysis of the soil.
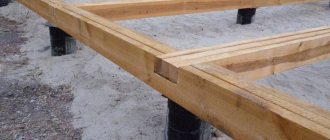
In most cases, a simpler foundation is sufficient for a frame house, which can easily withstand light loads. The most appropriate are screw piles. Such a foundation does not require a large amount of materials, which reduces the cost of construction estimates by an average of 15-20%.
Options for installing a grillage on screw piles
In the case of a monolithic foundation, it is necessary to dig a trench, compact the soil and pour a sand cushion. Before you start pouring concrete, you need to make formwork and install reinforcement bars. The solution must be compacted during the pouring process. Half a meter long vertical studs are placed in the liquid concrete of the base every 2 m - the lower frame frame will be attached to them. The surface of the resulting grillage must be leveled with cement mortar.
Insulation and protection of the structure from moisture ingress
Follow these steps:
- Attach a 150x25 or 100x25 board at the bottom perpendicular to the floor joists or similar. Most often this is done end-to-end. However, in the case of rigid fastening of the logs, every 40-60 cm is sufficient. It is recommended to fasten the board using self-tapping screws.
- The waterproofing membrane is nailed on top of the joists and the fixed board.
- Insulation is stuffed between the joists on top of the waterproofing. The climate zone affects the thickness of the layer. Its size is usually 15-20 cm.
- The insulation is laid in such a way that each joint is covered by the following layers.
- First, a vapor barrier, then an OSB board or plywood is stretched over the insulation. You can simply sew the board tightly.
Keep in mind that waterproofing and vapor barriers are installed with an overlap, following certain rules. It is necessary to avoid the formation of moisture inside and outside the insulation. The insulation is packed tightly, preventing the formation of cracks.
Bottom harness
Seven days after the work of pouring concrete, a lower frame made of wooden beams with a cross-section of 15x15 cm is laid over the entire surface of the foundation. The wood is pre-treated with antiseptic agents, and two layers of roofing material are laid along the bottom, which acts as horizontal waterproofing.
The timber can be fixed with anchor bolts or foundation studs. If bolts are used, then technological holes up to 10 cm deep must be drilled for them.
Scheme of the lower trim of the house
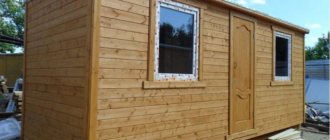
Comparing a tongue-and-groove cottage with alternatives
As already mentioned, an alternative to garden houses made of tongue-and-groove boards is a timber frame house or a structure made of sip panels. Let's take a closer look at the features, advantages and disadvantages of each of them.
We will evaluate them based on criteria such as cost, environmental friendliness and thermal characteristics.
Floors
When all the wooden beams are laid and connected to each other and to the foundation, grooves are formed in them and floor joists are placed (board 50x150 mm). The upper part of the logs is aligned horizontally, and boards are nailed along the bottom - they will serve as the basis for constructing the subfloor. Membrane insulation is laid on the resulting board base (prevents the insulation from weathering and getting wet, and does not prevent water vapor from escaping outside). In the gaps between the lags you need to press in insulation (mineral wool or polystyrene foam) and cover it with a vapor barrier. An edged board (40x15 mm) is laid on top.
Floor arrangement diagram
Preparatory work
House drawing
If you decide to do everything yourself, you should start with a drawing of the future house. It should include the frame diagram, location of partitions, height of the room, type of roof, location of windows and doors. You can draw everything yourself.
If financial capabilities allow, we order a project from an architect or buy a standard ready-made one from contractors or developers.
Wood selection
After the diagram, we decide on the type of wood and its quantity.
For load-bearing structures, experts recommend using hardwood such as
oak or larch . Since they are able to withstand heavy loads and are not subject to rotting. pine for house cladding , since the price-quality ratio meets the needs of the building.
You will need a lot of this material. The most important thing is that all wooden elements must be treated with an antiseptic and fire retardants before installation.
Choosing a foundation
The next stage is marking the site and choosing the type of foundation.
The foundation can be piled, strip or poured with a monolithic slab.
Since a house made of boards is a lightweight building, you can safely use piles. Some, instead of factory piles in the form of a drill, use buried asbestos-cement pipes filled with concrete solution.
But in our case, we will use a strip type of foundation , for this we will need to remove the soil to a depth of 90 cm. Fill in a layer of sand and crushed stone and compact everything.
We set up the formwork from unedged boards without cracks and fasten it with self-tapping screws.
We make two levels of reinforced belt, the reinforcement is connected to each other with knitting wire.
After which everything is filled with a concrete solution, everything should be poured at one time, and then rolled with a metal roller to remove air.
It is required to wait 28 days until the concrete hardens and sets completely.
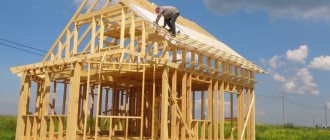
Creating a frame
From the very name of the technology it is clear that the main element of such a structure is the frame, and it is on it that the entire structure is supported. The frame consists of vertical posts fixed with crossbars and horizontal strapping. As before, here the entire construction process is carried out in stages.
Wood is used as a material. It is recommended to choose coniferous timber with a low degree of humidity, ideally kiln drying. The height of the racks must correspond to a similar parameter of the room. The racks are connected with nails 10 cm long. After adjusting the elements, there should be no gaps.
Depending on the load that will affect the load-bearing supports, as well as based on the size of the insulation and cladding material, the distance between the posts is planned. The universal section of the racks is 150x50 mm; double beams 150x50 mm are placed in the openings. The most popular pitch is 600 mm (allows you to install the insulation “in tension” to densely fill the wall). To connect the racks with the lower frame, temporary braces are used, which is why the structure acquires the necessary rigidity.
Layout of wall corners
The installation of the upper trim is carried out after installing all the racks. Fixation occurs using the same grooves that fastened the lower beam. The upper fastening to the racks is carried out with two nails, which must penetrate the material at least 10 cm. The final fastening of the frame is carried out by permanent bevels installed to replace the dismantled temporary ones. Read more about this in the article “Upper and lower harness“. We also recommend that you familiarize yourself with the structure of the most important components of a frame house.
Disadvantages of natural humidity boards (UH)
- Reduces the strength of the house. Dry boards compressed with nails use friction. A wet board in a house structure dries out, leaks appear, and the boards hang only on nails.
- Increases heat loss in the house - cracks appear in the solid boards and frame racks of all openings.
- The pull-out resistance of nails and screws driven into wet wood decreases after drying.
- A wet board has more weight, in some cases two people are needed instead of one. And this is an increase in labor costs.
- Not suitable for quick professional construction. A damp board in a wall covered with a vapor barrier can begin to rot.
To see how much wood dries out, watch this video.
We insulate the walls
The outer walls of the house are sheathed with imitation timber, wooden lining, plastic siding, as the owner of the house wishes. Insulation is best done using mineral wool. It is environmentally friendly, durable and does not burn, which makes frames even more profitable and in demand.
If you plan to live in the house all year round, choose thermal insulation with a thickness of 15 cm or more. For greater efficiency, fill a counter-lattice made of 50x50 mm timber (8) over the racks and place the insulation (7) as a “second layer” - this way you will avoid possible cold bridges and make the house truly energy efficient. Read more about the construction of a wall pie, as well as about the general insulation of a frame house.
Scheme of proper insulation of frame walls
The material is pressed into all the cracks between the beams to remove voids. A hydro- and windproof membrane, which is attached over the insulation to the studs, will help protect the tree from moisture, and only then the slatted sheathing for the ventilated façade, which will be hidden under the outer cladding, is installed. On the inside, OSB or gypsum fiber boards mounted on top of a vapor barrier are suitable for wall cladding.
Building a frame house: brief instructions
When assembling a frame house yourself, it is important not to miss anything and avoid mistakes. Here is a brief overview of instructions that will help you see the big picture in order to calculate your strengths and capabilities:
- Design. It includes both the architectural part - the design of the house, the location of rooms, walls and partitions, windows and doors, and the structural and engineering parts - the thickness of the walls, the arrangement of power elements, the location of bathrooms, the routing of engineering systems. All parameters are preliminarily reflected on the diagram so that you can correct some points, check the correctness of the calculations, and change the layout. Working drawings are detailed diagrams of individual parts, with the help of which all work can be carried out, adhering to the specified parameters.
- Marking and ground work. First of all, the area for future construction is cleared, then markings are made for the house project. The need to dig a foundation pit and its depth is determined by the type of foundation. The choice of type is influenced by the geology of the soil, the weight and configuration of the future house. For a pile foundation (pile-screw, bored), you do not need to dig a foundation pit, but for a buried strip foundation, you do. If there is a ground floor or basement, the pit will be deep.
- Installation. If the preliminary work was done correctly, during installation all that remains is to assemble all the parts into a single whole, obtaining the finished outline of the house. The assembly includes installation of the load-bearing frame, its filling, installation of the floor and roof, installation of windows, doors, and internal partitions.
- Finishing. It is produced both inside and outside the house, in order to obtain an aesthetically attractive, durable and easy-to-use structure.
Constructing a ceiling
The ceiling is attached to the floor beams, which in turn are fixed with nails or steel brackets on the top frame beam. Where interior partitions are installed, you need to install support beams, in the place of which a wooden ceiling panel is nailed.
Attic floor insulation scheme
A vapor barrier film should be laid on top of the shield, and mineral wool or foam plastic should be laid flush with it. The insulation is covered with a windproof membrane on top, and boards are laid on top of it. Read more about insulating attic floors.
Roof
Before you start work, determine the degree of slope, the number of slopes, the type of roofing cladding, and the design of the rafter system.
Dependence of the roof slope on the material used
A roof with a complex shape looks attractive, but it is difficult to implement and therefore not cheap. Most often, there are gable structures that allow you to equip an attic or attic space. Here it is necessary to install only one ridge; there are no valleys at all, which eliminates the accumulation of sediments and leaks. To prevent snow from lingering on the roof, plan a slope of more than 28º, but not more than 50º, otherwise the wind load will increase.
The cross-section of the rafters is determined according to the thickness of the insulating material placed between them. It is best to take a board with a caliber of 150x50mm and a length of 6 m. Two boards need to be knocked down in the shape of the letter L, and then they are lifted up and the angle is determined, making sure that the overhangs extend beyond the level of the wall by 30-50 cm. Now the boards can be assembled using a crossbar, and we get something like rafters.
Design of a gable roof truss system
The upper trim acts as a Mauerlat here. Based on the manufactured sample, rafters are created for the entire roof, not forgetting about a pitch of 600 mm. The rafters on the ridge are installed on the pediment and the installation of the remaining elements continues along them. The type of roofing material determines what type of sheathing will be used.
Roofing material
The step-by-step instructions end at the stage of installing the roof cladding. You can choose soft tiles, corrugated sheets or metal tiles. All of these materials are easy to work with, affordable, and look decent. After the facing work, all that remains is to install drainpipes and a drainage system, which will be responsible for draining precipitation outside the site.
Now you can imagine the whole process of building a frame house with your own hands, so that the structure is durable and warm. If you do not ignore the rules of construction and assembly technology, you will become the happy owner of your own home, which you can only dream of.
House using Canadian technology - pros and cons
The frame structure has many positive aspects, for example:
- Cost – if calculated per square meters, it is the lowest, which makes this technology popular all over the world.
- Speed of construction - a team of three people can build a house in just 1 month, provided that the foundation for the building has already been laid. The entire structure will be ready in 2 months - along with the interior decoration.
- Low heat capacity and thermal conductivity - modern heat insulators help create comfortable living conditions - both in summer and winter. In addition, the frame structure allows you to save thermal energy - it is enough to heat only those rooms that are needed at the moment.
- Aesthetics - already during the construction process, you can install all the necessary communications in the walls, “brick up” electrical cables and wiring, and install a ventilation system.
- There is no need to build a buried foundation, since the weight of the frame structure is small.
- There is no need to give the structure time to shrink. When constructing a frame structure, dry materials are used that will not shrink later.
- Environmentally friendly - during construction only natural materials are used that comply with sanitary standards and are safe for humans.
- Simplicity of finishing inside the building - the walls are sheathed with modern slab materials that do not require plastering, which significantly reduces the time spent on finishing.
- Resistance to temperature changes - it is worth noting that the frame structure is a kind of thermos that retains heat. Such a structure can be heated periodically.
- Seismic resistance - this design can withstand vibrations of up to 9 points.
- Construction can be carried out at any time. Even the foundation can be equipped with a pile-screw foundation.
- Ease of construction - no heavy equipment is needed for construction, a small construction team is enough.
- Microclimate – materials for construction are natural, they “breathe”, so a certain microclimate is created in the room.
But if you don’t talk about the disadvantages of frame structures, the picture will be incomplete:
- rapid flammability - in a few minutes the frame structure burns out completely, not even the walls remain;
- danger of fungus and mold - in climatic zones where there is frequent rain, dampness can appear in any structure. In a house built on a frame
- technology, this indicator is very high, so even during construction it is necessary to accurately calculate the “dew point”;
- low sound insulation is, of course, a significant drawback, but it can be eliminated by installing special soundproofing material in the walls;
- the difficulty of interior decoration is the impossibility of hanging heavy objects on the walls if you do not provide for the embeds in advance.
But if you approach construction with all responsibility, you can eliminate shortcomings, for example, follow safety precautions and treat the structure with various antiseptic impregnations.