Thicknessing machines for wood are a type of planer and planer, and are designed for precise production of “to-size” boards with a certain cross-section. Unlike planing woodworking equipment, such units are equipped with clamping and feeding devices, and can also process several workpieces simultaneously. The versatility of modern thicknessing machines increases if the tool kit includes not only flat, but also shaped knives.
Classification and capabilities
The design of the units in question can be quite varied. Machines are classified according to the following criteria:
- By drive type. Homemade mini-devices can also have a manual drive, but in most cases they still use an electric drive. At the same time, household models are equipped with a 220 V motor, and professional ones – with a 380 V motor.
- By type of delivery. The machine design may have one or two pairs of feed rollers; accordingly, in the first case, it will be necessary to make the pressure of the workpiece being processed to the table more powerful; vibrations at the time of cutting cannot be excluded. Double-sided roller feeds are more advanced and convenient to use. A number of foreign companies (Makita, DeWalt, etc.) equip their products with automatic feed units, but this option is justified only with significant production programs of the same type of products.
- According to the number of knife shafts. This determines how many different profiles the machine can process simultaneously. True, the number of operators will increase accordingly.
- By functionality. The design of thicknessing machines allows not only dimensional processing of a semi-finished product, but also its subsequent calibration. This eliminates the appearance of transverse chips, dents and other defects that may appear on the treated surface in case of non-compliance with the jointing technology or with an excessively large supply of starting material.
- According to its technological characteristics. In practice, the equipment under consideration is produced with a power range of 1...40 kW, at a shaft speed of up to 10000...12000 min -1, planing width up to 1350 mm, stroke up to 50 m/min and thickness of the initial workpiece 5...160 mm.
In addition, some models differ in the way they adjust the gaps and the design of the main drive bearing assembly.
Device and principle of operation
A typical wood planer can successfully replace two pieces of equipment: a mechanical drive jointer and a planer (transverse for short products, or longitudinal for long ones).
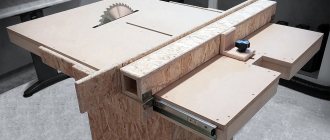
Homemade thickness planer
The simplest layout of a thicknessing machine (with one-sided supply of source material) includes the following components:
- Drive motor.
- Transfer. It can be a standard V-belt, toothed, with a variator, as well as with replaceable pulleys (the latter option has minimal values of transmitted power, and therefore is used only in low-power equipment).
- Knife shaft. May have multiple instruments with different configurations. Spiral knives are considered particularly successful because they produce minimal noise during operation.
- the upper direction unit, which, in turn, consists of a pair of rollers - front and rear. The front roller has a corrugated surface: in order to improve traction with wood and prevent a possible change in the direction of movement of the board being processed. The rear roller is always smooth;
- a clamping unit that prevents jamming of chips and possible cracking of the material. Structurally, the clamp can be made in the form of claw grips that penetrate into the wood, or it can also be made in the form of a massive metal element equipped with spring-loaded teeth;
- a lower direction unit, facilitating the feeding of the workpiece into the workspace;
- a table with devices for adjusting the technological gaps between the rollers of the upper and lower clamps;
- the bed on which all other elements of the working circuit of the machine are located.
Operating principle of a thickness planer
Units with a double-sided feeding device are distinguished by the fact that they are equipped with an additional unit for extending the knife shaft. In this regard, replacing a tool to reinstall it from one standard size to another (or for subsequent sharpening) is much easier.
Device of a thickness planer
This is how a thickness planer works. The torque from the electric motor is transmitted through gears to the blade shaft. The board to be processed is inserted into the gap and pressed first against the lower and then against the upper pressure rollers. In this case, the workpiece is captured by a grooved roller and fed to the tool. Before cutting, the semi-finished product is clamped between the upper and lower guide devices, which ensures reliable fixation of the material during processing. The clamping device ensures timely removal of chips from under the rotating tool. At the moment the workpiece leaves the rear guide roller, the next product is inserted into the front one, after which the process is repeated.
Assembly plan
One of the conventional planing machines is known to be equipped with a table made of sheet metal with a hole for the cutter shaft. For such an installation, it is possible to regulate the thickness of the removed layer. Depending on the length of the workpiece and the force of pressing it against the table, the process of moving the board towards the knife shaft begins, and the removed layer becomes larger.
As a result, the workpiece is not in a horizontal position, but at a certain angle to the tabletop, which distorts the accuracy of processing. If, of course, the table has a long tabletop, and the layer being removed is very small, then such a drawback will be invisible, but it still exists. Because of this, a thickness planer is not made from the planing equipment described.
The most suitable for do-it-yourself remodeling would be a machine with a table that has 2 parts of the table top. The tabletop parts are located at different levels, eliminating interdependence. The back part is located in the position of the top point of the circle, which is obtained by rotating the knife part.
The lower part helps to obtain the required thickness of the removed layer. Thus, the workpiece moves in a translational mode, and the disadvantage described above is not observed.
In order to use this machine as a thickness planer, a clamping and bearing mechanism must be placed on this equipment. The clamping part will provide planing. Based on the fact that the clamping mechanism is much more stable than the load-bearing one, the completeness of the layer being removed will be a predominant factor regarding calibration.
If you need to make a smaller workpiece, then the frame of the pressure element roller will rest against the limiter. As a result, the supporting mechanism will begin to work. The presence of a limiter in the supporting mechanism is intended for the frame roller when raised to a height, which prevents it from coming into contact with the edges of the window in the near area of the table.
It is better to work together on this homemade thicknessing machine. One operator will supply the wood, and the second will remove the boards from the device.
Video: how to make a surface planer from a household planer?
Homemade thickness planer in your own workshop: choosing parameters
There is a significant number of different models of the equipment in question on the market, both from domestic manufacturers (Corvette, Enkor, Krasny Metalist, etc.) and imported ones. The latter options are dominated by dubious Chinese brands, which are not reliable in operation, and, in addition, often have underestimated parameters compared to the passport ones. In such cases, and also if the proposed machines do not fit into the available space dimensions, it makes sense to make a surface planer with your own hands.
It’s worth noting right away that it’s better to purchase a number of components and parts rather than try to make them yourself. This, first of all, concerns the knife shaft itself along with the mounting bearings: home-made options will not differ in the required mating accuracy, as a result of which the part will overheat greatly under load.
Read also: Technology for making figures from crumb rubber
When choosing a machine diagram, they are guided by the available drawings (can be found on the Internet), but before that it is worth clarifying a number of elements of the device. For example, if in one unit there is a need to combine a jointer and a surface planer, then it is advisable to make equipment with a double-sided drive. Then, on one side of the device, it is possible to carry out preliminary cutting of the workpiece, and on the other hand, to carry out the final processing of the wood “to size”.
You also need to decide on the longest length of the knife shaft: a homemade machine with a shaft longer than 500 mm may lose rigidity when working on hard types of wood: pear, hornbeam, oak. As a result, wavy ridges up to 1 mm high may appear on the surface of the board, which will require further processing of the semi-finished product. The landing dimensions and diameter must be made such that home-made equipment can be used to produce plinth, baguette profiles, as well as other decorative elements made of wood.
When choosing a design, safety measures for subsequent operation of the unit should be fully taken into account. Homemade thicknessing machine Do-it-yourself machines must have a reliable fence for the working area of the table, and also eliminate the possibility of the board going backwards if the gap is too large, as well as its destruction during processing.
When analyzing the available drawings of home-made devices, it is worth keeping in mind that the presence of two lower clamps in the table will reduce the force of moving the board into the workspace, since the workpiece will move along the smooth surface of the roll, and not along the table.
Step-by-step creation of a surface planer
This part is also made of plywood
, must be secured from behind using screws.
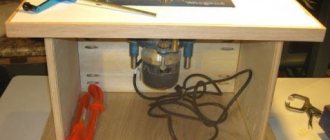
- Creation of a platform on which there will be an electric planer.
Use a jigsaw to make a hole in the shape of an electric plane.
- Assembling threaded screws for the platform.
All corners of the platform
We install screws with large threads.
We make a stand from a sheet of plywood on which we will need to install the upper part of the machine with a platform and an electric planer, we secure it all with screws
. We are thinking about how and where to lay the cable from the electric planer.
- Attaching and installing a handle to control the surface planer. You need to install it on one of the threaded screws. You need to secure it with washers and nuts. To prevent the electric planer from falling off the mounts, we create a through hole on one of the screws.
- Installation of the bar and indicator.
The measuring bar on a thickness planer is considered an indispensable part, thanks to it you can measure the thickness of the material. Any piece of ruler from 6–8 cm will pass for the bar. For the indicator
You can choose a regular arrow made of tin. That's all, now our hand-made surface planer is ready.
Remember to test it on any material and always remember to care for this device, clean it and sharpen it on time. To do your job efficiently, you should familiarize yourself with the drawings
thicknesser and watch a video on how to make a thicknesser with your own hands.
Safety when working on a homemade machine
- When working on such a machine, eye protection is always required.
- Gloves should be worn during rough work.
- Before work, you should check the functionality of the machine and the fixation of all its parts.
- Hairpins and knives must be free of defects and various cracks.
- Only clean material that is free of nails and other metal particles can be processed on the machine.
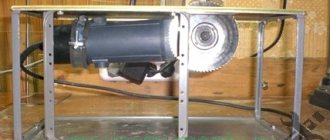
Thicknesser from an electric planer
How to work on a homemade thickness planer:
- The machine pin is placed at the required distance from the edge of the part, the required size is set and the block is fixed. After these actions, the machine tilts away from itself and then the cutting part of the pin opens. Next, you just need to pull the tool towards you and that’s it.
- If you properly operate a surface planer made by yourself, the work will be done perfectly and will not differ from work in specialized workshops.
Manufacturing and assembly
The manufacture of the machine begins with the bed. For these purposes, it is advisable to use tubular steel with a cross section of at least 60×40 mm: the pipe has increased rigidity and moment of resistance, which will have a positive effect on the accuracy of operations performed on a homemade unit. Structural elements are connected by welding. It can be replaced with a prefabricated version, but it is less preferable - assembling the table and frame using an angle and connecting pins with a diameter of M30 or more will force you to frequently check their tightness.
For feed rollers, you can use rollers from an old washing machine: their rubberized surface will cope with the tasks. The rollers are bored to the diameter of the existing bearings, taking into account the required adjustment range. In homemade thicknessing machines, this process can be done manually by rotating the handle.
To make a table for a homemade unit, a wide sanded board made of larch or oak is suitable. Wood dampens vibrations well, but to increase anti-corrosion performance, and from a fire safety point of view, it should be impregnated with fire-resistant compounds or creosote. The connection between the table and the frame can be bolted.
3d model of a homemade surface planer
When selecting a motor, the maximum required torque must be matched to the processing needs. As a rule, an electric motor with a power of 5...6 kW, with a speed of up to 3500...4000 per minute, is sufficient.
To ensure safety, a homemade machine must be protected by a removable casing. It can be made from thin sheet steel (0.6...0.8 mm thick).
The necessary components - bearings, knives, pulleys, fasteners - are selected in accordance with the specifications for the drawings of a homemade thickness planer.
When assembling a homemade machine, you must:
- ensure maximum flatness of the table surface;
- balance all rotating parts in static and dynamic modes;
- provide convenient adjustment of the table position;
- check the reliability of the fencing device for moving elements.
A homemade thickness planer is checked at idle speed. If all components are working correctly, check the unit in operating mode, after which all fixed parts are painted with weather-resistant paint.
If you find an error, please select a piece of text and press Ctrl+Enter.
Craftsmen who often work with certain wooden blanks are faced with the need to plan a large number of boards to give them an attractive appearance. At the same time, it is also necessary to equalize their thickness, make their surface smooth, so that the material can be used for the production of furniture, interior decoration, or for many other similar purposes. A wood planer is best suited for such work.
Now the cost of this type of equipment is quite high, even if it is a small machine for use in a home workshop. As a result, not everyone can make such a purchase. In this case, the right solution would be to make a thickness planer with your own hands according to ready-made drawings. As a result, on a regular workbench you will be able to plan a variety of wooden workpieces quickly and efficiently.
Do-it-yourself thickness planer made from an electric planer
It is precisely this approach to solving most tasks for a surface planer that arise in a home workshop that we find most interesting.
First of all, this interest is based on minimal modifications to an existing tool to perform the work of expensive equipment with almost the same result.
By installing an electric planer on a platform with variable height, we get almost the same thickness planer. True, it is not the position of the work table that is regulated, but the position of the working tool in relation to the workpiece being processed, but this does not change the essence of the process. The role of the table here is played by a flat, powerful board with width limiters on the sides. They also serve as the mounting location for the main unit. But first, let's talk about him.
On the planer, we will replace the rear support plate with a homemade one made from OSB or plywood, with a thickness that ensures the same level as the front plate, which regulates the required gap (1 - 3 mm) for removing chips. Its width should correspond to the width of our improvised desktop.
On the sides of this plate, slats are screwed to attach the legs, the height of which is dictated solely by common sense. It is obvious that, based on the standard width of the plane knives of 82 mm, the thickness of the workpieces being processed should not be more than 100 mm, so the distance between the axes of the leg fastenings can be taken as 110 - 120 mm. Accordingly, their total length will range from 140 to 160 mm with a width of 35 mm and a thickness of at least 10 mm. The legs are fastened strictly at the same distance from the edge of the bar.
Installation of the assembled movable upper unit with an electric planer on the desktop is carried out locally, so that the fastening is strictly at the same level. This is done to ensure that its movement is parallel with respect to the base surface, which will ensure accurate processing of the workpiece.
The easiest way to set the height during work is by selecting slats of appropriate thickness, screwed onto the work table width limiters, or using other stands.
And the clamping of the working tool is ensured with spring ties or a harness, but for small workpieces this is not required at all. Also, in a given position, this parallel platform can be fixed with self-tapping screws.
Video of using a surface planer assembled by yourself:
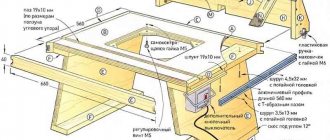
Table and frame of the future machine
Before you start making a surface planer for wood yourself, you should decide on its design and familiarize yourself with the finished drawings (at the end of the article). The entire structure should be located on the work table so that you can walk around it freely to feed the material. This tool can also be used in a home workshop, since its dimensions are quite small.
The main thing is that the surface of the table where it will be located is as smooth as possible to prevent the occurrence of strong vibrations.
To make such equipment for home use, the following design is usually suitable. The work table of the machine and its frame are welded; for this, a metal corner and a square pipe of dimensions 50x50 and 40 millimeters are used, respectively. In principle, when assembling the table and base of the machine, you can use materials not only of these, but also of any other sizes, but it should be remembered that the more massive the elements used, the more stable the equipment will be, and the less vibration will occur during its operation.
Read also: Voltage regulator on dinistor
To make a thickness planer for your home workshop, you will need:
- drilling machine;
- lathe;
- welding machine;
- drill;
- Bulgarian.
Do-it-yourself thickness planer made from an electric planer
It is precisely this approach to solving most tasks for a surface planer that arise in a home workshop that we find most interesting.
First of all, this interest is based on minimal modifications to an existing tool to perform the work of expensive equipment with almost the same result.
By installing an electric planer on a platform with variable height, we get almost the same thickness planer. True, it is not the position of the work table that is regulated, but the position of the working tool in relation to the workpiece being processed, but this does not change the essence of the process. The role of the table here is played by a flat, powerful board with width limiters on the sides. They also serve as the mounting location for the main unit. But first, let's talk about him.
On the planer, we will replace the rear support plate with a homemade one made from OSB or plywood, with a thickness that ensures the same level as the front plate, which regulates the required gap (1 - 3 mm) for removing chips. Its width should correspond to the width of our improvised desktop.
On the sides of this plate, slats are screwed to attach the legs, the height of which is dictated solely by common sense. It is obvious that, based on the standard width of the plane knives of 82 mm, the thickness of the workpieces being processed should not be more than 100 mm, so the distance between the axes of the leg fastenings can be taken as 110 - 120 mm. Accordingly, their total length will range from 140 to 160 mm with a width of 35 mm and a thickness of at least 10 mm. The legs are fastened strictly at the same distance from the edge of the bar.
Installation of the assembled movable upper unit with an electric planer on the desktop is carried out locally, so that the fastening is strictly at the same level. This is done to ensure that its movement is parallel with respect to the base surface, which will ensure accurate processing of the workpiece.
The easiest way to set the height during work is by selecting slats of appropriate thickness, screwed onto the work table width limiters, or using other stands.
And the clamping of the working tool is ensured with spring ties or a harness, but for small workpieces this is not required at all. Also, in a given position, this parallel platform can be fixed with self-tapping screws.
Video of using a surface planer assembled by yourself:
Knife shaft
The next element, the presence of which is mandatory in a thickness planer, is the knife shaft. This is the main part of the machine, which processes wooden blanks. The best option is to buy a ready-made design with axle boxes, since homemade shafts are very difficult to make well balanced. A suitable option would be to use a three hundred millimeter shaft, the design of which has three knives. It is best to choose stepped pulleys for the shaft and engine; as for the shaft speed, the best option would be 4000-7000 revolutions per minute.
To operate such a shaft, an asynchronous motor with a power of 4-5 kW is suitable. An important advantage of this choice is the fact that having made a machine with such a motor, it can be started from single-phase electric current, which significantly reduces the costs and complexity of using the equipment.
It is best to grind the pressure rollers yourself; it is also a good option to use ready-made parts from old Soviet-style washing machines. The roller frame must be welded with spring-loaded bolts.
Safety precautions at work
Before turning on the machine, it is necessary to check the sharpness of the knives and the correctness of their position. You need to make sure that the knife shaft is securely guarded. It is prohibited to process workpieces if they are shorter than the distance between the shafts.
Basic safety requirements are very demanding and include:
- Mandatory grounding to prevent electric shocks or fire.
- Under no circumstances should you bring your hands close to the rotating shafts.
- Long hair must be tucked under a headdress.
- The sleeves of clothing should either be rolled up or buttoned tightly at the wrists.
- There should be a rubber mat under the work table.
- It is prohibited to carry out any repair work while the machine is turned on.
- Before turning on the device, check the serviceability of all components and electrical wires.
Wooden blocks are fed onto the working surface and into the machine end to end. In this case, the entire available width of the desktop must be used.
Following simple rules prevents injuries and cuts.
Adjustment bolts and workpiece feeding
According to the drawing used, the table for installing the thickness planer must be installed on adjusting bolts, which will make it possible to adjust it if necessary. To adjust the table plane as accurately as possible, and also to prevent the need to adjust each bolt individually, bicycle sprockets can be welded to them, connecting them with a chain. Springs can be taken from valves from any truck engine.
In the drawing used, the workpieces are fed manually. But there is always the opportunity to improve the design by equipping the machine table with an automatic workpiece feeding system. In this case, the workpiece will be fed very smoothly into the machine, which will ensure accurate removal of the required layer of wood during planing.
In addition, it would be useful to use special rollers that will press the workpiece to the working surface during its processing. It is very difficult to do this manually efficiently, while rollers cope with this task “excellently”.
This completes the assembly of the thickness planer. To prevent the formation of corrosion and fungi, it is recommended to paint all metal parts of such homemade equipment. There is no need to paint only the lower working part of the tool, which will process the material.
Preparing the machine for operation
Regardless of which thicknesser is used - homemade or factory-made, before carrying out any work it must be configured for operation. Not only the quality of the work performed, but also the safety of the worker who uses such equipment when processing wooden workpieces will directly depend on this.
In addition, when preparing for work, it must be remembered that if the table is significantly filled, if it is necessary to simultaneously feed several parts across the entire width of the table, in the process of planing a large-width panel or similar work, the pressure in the feed rollers must be adjusted so that it is increased, since in such cases of work the cutting resistance increases significantly. If parts of small width are being processed or the table is not completely filled, in order to prevent the wood from being crushed during processing, the pressure in the rollers should be reduced to the required level.
Safe operation of the machine
Before each start of work on the machine, it is necessary to carefully check the correct position of the knives, as well as their level of sharpening. The knife shaft must always be guarded. On a homemade thicknessing machine, you cannot process parts whose length is less than the distance between the shafts.
To prevent the possibility of injury, it is strictly forbidden to repair, adjust or clean the machine, as well as clean the workbench with the machine while it is in operation.
It is necessary to feed wood blanks onto the work table and into the machine itself end to end, and it is necessary to use the entire width of the table.
By making a universal thicknesser with your own hands, you can significantly simplify the processing of lumber, saving on the purchase of professional tools. Thicknessers are used for planing lumber and giving surfaces an ideal, even shape. Homemade machines are versatile in use, allowing you to guarantee high-quality processing of lumber and giving it the required shape.
Purpose and types of thicknessing machines
A thickness planer is a tool that allows you to make perfectly straight, precise lines. This allows you to avoid unevenness and torn contours, which often arise when applying markings manually. Moreover, it is not necessary to buy this tool in a specialized store - you can make it yourself from an electric plane. The sharp blade ensures absolute precision without any errors or interference. If you need knives of different types, it will be very easy to change one to another (and get shavings of the required parameters).
However, it is worth remembering that before using a surface planer, you should process the wood on a jointer. For working with polymers, only thicknessers with rubberized rollers are suitable. As for processing small parts and delicate work, a homemade thickness planer is inconvenient.
There are two main types of surface planers:
- With one blade shaft. The simplest and most cost-effective option, suitable for thicknessing only on one side.
- With two shafts. In this case, the shafts are located on the table and above the table. Suitable for large jobs, and therefore often used in the construction of private houses.
The first option is often used in the manufacture of individual parts, and the second - in construction and in the manufacture of large-scale workpieces. A homemade machine made from an electric planer is usually used for the manufacture of not too large structures.
Description of the tool
Thicknessers are machines for wood processing that allow planing and leveling the surface of lumber to produce boards of a given thickness. This type of wood processing is carried out by using lumber in construction and making various structures from them. Planing equipment is in demand on the market and is popular with ordinary homeowners who independently engage in construction at the dacha and in their own home.
Self-made surface planers are distinguished by their simplicity of design, which allows them to be made using an electric planer, grinder and other similar power tools as a basis. You just need to make sure that you have the appropriate diagram, which you should adhere to when making homemade equipment.
How to make a simple thicknesser for wood with your own hands - step-by-step diagram
Step 1: Creating the Thicknesser Base
In the center of a T-shaped metal part measuring 3.5 * 7 cm, use a drill to carefully drill a hole with a diameter of 0.8 cm, then solder a tube into it, the outer diameter of which should be 1.6 cm, and the inner diameter, respectively , 0.8 cm. Thus, we will create a through channel for sliding the rod.
Step 2: Hairpin or Pencil Clip
We attach a ring clamp to one ring of the tube, which will serve as a mount for a pencil - for applying markings. At the other end we make a hole with a diameter of 0.6 cm with a thread for installing a thumbscrew. Its main task is to fix the rod in the required position. At the end of the rod where the clamp is attached, we install a soldered ring, which we equip with a clamping screw.
Step 3: Working on the Replacement Rod and Base
Our next step is to create a replacement rod in which we create several holes. One of them will be through - a hole with a diameter of 0.3 cm is drilled in it, the second hole is intended for installing locking screws 0.6 cm (M4 thread). In two places we drill a T-shaped part with an M4 thread. We will install a corrugated screw here, which will allow the tool to be used as a compass.
Advantages of homemade machines
A do-it-yourself jointing machine is distinguished by its versatility of use. The functionality of such equipment will be sufficient for high-quality wood processing. Using homemade machines, you can not only plan lumber, but also finish the boards, giving them the required thickness and a perfectly flat surface.
The advantages of hand-made surface planers include the following:
- Simplicity of the device of a planer for wood.
- Functionality and versatility of use.
- Affordable cost of the components used.
- Possibility of subsequent upgrades.
- Reliability and maintainability of equipment.
To make a homemade surface planer with your own hands, you can use an electric planer, which is used to create a machine that allows for high-quality wood processing, including planing, edge processing and chamfering. It is only necessary to select a high-quality project for the manufacture of a homemade thickness planer, which will be the key to producing reliable and universally-usable equipment.
Read also: Capacitor for 220V motor
How to make a thicknessing machine with your own hands - step-by-step instructions
In conditions where it is not possible to purchase a multifunctional unit, they usually resort to making thicknessing machines for wood with their own hands. But even when made at home, they perfectly correspond to the given parameters. Thus, in home use, a homemade thicknessing machine is used extremely rarely and instead they try to use a standard mechanism.
If you have very little money, then the best option is to make a unit based on an electric plane. To implement this action, the following spare parts are used:
- Standing part. It is made from a metal alloy with a width of at least 40-60 mm. In this case, an important point is the use of hexagonal rods with spacer bushings.
- Extended rollers. In this case, rubber rollers from a used washing machine will also work. Mandatory requirement: boring for bearings and fixing the mechanism on the axles. The length of the axes depends only on the length of the desktop surface. The best diameter is no more than 20 mm.
- To produce a desktop, piece plywood is used. It is covered with a zinc sheet, the minimum thickness is 1 mm, but before work the board must be coated with a protective agent.
- The coating used to protect the desktop is usually no more than 1-2 mm thick and is fixed at the bottom of the profile corner.
Most factory-made planes have a special support plate. Thus, in order to attach it to the base of the thicknesser machine, you should not have much difficulty.
The lower part of the plate must be equipped with a corner; it has a length of at least 5 mm. To properly regulate a homemade product, it is necessary to resort to an axis with a screw surface, but there are other equipment options.
To produce a thickness planer of this kind, you will have to pay a lot of money:
- About 10 thousand rubles need to be spent on an electric planer purchased at a specialized center.
- About 3 thousand will have to be spent on a metal profile.
- Other little things, as well as bearings and studs, will cost another 3 thousand.
It is important to understand that the power of the mechanism depends only on the components of the electric chopping tool. But this design is far from safe; it does not contain any devices that would block the reverse movement of the workpiece under the influence of work
If fragments and shavings fly from the board, then only a screen tin slider, no more than 3 mm thick, can protect you.
For budget buyers, the following models of units are provided:
- Universal mechanical thicknessing unit BBK 5906 costing from 14,000 rubles. Its main functions: circulation and jointing with a one-sided thicknesser. The drive power is no more than 2 kW, the cutting shaft rotates at a speed of about 8000 rpm. Penetration per pass – 3 mm.
- Woodworking unit with a surface planer, number BBK 5904. Estimated cost – 20,000-24,000 rubles. Equipped with a more powerful electric drive motor.
The device can easily replace many components:
- milling mechanism;
- miter saw;
- circulation saw;
- jointer mechanism;
- grinding machine.
The above machines are not suitable for industrial production; the best choice is the Stoman DMS-41 model. The average price is at least 220,000 rubles. Most often, this unit is used in wood processing workshops.
This model has a four-shaft shaft structure, with an average diameter of at least 1 dm. In a minute it reaches speeds of up to 5000 rpm. The built-in drive collects power up to 3 kW. DMS-41 and its analogues easily process workpieces with a thickness of 4-220 mm. The device removes at least 4 mm of its surface from the product.
Video: DIY thicknesser.
Making a thicknesser with your own hands
On the Internet you can find various designs for homemade jointers, which are distinguished by their functionality and ease of manufacture. Subsequently, you should adhere to the scheme on hand, selecting the appropriate components and correctly assembling the machine, the functionality of which will fully meet the requirements of homeowners.
Necessary materials
There are many options for making homemade planing machines, which will differ in their basis. The easiest way to make such a tool is using an electric planer or jigsaw.
To perform a surface planer you will need the following:
- Electric planer.
- Screwdrivers and keys.
- Ruler and corner.
- Screwdriver.
- Drive sprockets.
- Bicycle chain.
- Wooden beams and slats.
- A sheet of plywood 15 millimeters thick.
- Long threaded screws.
Plywood and timber will be required to make the base of the machine and the manual table, on which the electric planer and other elements responsible for the functionality and safety of using the equipment will subsequently be attached.
It is necessary to use high-quality wood, which is additionally recommended to be treated with impregnations against rotting.
Step-by-step instruction
Making a surface planer is not difficult, so almost anyone can handle this type of equipment.
The following work will need to be done:
- A sheet of plywood 15 millimeters thick is cut into a rectangle with a width of 400 millimeters and a length of 500 millimeters.
- In the middle of the rectangle, a mount-stand is made, to which the electric planer will subsequently be attached. The stand for the surface planer is made from a piece of plywood and is attached to the base with screws from the back side, which will ensure the strength and reliability of the machine made by yourself.
- A platform for an electric planer is being built. An opening is made in the platform, which is identical in size to the shape of an electric planer. The electrical appliance used is attached to the platform with screws and clamps.
- A drive mechanism is mounted on the base of the platform, which is responsible for raising and lowering the platform with the surface planer. Large-threaded screws are attached to the corners of the base. Subsequently, four sprockets are attached to the installed screws.
- Small stands are made from plywood, on which the platform with the upper part of the surface planer is installed. The stands are attached to the platform with screws or similar fasteners. It is necessary to think about the proper placement of the cable from the electric planer, which should be located at a short distance from the working saw of the planer.
- Fix the handle, which is intended to adjust the location of the platform. The easiest way is to fix the handle with a long screw with a large thread or secure it with several screws at once.
- At the final stage of work, an indicator and a measuring bar are installed.
- Using a measuring strip, you can measure the thickness of the processed lumber. It can be made from a small piece of plastic or wooden ruler. The indicator can be made from a pointer or a tin strip.
This is the simplest surface planer design that can be done at home. On the Internet you can find various drawings of a thickness planer made from an electric planer with your own hands, which will differ in their functionality and manufacturing method.
Subsequently, you can upgrade the completed basic design of the machine by adding additional tools, which expands the functionality of the equipment.
Step-by-step manufacturing instructions
To make a household thicknessing machine, you need to prepare a workplace and perform the following steps:
- Attach a sheet of plywood to the side edges of the plane. Mark along the contour of the protective casing and cut out a template. It should go around the electric motor casing without gaps.
- Make a template of another shape in the same way.
- Transfer the contours of the templates onto 10 mm thick plywood sheets and cut them out. Then you need to make two strips 10x10 mm thick, which will subsequently serve as guides.
- Make holding crossbars from a block. They should fit as tightly as possible to the front and back parts of the electric planer handle.
- Using a milling machine or jigsaw, cut out longitudinal grooves according to the previously applied markings. In the future, they will be necessary to adjust the thickness of the planing.
- By passing the crossbar under the back of the electric planer handle, connect the cut out parts. To fix the jumper, it is better to use screws with a countersunk head.
- Attach the slats prepared in advance to the back side of the workpiece and apply markings on them. Then you need to trim them according to the applied markings.
- For further fastening of the workpieces to each other, a through hole for bolts is drilled in the upper part. In the same place, using a cutter, a hole 4 mm deep is made. Then the fastening nuts are hammered into it with a hammer.
- Having combined both blanks, they must be fastened using bolts with pressed wooden washers. As an alternative, wing bolts can be used.
- Make a hole in a wooden block to install a guide pin into it. For secure fixation, it is better to use a lock nut.
- Install a block with a guide pin in the front part of the future machine. Secure it with countersunk screws.
- Assemble the outer frame in the same way as the inner one. Place a wing nut on the guide pin to adjust the position.
- Make a guide sheet. To do this, use a chisel or milling machine to make rounded grooves in wooden blocks, the diameter of which will correspond to the diameter of the guide pipes, and install them as shown in the picture below.
- Prepare your desktop. It consists of a sheet of plywood 10 mm thick. Stoppers are installed along the edges, on which the guide rails will subsequently be fixed.
- The guide pipes must be connected to each other using plywood strips and the vacuum cleaner pipe must be connected. After this you can start working.
After watching the video, you can get acquainted with the nuances of manufacturing a thickness planer, as well as see its practical application.
Safe to use equipment
When performing any homemade woodworking machine, you need to take care of the safety of working on the equipment. If possible, the cutter should be covered with protective devices, and working on a machine where the working cutting element does not have any protection is prohibited. Most home-made planer manufacturing schemes have high-quality protection for the electric planer, which eliminates injuries when working with such equipment.
- When working with homemade tools, you must use safety glasses and work gloves. In particular, the latter will be required when working with coarse, dense workpieces, when beating of a homemade surface planer from an electric planer is observed when processing the material.
- The studs used must not have cracks, defects or damage. If cracks or damage are found, the defective parts of the machine should be replaced.
If you follow the simplest safety measures, working with a thickness planer will not present any difficulty, and the machine itself will last for many years. Using homemade machines, it will be possible to perform high-quality wood processing, saving on the purchase of industrial milling cutters.
Step-by-step creation of a surface planer
- Creating the base, choosing plywood.
- We mount the stand for the electric planer.
This part is also made of plywood; it needs to be fastened from the back with screws.
- Creation of a platform on which there will be an electric planer.
Use a jigsaw to make a hole in the shape of an electric plane.
- Assembling threaded screws for the platform.
We install screws with large threads at all corners of the platform.
- Installation of the platform on stands.
We make a stand from a sheet of plywood, on which we will need to install the upper part of the machine with a platform and an electric planer, we secure all this with screws. We are thinking about how and where to lay the cable from the electric planer.
- Attaching and installing a handle to control the surface planer. You need to install it on one of the threaded screws. You need to secure it with washers and nuts. To prevent the electric planer from falling off the mounts, we create a through hole on one of the screws.
- Installation of the bar and indicator.
The measuring bar on a thickness planer is considered an indispensable part, thanks to it you can measure the thickness of the material. Any piece of a ruler from 6–8 cm will pass for the bar. For the indicator, you can choose a regular arrow made of tin. That's all, now our hand-made surface planer is ready.
Remember to test it on any material and always remember to care for this device, clean it and sharpen it on time. To do your job efficiently, you should familiarize yourself with the drawings of the surface planer and watch a video of how to make a thickness planer with your own hands.
Safety when working on a homemade machine
- When working on such a machine, eye protection is always required.
- Gloves should be worn during rough work.
- Before work, you should check the functionality of the machine and the fixation of all its parts.
- Hairpins and knives must be free of defects and various cracks.
- Only clean material that is free of nails and other metal particles can be processed on the machine.
Thicknesser from an electric planer
How to work on a homemade thickness planer:
- The machine pin is placed at the required distance from the edge of the part, the required size is set and the block is fixed. After these actions, the machine tilts away from itself and then the cutting part of the pin opens. Next, you just need to pull the tool towards you and that’s it.
- If you properly operate a surface planer made by yourself, the work will be done perfectly and will not differ from work in specialized workshops.
Studs and guides
We need to talk about these details based on the electric planer separately. They play the most important role in the operation of the surface planer.
- The pins lower and raise the thicknesser when processing workpieces.
- Guides help with precision and processing of workpieces; they are created from wooden blocks, so equipment costs can be considered minimal.
- You need to install the pin correctly, because mobility is very important for it.
- When creating guides for an electric planer, you need to make a certain margin in length.
This is interesting: How to make the right metal smokehouse with your own hands - we cover it point by point
Rules for working with milling machines
Knowledge of the rules for working with a surface planer will improve the quality of lumber processing, relieving the homeowner of any difficulties in operating the tool he has made.
The operating rules are as follows:
- The machine pin is installed in the correct position.
- Depending on the size of the parts being processed, the thicknesser stroke is set, for which the guide bar is fixed.
- The machine is slightly tilted, which opens the cutting part of the pin, the processed lumber is placed inside, after which the tool is pulled towards itself, this allows the cutting head to remove a thin layer of wood.
- Over and over again, forward movements are performed with the head of the thicknesser, removing a layer of wood from the processed lumber, achieving their perfectly flat surface.
A properly assembled thickness planer based on an electric planer will not be inferior to expensive factory equipment in terms of functionality, efficiency and productivity. You just need to find a high-quality plan for manufacturing a surface planer on the Internet and then follow the drawings when assembling an electric machine. The easiest way to make such a tool is on the basis of an electric plane, which is mounted on a plywood base. The simplest thicknesser, made independently, will differ in functionality in use, guaranteeing high-quality wood processing.