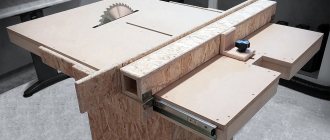
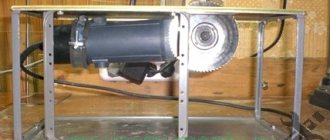
Hand tools have never been canceled in a carpentry workshop, and one of the important tools is a marking thicknesser. The thing is reliable and practical. It is clear that now you can easily buy any instrument, but this is not always profitable when you are balancing between price and quality. It is quite possible to make a surface planer in your workshop.
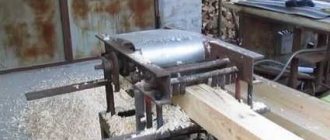
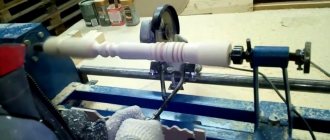
Here are 8 options for different surface planers as a source of ideas for flights of fancy and gaining experience:
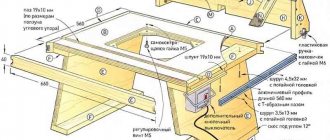
- Marking thicknesser from Yuri Raevsky
- Manufacturing of marking thicknesser from Mikhail Rebitator
- Curvilinear manual thicknesser from “Voxa 54”
- Carpenter's thicknessing compass for marking workpieces from "Drevo Woodwork"
- Homemade marking thicknesser from Sergei Petreev
- How to make a marking thicknesser in 5 minutes from Sergey Sergeich
- Thicknesser made of metal parts from Ilya Gonchar
- Homemade marking thicknesser based on a railing pipe from AlfFisher
The procedure for taking readings and marking with a height gauge
To ensure the accuracy of measurement or marking, preliminary verification of the height gauge is necessary, which includes checking its zero reading. This is done as follows:
- The measuring tool is installed on the test plate.
- The main feed frame lowers down until the leg is in full contact with the plate.
- The main scale and the vernier scale are checked - the zero strokes of both scales must match.
- If you are checking a tool model in which the lower limit exceeds 40 mm, then it is necessary to use measuring tiles of the required thickness.
Now let's move on to the features of using height gauges. The procedure consists of the following steps:
- Grasp the base of the tool and carefully move it towards the part to be measured.
- Lower the main measuring frame until the reading prism is in full contact with the surface being measured.
- Using a micrometer pair, ensure contact between the surfaces of the tool and the part.
- Lock both scales
- Read the main scale and add the vernier scale reading. Determining the size using a vernier is similar to a vernier caliper - the line of the vernier scale matching the line of the main scale determines the additional micrometric size.
If the purpose of the gage gauge is marking, then the procedure is as follows: the size is set on the main and vernier scales, the base is pressed against the plate and the tool moves relative to the part being marked. The markings are applied with a sharpened tip of the leg.
Choosing the Right Planer
Once you've done your research and weighed your options, return to your base of operations. Think about future projects and see what the needs will look like. This will help you decide what type of investment to make. Select first based on demand and then on price and other factors.
If you're just entering the woodworking world, the right investment now can lead to more intense interest later on. Consider a tool that will teach you to be a better carpenter. If you are a professional or avid user, consider a tool that can handle creative projects or various projects. Most importantly, don't walk away from surface-level impressions alone. Buy this product with confidence that you are making the right choice for your woodworking plans.
Interesting planing machine here.
Thicknesser
A thicknesser allows you to obtain a board with a given thickness. The workpiece in it is pressed tightly against the table by rotating rollers and pulled through the workspace. One or more knives rotate in the working space of the thicknesser, which ensures the removal of chips. Due to the fact that the workpiece is tightly pressed into the table with its lower surface, the thickness of the board after processing is constant. At the same time, the machine must have a mechanism for adjusting the height of the knives above the table.
It is important to understand that a thickness planer is not a replacement for a jointer or jointer. The board, which has a bend before being fed into the thicknesser, will be pressed by the rollers as it passes through the machine and will bend back as soon as it is released from the pressure. Before thicknessing, at least one face of the board or block must be smooth and flat. You need to start processing on a surface planer by placing the workpiece flat (faceted) side down.
The most important characteristics of a thickness planer:
- Engine power. The ability of the machine to process hard wood directly depends on the power. In addition, a weak motor can cause uneven finishing even on softwood boards.
- Maximum planing width. The larger it is, the better, of course, but you need to remember about power - processing a wide board puts a lot of stress on the engine. A machine with a large planing width must have a larger engine.
- Maximum workpiece height. The choice of this parameter must be made based on what the machine is intended to be used for.
- Maximum planing depth per pass. Affects work productivity. The lower this indicator, the greater the number of passes required on average, which means it will take longer to process.
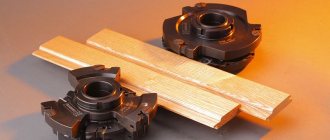
- Number of knives and their location. There are thicknessing machines that allow you to process two opposite faces or even all four sides of the workpiece at once. Of course, such equipment is more expensive, more difficult to set up and set up, and more demanding both in terms of engine power and the weight of the machine itself.