In the industrial production of lining, powerful woodworking machines are used to produce products of excellent quality, but not all users can afford it. Is it possible to make lining yourself and what is needed for this? We will talk about this in this article.
Do-it-yourself lining
Lining
Industrial production technology
Lining - what kind of material is it?
You will need this knowledge in order to independently make the best decisions when making lining at home. The process of industrial production of lining consists of several stages.
- Making boards. The logs are sawn on band or disk sawmills into edged boards of specified parameters. The thickness of the board is in the range of 15-25 mm, width 100-150 mm. Specific dimensions depend on the type of lining.
- Drying lumber. The process takes place in chamber drying, which reduces the amount of waste and minimizes the risks of torsion and cracking of boards.
- Sorting. Lumber is sorted depending on quality. For the manufacture of lining, boards of at least second grade are selected.
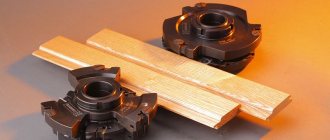
- Manufacturing of lining. The process takes place on a powerful four-sided planer. By selecting various cutters and knives, four planes are processed in one pass, and the desired profile is immediately created on them.
Lining production line
- Quality control and product storage.
Warehousing of linings
That’s all the technology is, there is nothing complicated, modern equipment allows you to automate production to the maximum. It is impossible to achieve this at home; you will have to waste much more time making the forcing.
Table. Classes of lining and their description.
| Class or variety | Description |
Extra | Free from cracks, knots and other defects. The surface is perfectly smooth and even. |
A or 1 | The surface is smooth or slightly rough. There is 1 healthy knot per 1 linear meter (knot diameter no more than 1.5 cm). There may be cracks: hairline cracks - no more than ½ of the panel in length, non-through cracks - less than 9.5 cm in length (the exit of the cracks is directed towards the end of the panel), which appeared during drying - no more than the width of the panel. There may be tars and resin pockets of 2 pcs. at 1 m p. |
B or 2 | There are many knots, of which no more than 2 can fall out. per 1 m p. There may be through cracks up to 1 mm wide and up to 15-30 cm long, hairline cracks are allowed along the entire length of the board. The presence of wormholes (3 pieces per 1 square meter) and rot (no more than 1/10 of the panel) is allowed. Grade B lining is suitable for painting. |
C or 3 | The quality is low. Many different defects. This lining is suitable for upholstery of technical rooms or rough work. |
Classification of lining
Prices for lining
Lining
Useful tips
And finally, a few tips that will ensure the reliability, durability and aesthetic appeal of wood cladding:
- Before installation, it is advisable to treat all wooden surfaces, including sheathing, with antiseptic impregnation, especially if clapboard is used to finish a wet room or external walls. This will prevent the spread of mold.
- When finishing interior spaces, materials must be kept in them for two to three days for acclimatization.
- The lined surface can be painted, coated with oil, wax, varnish, or stain. Pre-priming will reduce the consumption of varnish or paint.
List of the minimum set of tools and equipment
First of all, you must have a special separate room for work; woodworking machines create a lot of noise and dust. You will have to comply with the requirements of sanitary authorities. Another condition is that the electrical wiring must withstand additional loads, and they, depending on the brand of machines and their number, can increase significantly.
On a note! You can make both the simplest and quite complex lining with your own hands; we will consider both manufacturing options. But for all options there are several preconditions.
Making lining with your own hands
Beautiful examples
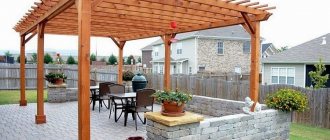
- Wooden lining looks organically combined with other finishing materials, as well as with household items.
- Modern designers successfully use lining in various styles. Naturally colored material is usually used.
- Modern styles can also include clapboard decorative elements. In this example, the lining plays the role of an ideal background for bright accessories.
- The following example looks like a good design option - the lining harmonizes perfectly with decorative stone and exquisite ceramics.
For more useful information about lining sizes, see below.
General requirements
On what machines and no matter what complexity you try to make lining, you must comply with the following requirements.
- Quality of lumber . Boards should only be edged, with the same thickness and width. Wide planes must be passed through a surface planer on at least one, and preferably on both, sides. For these purposes, it is better to have a double-sided surface planer at home, and if you don’t have one, then at least a basic jointer.
Jointer
Double-sided thicknesser
If there are no such machines, then you can work with a manual electric plane. This work is quite difficult and long, and the quality will always be much lower than when processing lumber on machines.
Practical advice! We strongly recommend that you do not plan boards with a hand-held electric planer. It is much more profitable to take the lumber to a friend who has a double-sided planer; in an hour or two of work you will pass 1-2 m3 of boards - this amount is enough to decorate a small country house. You will have to plan them manually for more than one day, and, as we have already mentioned, the quality will be poor. Such lining can only be used for finishing auxiliary premises.
- Drying. You can only work with lumber that has no more than 24% relative humidity. If the indicators are higher, then dry the boards under a canopy or in a ventilated area. The larger the gap between the stacks, the faster the lumber will get rid of excess moisture. Fold them carefully, do not allow any distortions to appear, place the spacers correctly, and be sure to press the top tier with a weight.
Drying the lining
- Job. Absolutely follow safety regulations. Statistics show that woodworking machines are considered the most dangerous equipment. Moreover, the injuries are very severe and often cause disability. This does not mean that machines should be feared, but they should be treated with respect. As for the use of mittens, this issue must be approached wisely. Mittens protect your hands from splinters, that's true. But it is also true that when the mitten gets caught under the cutting element, the hand or arm is pulled in, and injuries are much more dangerous.
Machine for making lining
We will tell you what machines and equipment you need to make lining with your own hands as the article progresses. The fact is that there are a large number of technologies, taking into account existing machines, it is impossible to describe everything in one article. Let's start with making the simplest lining - such work is accessible to most inexperienced craftsmen.
Price for the model range of jointing machines
Jointer
How to choose the direction of installation of panels
Before you start constructing the frame, you need to choose in which direction the lining boards will be attached. This is important because the sheathing guide bars must run perpendicular to the direction of the sheathing.
There are several ways:
- vertical is the most common. It allows you to visually increase the height of the room. For such wet rooms as a steam room in a bathhouse, it is also the most optimal, since water easily flows along the grooves between adjacent slats without lingering on the surface;
- horizontal - visually pushes the walls apart. Some types of lining are attached only in the horizontal direction. These include the "American" and the board with the chosen quarter;
The “American” is mounted with the tenon facing up to ensure normal water drainage from the surface Source parki48.ru
See also: Catalog of house projects with imitation timber presented at the “Low-Rise Country” exhibition.
- diagonal - used for decorative purposes on walls and ceilings;
- combined is also a decorative installation method that allows you to create patterns from multidirectional lamellas. It is the most complex of those listed, since the lining is attached to the transverse bars of the sheathing, which in turn must have a corresponding pattern.
The combined method of fastening the lining is difficult to do independently. It is better to entrust this work to specialists Source rus-teplitsa.ru
Making lining using a circular saw
Making lining using a circular saw
Circular saw
This is the simplest version of a circular saw; others have additional supports for fixing other woodworking mechanisms, which greatly expands their capabilities.
Universal woodworking machine
Step 1. Prepare lumber, decide on their quantity. To work, you will need boards planed on both sides, approximately 15–20 mm thick and up to 10 cm wide. There is no need to make it wider, this is due to the fact that the lining has the most basic profile, and it cannot guarantee the absence of warping during operation. The lining will be joined in a quarter, and such a lock cannot completely eliminate warping. The wider the lining, the greater the significance of warping; therefore, it is not recommended to make it larger than 8 cm.
Determining the size of the boards
Step 2 : Clean up your work area. Workpieces should be placed on one side of the saw, finished products should be stored on the other.
Important! Nothing should get in the way under your feet, all your attention will be focused on the working saw, there is no time to look at your feet - this increases the risk of injury. If the boards are longer than a meter, then do not work on your own, as it is difficult and very dangerous. In addition, the risk of serious injury increases significantly and the amount of waste increases. The fact is that you will not be able to press the board normally against the ruler as it exits the cutter; the linearity of the milling is disrupted at the ends.
Step 3. Align all boards to length and inspect their surfaces. If there are black, rotten, loose knots, discard the lumber. Such knots cannot be treated at home; they will definitely fall out.
When storing workpieces, pay attention to the location of the fibers, especially carefully monitor the location of wood development defects. Areas with curliness are very difficult to cultivate. Position the boards in such a way that the location of the twist is in the direction of rotation of the cutting tool, otherwise the surface cleanliness will be unsatisfactory. On industrial machines, such problems almost never arise; they operate at high speeds, have at least four knives on one head, and mechanical clamps eliminate the possibility of the board oscillating during processing. Due to this, cutting conditions are maintained perfectly, and the quality of processing of complex surfaces is significantly improved.
Sawing one side of the board
Important! Never remove the guard or spacer from the saw. They are not needed to keep sawdust flying into the eyes, as inexperienced carpenters think. Their main purpose is to prevent the board from flying back, which could pierce the abdominal cavity.
Unlike other safety features, the riving guard offers added convenience when sawing, so don't miss out on using it.
This is what should happen
Step 4: Align the circular saw. If the width of the boards is not the same, then first you need to align them. To do this, set the saw ruler at the required distance from the teeth and secure it firmly. Make sure that the ruler is parallel to the saw, this is very important. Factory machines have special marks; for homemade ones you will have to use a square. Checking the correct position is done experimentally. Take a small piece of board and saw through it, check the width and parallelism of the ruler. Repeat the installation if necessary.
We file the second side along the ruler
Ruler filing process
Planing of boards
It should look like this
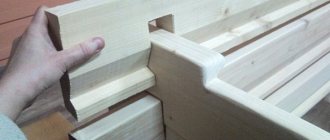
Step 5. A simple lining has a quarter joint; it can be made using an ordinary circular saw.
Quarter connection
To do this, you need to adjust the height of the saw table and its distance to the ruler. How it's done? To make the example easier, let’s take the board thickness to be 20 mm. Accordingly, the quarter will be 10x10 mm.
For this you can use a cutter like this
- Release the ruler and move it towards the saw. The distance between them should be 10 mm, carefully monitor the parallelism of the planes. Attach the ruler and check for correct installation. To do this, use any segments, skip a few for testing.
- Adjust the position of the circular table so that the saw teeth at their maximum point are at a height of 10 mm.
After adjustment, your saw height and its distance to the ruler should be 10 mm. If the boards have different parameters, then the distances must be adjusted in accordance with them.
Step 6: Start making a quarter joint. The first pass is to lay the board flat, the side surface is pressed tightly against the ruler. Once completed, the board has a cut along its entire length.
This can be done with a milling cutter, or you can do without it. In this case, take a small saw wheel and set it at an angle. The result is a so-called “drunk saw”. This method is used when there is no cutter. It is much more difficult to set up and is used when there is no other option. It's better to buy a cutter
Important! Do not press the boards near the saw with your hand, use a wooden block. To prevent it from sliding off the end of the board, cut a recess - it should simultaneously rest against the top of the board and against the end. Never rest your stomach on the end of a long board; hold it only with your hands, and your body should be located on the side.
Step 7. Place the board on its edge, the cut should be on the side of the ruler, cut out a quarter. Immediately remove the cut strip from the table, do not litter the work area.
Step 8. Rotate the board 180° and repeat the operation on the other side. The lining must have a mirror arrangement of quarters. If on one side the recess is located at the top, then on the opposite side it should be at the bottom. During installation of the lining, the joints overlap and cover the joints.
The result is a lining like this
Step 9. If possible, it is recommended to mill the visible side edges with a hand mill. Select the cutter profile you like, firmly secure the board in a vertical position and make a pass with the tool. How to work with hand cutters is described in detail in the manufacturer's instructions. By the way, the presence of a manual milling cutter significantly expands the possibilities; it is recommended to have such a tool for everyone who does carpentry work.
Working with a hand router
If you use serviceable saws with pobedit tips, and the machine is sufficiently stable, then when making such a simple lining, you can completely do without a surface planer and a router. Correctly selected saw speeds and optimal feed speed ensure good surface finish. If necessary, the latter can be treated in some places with sandpaper or a grinding machine, and the external surfaces of the lining will be quite satisfactory in quality.
All that remains is to take the waste and cut the slats. Moreover, the slats do not have to be made as long as the linings. In other words, the boards are on their own, the slats are on their own. No one will notice the joints of the slats. The slats should be cut thinner than our grooves. The slats will still fit perfectly into the grooves due to their natural curvature. And, of course, the slats are simply sawn. They do not need to be planed, especially since this is an extremely dangerous undertaking. If you use a good saw, the rake will be quite smooth
This is what the ceiling of the cellar looks like, decorated with such clapboard
Now let's look at how you can make eurolining yourself.
Prices for the popular range of circular saws
A circular saw
Peculiarities
The main dimensions of wood bases are regulated by standardization corresponding to GOSTs 8242-88 for profile parts made of wood for construction and 8486-86 for lumber of softwood. There is also a European parameter for industry - DIN 68126/86. There are no strict regulations on the length of the lining.
The main features of the lining are its length and width. These indicators are taken as a guide when calculating the quantity of production. Regardless of the dimensions, laying any boards is carried out according to an identical principle. This is convenient for the consumer. Since, for example, if replacement or repair is necessary, it will not be difficult to find a similar part of the required size and with an identical fixation method.
To avoid any difficulties during installation, it is important to study the instructions supplied for a specific type of product. Usually it is included in the packaging with the product. Differences may be present if the lining is of European or domestic production. The differences lie precisely in the standard sizes of the varieties. Domestic lining of the first, second or third grade does not correspond to the standard dimensions of European-made products of class A, B, C. The same dimensions can only be found in products of the “elite” class. However, there is a difference here, since European-made products are usually more expensive.
By the way, the cost of the lining is very dependent on the dimensions. If we consider the length, then, as a rule, short boards are cheaper. Long boards are more expensive, since the blanks are usually needed for hemming roof overhangs and should not contain dead knots. If at the processing stage there are dead knots in a long board, then they are cut off and products of the same harvested grade are obtained, but shorter. If dead knots remain, they will fall out of the finished products at any time, resulting in defective finishing.
Experts also distinguish between living knots. They will not fall out when using the board, so in some grade categories they can be left on. Lining with live knots is suitable for finishing walls indoors. Inexpensive varieties are usually used for baths, hallways, and other similar rooms where a particularly sophisticated finish is not required. With proper processing, lining of exquisite varieties can turn into designer decor, so it is worth considering the varietal types in more detail.
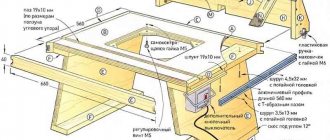
Manufacturing eurolining on a milling machine
This is more complex work; you will need solid experience working with woodworking machines. We will tell you about the technology, and select the dimensions of the lining and the profiles of the front surfaces yourself, taking into account the availability of tools and personal preferences.
The design of the machine is quite complex. Complete instructions must be included with such equipment.
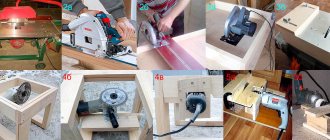
We see an example of a homemade machine for making lining, its components and details
We see another example of a homemade machine for the production of lining at home
How does eurolining differ from regular lining?
- The tongue/groove connection is deeper. Due to this, the risk of seams showing through during a significant reduction in the width of the boards is eliminated, and installation of the sheathing is simplified. It is easier to insert hardware for fastening into a deep groove.
- The reverse side has one or two slots - the wall surfaces can breathe, static forces are reduced when changing the linear dimensions of the lining. It is as a result of strong static forces that the cladding of a house can warp.
Photo - Eurolining category B
As the initial data, we assume that the boards of the required sizes have already been prepared, the material is sorted and folded in the proper place.
Step 1. Install a cutter on the machine to make a groove and a side decorative chamfer, adjust the depth. To do this, release the ruler, place the end of the board against the knife and, moving the ruler closer or further, find the desired position. Fasten the milling head and ruler with great force.
Mills used in the manufacture of lumber
In order to correctly align all the knives on the head, you need to plan a section of the board as a test. Next, place it again on the cutter and, slowly rotating the head in the opposite direction, check that all the knives are working. You can recognize this by the sound; if everything is normal, then the number of minor touches on the board should correspond to the number of cutters. For example, if the head has four knives, but you only felt three touches, then this means that one knife is not working. Find which one and adjust its position. This is quite difficult to do and will take several attempts. Make sure that the spacer wedges of the knives are pressed firmly against the head.
Knives
Several different knives-attachments for a homemade machine for making lining will allow you to create various wood products
Step 2. Attach the top and side clamping stops, set the desired distance. Such stops greatly facilitate the milling process, improve quality and increase labor safety. Pass all the boards on one side.
Step 3. Replace the cutter with a new one; it should cut the groove and remove the decorative chamfer. There is no need to re-adjust the clamps; the width of all boards is the same and did not change during the first pass.
Step 4. Remove the side cutter and release the ruler and clamps. Install a cutter to make recesses on the inside of the lining. The size and number of grooves do not matter; select them at your discretion.
Manufacturing eurolining on a milling machine
Practical advice! If you don’t have special knives for cutting grooves, no problem, you can use the same ones that were used for cutting the groove. Raise the head so that the groove knife is located in the middle of the board. The groove knife is longer than the chamfer knives; adjust the distance to the ruler so that only it works. The depth of the groove in this case will be approximately 3-5 mm, which is quite enough for a groove.
Prices for the popular range of milling cutters
Fraser
Choosing the right tree
The choice of material for the manufacture of lining cannot be considered only an accompanying procedure. It is at this stage that the quality of the future product is laid down. And the main thing when choosing is not to make a mistake with wood. Aspen, for example, is very easy to process, but it is a completely bad material in terms of finishing: it quickly loses its appearance, it warps from temperature changes and changes in humidity.
The best lumber can be considered from the coniferous family.
And the structure of the wood is very pleasant to look at, and it is not very difficult to process, and the service life of such wood is very long, especially if it is well impregnated. You should only be wary of tree trunks that have a large number of cuts from old branches. Young branches, as a rule, do not pose a danger to the material. But in the place of old branches, when planing, the core of the branch often falls out, which goes deep into the tree trunk.
Quartblog Digest
Wooden walls in an apartment: 4 budget-friendly ways - How to add a wooden wall to your interior and stay within budget.
How to sheathe a balcony: sorting out the materials - We have figured out this issue and are now ready to share with you what materials are best to sheathe a balcony or loggia to make it warm and cozy.
1/4 closer to nature: an accent wall made of wood - An interesting accent in the form of a wooden wall: where and how to use it.
Not just decoupage: 5 decorative techniques for working with wood - Glazing, etching and other techniques that will help make your things better.
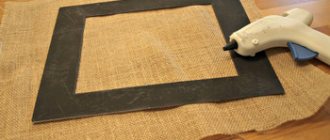
DIY: A frame for a mirror in a marine style from the remains of clapboard - The most summer master class: how to make a frame for a mirror with your own hands from the clapboard left over after renovation and shells brought from vacation.
Using a hand router for carving
You can significantly simplify the process of wood carving with a hand router. This special electric machine allows you to perform almost all types of artistic carving much faster. The only exceptions are sculpted and notched carvings. A hand-held wood carving router is a specialized tool for wood processing. The main parts of the tool are cutters, heads with cutting parts of different shapes, each of which has its own purpose:
- profiling the edges of wooden parts;
- milling of decorative and technological grooves of various configurations;
- production of unusual parts;
- creation of artistic carved products using a hand milling machine.
Using a router, it is easy to make various elements of wood carving: wooden trim, carved plinths, carved cornices and a wide variety of moldings.
A hand milling machine can be used to produce exclusive custom-carved furniture with great efficiency. Artistic carving with a hand router is most often done with fillet and V-shaped cutters, which allow you to make engraving of the desired length. Disc types of cutters are designed for sawing rectangular grooves.
Characteristics
According to the experience of many people, it becomes clear that careful dismantling of the lining is quite possible, but it requires quite a lot of time and money if the work is carried out by a hired team of workers.
This type of cladding material is very popular in the process of decorating the facades of private houses. It consists of wooden planks, which in former times were used to cover transport cars. This is where the modern name for this material comes from.
Nowadays, lining is called elite wood, processed using a special method. That is, the lining is a cladding board. It has a number of significant advantages compared to other finishing options available on the domestic market of finishing materials.
The wood that is used in the manufacturing process of such planks has the ability to absorb moisture directly from the environment if it is in excess, and, conversely, release it into the air if the room is excessively dry.
Therefore, we conclude that lining is capable of creating a balanced microclimate in the room. I would especially like to note that this material has a pleasant aroma of coniferous forest, pine forest or larch (it all depends on the raw materials used to make the boards), which cannot be compared with the aroma of various PVC chemical products.
Vapor barrier and insulation in the lining of the lining
Regarding the place and method of installing vapor barrier and insulation in the lining of the lining, different opinions are expressed and often opposite to each other.
Vapor barrier is a protective material, the purpose of which is to create a barrier to the penetration of moisture that has already arisen to certain areas of the building structure. In our case, the area that we want to protect is a wooden paneling that is not resistant to moisture. The name of the material, vapor barrier, is a little confusing, because it does not actually insulate vapor. Steam can form in any part of the wall pie, during the interaction of cold and warm air, where it is converted into condensation. The place where condensation forms is called the dew point. Where the dew point occurs depends on many factors. Learn more about dew point formation.
vapor barrier finishing
That is, before installing a vapor barrier material, it is necessary to find out in which part of the wall a dew point can form. And install the vapor barrier in such a way that it protects the wooden paneling from the resulting moisture.
For example, if the dew point is formed in the structure of the rough wall of the house, then the vapor barrier should be installed directly on the wall, the reflective side should be pressed directly against the wall with the sheathing, and insulation should be installed on top of the vapor barrier.
If a dew point forms in the internal wall frame and insulation, which is an extremely unfavorable case, and if you cannot fix it in any way, then a vapor barrier should be installed on top of the insulation to protect the lining from moisture and mold formation in the future. In this case, if the insulation is installed after a vapor barrier and a dew point appears in it, then it will absorb the resulting condensate like a sponge. Without the ability to release the absorbed moisture through the rough wall, the insulation and lining will rot, with the formation of fungus.
o dew point is indicated
vapor barrier over insulation
Installation of a vapor barrier to a wall is carried out using ordinary dowels and nails with plugs when installing a frame, on a stone wall, and with wood screws when working with a plaster or wooden wall.
There are currently a large variety of insulating materials for walls. Read more about types of insulation. The most common wall insulation is mineral wool. The choice of material for insulation should be selected based on the technical characteristics of the room, the material and the thickness of the sheets.
The insulation is laid into the frame quite quickly. Holds securely without additional fasteners. To cut the insulation to size you will need a construction knife.
insulation - mineral wool in wooden lathing
Preparatory work
Any master will tell you that repairs should begin with careful and detailed preparation. This is what determines how quickly and efficiently the repair will be carried out, and how many nerve cells you will have left upon its completion.
First of all, this is, of course, the calculation of the lining for the walls; it’s better that you have a few extra panels left, which can then be used in the event of a defect, than that several segments are missing.
Well, the first thing you need to prepare is a tool. There are no tricky devices here, but it’s better if everything is at your fingertips and you don’t have to waste time looking for all sorts of little things.
So, laying eurolining on the wall is done using the following tools:
- Instrumentation. Or, more simply put, meters. This concept includes a tape measure, a pencil and a chalk thread for marking straight lines. You can easily do without the latter, but as a rule, any home craftsman has such a thread in stock.
- Wood saw or jigsaw. In principle, clapboard can be cut with a grinder, but if you live in an apartment building, be prepared for the fact that your neighbors may call the fire department, as there will be a lot of smoke.
- Building level. Not a single repair can be done without this tool, and it is best if it is a modern laser device that can greatly simplify the work process. Of course, not everyone can afford a laser level, so you can replace it with the simplest one, with a water mark.
- Perforator and drills for it. The tool is a threat to all neighbors, but, unfortunately, you can’t do without it.
- Brushes and other painting tools. The lining is rarely used in its raw form, so you will have to do a little work as a painter.
- Hammer. Where would we be without him? One of the most important tools in a home craftsman's arsenal.
In principle, this is the entire simple set that we will need, and the most important thing is that you always have it all at hand.
Figurine cutters
Using cutters for paneling (or figurine), thin planks of a certain configuration are made, which are used to frame various decorative elements. Panels are most often used for the manufacture of decorative frames, as well as for the design of furniture facades. A paneled element used exclusively for decorative purposes can be cut along the contour of the product. Using milling cutters for panels, it is possible to produce products that simultaneously perform two functions: they act as a decorative element and fix the connected elements together using the “tenon and groove” principle.
On the modern market, various cutters for infill are offered, which involve the production of such a decorative element in one or several passes. When making a panel in several passes, at each stage of the technological process, a layer of material is removed for which the tool used is designed. As a rule, in such cases, not one paneling tool is used, but a whole set of them.
Panel cutters can work in vertical and horizontal planes. Vertical cutters for infill are used to process baseboards and the edges of cornices, which involves processing to a greater depth. Horizontal cutters for infill are distinguished by a larger diameter of the cutting part. They are used to process furniture facades, shelves and door panels. Although cutters of this type can improve processing productivity, they are significantly inferior to vertical cutters in terms of cutting depth. It should be noted that almost no production can do without panel-type cutters.