The issue of making a wooden boat with your own hands should be approached more than responsibly. After all, the watercraft must be reliable and safe. We'll tell you how to make a wooden boat with your own hands in this article.
The assembly principle may be the same, but the shape may be slightly different.
Final sealing of the joints of the bottom and side plating sheets
After the glue has dried, you will need to lay two canvas strips, thoroughly soaked with epoxy glue, along the inside of the junction of the side and bottom skin sheets.
From the outside, the seam needs to be reinforced with small tow, hammered with a wide flat screwdriver between the edges of the sheathing sheets. Before this, it is important not to forget to coat the inside of the seam with epoxy glue and only then quickly push the sealing material there
When all connecting seams have thoroughly dried, you can begin priming the surfaces. It is done with a brush and spatula. Before the operation, the hull must be turned upside down. Protruding heads of screws and bolts, joints of sheathing sheets and other protruding structural elements are carefully coated with two or three layers of primer. The best option for a primer would be drying oil heated to a boil. Several layers will ensure proper coating quality. Two or three coats of paint will provide a good finish on the outer surface of the hull and will help make your wooden boat more durable.
What are the benefits of a wooden boat?
A wooden boat has been used as a fisherman's vehicle since time immemorial. Initially, people learned to make dugout boats from whole wood, and later from wooden planks. Despite the fact that countless boats are now being built from a variety of modern materials, a wooden boat is often used by fishermen, as it has a number of advantages.
Firstly, a wooden boat is quite strong and reliable afloat, since wood is lighter than water. Even if it capsizes, a wooden boat will not sink, but can save the life of its owner. Secondly, a boat made of wood is relatively light, which is important when transporting it and when using it on the water. Thirdly, a wooden boat, unlike metal and plastic ones, is practically “silent”, which is very important, especially when catching cautious fish. Fourthly, a wooden boat is made from environmentally friendly materials. For the construction of wooden boats, wood from coniferous trees is usually used, less often from deciduous trees. Fifthly, a wooden boat can be built by anyone at home with certain skills in working with wood and with the availability of tools. Sixth, a boat made of wood is much cheaper than similar sized metal, plastic, rubber or PVC boats, especially if it is built with your own hands. Seventhly, in our time we can easily eliminate the main disadvantage of a wooden boat (susceptibility to rotting), provided that wooden structures are treated with modern materials and painted with special high-quality paints. Now the wooden boat has become quite durable
With proper storage and timely maintenance, it can last for many years. A wooden boat can be used with oars, an outboard or stationary motor, as well as a sail. Depending on its purpose, a wooden boat can be keeled or flat-bottomed.
What types of ships are there?
A boat is a small vessel that has no deck, no deckhouse, no superstructure. In fact, it is just a hull, which includes a frame and plating, the presence of which ensures the waterproofness of the vessel. The front part of such a schooner is called the bow, the rear is called the stern, and the sides are called sides. The bow and stern (or just the bow, as, for example, on a punt) are pointed.
Depending on what material they are made of, they are divided into the following groups:
- From fabric.
- Boats made of wood.
- Made from plywood.
- Made of plastic.
- Of steel.
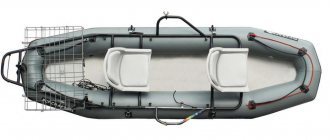
Vessels made of fabric (inflatable) are not reliable. They do not tolerate sudden temperature changes and are easily damaged. Because of this, their operation can be life-threatening. Other types of such vessels are much more reliable.
Plastic schooners boast relatively light weight, so transporting them is not difficult. With proper care, they will serve their owner for many years.
But the most reliable are, of course, metal vessels, however, due to too much weight, moving them to a body of water is not always easy.
Wooden boats are lighter and more durable, and if necessary, they can be made independently. However, to extend their life for many years, they require careful care (application of moisture-repellent compounds). Compared to wooden ones, plywood schooners are much more durable and moisture resistant. But building a boat with your own hands using plywood as the main material can be difficult.
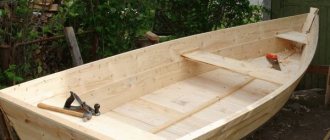
How to make the bottom of a boat with your own hands
Place the future boat on a sheet of metal and trace its boundaries with a marker, do not forget to take a few centimeters of extra space just in case, you can always trim off the excess.
The next step is to cover the connection of the boat with its bottom with a special silicone sealant along the entire length in one line. On top of the sealant, until it has dried, a cord is laid in several rows - all this is necessary to ensure that the bottom of the boat is airtight and does not let water inside.
When this process is completed, we move on to connecting the bottom to the frame. Carefully place the bottom of the boat over the bottom of the boat. Use nails or screws to connect.
Start connecting from the middle and move towards the edges of the boat
Do the work as slowly and carefully as possible, as this part is very important.
We cut off the excess metal that sticks out more than 5 mm from the edge of the boat, and bend the rest with a hammer
It is also important to protect the bow of the boat from external factors using the same metal. Cut a rectangle of tin to the size of the boat.
Be sure to make a fastening on the bow for the chain
This will help if someone wants to steal a brand new boat, since on a body of water it will attract special attention due to its newness.
Before you build a boat, think through and look at all the ideas that you can use to make a boat. Perhaps you will choose a special material for yourself that will be more convenient for you to work with, or maybe you need special protection or massiveness.
Do not forget to cover the bottom with special paint on the back side, since galvanized metal is destroyed over time when in contact with water. The wooden parts of the boat must be coated with several layers of special impregnation and the boat must be left to dry in the shade.
For convenience, a wooden flooring can be laid out inside the boat at its bottom. This way the bottom will not rattle when you move along it.
At this point the boat will be ready. Read in more detail the article on how to make the best homemade boats with a description to find out some other nuances that may be useful to you in future construction.
Mast
Without a small mast with a sail, the job will look unfinished. I used a drill bit that was about the same diameter as my dowel. Do not forget that they must match each other - in this case you will not have to use glue. After turning a round mast from the board, insert it into the hole. If it doesn't fit tightly, you'll have to use glue and tape to narrow the diameter, so it's best to work gradually.
I also drilled tiny holes at the ends of the mast into which I inserted threads. They will hold the sail, which will make the toy even more interesting. It can be made from fabric. Use durable material and trim the edges to prevent it from unraveling prematurely. When working correctly, the sail can even guide your small boat when it is lowered into the water.
Swollen eyes, dizziness and other possible reactions to the COVID-19 vaccine
I prepared lazy sausages in dough: I put bagels on the sausages and baked them
The black part in the head of the shrimp: many people do not know whether it is edible or not
Making a wooden punt
How to make a boat with your own hands, reliable, strong, unsinkable? There is only one answer: all stages require precise implementation, since haste, any shortcomings, and the traditional Russian hope “at random” are contraindicated
Attention to even the “small details” is a necessary condition
Manufacturing of boards
- First, according to the drawing, all the blanks are cut out. Parts, including the sides, are processed with a file and then sandpaper. Impregnated with antiseptic.
- On one side of the side boards, a cut is made at an angle of 15-30°, then the ends are chamfered to ensure an ideal fit (without gaps) of the workpieces in the bow.
- The bow of the boat is fixed with a triangular beam, attaching it with nails or self-tapping screws to the joint of the boards from the inside after a perfect fit. The edges of the contacting parts are first impregnated with an antiseptic, then lubricated with glue (resin).
- They call an assistant and give the sides of the boat the desired shape using paracord or its replacement. The sides are tied with a cord, having previously installed spacers between them of the same width as the future boat. The rope is then tightened.
- The transom is attached (the rear element of the boat is the flat stern part). It is connected to the sides using glue (resin) and self-tapping screws (nails).
Creating and fixing the bottom
The bottom is made of wood (it is better to find a wide solid board), waterproof plywood (FSF, 12 mm) or sheet metal.
- If a metal sheet is used, then the part is cut out so that its dimensions exceed the bottom by several centimeters. They are needed for attachment to the bottom of the sides. Since leaks are the biggest threat here, all joints are generously coated with glue or resin, and tow is used. The edges of the metal are bent using a hammer. Self-tapping screws are planted in increments of 15-20 mm along the entire perimeter of the boat.
- If a wooden board (plywood) is found, then an element of the desired shape is cut out of the material, and then proceed in the same way - treated with glue or resin, tow and fasteners are used.
Final processing of the material
Now the elements of the boat are again generously treated with an antiseptic, and all potential gaps are eliminated using tow or sealant. Then they prime twice, apply paint in several layers, each of them is given time to dry.
Then the vessel is coated with varnish, also in 2-3 layers. The last stage is the installation of bench-cans, installation of triangles for the stern, they are processed - primed and painted (varnished) - separately. At this point, the production of the punt boat is considered complete.
Checking the water tightness of the boat
This operation is necessary to ensure the reliability of the vessel before its first long voyage. There are several ways to do this, but it is better to conduct a comprehensive test.
- Inspection at the construction site. In order to ensure the quality of the work, the boat is turned upside down and placed on a long bench or on several stools. Then a large amount of water is poured onto it from a hose. The recommended duration of this test is 5-10 minutes. The boat is turned over and inspected for leaks.
- Testing a mini-ship in big water. If a homemade punt has not proven itself to be a leaky trough at the “shipyard,” then it is first sent for free swimming to shallow depths. When the first water tests are successful within 30 minutes, the boat is ready for any body of water.
Some tips
They can be useful for those who do not like to make mistakes in their work, which always require additional effort to correct them. Therefore, some recommendations can (and should) be “wound up” in advance:
- when making a homemade boat, it is better not to skimp on the quality of materials, since the best wood is synonymous with the longevity of the future of your own watercraft;
- It is recommended to cut all blanks with a small margin, because it is much easier to cut off the excess, otherwise you will have to cut out a new element;
- sealant, glue, resin or tow - something that needs to be purchased in large quantities, the joints of the sides with the bottom are especially important;
- In all wooden parts for fastening, you need to pre-drill holes of a slightly smaller diameter than nails or self-tapping screws, the goal is to prevent possible cracking of the material.
Prices
Building such a craft with your own hands is an interesting and creative activity for people who like to do things themselves. The main thing is to adhere to the dimensions indicated by the drawings.
It is possible that during this process there will be mistakes that need to be redone. But the result will be an excellent and inexpensive boat. It is best to store this product on dry land. This boat is perfect for use on calm lakes and rivers.
Going out to sea or rafting down mountain rivers is prohibited. You also need to carefully monitor the seams and the integrity of the structure; if there are problem areas, they need to be sealed.
If treated with care and properly stored, such a watercraft will last a long time and will help you have a great time fishing, or just while walking along a pond.
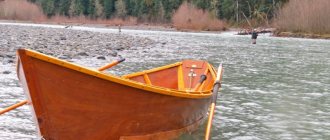
DIY plywood boat. How to make a boat from plywood. DIY boat. How to make a boat with your own hands. How to make a boat from plywood. And then an interesting idea came to me: shouldn’t I make a boat myself? Well, that’s basically something for everyone to decide for themselves. But I liked the idea. And I came across several sites on this topic. It was on one of them that I found an interesting constructor. A certain “WORKLOG” for the production of a small, but quite real boat.
Material: FSF plywood 6mm, 10mm, covered with fiberglass. The seams are glued with epoxy glue and reinforced with glass tape. The plywood is impregnated with the antiseptic composition against rotting and fungus “BIOSTOP”. The boat is coated with 2-component epoxy primer and painted blue. The lower part of the hull is painted white, the cans (seats) and deck are varnished, the hatches are made in Italy (sealed, with a rubber seal, mounted on silicone and stainless steel fasteners). The mast is made from AMG6 45mm pipe, the sails (mainsail and staysail with a total area of 7.5 square meters) are made in the sailing workshop UA-SAIL, the mast stays are made from cable with a diameter of 3mm, oarlocks, under oarlocks, cleats, etc.
Length 3.37 m Beam 1.53 m Midship depth 0.5 m Freeboard height 0.37 m Hull draft 0.13 m Draft with centerboard 0.8 m
Sailing rig 7.5 sq.m.: mainsail 5.5 sq.m., staysail 2 sq.m., possible installation of a spinnaker 5 sq.m. Load capacity 230kg for use with sails, and 400kg for oars or motorized Maximum outboard engine power 5 hp. The estimated weight of the dinghy when fully armed is 85-90 kg.
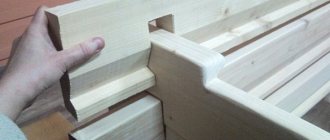
The body blanks were cut from FSF 6mm plywood. Frames and forespigel made of 10 mm FSF plywood. Transom made of 2 layers of 10mm FSF plywood. The bottom blanks were glued together using overlay strips. The outside seam is taped with fiberglass.
The side blanks were glued end-to-end using fiberglass: on the outside in 2 layers, on the inside in one layer.
The case was assembled using copper clips with a diameter of 2 mm. The seams on the outside are taped with 60mm glass tape using CDA-HD epoxy glue.
The bottom along the keel line is glued in three layers: two layers of fiberglass with each overlapped by 2 cm and one layer of glass tape.
Under the glass tape you can see the stainless steel screws with which the transom was additionally secured.
The side stringers were glued on. They were fastened with screws, which were removed after polymerization of the glue, and the holes were filled with putty made of epoxy glue and Aerosil.
From the inside, in the bow, the forespigel and the bottom along the keel are glued with 2 layers of fiberglass and one layer of glass tape.
It was decided to sheathe the cans completely to make the dinghy unsinkable when capsized. For this purpose I ordered plastic sealed hatches.
Therefore, I had to glue a stinger on the bottom, and side strips on the frames.
The side cans are coated with epoxy primer.
All compartments that will be closed were painted in two layers.
The front deck, pre-cut to spare, was placed on brick pads, moistened with water with a roller, a weight was placed on top and heated with a hairdryer in order to have a curved appearance. This will make it easier to install it on the case.
It was decided to lay the fabric from one side to the other, overlapping the bottom - I didn’t want to spoil the excess fabric. The necessary pieces of fabric were cut off, taking into account the overlap of the subsequent layer on the previous one. Although the fabric contained a direct silane lubricant, I annealed it with an industrial hair dryer for better impregnation. This was not done in vain; you will see the result of pasting with such a fabric, devoid of any lubricant, below.
The epoxy adhesive was applied using a low nap roller. This allows you to apply glue to a large surface quickly and evenly. Never apply too much glue in the hope that it will saturate the fiberglass and the excess will come out. Otherwise, you will get a wavy surface, which will cause a lot of trouble with puttying.
After gluing each strip, the fabric was smoothed with a wide spatula. After finishing the pasting and waiting a couple more hours until the epoxy began to polymerize, a layer of epoxy glue was applied to the pasted surface using a roller. The surface took on a more or less even shape. It took 7 hours to paste the body. With an assistant, things would move faster.
The next day, having removed obvious defects (protruding threads, moss along the edges of the fabric) using the scraping method, I began to putty the body. In general, you can talk a lot about puttying fiberglass, but there is one unshakable rule - puttying fiberglass does not mean removing irregularities, otherwise you will remove the fiberglass or damage its base (was it worth bothering with pasting at all?), but filling the recesses and depressions with putty.
This is where they remember that they put a lot of glue under the fiberglass and initially made the surface wavy like the sea. The more carefully you perform the pasting, the less headache with puttying. Experience comes with practice. and the surface after my pasting requires 2-3 thin layers of putty. The photo shows that the surface with putty made of Aerosil and epoxy resin applied in one layer is quite smooth and even.
For gluing, a modified CDA-HD epoxy resin was used with a long polymerization period and low heat generation during this process, which allows mixing large volumes without the risk of resin boiling.
Since we have to make kits for building a boat ourselves and in order to avoid dust in the room, cleaning the hull after each puttying, it was decided to take the hull out into the yard under a canopy. With the help of comrades and under the strict guidance of your humble servant, the body was brought into the light of day. It was sanded with sandpaper and puttied a second time. I was pleased with the result. Tomorrow I will decide whether it will be necessary to putty a third time, or whether only certain places require puttying.
I decided that two layers of putty would be enough. The body was sanded with #60 sandpaper. These tools were used for the job. No grinding machines can replace manual labor in terms of the quality of the final result. I spent two days cleaning the hull to an eggshell state.
The deck was adjusted to size. Pre-bending the plywood made this work easier - for fitting, I fixed it with only three screws, one at the front and two at the back corners. Excess plywood was removed with a belt sander.
On the bottom, along the keel line, slats were prepared and glued. This will give additional rigidity to the bottom and will provide a place to attach the bottom steps.
Reinforcements made of 10 mm plywood were glued to the lower part of the deck to accommodate the cleats, mast and stays. The areas where the glue will be applied were sealed with masking tape. The deck was impregnated with BIOSTOP antiseptic, after drying it was painted in two layers.
The bottom steps and keel were manufactured and adjusted to size.
Holes were previously made for fixing with screws for gluing. A 20x15mm rail was used for the central redan, and 30x15mm for the side ones. These dimensions are due to the fact that the keel was made of 10mm plywood, glued in half (20mm). In the future, to protect the slats from abrasion, aluminum thresholds 20mm and 30mm wide, which are used for fastening carpets and linoleum, will be screwed onto them. Construction stores have a wide variety of such profiles.
The work area where the epoxy glue will be applied was covered with masking tape. Don’t be too lazy to do this every time you work with glue - this will save you the tedious cleaning of glue residue and save time.
As you can see, the gluing area does not require further processing, and the adhesive seam looks very aesthetically pleasing. Tomorrow the screws will be removed and the holes will be filled with a mixture of epoxy resin and aerosil.
Today, aluminum profiles were purchased at the nearest building materials store to protect the bottom rails from wear. After 2 hours of work, the profile was adjusted to the required size and bent at the edges in the form of runners. I also decided to additionally protect the centerboard well, so I had to glue strips to it, on which protective strips would also be attached.
Having completed the priming and sanding of the hull, the hull was re-edged and the deck was glued in place. Fixation was carried out with stainless steel screws. The screw heads were puttied with a mixture of epoxy resin and Aerosil. Since we plan to varnish the deck, we had to limit the places where we putty the screw heads with masking tape.
In the 9 days since the last photos, the boat has acquired some new features. As you can see, the fender beam, overlay strips on the centerboard well and the middle frame were glued in, the cockpit was soaked in antiseptic, primed and painted in 3 layers. The cans were sanded with 250-grit sandpaper to apply the stain and varnish. I decided on oak. Samples of this tone look quite decent, but doubts have crept in about what color to paint the body. Initially I planned to paint it white, but after thinking about the fact that the boat should have an elegant and attractive appearance, I am more and more inclined to paint the hull blue and the bottom white. This color scheme will give a contrast between the blue hull of the boat, the white cockpit, the banks and the varnished front deck.
The cans were given two coats of oak-toned stain and three coats of polyurethane varnish.
The bottom along the chine line was covered with paper masking tape to create a smooth border between the side and the bottom. The beams were also covered with masking tape. The sides, transom and forespigel were painted blue with three layers of paint.
After the paint had dried, white stripes were applied to the sides. To make them even with the least effort, 30mm wide paper masking tape was used. First of all, I glued the first strip of masking tape from the fender. Then I glued the second strip butt to the first tape, and then glued the third strip of masking tape to the second butt. After this, the second strip was removed, thus obtaining an even side strip for applying white paint. In order for the edges of the white stripe to be rounded, I bought some ORACAL film and printed four 30mm wide strips with rounded ends on it on a printer (done in AUTOCAD). Then I cut out these “masterpieces” of design with scissors and glued them along the edges of the places where the white stripe will be applied. I applied 2 layers of white paint and after it dried, I removed the masking tape and ORACAL film.
The deck was sanded with #120 and #200 sandpaper and covered with two coats of stain. After the stain had dried, I sanded it again with sandpaper No. 200 and coated it with three layers of polyurethane one-component yacht varnish. After the first two layers had dried, before applying the third, I sanded it with sandpaper No. 300, wiped the surface from dust with a damp rag and degreased it with white spirit.
The seats were covered with paper, and masking tape was glued along the contact line to the side to create an even transition line between the paint on the sides and the varnish on the seats. In a hardware store, I came across acrylic paint with a water-soluble base from DUFA. That is, while the liquid is diluted and washed off with water, but after drying (30 minutes) the water reaches only one place. The surface after drying is hard but elastic. In the evening I read on the Internet that these are now used for painting cars. After that, I regretted that I had not come across this product earlier, and would have covered the bottom with this paint.
All parts were secured with stainless steel screws. The hatches were sealed with silicone for sealing. To discourage the desire and temptation to dismantle any of the installed parts, the screw heads were filled with epoxy resin.
I installed the stay puttens (for attaching the bow guy on which the jib is attached) and mast steps (the base of the mast attachment).
A handle was installed on the forespigel to pull the boat ashore. Fixed with stainless steel screws and epoxy. I couldn’t find a suitable one anywhere, so I bought an aluminum door handle at the store and painted it with paint with a hint of chrome. Then, if I find somewhere, I’ll cover it with chrome using an electrochemical method.
An oarlock with an oarlock inserted into it.
At the end of the side, the sub-key is secured with four stainless steel screws. The slots of the screw heads are sealed with epoxy glue so that they cannot be removed.
Two drain plugs with a rubber seal were installed at the bottom of the front frame. Mounted on silicone and stainless steel screws.
Front side can with the sealed inspection hatch cover removed with a bayonet lock (rotating the lid 60 degrees in one direction or another allows you to install or remove it) The front cans are completely sealed and have a volume of 35 liters each.
In general, the hull has seven separate compartments (bow, two front side, two rear side, aft, and the cockpit itself), which gives greater survivability to the hull in emergency situations. The total volume of hermetically sealed compartments is about 180 liters or 180 kg of positive buoyancy when the boat hull is completely flooded with water.
A tiller was installed on the steering wheel. Consists of two parts connected by a hinge. All pieces of iron are made of stainless steel.
Once upon a time, the shores of lakes and ponds were completely strewn with wooden boats of various sizes and designs. Of course, there were rubber ones, but there were few of them and they served patched and patched for many years. It was even rarer to find duralumin products produced in small batches at that time.
Punts of our rivers
Those times have sunk into oblivion, and with them the good old traditions of building simple boats by hunters and fishermen themselves. Now inflatable boats have firmly taken their place. They turned out to be more mobile, lighter and more convenient.
True, in some places far from large populated areas, you can still see ones made by yourself. So I've been using it for many years.
The boat, equipped with one loose oar, with a sharp wedge-shaped bow, strong wooden sides, is excellent for moving both along narrow rivers and through dense thickets of reeds, which allows it to be successfully used for fishing and hunting.
Such boats were generally built according to a single principle, but in different regions they had a number of features. For example, some had a wooden bottom, others rubber, and still others tin.
If for some reason you need just one, then you can make it yourself at home. There is nothing complicated in making it, although the first time it may not turn out exactly what you would like.
Preparation of material
So, let's begin. Before construction begins, you need to take care of its most important parts - the sides. For this purpose, long, wide, not thick, preferably without knots, pine or spruce boards are selected. They must lie for at least one year in a dry place, on a flat surface with slight pressure on top to avoid their bending.
We inspect the prepared boards again for defects - cracks, falling knots, etc. Then we measure the required length (here, as well as further, specific dimensions of the parts of the boat will not be given, since all this is at your discretion) with a small margin and file each of them at an angle of 45 degrees - this will be the bow part.
Next, they need to be planed, and chamfered from the sawn ends so that the boards pressed against each other in the bow do not have a gap. We impregnate these areas, and subsequently all others that will not be available for painting after assembling the structure, with a protective layer of antiseptic.
After this, we proceed to making the base of the nose - a triangular block. Its length should exceed approximately 1.5 times the width of the sides of the boat. The timber is also planed and covered with a protective layer.
Don't forget to leave a margin at the top and bottom, then after assembly, all excess will be cut off.
Initial assembly stage
Having prepared these elements, we proceed directly to assembly. We start from the bow, firmly connect both sides and the triangular block with screws or nails.
We cut off the protruding parts at the top and bottom flush with the sides.
It must be exactly the same height as shown in the photo, otherwise the boards may burst during bending. The spacer angle should also not be made too large.
Having installed the spacer, we begin to bend the sides; here you will need a couple of assistants or a rope. Having bent to the required distance, we apply the “back” and determine where and how much to chamfer so that the sides adhere to it without gaps.
So, removing it little by little, we adjust it until we achieve the desired result.
Having achieved it, we nail down the sides and cut off the protruding parts from below, and from above as you wish. I made it in the shape of a triangle.
Then we proceed to install the permanent braces and seats. Their number and location is at your discretion. When fixing them (and in general, in other places), be sure to first make a hole with a small drill in order to avoid the appearance of cracks.
We complete the very important initial stage by chamfering the bottom of the sides, spacers and applying a protective coating to them.
See the next part for the continuation of construction.
A wooden boat is an indispensable thing for lovers of hunting, fishing, and also for tourists. After all, overcoming small water obstacles (ponds, rivers, lakes) can often become an insoluble problem. But buying a wooden boat is not always possible, since the pleasure is by no means cheap. Therefore, as a way out, there is the opportunity to build a boat with your own hands.
Peculiarities
A simple example of a homemade vessel would be a punt. For greater convenience, it can even be folded. A collapsible boat is easier to move to a body of water. This mini-option is also advantageous because the manufacturing costs are quite low. Homemade plywood boats can also be motorized or ordinary rowing. In this case, the stern part will be different during manufacturing. You will need to install a transom under the motor (multi-layer plywood is suitable for it).
There are already popular models of boats, for example, the rowing sectional boat “Dori”, “Perch” and many others, drawings of which can be easily found on the Internet. And also in a specialized store you can purchase ready-made kits for assembling a boat from plywood, for example “Skif”.
Blueprints
Before drawing up a drawing of a boat, you also need to decide on its dimensions. This largely depends on how many people the ship must accommodate in the future. To build a floating craft from plywood of the specified thickness (0.5 cm), the following parameters will be optimal: length - 4.5 m, width of the largest part of the vessel - 1.05 m, depth of the craft - approximately 0.4 m. To create a project, it is better use graph paper, this will allow you to make more accurate contours of the elements of the ship's hull.
Next we create a sketch:
draw an axial line along the length to divide the drawing into two parts; maintaining symmetry in this case is very important; then we conditionally divide the diametrical plane into 4 sections, in which the transverse ribs of the hull (frames) will subsequently be located; we draw a vertical projection of the vessel, and also draw a top view of the vessel; draw out the frames; be sure to check the parameters of all elements according to a given scale; we draw up sketches of the frames on a scale of 1 to 1 on thick paper; Using a pattern and a long ruler, we draw an image of curved lines; we check the symmetry of the drawing; to do this, you can fold it in half and compare the identity of both halves on the pattern.
Assembly of the structure
When you have the materials and drawings, you need to start working. The first step will be cutting out the parts from plywood. For this, it is best to use a jigsaw. It is important to cut exactly to size, otherwise the design will not fit together.
Then the frames are glued to the rear side; these parts will be very heavy. If the watercraft requires a motor, then the rear side is strengthened.
The next step will be to attach the transom to the sides and bottom. The sheathing parts must be secured with glue.
After assembling the structure, you need to prepare aerosil and epoxy resin. These substances are mixed 1 to 1. The resulting substance is used to seal seams. Also for this purpose, inside the boat, the seams are sealed with strips of fiberglass.
Important: this type of work uses very toxic substances, so you need to work outside, or in a ventilated area, and using special protective equipment.
When the glue dries, you need to install the frames. Then you need to install seats, luggage compartments and other elements. After the vessel has dried, it is necessary to proceed to the final stage, which is sanding and sealing with fiberglass and epoxy mortar.
This is followed by the process of painting the structure, this will help further protect the vessel from the influence of water and give it a good appearance.
Painting consists of:
- Degreasing of all parts of the vessel;
- Treatment of wooden elements with impregnation;
- Surface putties. This will mask all defects;
- Primers. To do this, you can use boiled drying oil;
- Application of paints and varnishes. To do this, you can buy any paint, but special waterproof materials for plywood will help increase the service life of the boat;
Making a wooden boat
With the help of wooden materials and knowledge of the nuances of making a swimming device, you can get a good result. Let's consider the entire production process of such a device in order.
Required tools and materials
To make a boat with your own hands, you need to purchase:
- boards;
- polyurethane glue;
- nails;
- latex-based paints;
- silicone sealant;
- syringe for sealing seams;
- sandpaper;
- jigsaw;
- paracord;
- clamp;
- screwdriver;
- roulette;
- drill;
- brushes for applying paint.
After all the tools have been purchased, you should prepare some materials. The board is divided into parts, as a result of which the following are suitable for the future bottom and base of the hull:
- One section measuring 460x610 mm;
- The second section is 310x610 mm;
- The third section is 610x1680 mm.
The side parts are made from parts 310x2440 mm. For supports, you should take small bars of 25x50x2400 mm, a total of three supports will be required. To create the bow, it is recommended to use timber, the size of which is 25x76x2400 mm.
To make a boat hull you need to take two bars measuring 25x50x2400 mm. You can fasten them using paracord, after cutting them into several sections.
Manufacturing of parts
In order to make parts, you must adhere to certain rules:
- Use a disk saw to cut the boards into pieces.
- If the wood is less than 1 cm thick, you can cut it with a stationery knife.
- If the thickness of the board is from 2-6 cm, then the most correct solution would be to use a jigsaw.
- To avoid cracks in the material, it must be cut crosswise and weakening strips must be applied to the top layer of veneer.
You can fasten wooden parts using:
- wires;
- self-tapping screws
First you need to make a hole using a drill of the required size and then install a self-tapping screw
When gluing parts, pay attention to the description of the use of the adhesive base, what the drying time is and the operating rules:
- stripping;
- degreasing;
- surface treatment.
It is worth not forgetting about the location of the fibers on the two parts of the tree. If they are placed in parallel, the strength of the product will increase several times. Damaged parts should not be used; they are defective and will not be suitable for building the boat.
Boat assembly
After preparing the required parts, you can begin assembling the wooden boat with your own hands. For this action you will need:
- nails;
- pins.
To assemble a wooden boat yourself you need:
- Install the bottom and secure the left side.
- Fix the stern on the left side to the bottom.
- Set the right side to the bottom and stern.
- Secure the nasal area.
To fix the boat with nails, you need to assemble it using an adhesive base. Once you are satisfied with the appearance, you should secure the joints with nails.
After the frame of the boat is made, it should be painted and polished. The finished product should be polished from smaller roughnesses and uneven areas. For this process you need:
- sandpaper;
- Sander.
Using silicone sealant, seal all the cracks that appeared during assembly. In order to ensure that the boat dries evenly and completely, it should be left in the open air. After 24 hours you need to start coloring the product:
- The first layer must be applied externally.
- The second is inside.
After the paint has dried, you should paint the inside of the boat again.
SECRETS OF THE DOUGET BOAT
For many years, M-K has constantly paid attention to amateur shipbuilding: on the pages of the magazine there appear descriptions of the designs of motor boats, tourist sailboats, and original designs of windsurfers made by amateur designers. However, in our opinion, another type of small vessel has been undeservedly forgotten. We are talking about a dugout boat. Behind its apparent simplicity and “absurdity” are hidden both the rationality of the design and excellent driving performance. The absence of scarce materials and the minimum set of required tools make it possible to manufacture such a boat directly on the shore, far from populated areas, in hunting or fishing areas.
For many decades, the secrets of boat masters were passed on “by word of mouth,” from father to son, without drawings or calculations. And since a limited number of people were engaged in this trade, today it is very difficult to find a specialist who can competently, according to all the rules, make a real dugout. This is aggravated by the fact that now, in the era of modern materials and technologies, there are practically no masters of the younger generation, and the old ones, unfortunately, take their experience and skill with them: their art dies with them. That’s why we decided to introduce home-made people, M-K readers, to the process of making a dugout boat. Perhaps some of them will be interested in this topic. We hope that the traditions of folk crafts will be preserved and continue with their help, bringing benefits.
When describing the procedure for working on a boat, we proceed from the capabilities of a single craftsman, without the use of machine tools or any lifting mechanisms. However, in any case, both the manufacturing process and the boat itself will bring you real pleasure.
SELECTION OF MATERIAL AND BOAT SIZES
A dugout boat can be made from pine, cedar, larch, aspen or poplar.
In our area, preference is given to aspen and poplar, as their wood is durable and easy to process. The time of year for cutting down a tree does not matter much: it can be either winter or summer. It is important that this is done “to the full moon.” According to the experience of old craftsmen, if you cut down a tree “for the new month”, then the manufactured boat will be very difficult to build, and during operation it will quickly fail. This may seem like prejudice to some, but this advice has come to us from antiquity. A dugout boat can be made directly on the river bank.
In the photo is the oldest master boatmaker Yakov Evmenovich Solomennikov. The length of the boat is selected based on the required carrying capacity (usually about half a ton), the condition of the body of water where it will be used, and the availability of suitable size wood. The following dimensions are usually used: 4.5 m, 7 m and 9 m. The longer the boat, the more labor-intensive it is, naturally, to manufacture, but it runs better. The appropriate diameter of the trunk is selected as follows: clasp the tree with both hands, and if the fingers do not meet by 30...40 cm, this is what you need (circumference length is approximately 180...200 cm).
TOOLS
Necessary tools for work. Tesla: A - side left, B - straight.
To make a boat you will need the following tools: an ax; adze - straight and boom (made from an ax with subsequent hardening); plumb line; brace or drill with a drill Ø 10 mm; a two-handed plane (a regular one-handed one will also work, but it’s more difficult to work with); crosscut saw or chainsaw.
PREPARING THE BOTTOM OF THE BOAT
Having laid the felled trunk of the selected dimensions on two thick poles (this will make it more convenient to work alone), they begin to prepare the bottom of the future boat. To do this, inspect the workpiece along its length and find a section that is flat along its entire length, without visible dips or curvatures in the middle - this will be the bottom. The selected area is sanded with a width slightly larger than the width of the ax blade, and then a line is struck on the resulting strip using a plumb line and a cord. Now we carefully remove the layer of wood along the line, making sure that there are no humps or depressions.
Beginning of work. Breaking out the marking line.
Processing the bottom of the boat.
Definition of the midline.
Bottom marking.
Having turned the trunk over on the poles and secured it so that the bottom plane is horizontal, we determine the middle of the log. For this, a plumb line and a ruler are used. Having punched through the middle with a lace, we step back to the right and left from this line by about 40...45 mm (two fingers) and draw two more side lines.
BOW AND STERN PREPARATION
When starting to mark the bow and stern, you need to remember that the butt of the workpiece will be the bow of the boat, and the top will be the stern, that is, the bow should be larger in size than the stern. This factor is associated with operating features, for example, with outboard motors.
After completing all of the above, from the bow and stern, along a plumb line, we beat off lines that are, as it were, a continuation of the middle and lateral lines of the bottom.
Stepping back from the bottom edge of the log by 120...150 mm, we draw the lower edges of the bow and stern perpendicular to the vertical lines. Marking the ends of the workpiece. Determining the length of the bow and stern of the boat. Selecting reference points.
Processing of the extremities: A - formation of the cheeks, B - processing of the stem.
Now we need to determine the lengths of the bow and stern. When making a boat of recommended dimensions, they are approximately 500...600 mm and 400...500 mm, respectively. In general, they depend on the diameter of the trunk and can change in one direction or another. But for any value, the length of the bow should be 100...120 mm greater than the length of the stern. In order not to subsequently “lose” the necessary points (the intersections of the lower edge lines with vertical markings at the ends and the side lines of horizontal markings with limiters for the length of the stern and bow), highlight them with a bright pencil or charcoal.
The cutting of the bow and stern is done with an ax.
Here it is important not to rush and not to cut beyond the marked points. The slope of the cheeks should not be too steep and not too gentle. Any other recommendations are hardly appropriate: you just need to feel the tree and, when choosing sizes, rely first on intuition, and then on experience. So, with a sharply sharpened ax we give the cheek the shape shown in the figure. We process the workpiece on the other side in the same way. Then we connect the reference points and remove the excess so that we get a narrow inclined surface. Applying markings to the workpiece for installing guards.
Processing the ends of the boat blank.
Having processed both ends in the described way and without turning the workpiece over, sand it over the entire visible surface. From the outermost horizontal marking lines, we remove the wood with tapes so that the cross-section of the trunk takes on an egg-shaped shape. Usually this requires going through 4-5 tapes. Of course, we must not forget about the symmetry of the sides, and also avoid visible dips and bulges. The exit of the tape to the bow and stern should be smooth. This work is not difficult, but it requires accuracy and should not be rushed. Finally, turn the workpiece over and finally sand it.
PREPARATION FOR CHAULING
Having installed the workpiece on the keel, using a plumb line we check the verticality of the lines at the ends. Then, looking from the ends, stepping back from the extreme vertical lines to the right and left by 20 mm, we beat off two horizontal lines along the length of the trunk. Using a string, measure the length of the arc along the sides and bottom of the boat. Now, dividing the resulting value by four (folding the lace in four), set it aside from the end of the nose bevel and make a mark. We measure the same distance, but reduced by 20...25 mm, from the bevel at the stern and also make a mark. We perform these operations on both sides (along the sides) of the workpiece.
We connect the resulting marks, as shown in the figure, and use an ax to select the part of the workpiece highlighted by hatching. To speed up the work, you can use a chainsaw or a two-handed crosscut saw, making preliminary cuts.
Bottom treatment.
We cut the space between the points marked with the letters A and B with an ax in the form of a gutter, and towards the stern and bow the slope of the gutter walls increases from 90° to 120°.
Now you need to gradually “finish” the shape of the gutter booms, the tan kan and the shape of the bottom. In addition, in the stern and bow it is necessary to narrow the upper part by 30...40 mm on both sides. From the points marked with the letters B, D, D, E, we beat off lines to the ends of the bow and stern and remove the excess with an ax. This concludes the preparation for chiseling.
GOLDING
To perform this work you will need a straight and side adze, an ax, a stick for cleaning wood chips, and a two-handed plane.
We start by taking out the bow and stern with a straight adze, and then cut out the entire “gate” as far as the tool allows us to “take”. Be careful not to cut the edges of the sides!
Having turned the workpiece over, we use a plane to cut through its entire surface. In this case, we leave the plane of the bottom as it is, without rounding the edges. It is more convenient for two people to plan with a two-handed plane: the craftsmen sit face to face and gradually move from bow to stern.
Chiseling.
The gatehouses are clearly visible. Every 250...300 mm perpendicular to the longitudinal axis of the boat from one side to the other, we draw marking lines, and then, stepping back from the edge of the bottom area by 30...40 mm, we drill holes along these lines about 10...12 mm to a depth of 40...50 mm. Hole pitch 100…120 mm. Drilling is carried out along all lines, including on the cheeks of the bow and stern.
Based on the number of holes obtained, we prepare gatehouses - rods from cedar round timber. With their help, when chiseling, the thickness of the walls of the boat is determined. Before driving the rods into the holes, their ends are blackened with charred logs - the tan will be better visible. The average length of the guard is 17...18 mm; at the bow and stern it can be increased by 15 mm.
Preparing for chiselling. Marking: A - marking lines;
B - determination of arc length; B - determining the location of marking points; G - marking marking lines. Having “set” the thickness of the walls, the boat can be turned over and finally hollowed out along the gatehouses, tilting the workpiece to one side or the other for convenience.
A spacer placed in the middle can make the work easier. But it should not be very large - otherwise the edges may chip. And one more thing: along the entire length of the boat in the middle it is necessary to leave a thickening called a “melon”. Its dimensions can vary from 70...80 mm at the bow and stern to 50...70 mm amidships. The width of the “melon” is approximately 70...90 mm. A workpiece prepared for chiselling. Side view.
Chiseling the gutter.
Marking marking lines on the body. Drilling holes for guards
Making gatehouses.
All the work described usually takes the master 2.5...3 days of work. After the boat has been hollowed out and cleared of wood chips, you can proceed to the wiring. If it is not possible to start this procedure in the next day or two, then the workpiece must be lowered into water for storage. In general, an undiluted boat can be stored for one to two months.
BREEDING BOAT
First, a few recommendations.
Since the breeding process involves heating over the entire surface on an open fire, all fire safety rules must first be followed. It is also advisable to wait for calm weather or to specifically choose a suitable place.
It’s easier to work together, clearly assigning roles, since the wiring itself will only take an hour and a half, and everyone’s actions should be quite clear and quick.
Section of the hull of a boat prepared for breeding.
We prepare raw spacers from bird cherry or other flexible wood ahead of time. Their task, being installed inside the boat, is to apply even pressure on the heated side.
During operation, due to uneven heating, burning of the sides or bottom is possible. These places are clearly visible, and in this case they are moistened with a damp cloth. Therefore, ensure that you have a couple of buckets of water and a rag on hand at the right time.
The tank, like a boat, is located on two points of support; when heated, the bottom may sag or the stern and bow may hang down. This defect will dramatically reduce driving performance. This can be prevented by correctly positioning the boat on the poles and not bending the workpiece excessively.
Now let's make a fire and spread it along the entire length of the boat.
Above the fire, at a height of 0.8...1 m, we fix two strong, damp birch poles and place the workpiece on them, bottom down. The boat is ready for deployment.
Having achieved a uniform flame, warm up the bottom. It will reach “standard” when bubbles of moisture appear next to the “melon” and the sides begin to diverge. Having inserted the spacers, we tilt the boat on one side over the heat, making sure, however, that the bottom does not cool down. If at some point it turns out that the side “does not go”, then it is necessary to remove a strip of wood 5...7 mm thick from the middle of the boat to the bow and the norm - this will eliminate the tension and the process will continue. In principle, using this technology, the barrel can be deployed even in a leaf. The other side is processed in the same way. You just need to remember about symmetry. The spread of the sides will show how well you have processed the hull. If there are unevennesses in the thickness of the boat, then during breeding, bumps or holes will appear in such places that cannot be eliminated. If the bottom was planed too roughly, this will be noticeable later. There are no trifles here. The stresses arising in the material during wiring are very significant, so any removal of wood from the side must be done very carefully: one wrong movement and chipping will occur. All the work will have to be done first.
The moment of completion of the wiring and the symmetry of the boat are determined by eye - this is where the skill lies. Each boat has its own distinct personality.
After heat treatment, without removing the spacers, the boat is moved away from the fire and kept until the material hardens without changing its adopted shape.
REFINING AND FINAL FINISHING OF THE BOAT
Refinement includes the manufacture and installation of frames (we call them “irons”) and plating the sides (this operation is called “lining” the boat). Irons are made from uprooted stumps. You can also use fallen trees left after the spring flood. Frames are obtained by splitting a stump with roots and extracting the required part from it. The strength and reliability of such parts is amazing.
In the places where the irons are installed, the “melon” is cut a little and a groove is selected. For the moaning of water from below, cuts are provided on the frames.
The total number of transverse parts depends on the length of the boat and usually ranges from 5 to 9 pieces. Of course, you can also use frames assembled from parts. And not only wooden ones, but also metal ones. Their technology is described in detail in the literature on amateur shipbuilding.
The irons are fixed in the body with nails: one or two along the upper edge on each side.
The boat's stems are reinforced with overlays made from birch bars, which are nailed with four nails each.
To cover the boat, it is necessary to prepare material in advance.
As a rule, these are wide dry cedar boards 20 mm thick and 8...9 meters long. Replacement is also possible - for example, pine, larch, spruce or fir. However, it is difficult to select long-length boards without knots from them, and in addition, when bent, they are more prone to chipping. Processing (planing) cedar boards is also easier. Manufacturing of frames and irons. Installation of overlays on stems. Zhom.
Cross-section of a split and sheathed dugout boat.
Now you need to make three presses, or clamps. The boards are planed on both sides to a thickness of 12…15 mm. Having slightly wetted the board (putting it in water for 5...10 minutes), it is fixed in the midsection area with the help of a press, and then pulled to the extremities. It is necessary that in the central part the board overlaps the side by 80...100 mm - this is necessary for driving nails (preferably copper), as well as for caulking and filling the joint.
Drive the nails from the center to the edges, also moving the clamp. The edges of the board are rounded at the top of the board and trimmed into a wedge at the bottom. At the bow and stern, the board is cut evenly and rounded. Tan is also sheathed on the other side.
When performing work, make sure that the thickness of the board is not less than 10 mm (otherwise it may break).
Now, having turned the boat over and laid it on two blocks, we begin to caulk the grooves between the skin and the side with tow or cotton wool. After this, the grooves are filled with molten pitch or tar.
All that remains is to cover the inside of the boat hull with hot drying oil and then paint it with oil paint. This operation allows, as we joke, to walk along the river in felt boots.
If properly organized, the entire work of making a dugout takes about five days. The last boat we built has been in service for more than five years. By the way, about operation. When not in use, the boat should be on the shore with its bottom facing up. Over time, the guards sometimes fall out, especially during transportation, so it is necessary to make new ones with a slightly larger diameter. Usually, after lying on the shore for a long time, a leak occurs, but after 20 minutes the boat is ready for sailing.
Cracks caused by impacts are sealed with tin with a rubber gasket on nails.
A few more words about using a dugout with an outboard motor. It is best installed on boats at least 6 meters long. When planning to install a motor, the stern should be made a little higher than usual, as well as steeper. The motor suspension is mounted on a special removable bracket, preferably metal, welded. It is secured with bolts with rubber gaskets. It should be noted here that although the propulsion of a dugout boat under a motor is better than that of a plank boat, its maneuverability in narrow spaces is somewhat worse. Engine maintenance afloat is also more difficult.
We have described a simple and reliable technology for making a dugout, proven over many decades. We wish good luck to everyone who wants to use it and make such a boat with their own hands.
Y. SOLOMENIKOV, I. SOLOMENIKOV, Krasnoyarsk region
We recommend reading
- INTO THE SKY ON ENERGYSERS Electric airplanes enjoy steady popularity among aircraft modellers, but sometimes this popularity is of some theoretical nature. The point, apparently, is that many people consider manufacturing...
- CHRYSLER 300D Walter Chrysler, who connected his life with the automobile industry and held numerous positions in famous American companies, nevertheless dreamed of creating his own car. By using…
Specifics of creating a wooden ship
To make a boat from this material, the following operating points must be taken into account:
The ability to work with wood and wooden elements is the main feature that must be taken into account before starting to manufacture a vessel. A person must understand which lumber is best to choose to create a boat. It is recommended to study various reference books and instructions before starting work so that the final result is free from defects. It is necessary to find suitable drawings and diagrams of a wooden boat. You can make these documents with your own hands, since there are many specialized computer programs for these purposes.
It is important to know: you will need not only wood, but also other building materials with which the structure of the boat can be secured and protected from water penetration. Specialists can make a wooden boat in 10 working days
It is necessary to consider how much free time will be available to carry out this work. In addition, you need to find a free place where the floating device will subsequently be assembled. Before starting work, you should purchase the required tools and materials, a list of which will be presented below.
These are the key features to pay attention to, but other specific issues may arise as you work. To have a visual idea of the design, below is a drawing of a wooden boat
Choosing wood for a boat
First of all, in order to make a boat, you need to choose the right material. The boards that will be used to make the boards must be of very good quality.
The best option would be boards made of coniferous wood. For example, pine or spruce, or even better, larch. The resin contained in coniferous species makes the wood more resistant to moisture. Which is very important for a boat.
The boards for the side should not be too wide. The maximum width of the boards should be 2.5 cm. No thicker.
The boards must be absolutely flat and well dried. The boards should not have cracks, knots or other, even minimal, defects.
Before starting work, it is necessary to treat with an antiseptic all parts of the boards that, after assembly, will be inaccessible for processing.
What types of boats are there?
Although our article is about boats made of wood, first we will briefly tell you what other types they are. After this, we will move directly to a description of the manufacturing process of the described watercraft.
- Inflatable boats are also called woven boats. They are made from rubber or polymer compounds. They are relatively inexpensive and do not take up much space when deflated. They are also lightweight and easy to transport even for those who do not have their own transport. However, at the same time, they are not very stable on the water. And also not very reliable. Not only are rubber boats easily damaged and can crack in the cold. So they can also do this at the most inopportune moment. For example, when you are in it in the middle of a river or lake.
- Plastic boats are characterized by great durability with proper use. In addition, this type of swimming device has a wide variety of colors and appearance.
- Metal boats are even more durable. They are made of light metal - duralumin. This metal is also used in aircraft construction and even astronautics, so it makes no sense to further describe its strength and wear resistance.
- Plywood boats have good moisture resistance and are quite durable. They are also able to withstand heavy loads. However, plywood is very difficult to bend without damaging it. Therefore, boats made from the described material most often have angular shapes.
- Wooden boats have stood the test of time. After all, boats and ships have been made from wood since BC. They, of course, are not as durable as metal ones, but with proper care, a wooden boat will last you quite a long time.
DIY wooden boat
For many centuries, people have used wood as a means of transportation on the water surface. At first these were simple structures in the form of small platforms, later a boat appeared, the production of which took a long time.
After all, it must be of high quality for the safe transportation of cargo. Nowadays, if desired, anyone can reproduce the remedy at home.
A simple step-by-step plan will teach you how to make a wooden boat. It is necessary to prepare in advance long, wide boards that will serve as the sides of the shuttle. They must be dry, smooth, and free of cracks.
After preparing the base material, it needs to be processed for easy fastening. The edges of the boards must be cut evenly so that when assembled, the boards touch each other tightly. Next, we begin to make a vehicle. You need to start from the bow. We cut out an additional board that will hold the sides in the middle.
We cut out the desired shape from a sheet of iron and, thanks to densely driven nails, fasten it to a wooden base. The boat is almost ready. All that remains is to attach the iron chain, which will serve as the basis for the anchor.
After once again checking the drawings for correctness, they are transferred to cardboard. Thick and rigid paper will make it easier to transfer the drawings to the workpieces. The drawing is transferred to the workpiece, taking into account all the contours and contours exactly as it was drawn, without all kinds of overlaps, reductions and increases in size.
When copying designs, take into account the direction of the wood grain. In this case, it all depends on the design of the boat elements. If the element is made of plywood, then the layers of plywood themselves are arranged in such a way that the fibers of each subsequent layer are perpendicular to the previous layer.
As for making futoxas, they can be made larger in height, since they can then be trimmed.
How to choose wood?
The first thing you need to pay attention to and what 80% of the result depends on is choosing the right wood. Before learning the basics of legal proceedings, you need to learn as much as possible about the wood that is suitable for making wooden boats
Not only the type of wood will be of great importance, but also even the part of the trunk that you will use for construction.
The end section shows that any wood is heterogeneous. A tree trunk consists of three parts: pith, core and sapwood. The core is the strongest part of the trunk, which has good natural protection against decay. This is what is used in the construction of the boat.
In addition, before building a boat, you need to dry all the lumber so that the connection of the parts is not disturbed. Lumber should have a moisture content of no more than 15-18%! After assembly, it is necessary to saturate the finished boat with moisture-protecting agents so that the boat does not warp over time.
Larch is considered the best tree for building boats, but other coniferous trees, such as pine or spruce, are also suitable. The main requirement when choosing lumber is the absence of knots.
How are homemade plywood boats made?
It is quite possible to create a small, stable, capable of lifting 2-3 people on board and at the same time a light vessel, capable of sailing both with the help of oars, a motor or a sail, without special training, since boats of this class can be created even by beginners . And it is precisely for such homemade products, which use the simplest tools and have limited funds, that the most affordable material is plywood.
Durable and at the same time easy to process with both electric and hand tools, plywood is very widely used not only in the construction of small vessels, but also quite respectable sea yachts.
At the same time, for a small vessel, plywood is the best way to realize the possibility of installing a boat motor capable of developing quite decent speeds.
Tools and materials
Oddly enough, for self-building a boat, the most necessary condition is a properly selected room in which you can freely place the boat, while a prerequisite is the presence of ventilation and, when working in the cold season, heating that can maintain a comfortable temperature for work and prevent temperature changes air.
When making drawings you will need:
- drawing supplies:
- pencils;
- elastic bands;
- patterns;
- long metal rulers and large triangles;
- line;
- cardboard and drawing paper;
- paper glue;
- calculator;
During the construction process you will need:
- electric jigsaw;
- hammer;
- axe;
- clamps (and most likely a lot - at least 10 pieces);
- brushes, metal spatula, rubber spatulas;
- screwdriver;
- hand planes or electric planes;
- screwdrivers;
- chisels;
- stapler;
- hand saws and electric circular saw;
The following materials are recommended for manufacturing:
- plywood of standard sizes 1.5m * 1.5m;
- boards – pine, oak:
- fabric for covering the body;
- putty for sealing cracks and joints of sheets;
- special waterproof glue;
- natural drying oil or water-repellent impregnation for wood;
- oil paint (if the owner is an adherent of the traditional method of painting the hull) or special enamel for ship hulls;
- nails, screws, self-tapping screws;
- metal strip, metal for oarlocks and fastenings;
Parameters of the future boat
The optimal parameters for a boat made of plywood with a thickness of 4-5 mm are:
- the total length of the hull from bow to transom is 4.5 meters;
- width at the top at the widest point of the body – 1.05 meters;
- The depth of the boat is 0.4 meters.
What is the boat made of?
The main element of the boat frame is the keel - the base on which all other parts of the hull are attached.
The bow of the boat, formed by the stem, is attached on one side, and in the stern there is a sternpost. These are the elements responsible for the longitudinal rigidity of the structure. They can be either solid wood or composite - glued together in separate parts, and secured with nails or screws.
Hull bends and transverse shapes are formed thanks to frames - transverse elements of the hull, giving it additional rigidity. The boards on top of the stem and the sternpost, connected to the frames on both sides, form the sides.
The frame thus obtained is sheathed on top with plywood.
A flooring is made inside the boat - a slant, which acts as a lower deck so as not to stand on the bottom of the boat.
Plywood boats for motors
Boats for using a motor are not fundamentally different from those designed for oars or sails. The main difference here is that the stern is modified to mount the engine - they have a transom board or transom made of multi-layer plywood that can withstand the engine mount.
Some more modern boats may also have other elements of small vessels of this class - a cockpit, deck stringers, side stringers. To ensure buoyancy, such boats are provided with sealed niches filled with foam that can keep the boat on the surface in the event of capsizing.
Komya - catamarans of North-West Russia
During one of the expeditions dedicated to the study of traditional wooden watercraft of the West and North of Russia, on the territory of the modern Andreapolsky district of the Tver region (formerly the Pskov and Novgorod lands), we managed to stumble upon unique dugout single-tree catamarans. These ships have existed unchanged, probably since the times of Ancient Rus', and are still used by the local population of villages remote from civilization. We are talking about twin boats made from a pair of roughly hollowed out aspen trunks, connected to each other using two metal ties on nuts and called “komya” by the local population. In the language of modern boatmen, this design is called a catamaran.
Lumps living out their days in the upper reaches of the Toropa River As it turned out later, these dugouts were in use for a long time among the population of the Pskov1, Tver and Novgorod provinces, and similar boats were used by completely remote peoples.
Active clods on Lake Zhelno, Andreapolsky district, Tver region
At present, the production of lumps has most likely ceased, but those that still exist are still exploited by the population. All the boats presented in the photographs in this article were found by us along the rivers Toropa, Volkota, Khlustovka, as well as on the shores of lakes Okhvat, Gorodno, Luchanskoye and Mishutinskoye in the Andreapol region of the Tver region and on some other bodies of water in the modern Pskov and Novgorod regions during trips, undertaken in 2005–2008.
Looking for traces of ancient boats
Traditional wooden shipbuilding in our country has a long history. Since ancient times, people have settled near water, and the network of reservoirs in Russia is unique. He began to use bodies of water as transport routes and move along them quite early. Probably the first “meaningful” wooden craft was a log, and later a raft. Later, with the development of manual skills and the advent of tools, dugout boats, also known as “one-tree boats,” began to be used, since they were made from the trunk of a single tree. In some areas, unstable one-tree canoes were placed side by side, connected, and the result was “twins”, “troughs”, clods...
Active lumps on the river. Torope and standard inflatable “Ufimka”. Compare dimensions
The evolution of wooden shipbuilding is approximately as follows: dugout-deck (single) -> “divorced” -> dugout with ribs -> boat with a dugout bottom and stacked sides and, finally, a fully stacked structure. Thus, the discovery of working dugout boats, manufactured using traditional centuries-old technology, and even in pairs, cannot leave indifferent anyone who is even slightly interested in history in general and wooden shipbuilding and traditional crafts in particular.
Walking on clods
What kind of miracle?
Structurally, komyats are a primitive dugout catamaran, made from the trunk of one single tree or from two trees of the same diameter. The dugout bodies are secured next to each other using metal “rods” on nuts and a longitudinally oriented “stitching” board. Lumps were made from one log of soft, fine-grained wood, such as aspen, poplar, linden, by chiseling or burning, or even by both methods. The most common material for manufacturing is aspen.
Active lumps on one of the channels between lakes in the Toropa River system
Metal rods and nuts were made in local forges. The peculiarity of the lumps is the slight spread of the hulls (short distance between them), which makes the boat narrow and unstable (unstable), but allows it to easily move along narrow overgrown channels between lakes, which are so numerous in the regions where these catamarans are found. They ruled the clods while standing using a pole. Sometimes the kit might include a short wooden oar or wooden paddles. In this case, the pole was used as a propulsion device, and the oar and strokes were used for steering on the spot, say, when fishing. IN AND. Dahl also describes an option when the lumps were ruled using a two-blade oar: “... a rower, with a two-blade oar, sits astride, on a stitch...”, however, this option was clearly less common.
Two aspen logs hollowed out with an adze, a “stitching” board and two metal ties - the design features of the clods
Features of the distribution area.
The uniqueness of the territory where active dugout one-tree clods were found lies in the fact that this is the Great Watershed of the Russian Plain - the Valdai Upland, where three large rivers begin: the Volga, the Western Dvina and the Dnieper. Each of them carries its waters to different sea basins: the Volga - to the Caspian Sea, the Western Dvina - to the Baltic, and the Dnieper - to the Black Sea. More than 1,500 rivers on the Valdai Upland belong only to the territory of the current Tver region, and the number of lakes here exceeds 4,500. Rivers and lakes have long served as waterways along which the development of forested, sparsely populated lands took place.
All kinds of nationalities have passed through the territory of the Great Divide since the 10th millennium BC, from the time when the watershed turned into one of the most important inland water hubs of the continent, and its active development by man began. It is noteworthy that Seliger is also located on this territory - the largest system of lakes and channels, lying at the crossroads of waterways connecting five seas: the Caspian, Azov, Black, Baltic (via the Volga, Western Dvina, Dnieper, Lovat) and White (via a tributary of the Volga Sheksna - Lake Kuban - Sukhona River). Naturally, people began to move along these routes very early, exchanging goods. A special feature of the Great Divide territory is the abundance of lakes connected to each other by narrow channels. For example, the same Toropa in the upper reaches consists of lakes connected by channels, and the great Lake Seliger is also nothing more than a chain of lakes and channels, called “rivers” by the local population.
One of the small lakes in the Toropa River system. A typical water area for traveling on clods.
Channels tend to become overgrown by mid-summer, and some small lakes and rivers become so overgrown that it is impossible to get through them on anything other than a heavy dugout with great inertia. Thus, wooden dugout catamarans were an ideal means of transportation near the house - for setting nets and mesh, fishing, hunting trips, as well as picking mushrooms and berries, and just visiting.
From a survey of old-timers of villages along Lake Okhvat (Seliger system) and local historians, we learned that lumps were also popular among professional timber rafters who lived along the banks of the Volkota River - the main rafting route to the Western Dvina (and along it to the Baltic states). It is not known whether the raftsmen used lumps for their professional needs, but they definitely had them on the farm.
When did the lumps appear?
It is difficult to determine how old the tradition of building dugout boats is in North-West Russia. The only thing that is absolutely certain is that “...single trees, expanded as a result of heat treatment […], have been known in the Northern European region since the first centuries of our era. Ships built on a single-wood base did not undergo significant changes during the Middle Ages and have survived almost in the same form to this day.” This statement belongs to Pyotr Egorovich Sorokin, a historian of ancient Russian shipbuilding and underwater archaeologist (Sorokin P.E., 1997, pp. 92, 94).
What's in your name?
The amazingness of the paired dugouts, or “twins,” found on the rivers and lakes of modern Tver, Pskov and Novgorod regions, also lies in the fact that their names used in different areas vary extremely greatly. Thus, in the “Explanatory Dictionary of the Living Great Russian Language” by Vladimir Ivanovich Dahl there is a dictionary entry explaining that in the Pskov province a boat, which is “... two clumsily hollowed out troughs […] in the form of canoes […] logs, held together side by side […] called […] kamyi (pl.) or kameika.” He also gives other options for the name of this boat: “Komyagi, kamya, komya2, a pair of komyagi - a bunch, Volga - troughs.” Brockhaus and Efron, describing “dugouts”, indicate that “... in addition to […] single boats, there are also double, or twins, when two dugouts are rallied together (side by side) […]; local names for such single-trees: kama, kameika (Pskov), komyagi (eastern provinces), korytki (on the Volga), slats (Novgorod province), etc.” There are also other names for these watercraft in the literature, such as “komya”, “komye”, “komli”. Such a variety of names for the same object speaks of the multinationality of the small, by Russian scale, territory in which the described boats are found, as well as the mixing of languages of a large number of nationalities that replaced and complemented each other over many generations.
Thus, Brockhaus and Efron, describing the territory of the contemporary Pskov province, Fr. And the great Russian ethnographer Vladimir Ivanovich Dal, characterizing the speech of the population of the same places, pointed out that “... in addition to Russian […] there is a pronunciation with signs of the Lithuanian language […] and Belarusian pronunciation (Toropetsk district), […] the speech of the Ilmen Slavs is heard, […] as well as the speech of the peoples of the Finnish tribe, and […] there live the so-called half-believers who speak Estonian, […] as well as quite a few Latvians...”
Local fisherman on clods.
From the population living in settlements located 20-70 km from modern Andreapol, I was able to hear the following options for naming dugout catamarans: “komya”, “komye”, “komli”. Where the name came from and which of them was the original one is extremely difficult to say. All three of the above options, as well as “komyags” from lands located east of modern Andreapol, can go back to the word “komel”, that is, the base of a tree, from which they were, in fact, made. The statement is nice, but controversial, since in the vocabulary of the indigenous inhabitants of villages located in the upper reaches of the Toropa, a dialect has been preserved to this day that is very different from the “traditional” Russian language, so “komel” may have nothing to do with it. For example, the Pritoropetsk old-timers still call a turkey “kuran”, an ant – “sikaha”, a butterfly – “myaklish”, and trout – “salmon”... V.I. Dahl, interpreting the terms “kamya” and “komyaga”, went back to the Tatar “keme”, meaning boat; but a similar word denoting a single-hull dugout is found among some Siberian peoples. With regard to the variants “komlyaga” and “komy”, Vladimir Ivanovich assumed that the Pskov “komlyaga” or “komel” was fundamental, meaning the butt, that is, the base of the tree. Well, Max Vasmer, who also mentions in his etymological dictionary the term “komey” - “single-tree boat” (Pskov) believed that it goes back rather to “komyaga” than to the Turkic “keme” (boat).
Logs to the mooring for clods on Lake Zhelno (Toropa River system, March 2006).
As for the names of single-hull dugouts made in ancient times on the territory of modern Pskov, Novgorod, Tver, and Smolensk regions, they are even more diverse. From Brockhaus and Efron we read: “(there are) […] various kinds of boats made from thick tree trunks, sawn in half and hollowed out along the axis inside... They are called differently, depending on the area: busa on the Dnieper, […] dolbanets (Pskov province ), tree (Smolensk province), dubas (Vologda, Tver, Voronezh), […] kamya, komey (Pskov).” At V.I. Dalia - “dolbushka boat, baht, botnik, one-tree, gas chamber.” By the way, the term “gas chamber” was also used in relation to paired lumps, which is the subject of this article. It was used before, and is still found in some places...
Gas chamber boats
How and by whom were the lumps made?
Most likely, in ancient times, when there was no professional division, and everyone made fishing, hunting and household utensils for themselves, watercraft were also produced independently. However, it is reliably known that in the 19th and early 20th centuries there already existed a folk craft of producing canoes and other boats, which were carried out by families. In the book “Handicrafts of the Pskov Province” (Pskov, 1914) we read: “... for a number of villages in the Toropetsk and Kholm districts there was an original craft - the production of dugout single-wood double shuttles (clumps) ...". “The organization of labor is family-based, without hired workers. There is no division of labor. The working day is 9-10 hours, from 8 am to 6 pm. In addition to the usual woodworking crafts - with an axe, handicraftsmen also use a scraper (40-60 kopecks) and an adze (60 - 1 rub. 50 kopecks). The material for fishing is aspen.” And also, in the same place: “Production of boats in two villages of the Posadnikovsky volost of the Novorzhevsky district and in two villages of the Zhadrinsky volost of the Opochetsky district, one yard each, and both yards work exclusively for customers. They fish in the spring for about 2 ½ months. Tools for building boats are used exclusively by carpenters... A complete set of tools costs 10 rubles. Boats are produced in different sizes.” Further: “...the production of shuttles is scattered across different villages in the south-eastern part of the province in the districts of Velikolutsky, Kholmsokoy and Toropetsk. This fishery has existed for a long time. The reasons that brought this fishery to life were, on the one hand, the availability of natural materials, and on the other, proximity to lakes and rivers, which determined constant sales. Over time […] the sales market has constantly expanded.
The fishing is carried out exclusively by men. They are usually busy all year round, with the exception of 4 summer months. But although the fishing period is long, there are significant interruptions in work, explained by the difficulty of acquiring suitable materials. For canoes, thick (10 to 18 inches) aspen is required. Aspen is purchased for value in state-owned or privately owned forests from resellers at a price of 2 to 3 rubles per tree. 1-2 boats come out of one tree.”
Traders engaged in the production of lumps (komyag) and other rough dugout products (troughs) were called komyazhniki (found in V.I. Dahl).
It is also known that residents of remote villages and farmsteads sometimes stole material for boats directly in the forest and cut clods there on the spot. Such boats were operated locally and were not attached to housing.
"Slipway" in the forest. On one of the channels we found a place where the next lumps had once begun to build. The local shipbuilder used an aspen trunk felled by beavers as a raw material. A fragment of the required length was cut out of the trunk, and the workpiece began to be given a typical shape. Why the process was not completed is a mystery...
There were two types of lumps (and single-hulled shuttles too): “unfolded” and not. Unexpanded shuttles are the most primitive version of dugouts - to make them, it was only necessary to hollow out the workpiece from the inside to the required wall thickness. Considering the shortage of gigantic-thick aspens, the width of the hull left much to be desired. In order for the dugout to become wider, it was necessary to unfold it, or rather, to steam it. There were several technologies for this - from the primitive pouring boiling water over a hollowed-out workpiece, followed by expansion with “elastics” made of pine branches, to the complex technology of steaming over boiling resin and over an open fire. In the latter case, the best effect was achieved, but only when the wet wood had already begun to char. The canoe blank with the wood selected from the inside was heated (steamed) over a fire until charred and thus “diluted.” The “unfolded” body of the “dugout” was strengthened from the inside with wooden elastic spacers, usually made from pine or spruce branches. It was not possible to find out exactly what technology was used to unroll the Andreapol lumps, but there were definitely unrolled specimens3.
For chiselling the shuttles, adzes were used - a kind of “transverse” axes with a scoop-shaped profile. We worked with an adze “for ourselves,” gradually removing excess wood. The main problem in the manufacture of all dugout boats, regardless of their origin, is the need to control the wall thickness of the product.
Carpenter's tool for making lumps. In the center there is 2 Tesla. From the collection of the Andreapol Museum of Local Lore
In order to achieve the same bead thickness, throughout Eurasia there were only two “technological” methods - using wedges and using an awl. The first method is more accurate, but also complicated. To implement it, holes were drilled in the bottom and sides of the hewn blank of the future canoe into which guards4 were driven, usually made of wood of a color different from the color of the canoe material. Often these were spruce knots, and in Siberia - alders. In some cases, the ends of the gatehouses were blackened. The guards were hammered to the required depth, corresponding to the desired thickness of the side or bottom of the boat. Subsequently, all excess wood from the inside of the workpiece was hewn out with an adze. The second method was to control the thickness of the bead using an awl (“awl”), which pierced the wood from the outside to the inside. The method is simpler, but less reliable; applicable only on wet logs. The lumps of the Andreapol region that we examined do not have gatehouses, and, therefore, they were made either using the “second” technology, or even simpler - “by eye.”
Metal ties on homemade nuts
Unskilled repair of leaky lumps
Rods - metal rods of considerable thickness, most similar to modern crowbar, were forged by local blacksmiths in forges. To make a pair of lumps of rods, two were required. Threads were cut at their ends, horizontal holes for rods were drilled in the bow and stern areas of the hulls of the future boat, after which the hulls were installed “next to each other” and secured with homemade nuts; often rough and square. A longitudinal stitching board was installed over the junction of the hulls, on which one was supposed to sit while fishing, or even while rowing. There was no steering wheel. Some boats had a loading platform installed, such as on the clods from the village of Kurovo, presented in the Andreapol Local History Museum. The option with a cargo platform is more rare than without it.
Cargo lumps with platform. From the collection of the Andreapol Museum of Local Lore
Near the village of Moscow, Andreapolsky district, we came across another interesting version of a double-hull dugout, intermediate between traditional lumps and single-hull boats. The remains of the boat rotting in the water were clearly assembled from two dugouts cut longitudinally along the “keel”, that is, the boat consisted of two halves - right and left, connected to each other by metal brackets, where previously, most likely, there had been sewing with a tree root. Whether this boat was converted lumps or was originally built from two halves, it was not possible to find out due to the fact that no one ...
A fragment of a single-hull dugout, composed of two literally sewn between pre-hollowed aspen logs “unfolded” over the fire. We found the boat near the village of Moscow (Andreapolsky district). The longitudinal seam made from the pine root is clearly visible; part of the seam is repaired with aluminum wire. Some of the lumps had the same bodies
Currently, the trade of making dugout boats is being lost. In the Andreapol region, one of the places where lumps were traditionally made from century to century was the village of Kurovo. It is difficult to say whether the masters have survived there today. According to the information we received during our trips “for lumps”, none of them were left alive... Traditional fishing for producing lumps also existed in villages located along the Volkota River, the main feeding river of Lake Okhvat. The rafters who lived there made a living by rafting timber along the Volkota to Okhvat and from there to the Western Dvina5. It is not possible to say for what exact purposes the lumps were made by the residents of these villages - for rafting or for fishing and some “local” purposes, since at present all these villages are destroyed. A similar fishery once existed in Toropats, a village located at the source of the Toropa. It is interesting that during the heyday of the Cold War, when the Andreapol lands were considered exclusively strategic6, the indigenous villagers got into the habit of making such “variations on the theme” - lumps from aluminum aircraft fuel tanks.
Aluminum lumps - “variation on a theme”
One of these crafts, photographed on Lake Okhvat near the village of Bobrovets, can be seen in the photograph: the aluminum lumps even have a transom; and nearby, the flooded traditional butts are rotting...
Rotting lumps near the village of Bobrovets
How long will it take before “non-museum” specimens of clods completely disappear from the rivers and lakes of North-West Russia? It is difficult to say, but it is approximately possible: within 10-15 years. The fact is that the average lifespan of all types of dugout boats made from hardwood is about 10 years +/- 5 years, depending on the careful operation and storage method. The active lumps we found on Lake Zhelno date back to a maximum of 80 years of the 20th century, and they are not particularly well preserved.
Rotting clods are all that remains
All the rest are either older or more destroyed. According to locals, many lumps were burned for firewood by fishermen and hunters7. Meanwhile, even in museums with lumps it’s a little tight. The Andreapol Local History Museum, solely thanks to its leader Valery Linkevich, was lucky, one might say: he managed to get a wonderful specimen of cargo lumps from the village of Kurovo. But the larger one in Torzhok was not “lucky”: the clods were ordered to one of the surviving craftsmen, but he got drunk and never made it... Thus, after a decade and a half, we risk never meeting the twin dugouts again, at least , on the pond...
A couple of stories from the life of lumps
- Gas chamber boat
Among the numerous names of lumps adopted in various regions, in Dahl’s dictionary you can find the following: “gas chamber boat.” The name is not accidental. For their instability and tendency to overturn, as well as strong inertia, clods have earned a very bad reputation over the long period of their existence, especially among those who did not regularly use them. Having wandered into the village of Moscow, Andreapolsky district, in search of rare catamarans and turning to a local resident (Muscovite J) about “whether there are a couple of unnecessary clods lying around somewhere,” we heard in response: “Yes, they’ll drown in no time!” No, we use boats... There are some lying around outside the village, no one needs them. Look, they're completely rotten. Take it if you are interested." There was interest, but only of a photographic nature, and the lumps really turned out to be rotten...
Other residents of the Andreapol region also mention the treachery of these boats. One of the extremely elderly old-timer women reported that “in ancient times, a local priest rode on clods across the lake, and drowned...”. One of the possible reasons for the unsafety of lumps lies in their design: many logs did not “unfold” over the fire after hollowing out, but remained in the shape of a pipe with a selected top, that is, they had sides that approached the top. This design contributed to the fact that when the catamaran turned over, one of the legs of its owner, who was usually shod in rough tarpaulin boots, tightly fixed to his feet with footcloths, found himself pinched in the hull of the boat. It’s good if the leg was freed in a timely manner, but if not...
- Rescue boat
People who regularly use clods speak warmly of them. Let them be heavy and unstable, clumsy, but they are their own. Again, you don’t need to go far for materials for manufacturing. For a long time, village residents were in extreme poverty, so the boat, which required nothing more than two aspen logs, a couple of crowbars and a handful of nuts, could not remain unclaimed. Quite funny stories also happened involving lumps, but they nevertheless characterize these boats from the best side. I learned one of them from a work friend, and he learned from a forester, originally from one of the villages in the Andreapol region. This story is quite true and is confirmed by local residents; it happened in 1982 - in early spring, during high water, immediately after the snow melted. That peasant forester was rafting on clods from Lake Khlustovno on his forestry business along the Khlustovka River (see photo), which was high and swift due to the flood. Suddenly, out of nowhere, a bear came out of the forest. He jumped out and ran along the shore after the boat, and then, which is not at all typical for bears, jumped into the water and swam after it, “roaring terribly.” The forester began to run away from him on clods, pushing off with his pole - the bear did not lag behind. The clubfooted forester chased for quite a long time - to the place where Khlustovka dived under the road into a concrete pipe - the guy lay down and swam, but the bear did not dare... Subsequently, the forester, describing the incident, uttered a phrase that greatly amused my friend, and me too: “That the bear was in the mood to eat me!” However, thanks to the lumps, I didn’t eat it...
Footnotes
1 The territory of the modern Andreapol region in the 11th-12th centuries was part of Kievan Rus. During the period of feudal fragmentation, for a long time it belonged to the independent Toropets inheritance (which, in turn, belonged to the Pskov region), as well as to the Smolensk land, Novgorod, and in the XIV-XV centuries - to the Grand Duchy of Lithuania.
2 Plural in Tver and Pskov provinces.
3 In the photo from the local history museum you can see typical “unfolded” cargo lumps. The fact that the boat's hulls were steaming is clearly visible from the appearance of the sides.
4 In different regions they were called differently: dowels, pegs.
5 Brockhaus and Efron: “...Volkota (about 50 ver.)[...] delivers the largest mass of water (in Lake Okhvat), which in the summer often backs up the water of other rivers (stops their flow) and exits through the river. Zap. Dvina, which then flows to the Riga Hall. Baltic Sea..."
6The so-called “third ring of Moscow’s defense” took place here, and Andreapol was home to one of the most significant military airfields in the region.
7 The same fate befell a rare oak tree on Lake Nagovye (the source of the Serezha River, Toropetsk district of the Tver region).
Share on social media networks:
Previous Next