For more than 40 years I have been fishing on the bream lake (length 3 km, width -1, depth up to 10 m). This hobby requires a good punt. During this time I tried various of its designs.
In the article I tell you how to make a boat out of wood with your own hands, I attach drawings and photos of the main parts with simple pictures. I try to show how to make them in several ways, so that the novice craftsman has the opportunity to choose the most appropriate option.
What qualities should a fisherman’s wooden boat have that need to be ensured?
Let me immediately note that fishing is not the only purpose of having a punt on hand. In warm summer weather, you can simply drive into the middle of the lake, jump into the water, swim, cool off, and climb back over the stern.
With the onset of the mushroom season, a quiet hunt begins on the islands. And this is a hobby for the whole family: we got together, went and received a lot of positive emotions.
Even just sitting down at the oars, rowing for half an hour or an hour in calm water and fresh air is a pleasant walk, good for health. Children and adults enjoy these trips so much that they become a regular ritual.
However, for all these purposes the boat must meet the following requirements:
- be durable and reliably withstand physical stress when transporting various categories of people, especially children and the elderly who cannot swim;
- have good stability during strong rolling, when you have to row along a large side wave created by a strong autumn wind;
- do not leak from cracks and joints between boards;
- have good buoyancy, ease of movement, requiring low muscular effort when covering long distances;
- combine the ability to install a simple outboard motor and rowing with oars;
- maintain the listed performance characteristics for a long time for at least 10 years.
I explain further in the text how to optimally implement all these six conditions with your own hands.
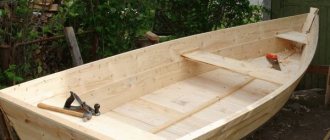
Device
The craft consists of the following:
- of two sides (right and left) up to 60–70 cm high;
- flat bottom, reinforced with longitudinal or transverse stiffeners (lamellas);
- rectangular stern (transom).
To transport people and control the boat, 2–3 benches (banks) are attached between its sides. Various fishing accessories are stored in a box with a locking lid mounted on the stern. Depending on how many people are planned to be transported by boat. Its length varies from 2 to 4 meters with a width of 1.0–1.2 meters.
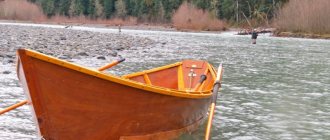
Most modern models have a pointed or narrowed bow shape, due to which such a boat acquires better maneuverability and speed of movement (especially against the current), and has less windage in strong headwinds.
You can move around on a punt either with the help of oars or with mounted screw or water-jet engines mounted on the stern.
How to easily resin a boat hull
Impregnation of wood with resin protects it from premature rotting and at the same time seals all joints. In northern countries, fishermen constantly treat new wooden boats with a solution of resin in gasoline.
Its consistency is brought to the level of liquid sour cream, and processing is carried out with a regular brush. The protection lasts for a long time, it replaces more expensive oil paint, but at first it gets very dirty.
When I first tried this method, I had to constantly put newspapers on the benches. The paper protected clothes from the resin.
Therefore, seats and places with which people come into contact are not treated in this way, but simply painted. However, nothing prevents the use of other industrial impregnation compositions or conventional oil processing.
The resin is taken from bitumen. It is used in construction as a waterproofing layer and comes in various grades, differing in hardness, viscosity and fluidity.
We usually come across an unknown variety for processing a boat. It must be checked, prepared, brought to the state of chewing gum. To do this, the resin is heated over a fire in a bucket until it boils, oil is added to it, and the viscosity is assessed on a cooled piece.
The resin should stick well to the wood, but not break under load, but stretch. The composition of the oil proportion is determined experimentally.
The place for the fire is prepared in advance at a distance from fire hazardous objects. Two posts are driven into the ground, and a crossbar for a bucket is hung on them.
It is convenient to take the molten resin out of the bucket using a jar with an elongated handle, and process it by rubbing the surface of the boards with a kvoch: a rag wrapped on a stick.
When pouring heated resin into the cracks, use a regular stick with a wedge-pointed end. The varnish that has penetrated into the joints seals the space well and prevents leaks.
To distribute the resin evenly over the surface of the wood, it is additionally heated with a blowtorch flame. The resulting drips are dispersed with a hammer and a wooden wedge. The liquid resin should fill all the cracks.
It is more convenient to work together. Please note that molten resin and open flame from a torch can be harmful to health. Use boots, closed clothing, glasses, work gloves. The consequences of accidentally splashing boiling resin on your body are much easier to prevent than to treat.
Safety precautions are never superfluous.
Do-it-yourself punt boat made of plywood: drawings, instructions
A boat is an indispensable thing if you want to go fishing or just spend time with friends or family on the river. This is a great device for a walk or even a whole water adventure that you can do yourself.
Flatboat
If you are interested in the technology by which you can make a punt boat from plywood yourself, the drawings presented in this article and the recommendations will be useful to you in your work.
Making a simple boat from plywood is the most budget-friendly way to get a boat. To do this, you just need to stock up on everything you need, including tools and drawings, as well as show a little patience and diligence. Otherwise, making such a product will not be difficult for you, the main thing is to strictly follow the prepared drawing.
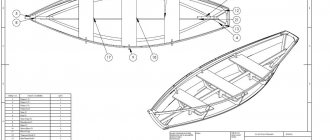
Flat-bottomed boat drawing
What do you need for work?
The material on which the structure is created is, of course, plywood. It consists of veneer layers glued with phenolic glue, which are pressed in production. There are several types, but not every type of plywood is suitable for making a boat with your own hands.
Note!
The highest quality and waterproof plywood is marked FSF. It is usually made of birch veneer. When using it, you can achieve reliability and quality from your future product. As a result, you will spend significantly less effort on sanding and finishing your boat.
Boat drawing (bottom view)
If for some reason you do not have the opportunity to get plywood of a high-quality brand, buying not very high-quality products, pay special attention to the execution of the end parts on the sheets. The absence of through cracks, knots, holes and defects is a sign of a standing material.
The quality of the chosen plywood will depend on:
- the quality level of the product itself;
- performance characteristics of the boat;
- cost of finishing work;
- time spent on finishing work;
- volumes of required material;
- number of seams in the finished boat.
Therefore, you must treat your choice with maximum responsibility. Some parts of your flat-bottomed boat may require blocks or boards, preferably dry and completely free of any flaws or damage.
To cover the boat, fiberglass is used, sold in rolls. You can cut it into pieces of the required size, which will be convenient for gluing joints and seams. A single piece will be more appropriate for processing the bottom.
Varnish, glue and paint are used to protect the boat from moisture. It is best if the varnish is ship-grade and the paint is not water-based.
To make brackets for your boat, you can use plastic clamps and copper wire. Any other material will also work, which can then be easily removed.
Parts assembly diagram
List of tools:
- electric jigsaw and a set of files for it;
- sander;
- hammer and plane;
- clamp;
- tape measure for measurements, a metal ruler and a simple pencil for marking;
- brushes for applying varnish and glue;
- spray gun for working with paint;
- a spatula that will help level the fiberglass during the gluing procedure.
Scheme with basic parameters
Boat manufacturing work: splicing method
After you have selected the appropriate drawings and prepared all the necessary tools, you can begin making the boat.
Note!
In the event that you cannot find the plywood of the size required for your boat, it can be joined together using plywood miter splicing technology.
Expanded diagram
Sheet splicing technology:
- Sheets of material must be laid on top of each other, mark a line of the mustache (its length is ten to twelve thicknesses of a plywood sheet).
- To obtain an even and high-quality result, it is recommended to secure the material using clamps and a limit bar. It is along this bar that the mustache will be formed. Make sure that you do not have sharp changes in the length of this line.
- The formed mustache must be sanded with a machine to an ideal state, constantly combining and adjusting the sheets.
- An adhesive composition is applied to the mustache area, after which the plywood sheets must be stacked on top of each other with the treated surfaces and secured with clamps, placing weights on top to ensure complete gluing.
- Excess glue must be removed immediately, without waiting for it to dry.
- After the glue has dried, you can remove the clamps and leave the product alone for 24 hours until the glue completely hardens.
The remaining glue must be sanded off with sandpaper to even out the seam and make it less noticeable.
Recommendation for the manufacture of the product
First, you need to mark the bottom on plywood, first laying it out on a flat surface. Based on your drawing, draw the centerline of the boat, after which you can place a grid on the basis of which the contours of the future product are marked.
Boat bottom
To ensure a tight fit of the joints, chamfers can be made at the edges of the plywood junction. A grinding machine is suitable for this. After this, you can sew the parts together using staples and clamps. The procedure should begin from the stern, gradually moving to the bow of the boat, slowly bending the plywood. Both the sides and the transom are secured.
The next stage is checking the geometric dimensions of the structure. After which you need to tighten the clamps more tightly, place spacers in the places where the frames are mounted to fix all the parts.
The seams are glued from the inside of the product. To do this, you need to take glue and fiberglass, which must be cut in advance into strips 7 cm wide. Using a brush, apply the adhesive to the joint, glue the fiberglass and level it with a spatula, removing bubbles and wrinkles. The seams need to be taped two or three times.
Boat frame
After the seams have dried, you need to secure the fender bars, which should run along the upper edge of the structure. And the frames are fixed on the inside. The transom should be reinforced with pads. The fasteners are removed from the outside of the bottom, the structure is modified with a sander and glued at the joints with fiberglass.
Finally, let the boat dry, paint it and cover it with a layer of varnish.
Features of wooden “boat work”
The creators of these boats have several requirements that will have to be taken into account. Among them:
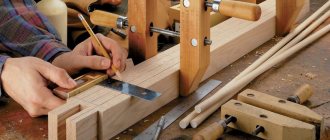
- Ability to handle wood, knowledge of all the nuances. This concept includes the optimal selection of boards, the ability to calculate in advance the future maximum loads on the wood, as well as awareness of how the workpieces bend.
- Correct choice of other materials: in addition to wood, you will need means to protect it from leaks, from the harmful effects of water, and elements to hold all the parts of the structure together.
- Availability of space for assembly. Since all the blanks and the vessel itself are quite large in size, and assembly will take a beginner a lot of time, you need a room or area that is reliably protected from rain.
- The need to have all the tools to work with wood.
- At least one assistant will definitely be needed.
This is a minimum list of what is needed, so other conditions may arise as you work.
Voting leaders
Leader 500 Length, cm: 500 Reader rating: 65.8 Total votes: 839
Fantasy Length, cm: 420 Reader rating: 65.3 Total votes: 959
JackBot 240 Length, cm: 240 Reader rating: 64.9 Total votes: 643
ProfMarine PM 300 Length, cm: 300 Reader rating: 62.8 Total votes: 817
Spinningline 470 / SL 470 Length, cm: 478 Reader rating: 62.7 Total votes: 1,364
Volzhanka 65 Length, cm: 650 Reader rating: 62.7 Total votes: 977
Catfish 310 Length, cm: 310 Reader rating: 60.4 Total votes: 1,041
Compact 200 Length, cm: 200 Reader rating: 59.8 Total votes: 940
J.Silver 300 Length, cm: 300 Reader rating: 59.6 Total votes: 1,488
Marlin 320 Length, cm: 320 Reader rating: 59.5 Total votes: 1,477
Main
Before you start building a plywood boat yourself, you need to understand that such homemade products do not tolerate careless approach to the matter. This can affect not only the appearance of the product, but also your safety and reliability.
The first thing you need to pay special attention to is the room in which the work will be carried out. If it was decided to build a boat in winter or early spring, then it is necessary to exclude drafts and high humidity
The second thing you need to pay special attention to is the material and tools. Plywood must be selected without knots, glue, paint and drying oil only from a trusted manufacturer. The instrument must be in perfect order. The jigsaw is equipped with a file with small teeth.
If you are planning a motor boat, special attention should be paid to the transom. To make it, it is better to take a solid oak board
Plywood glued together in several layers will also work, but the board will be more reliable.
You should also strictly monitor the symmetry of the bottom and the uniformity of the sides. Incorrect bending of one side on a boat or on a dinghy, depending on what is being built, will lead to the fact that it will scour the water or pull to one side.
And lastly: there is no need to rush under any circumstances. If the instructions for the glue indicate that it should dry for three days, then further work should be started only on the fourth. The same principles apply with paint and drying oil.
Materials and tools
To complete the work we will need the following materials:
- waterproof plywood 2.5 by 1.25 meters, its thickness should be 0.5 cm;
- 1.5 panels of moisture-resistant plywood of the same size, but with a thickness of 0.6 cm;
- planed boards - it is better to give preference to soft and porous types of wood;
- wooden slats;
- epoxy resin;
- waterproof varnish or paint;
- nylon thread;
- fiberglass in a roll to cover the hull of the boat;
- graph paper and thicker paper (cardboard can be used) for sketching;
- bars 0.5 x 3.4 m and 0.4 x 0.2 x 4 m.
And also prepare your tools:
- screwdriver or drill with the required power;
- hand grinder or plane;
- a clamp, or better yet several - if you don’t have a special tool, you can use clamps from old manual meat grinders;
- electric jigsaw;
- brass nails of various lengths and wood screws;
- hammer;
- roulette;
- brushes or roller for applying varnish.
Kinds
Depending on the material used to make the punt, they come in the following types: Wooden – the classic version of this boat. Wooden boats are made independently from softwood boards (spruce, pine) and plywood. The disadvantage of such watercraft is their considerable weight, which is why fishermen who do not have a car with a trailer use such a boat only on a nearby body of water.
A wooden boat must be made from boards with a moisture content of no more than 16%, free from cracks and falling knots
Plastic - lightweight and durable factory boats with a one-piece structure made of durable and impact-resistant polypropylene, fiberglass, and ABS plastic. It is impossible to make such a boat yourself. Its price, compared to inflatable analogues, is slightly lower. The disadvantage of such a boat is its fragility at low temperatures and very difficult independent repairs.
Plastic models should be used only in the warm season - in cold weather and frosts their body becomes fragile and is easily damaged
Metal – such boats are made from aluminum and duralumin. In terms of strength and weight, such boats are the “golden mean” between wooden and plastic models. Having low weight and constant strength of the body material, independent of air and water temperature, they can be used freely throughout the entire open water season.
An aluminum punt boat is not suitable for sailing on the sea - the lightweight design can easily capsize in a big wave
Let's start construction
The construction of the boat begins from the bow. Take two wide boards intended for the sides, file their edges a little, maintaining an angle of no more than 45 degrees. Drill holes along the edges and connect the boards together. It is better to “sew” them with copper or aluminum soft wire. After this, you need to move the boards in different directions with an assistant and install a spacer beam in the middle
It is important that the widest spacer stands exactly in the middle of the future boat or in the place where its widest part is planned, since it is from this that the rounding of the hull will begin. Now cut out the following spacers, using them to form the shape of your watercraft
Since you won’t be able to quickly make a boat out of boards, take your time. You can leave the boat on the struts for a few days so that the wood gets used to this shape and stops springing too much. Some craftsmen even re-wet the boards and leave them to dry in this position. But in this case, it is better to immediately decorate the stern and bow of the boat with bars mounted on screws or generously coated with sealant. All abutting parts must be well adjusted - the work is very painstaking, but there is no escape from it, so carefully check all the dimensions.
Correct dimensions and drawing
They are a separate discussion, because the weight, capacity, carrying capacity and stability of a small vessel on the water depend on the size. If we write about recommendations, they are as follows:
Side height. The optimal value is 500 mm, but no one prohibits a slight change up or down. Length. This parameter depends on how many people will be in the boat at the same time. If the craft is designed for one person, then a length of 1800-2500 mm is enough. For a duet of “seafarers”, 3000 mm is needed, for 3-5 people 3500-4000 mm is enough. The latest design can accommodate six people, but in this case the question is different - the comfort of such a large company. Width. Here the recommended value is 1000-1500 mm, however, it must be taken into account that the maximum figure will significantly reduce maneuverability, but will make the vessel more stable
You need to take into account the weight of people, the potential cargo that will be transported on the boat, and the length of the craft.
Based on the recommended (or chosen by the builder) dimensions, it is necessary to make a drawing. If the master is not good at drawing up such diagrams, it is better to stick to ready-made, proven sketches that are easy to find on the Internet: just enter just two words into the search engine - “boat drawing”, and then switch to “Pictures”.
Final sealing of the joints of the bottom and side plating sheets
After the glue has dried, you will need to lay two canvas strips, thoroughly soaked with epoxy glue, along the inside of the junction of the side and bottom skin sheets. On the outside, the seam must be reinforced with small tow, hammered with a wide flat screwdriver between the edges of the sheathing sheets
Before this, it is important not to forget to coat the inside of the seam with epoxy glue and only then quickly push the sealing material there
When all connecting seams have thoroughly dried, you can begin priming the surfaces. It is done with a brush and spatula. Before the operation, the hull must be turned upside down. Protruding heads of screws and bolts, joints of sheathing sheets and other protruding structural elements are carefully coated with two or three layers of primer. The best option for a primer would be drying oil heated to a boil. Several layers will ensure proper coating quality. Two or three coats of paint will provide a good finish on the outer surface of the hull and will help make your wooden boat more durable.