Many residents of modern megacities try to be closer to nature. And some of the most fascinating places are the banks of rivers, lakes, and seas. But the most romantic, of course, is an evening spent with your significant other, slowly sailing past picturesque landscapes.
However, here the question arises: where to get a vehicle to spend the evening in comfort and silence, alone with each other. Buying your own boat can put a strain on your budget. Therefore, if you want to save money, read this article about how to make a boat with your own hands.
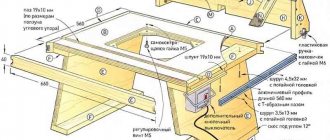
First, think everything over carefully: prepare a detailed drawing of a plywood boat with all the features. Pay special attention to details, proportions, calculations - everything should fit together well. Otherwise, all sorts of breakdowns are inevitable.
Photographs of boats (including those made by yourself) often show damaged models, most often due to errors in calculations.
Materials
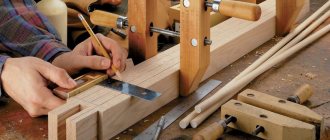
Now start preparing your materials. Choose the best quality possible. Inspect each board very carefully and try to avoid any with cracks or other visible defects.
Describe each of them at an angle of 45 ° - this will be the bow of the future product. Press the parts of the structure as tightly as possible to each other so that there are no cracks or gaps. Soak in several layers of antiseptic.
Final sealing of the joints of the bottom and side plating sheets
After the glue has dried, you will need to lay two canvas strips, thoroughly soaked with epoxy glue, along the inside of the junction of the side and bottom skin sheets. On the outside, the seam must be reinforced with small tow, hammered with a wide flat screwdriver between the edges of the sheathing sheets. Before doing this, it is important not to forget to coat the inside of the seam with epoxy glue and only then quickly push the sealing material there.
When all connecting seams have thoroughly dried, you can begin priming the surfaces. It is done with a brush and spatula. Before the operation, the hull must be turned upside down. Protruding heads of screws and bolts, joints of sheathing sheets and other protruding structural elements are carefully coated with two or three layers of primer. The best option for a primer would be drying oil heated to a boil. Several layers will ensure proper coating quality. Two or three coats of paint will provide a good finish on the outer surface of the hull and will help make your wooden boat more durable.
Assembly
Now that the base is ready, you should begin the final assembly of the structure. Particular attention must be paid to the correct shape of the boat. To do this, first install the spacer and bend the sides on the sides. For this you may need a rope and a couple of helpers.
So, now the most time-consuming part is adjusting it to the desired size and shape. This can take a long time. But, little by little, you will achieve the desired result. Now it’s time to secure the sides and cut off the excess.
Wooden boat
How to make a wooden boat with your own hands
I have long wanted to create a record marking the main points in the manufacture of a boat, but it never worked out!
Dad is getting older every year, but he still doesn’t have a crib sheet, although he and I have put together more than one pair of boats... And this year there was a need to expand our fleet, because the kids are growing up and boats are needed that are more stable and load-bearing for reliable movement. I myself used to swim to the surface, but with my sons I have to be careful about this! The time has come to take out the previously stored boards, edge them, plan them, prepare nails, and one weekend we get down to business! (It’s better to use spruce boards, without knots, but you don’t always have what you need) First of all, Dad sketched out a small drawing with dimensions based on the requirements and previous construction projects
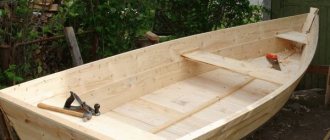
Then they laid out the boards for the bottom, drew a contour on them according to the dimensions, cut out the main parts with a jigsaw, leaving only the edges, this can be seen in the photographs.
When adjusting the boards to one another, we leave gaps in the stern and in the bow, but in the middle we fit them more or less tightly
Next, we prepared crossbars for the bottom from the bars. The crossbars are made rounded as shown in the photo
When all the parts are prepared, we begin assembling the bottom, first tightly assembling the boards, sewing them with nails in the middle with a cross member, then using a rope and two crowbars we pull together the stern, sew them together with nails, and do the same with the bow
Due to the fact that the crossbars are rounded, and gaps were left between the boards in the bow and stern, when screeding and assembling, the bottom turns out to be a bit of a sphere both across and along its length. In the future, this gives the boat stability on the water. It is not necessary to adjust and tighten the bottom boards to microns, small cracks are quite acceptable, this will make it easier to caulk the bottom.
When the bottom is assembled, we line out the edges according to the planned dimensions and markings so that the edges are smooth, otherwise it will not be possible to bend the side boards clearly
Next, we prepare the surfaces for the side boards, hammer out the frames, the bow board, and the stern.
The most interesting thing is ahead, you need to bend the sides at the same time on both sides, if bending one by one can warp and the boat will turn out to be skewed. We apply the side board to the bow on one side and sew it on, then do the same on the other side, then one presses it, bending the boards, the second pierces it with nails towards the stern.
The boards were tied together in the same way as the bottom - with rope. As a result, some kind of shape was drawn, then it’s easier. We bend the second row of side boards in the same way. We don’t hit a lot of nails when stitching because we still have to caulk! Next, we saw off the excess ends of the boards, both the side boards and the bow and stern. Then you adjust the front bow board.
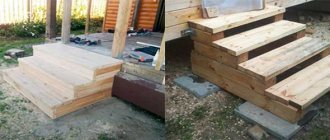
After completing the assembly, you work with a plane, rounding where necessary, leveling it, going through the entire longboat, cutting out the frames beautifully. After making it beautiful, we caulk it, add nails in places, screw the rowlocks, resin the bottom, nail the strips to the bottom, resin them, then paint. We also make seats and paint them as you like. Our oars are transferable, we change boats, but the oars are the same. The oarlocks on all our boats are the same, so there are no problems.
In principle, I tried to take into account all the stages and subtleties in the photograph, so that it was clear. Two boats have now been put together, one for the opening, the second just recently. The boats were made identically, one was tested, the second was at the stage of completion of work.
If anyone has any questions, please ask, I’ll be sure to clarify! It’s true that questions usually arise when making things yourself, wondering if someone will take it and make a piece of wood. For those who live near the lake, a piece of wood is irreplaceable!
Thank you for your attention!
Drawings and photos
Anchor
In addition, it will be very useful to make an anchor for the boat. It will help keep your homemade boat in place even in strong winds. This can be very useful if you like to go fishing.
Anchor cat
One of the best models for a homemade watercraft is a grapple anchor. It has a fairly high level of reliability. To strengthen the structure and reduce the risk of damage, secure the device to the stem.
For fastening, you can use cotter pins made of copper plates. The paws are attached using a hinge mechanism, which increases the efficiency of their use.
In addition, for more convenient transportation, you will need to make wheels for the PVC boat with your own hands. It's not very difficult.
Uncover
Now, using the finished patterns, you need to cut the PVC fabric, carefully observing all dimensions. When transferring parts, outline not only their outer part, but also transfer all the markings onto the fabric so as not to get confused with them later, since a homemade PVC boat requires the presence of all the main parts in duplicate.
After you have transferred all the parts, you need to cut them out. Try to use sharp scissors or a special device that uses a laser to cut so that all the parts are even. Remember that if there is an error of even a centimeter, expensive material can be damaged.
Manufacturing
Many people probably have a lot of unnecessary materials in their garage that are ideal as material for making wheels. You can make them from several pipes and fasten them with metal fasteners. Or you can use a ready-made design.
DIY fan: how to make a homemade powerful fan. Basic parameters and properties of fans (130 photos)- Why do you need a security alarm, what functions does it perform?
- How to choose winter workwear and not make a mistake - recommendations from the pros
Drawing
The manufacture of any boat begins with the preparation of a drawing. You can do it yourself, order it from a specialist, or find a ready-made drawing on the Internet. In cases where you try out some ready-made boat drawing from the Web, it is recommended that you first make a small-sized vessel according to this plan, if necessary, reducing all the details to scale. This is required in order to check the correctness of the drawing. And in order not to waste expensive PVC, such a model can be made from dense polyethylene.
Repair
For boats that you have built, your best option is to do the repair work yourself. You should first inspect the boat, find the cause (hole, etc.) and be sure to correct the existing defect.
You can repair the hole with pieces of boards, after degreasing the surface and gluing a new piece of wood. If the problem is more serious, then it would be best to contact a specialist who can carry out professional repair work.
Thus, now you know how to make a boat yourself and repair it at home.
How to easily resin a boat hull
Impregnation of wood with resin protects it from premature rotting and at the same time seals all joints. In northern countries, fishermen constantly treat new wooden boats with a solution of resin in gasoline.
Its consistency is brought to the level of liquid sour cream, and processing is carried out with a regular brush. The protection lasts for a long time, it replaces more expensive oil paint, but at first it gets very dirty.
When I first tried this method, I had to constantly put newspapers on the benches. The paper protected clothes from the resin.
Therefore, seats and places with which people come into contact are not treated in this way, but simply painted. However, nothing prevents the use of other industrial impregnation compositions or conventional oil processing.
The resin is taken from bitumen. It is used in construction as a waterproofing layer and comes in various grades, differing in hardness, viscosity and fluidity.
We usually come across an unknown variety for processing a boat. It must be checked, prepared, brought to the state of chewing gum. To do this, the resin is heated over a fire in a bucket until it boils, oil is added to it, and the viscosity is assessed on a cooled piece.
The resin should stick well to the wood, but not break under load, but stretch. The composition of the oil proportion is determined experimentally.
The place for the fire is prepared in advance at a distance from fire hazardous objects. Two posts are driven into the ground, and a crossbar for a bucket is hung on them.
It is convenient to take the molten resin out of the bucket using a jar with an elongated handle, and process it by rubbing the surface of the boards with a kvoch: a rag wrapped on a stick.
When pouring heated resin into the cracks, use a regular stick with a wedge-pointed end. The varnish that has penetrated into the joints seals the space well and prevents leaks.
To distribute the resin evenly over the surface of the wood, it is additionally heated with a blowtorch flame. The resulting drips are dispersed with a hammer and a wooden wedge. The liquid resin should fill all the cracks.
It is more convenient to work together. Please note that molten resin and open flame from a torch can be harmful to health. Use boots, closed clothing, glasses, work gloves. The consequences of accidentally splashing boiling resin on your body are much easier to prevent than to treat.
Safety precautions are never superfluous.