If you calculate what components make up the final cost of lumber - the price of wood + processing + transportation to the destination - then it becomes clear where you can save. Wood blanks (boards, beams, slats) are one of the most used samples in the field of construction and repair.
Considering the ease of working with wood, it makes sense to “dissolve” it directly on the site. All you have to do is make a sawmill. This article will introduce you to standard drawings, the procedure for making your own tape modification and some design features.
The feasibility of such a solution will become even more obvious if you look at prices for factory sawmills on websites. They are available for sale, but the cost of the installations is such that most of us are unlikely to want to purchase any model for home use. Depending on the series (in rubles): “Kedr” – from 138,000 to 194,000, “Taiga” – from 116,890 to 172,400. And these are also relatively inexpensive samples. Only mini-machines are cheaper (about 94,000), but they are unlikely to satisfy all the woodworking needs of the owner of a private house.
DIY band sawmill. Video
Making such a design is quite difficult. In addition to the fact that you need to prepare all the components, study the design, draw drawings, do welding and turning work, it will be necessary to ensure loading of logs weighing up to 300 kg, adjustment of its cutting and safety precautions.
The operating principle of a band sawmill
The design resembles the rotation of two reels, between which there is a saw. The distance between these coils is equal to the size of the log being processed.
Working cycle of a band sawmill:
- Preparation. The logs are given the same shape and size.
- Treatment. The equipment is set up and the logs are processed according to a given pattern.
- The final stage. Defects remaining after sawing are removed manually by the operator.
To get a board of the required size, you need to fix the log on the platform so that it is motionless. After this, the mobile cart will begin to move and cut the tree. A well-tensioned saw blade should be in a horizontal position. In order for the board to be the desired size, the operator must first set the necessary parameters.
Required materials and tools
homemade band sawmill
- Various pipe diameters.
- Pulleys (can be old, but in good condition).
- Profile pipes with which sleepers will be created.
- Corners for creating rails.
- Channel.
Required tools:
- milling machine;
- welding machine;
- electric drill;
- Bulgarian;
- hacksaw;
- clamp;
- a set of wrenches and screwdrivers;
- pliers;
- hammer;
- ruler, square, tape measure;
- various fasteners (nuts, bolts, etc.).
In addition, you will need to study and make clear design drawings, according to which the entire assembly of the sawmill should take place.
Stages of work on making a band sawmill with your own hands
First of all, it is necessary to make a fixed part of the structure - the frame, which should be U-shaped. For its manufacture, two channels, two rails or corners 50x100 mm are suitable. The length of the channel should be about 8 meters, and the height should be at least 14 cm.
- Holes are drilled along the entire length of the selected material, the distance between which should be 1-1.5 meters.
- The channels are pulled together using pipes 25 centimeters long, bolts and studs.
- Now you need to make racks of pipes or channels on which the sawmill will be installed. Their number depends on the length of the structure. For an eight-meter machine, you need to make four stands.
- In order to achieve rigidity of the structure, it should be additionally strengthened using braces.
- Now you need to assemble a mobile cart, the length of which should be approximately 60 centimeters and which on both sides should be eight centimeters longer than the frame. It can be made from a steel plate 46 millimeters thick.
- To ensure the movement of the trolley, it is necessary to install an electric motor.
- Now you can attach a circular saw to the cart, and install a special steering wheel on the side, which will be used to control it. The structure will move using a chain that must be tensioned.
- You should make clamps from the pipes, which are needed to prevent the log from jumping out. The internal diameter of the pipes should not exceed 40 millimeters, since movable rods will need to be installed inside them.
- It is necessary to make clamps from a metal corner that will be installed on top of the pipes. For the design to be reliable, they must be at least 15 millimeters. It is also necessary to install clamping cam mechanisms.
If the saw and electric motor were not installed at the beginning, installation can be done at the end of all work. When purchasing an engine, you should make sure that the proportions of the entire structure match. So, for example, for a bed 8 meters long you will need a saw with a length of at least one meter and a motor with a power of approximately 10 kW.
It is recommended to assemble the band sawmill with your own hands directly at the site where it is located. This is due to the large weight of the future structure and its massiveness.
https://youtube.com/watch?v=ZFYEUYKHrbE
Technical characteristics of band sawmill Taiga T-3
| Parameter name | Taiga T-3 | Taiga T-3 SUPER |
| Main settings | ||
| Diameter of sawn log, mm | 100..900 | 100..900 |
| Length of sawn log, m | 6,500 | 6,500 |
| Saw pulley diameter, mm | 600 | 600 |
| Productivity, m3/shift 8 hours | 6..12 | |
| Saw blade speed, m/s | 30 | |
| Saw blade width, mm | 38..41 | 38..41 |
| Saw blade length, mm | 4290 | 4290 |
| Drive for raising/lowering the saw unit | electr. | electr. |
| Saw carriage movement drive | manual | manual |
| Electrical equipment of the machine | ||
| Type of supply current | 380V 50Hz | 380V 50Hz |
| Number of electric motors on the machine, pcs. | 2 | 2 |
| Saw electric motor - rated power, kW | 11 | 11 |
| Electric motor for lifting and lowering, kW | 0,55 | 0,55 |
| Dimensions and weight of the machine | ||
| Machine dimensions (length x width x height), mm | 630 x 2000 x 1700 | |
| Machine weight, kg |
- Amalitsky V.V. Woodworking machines and tools, 2002
- Afanasyev A.F. Wood carving, Technique, Tools, Products, 2014
- Bobikov P.D. DIY furniture, 2004
- Borisov I.B. Wood processing, 1999
- Jackson A., Day D. Woodworking Bible, 2015
- Golden Book of woodworking for the owner of a country plot, 2015
- Ilyaev M.D. Wood carving, Master's lessons, 2015
- Komarov G.A. Four-sided longitudinal milling machines for wood processing, 1983
- Kondratyev Yu.N., Pitukhin A.V... Technology of wood products, Product design and calculation of materials, 2014
- Korotkov V. I. Woodworking machines, 2007
- Lyavdanskaya O.A., Lyubchich V.A., Bastaeva G.T. Basics of woodworking, 2011
- Lyubchenko V.I. Thicknessing machines for wood processing, 1983
- Manzhos F.M. Wood cutting machines, 1974
- Rasev A.I., Kosarin A.A. Hydrothermal processing and preserving of wood, textbook, 2010
- Ryzhenko V.I. The Complete Encyclopedia of Wood Art, 2010
- Rykunin S.N., Kandalina L.N. Woodworking technology, 2005
- Simonov M.N., Torgovnikov G.I. Debarkers, 1990
- Soloviev A.A., Korotkov V.I. Setting up woodworking equipment, 1987
- Sukhanov V.G. Circular saws for sawing wood, 1984
- Fokin S.V., Shportko O.N. Woodworking, Technologies and equipment, 2017
- Hilton Bill Woodworking, The Complete Guide to Stylish Home Furniture Making, 2017
Bibliography:
Related Links. Additional Information
- Directory of woodworking machines
- Manufacturers of woodworking machines and equipment
- Manufacturers of household woodworking machines
- Manufacturers of chipping machines
- Classification of woodworking machines
- Machines for longitudinal cutting of lumber
- Sawmill frames. Classification
- Lumber. Basic concepts. Terms and Definitions
Home About the company News Articles Price list Contacts Reference information Interesting video KPO woodworking machines Manufacturers
Sawing logs into boards with a chainsaw
Very often there are situations when you need to produce a very small volume of boards or beams for your own needs. Of course, buying machines in this case is absolutely not an option. Having certain knowledge and skills, it is much more profitable to cut logs with your own hands, using an electric or gasoline chain saw. Despite the fact that this work is quite labor-intensive, the result is quite justified.
Most experts believe that a chainsaw is better suited for this purpose. Such equipment has high power and can operate without interruption for a long time. In addition, the operation of a chainsaw does not require electricity, so you can work far from the power supply, for example, right on the plot.
In order to cut a log into boards using a chainsaw, you will also need special tools, such as a mechanism for securing the log, a frame attachment for the chainsaw, and a guide for making the cut. The attachment frame must be attached to the chainsaw bar so that it can be used to adjust the gap between it and the chain. This will make it possible to create boards of different thicknesses. It is worth purchasing a special chain for longitudinal sawing. It has a special tooth sharpening angle. The guide ruler can be made from a metal profile of the required length or a flat, rigid board.
Read also: Technology of manual argon arc welding with non-consumable electrode
Before starting work, you need to remove all the bark and remaining branches from the workpieces, and also carefully inspect the log for various flaws. This way, you can choose the most suitable cutting pattern and, therefore, reduce the amount of possible waste.
If you are longitudinally sawing trunks, you need to make sure that the resulting lumber is of the same density across the entire width. Since the density of wood from the northern part of the log is much higher than from the southern part, the cut is carried out in a plane directed from east to west (or in the reverse order).
The first step is to remove the slabs from two opposite edges of the log. As a result, a double-edged beam will be obtained, which is then cut into boards or other lumber of equal thickness, according to the intended sawing pattern. The final product is an unedged board, from which the edges must then be removed.
Preparatory activities
Selecting a location
If there is a suitable room, then it should be taken into account that its usable area should not be less than 18 square meters. This is enough to cut even large logs on a band sawmill.
In the private sector, it is rare that anyone can allocate an empty building or at least a compartment for installation. As a rule, woodworking has to be done outdoors. It is unlikely that neighbors in adjacent areas will applaud sawdust and small shavings flying in the wind. And your own territory will quickly become littered. Conclusion - after assembling the band sawmill, you will immediately have to build a continuous type of fence. For example, from polycarbonate sheets or multilayer plywood.
In addition, you will have to decide in advance where the finished lumber will be stored. Therefore, next to the sawmill there should still be at least a small but free piece of land.
This is what you should proceed from when choosing a workplace for equipment.
Selection of materials and components
Engine. As a rule, one of two types is used - gasoline or electric. The main thing is that the power matches. From a practical point of view (if anyone has any doubts), an asynchronous electric motor is much better. Firstly, the problem with connecting to the home electrical network is in the solvable category. Secondly, such a mechanism does not require any maintenance or frequent repairs (unlike a petrol/unit). Thirdly, constant speed will ensure high quality of cutting logs at the sawmill. Materials. Considering the weight of the wood being processed, there are only metal products everywhere. Which? For the moving part (trolley) on which the workpiece is placed, a profiled (thick-walled) pipe of square or rectangular cross-section is also suitable. But the support frame of the belt installation, taking into account the total loads, should be mounted from a channel. Accordingly, the rails for the movement of the trolley are from the overall corner (at least 45). Although you can use the same channel, only with smaller linear parameters.
Tools and equipment
Here it is short - you can’t do without a welding machine. In relation to the sawmill, bolted connections should not be practiced. Over time, one way or another, they will become loose, and daily monitoring of the condition and tightening is not the best prospect.
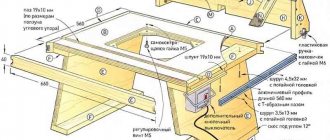
Sawmill drawings
Below are drawings of a simple band sawmill, which you can easily adapt to your conditions and needs, observing the proportions and principles of operation:
DIY corner sawmill
A corner circular sawmill, the self-made drawings of which are available in large numbers on the Internet, is an indispensable device for those who want to start building a house or connect their life with woodworking.
Buying a corner sawmill is an expensive business. Therefore, for personal needs, it is more advisable to make it yourself, especially considering that a drawing of a corner sawmill is not difficult to find on specialized sites. However, you can independently draw up such a drawing, design the device and assemble the structure.
Important steps in assembling a homemade circular sawmill:
you need to create a strong metal frame, for example, from any metal pipes or guides so that the pipes are connected in the most reliable way; it is better to weld them as guides; experts advise using high-quality rails without external flaws, otherwise the wheels of the carriage will jump off all the time and the carriage may get stuck assembled from metal parts, when creating a sawmill, be sure to pay attention to the fact that the geometric shape of the frame with built-in rollers or wheels must fully correspond to the distance between the finished rails. Thus, the carriage will move smoothly and freely; any gasoline engine can be used as a motor. The power unit must have high power to avoid the possibility of engine overheating; it is worth replacing the chain drive with a more reliable and durable analogue
After this, the machine will become safer and its service life will increase.
The power unit must have high power to avoid the possibility of engine overheating; it is worth replacing the chain drive with a more reliable and durable analogue. After this, the machine will become safer and its service life will increase.
How to make
Let's take a closer look at how to make your own sawmill from a regular chainsaw using the example of a stationary structure.
What you need
For work you will need the following materials:
- Chainsaw.
- Welding machine.
- Square metal pipes.
- Metal squares.
- Rollers.
Expert opinion Kulikov Vladimir Sergeevich
If square metal pipes are not available, you can use regular water pipes instead. Only in this case it is necessary to select pipes of sufficient strength. But it is best to use metal channels, if possible. It is more convenient to work with them during installation, and they can be fixed more reliably.
Manufacturing process
To manufacture the device you will have to perform the following steps:
- Assemble the base of the future sawmill from pipes and angles. There is no need to install the structure immediately. First you need to fold it and check how smoothly all the elements are connected. They do this using a level. Only after this the pipes are connected to each other by welding.
- When the base rectangle is assembled, for greater structural strength it must be strengthened with at least two ties. They can be made from the same metal pipes. The ties are fastened transversely at an equal distance from each other. The best mounting option is bolted.
- Then thinner pipes or metal profiles are welded on top of the pipes from which the base of the structure is assembled. They will serve as guides for the logs being cut and will not allow them to fall off the sawmill. Transverse guides are also welded. Ideally, they should rotate - this will ensure smoother movement of the log and minimize the effort that needs to be applied during operation of the device.
You can do without transverse guides if you used round pipe ties. The log will also move along them quite easily. But you need to remember that its movement will not be as easy as in the case of rotating transverse guides.
- After the base is completely ready, it is installed on racks. Steel squares are best suited for their role. They are welded in the corners of the base. For greater structural strength, braces can be welded between the posts.
- Afterwards, the trolley for the cutting part is assembled. It is a rectangle of metal pipes supported by two longitudinal steel strips. Between these strips and the walls of the rectangle, two slopes are installed so that the structure is stable. Rollers are placed under the strips, which will ensure the movement of the cutting part along the base. Then another pipe is welded to one of the strips, connecting it to the rectangle on top. This is the attachment point for the saw.
- When the cart is ready, secure the saw. This can be done in a variety of ways. The most common method is to secure the saw body using clamps or metal ties. It is quite reliable and does not cause irreversible damage to the device. If necessary, additional transverse strips are welded to the trolley from the same pipes from which the remaining parts of the structure were made.
There is another way to fix the saw - by the blade on which the chain is attached. It is less reliable, requires drilling out the blade and holds the chainsaw worse. However, with this installation method, the saw chain vibrates less (most of the vibration is transferred to the base of the sawmill) and makes smoother cuts.
How not to make a mistake with your choice
There are a large number of types and designs of sawmills produced by both domestic and foreign companies, manufacturers of devices designed for processing wood blanks. From all the variety, it is quite difficult for a simple user to choose exactly the model of a manual sawmill that would be not only easy to operate, but also practical to use.
Type of portal design
The best option is an equipment model for which the manufacturer chose a pipe with a square profile for the manufacture of the portal, and also strengthened it through the use of special elements. You can be sure that such a device has a high level of strength and stability and does not vibrate during operation.
Some manufacturers, in order to reduce the cost of the product, try to use a minimum number of amplifiers. This negatively affects the quality of the result and also shortens the period of use of the machine.
Machine tension unit
The type of tension unit has a direct impact on the service life of the device, as well as on the profitability of its use. During the work operation of sawing a wooden workpiece, it is possible that hard tree bark, knots or a lot of sawdust will get between the cutting element and the pulley.
If the design of the device uses a flexible tension system, the movement of the cutting element is absorbed, the blow is softened, and the saw itself is not damaged. Using a tighter tension will subject the saw to sudden and constant impacts or jolts, causing damage. Even the use of durable materials such as chromium or vanadium to make saws does not save the situation. Changing saws in the process of completing a task will certainly lead to an increase in the cost of the production process.
Carriage movement option
The carriage has quite a significant mass. If chains are used to move it, they will gradually stretch under the influence of heavy weight. As a result, the shape of the final wooden piece will be distorted.
This problem can only be avoided by choosing models whose carriages move using a manual or electric movement system.
https://youtube.com/watch?v=geQold6y2qI
Pulley selection
It is not uncommon for equipment pulleys to rupture under heavy loads. The reason lies in the fact that the manufacturers used low-quality material to make the pulley (this could be non-ferrous metal or metal that is susceptible to corrosion). In order to hide visual defects of the pulley, its surface is covered with a layer of paint.
The only correct solution would be to purchase a unit for which a solid metal sheet was used to make the pulley.
You should also not forget about such a criterion as the diameter of the pulley. There is an opinion that as this indicator increases, the service life of the equipment also increases. However, the use of a large diameter pulley in the design only leads to the need to use a longer saw.
Guide rollers
Preference should be given to models whose design is equipped with the largest possible number of adjustment mechanisms located on both vertical and horizontal planes.
Thanks to this, it will be possible to minimize the number of microscopic cracks that form in the body of the saw mechanism and extend its service life.
What is needed to carry out the work of creating a homemade sawmill?
In order for the sawmill from a chainsaw to be made correctly with your own hands, you should download or create drawings yourself, which reflect the main linear dimensions and the correct location of all elements. Before doing this work, you should decide where the equipment will be installed. A chainsaw sawmill can have different overall dimensions, which allows installation in almost any room. It is also necessary to provide for the possibility of attaching the structure to the base. During cutting, quite a lot of dust can be generated. Therefore, when working indoors, you should ensure that you have a special hood.
When considering how to make a sawmill from a chainsaw yourself, you should pay attention to the following list of necessary parts:
Channels 8 meters long and 150 millimeters high, 2 pieces
It is worth paying attention to the fact that the channels will take the entire load, which can be quite significant. Two rails. They will become the upper part of the sawmill, as well as a kind of guides for the moving element
The rails must be extremely straight and free from defects. Corners, calm, the dimensions of which are 50 by 100 and 40 by 40 millimeters. Sections of water pipes 25 centimeters long are used as ties. A steel plate about 60 centimeters long and at least 4 centimeters thick. A mechanism of movable hoses that act as protection for electrical wiring. Pipes with a diameter of 35-40 millimeters. Hand chainsaw. The choice of saw should be taken seriously. It should be taken into account that the characteristics of the wood being cut will depend on its indicators.
Construction of a homemade circular sawmill
The simplest version of a homemade mini saw includes a table and a cutting disc. You can make such equipment yourself, but it will not have high performance indicators.
The main disadvantage of this type of design is the need to feed the material yourself. This can easily lead to a violation of the geometric parameters of the future timber or board. Therefore, such installations are used only for processing sheet materials and relatively small workpieces.
A corner sawmill boasts a much wider range of functions. This equipment simultaneously makes two cuts in a vertical and horizontal position. But it is much more difficult to make than the model mentioned above. A homemade circular sawmill has the following design features:
- moving sawing carriage. This element moves along special guides located on the platform. It contains two motors with discs;
- stationary platform. It provides for the presence of material clamps that prevent the displacement of logs and their subsequent deformation during operation.
You can make such an installation using available tools and materials.
It is important that the sawmill can withstand constant vibrations and loads
If the equipment will be used exclusively for making boards, then instead of a horizontal tool, you can install another vertical one. This will significantly increase the productivity of the sawmill.
Design features of a chainsaw sawmill
Portable homemade sawmill based on a chainsaw
If factory-assembled machines are mainly stationary options, then home-made ones are more profitable and easier to make portable. This determines the design features. If in a factory unit the cutting part is mounted on a frame, then in a homemade saw blade it is installed in a special frame welded from a metal profile. It acts as a stroke limiter and also determines the evenness of the cut.
True, sometimes you can find a stationary model on the farm, which enterprising owners assemble in a specially designated place on the site. Here, more massive rolled metal is already used - a channel, and a corner from which the bed for the tree trunk is made. A massive carriage with a chainsaw mounted on it moves along the log along rail guides using rollers. Although such products provide a more accurate cut, they are much more complex and expensive to produce, so they are justified only where you need to work with a large volume or for a long time.
Drawing and material
Depending on the design, drawings of a circular sawmill of varying complexity are drawn up. In custom development, certain requirements must be taken into account.
- Using log feed on a carriage, the width of the platform is taken equal to the width of the guide rails. This will ensure stability under load. The rail is taken P50, the rollers are selected accordingly;
- on the platform, provide clamps for a tree trunk, convenient, reliable fixation of various sizes of workpieces;
- It is advisable not to combine an electric motor and a saw on a rigid drive. It should be protected by a belt (chain) drive. This will improve the air cooling of the windings and remove them from the zone of intense wood dust formation. Before creating a drawing with your own hands, you need to measure the dimensions of the engine; with the same characteristics, the manufacturer gives its size according to the overall dimensions;
- calculate the working area for a saw Ø 500 – 700 mm;
- The frame, depending on the dimensions of the installation, should be welded or dismountable (moving to a new place of work). Channel No. 4, No. 6 are placed in the main harness. Additional stiffening elements are made from steel corners and pipes (if necessary).
https://youtube.com/watch?v=7YH78aJykL0
Purpose and principle of operation
The sawmill is used to produce various lumber (timbers, slats, boards, sleepers) from solid logs. It is used in wood processing plants, sawmills, furniture factories and in the construction industry. This device allows you to:
- Reduce the amount of shavings and other dirt that appears during wood processing.
- Cut short workpieces with a length of 1 m and obtain parts with a thickness of up to 0.2 cm.
- Reduce energy costs.
- Determine the size of the resulting lumber.
- Produce wooden parts with high surface quality with an accuracy of up to 2 mm.
The sawmill has the following advantages:
- Mobility. The woodworking machine can be quickly disassembled and moved to a new location.
- Stability of the structure. The woodworking machine can operate under harsh climatic conditions both indoors and outdoors.
- Ease of use. The sawmill is equipped with many automatic mechanisms that facilitate the process of processing logs. During operation, it does not make unnecessary noise.
The disadvantage of this unit is its high cost. It depends on the type of machine and its technical characteristics. The cost of equipment is also influenced by the manufacturer's brand. The most expensive devices are from Swedish and Canadian manufacturers. Their average cost is 324 thousand rubles. Machine tools produced in Russia cost 135 – 220 thousand rubles.
The sawmill consists of the following elements:
- Bed. It has a U-shape and is assembled from 2 parallel channels. A mobile trolley with a saw element mounted horizontally moves along the bed. Frames and brushes are also attached to it, designed to clean the working surface from sawdust and other industrial debris.
- Saw frame. This part is a device consisting of several welds. At its ends there are driving and driven pulleys. The saw frame moves using metal rollers and an electromechanical drive with driven and driven wheels.
- Guides. They are fixed in the middle part of the saw frame using brackets. Support rollers and log racks are located on the guides.
- Screw mechanism. It is necessary to adjust the thickness of the workpieces being processed. This element helps prevent the log from skewing during processing.
- Clamping device. It is designed to hold the log while sawing. The clamping device consists of a round pipe and clamps in the form of bushings.
- Saw. It acts as the main cutting element of the sawmill. Its average width is 6 cm. The saw is tensioned using a hydraulic or spring mechanism. It allows the operator to adjust the position of the driven pulley and prevents the cutting element from coming off the wheels.
- Tank for cutting fluid. It is used to prevent sawdust from sticking to cutting elements. The tank has valves for supplying liquid.
- Electric motor. It is designed to transmit torque to the pulleys and activate the chain transmission mechanisms that move the saw frame. The average power of the electric motor is 5 kW.
- Remote Control. It is located on the top crossbar of the woodworking machine. Next to the control panel, on the operator’s side, there are measuring instruments for accurately calculating the thickness of the resulting lumber.
The structure of home sawmills is organized in the form of several blocks. This design is easy to manufacture. Its disadvantage is low productivity. Therefore, these machines can only be used in domestic conditions to produce small amounts of lumber. The operating principle of this unit is to cut a log fixed on a special platform with a saw tool located in a horizontal position. The dimensions of the resulting lumber are pre-set by the operator.
What needs to be provided?
Before making, you need to pay attention to the following things:
- The diameter of the logs being cut, if there are large diameters, then you need a more powerful saw, a longer bar with chain;
- Loading heavy logs for sawing, for this it is necessary to provide some kind of mechanism, or they can be rolled up either by additional jacks or, ideally, by a loader;
- The log must be fixed so that it does not play during sawing and the boards are even;
- The chainsaw guide and sled should not play, so they need to be strengthened;
- The more powerful the saw, the easier production will be. Therefore, when purchasing a saw, you need to take the most powerful one;
- Using electricity as an energy source allows you to save a lot;
- Do not forget that the chain must be for longitudinal sawing, this will significantly increase the speed of the process. Experts recommend using a 3*8 chain.
- It is advisable to buy a carbide chain. This is what he is doing today. Conventional circuits fail quite quickly;
- The length of the logs to be cut must take into account the maximum and minimum. So that the longest ones fit in, and the shortest ones don’t fall between the guides;
- Calculate in such a way that the saw does not vibrate or play on the guides during operation;
- The power of the saw, in some cases you want it to be both more powerful and more economical. In this case, folk craftsmen do the following. Instead of a chainsaw, an electric motor is installed, and the tire is left for sawing, see photo below;
- The height of the sawmill. It is necessary to provide in such a way that the back does not hurt to bend over and the logs do not need to be lifted high. If the wood is not heavy, it is better to make it higher. If the forest is heavy, you can go lower.
- Sawing of wood can be carried out either by the upper part of the tire or by the lower part. When sawing with the lower part, sawdust flies towards the chainsaw and clogs it. The upper part throws out sawdust from the chainsaw, this allows you to increase both the service life of the saw and the downtime during sawing;
- During the sawing process, the chain very often stretches on the saw and needs tensioning. Therefore, when installing the saw, it is necessary to provide access to the chain tension and secure the saw with access to the mechanism;
- When sawing, it is better to fix the position of the chainsaw handle, this simplifies the process;
- The cable, clothesline or lace should not drag, since the sawing process should be uniform over time.
Band Saw Operating Instructions
The band saw is made of high carbon steel, which ensures maximum stability of the saw band when sawing.
To achieve maximum efficiency from the Taiga T-3 log band saw machine, the following conditions must be met:
- it is necessary to align the saw blade on the pulleys: the distance from the tooth cavity to the edge of the pulley;
- correctly align the guide rollers horizontally and vertically;
- when sharpening a saw blade, the shape of the tooth must be repeated exactly;
- The alignment of the saw blade teeth must correspond to the work being performed, for example: when sawing a log with a diameter of 20 cm compared to a log with a diameter of 80 cm, the volume of sawdust that must be removed from the cut is approximately 3.5 times greater.
During the sawing process, the saws heat up and, as a result, increase in length. As they cool, the saws tend to shrink to their original size, causing excess stress to arise in them. In addition, the saw retains a “memory” of the shape of the two pulleys, so it is necessary to cut at the minimum possible tension of the saw blade (150 kgf/cm for a 50 mm wide band and 150 kgf/cm for a 35 mm wide band).
Attention! During operation, especially in the first 10-15 minutes, the band saw heats up and its length increases. The saw needs to be tightened.
To relieve vibration of the band saw during the sawing process, support rollers are used.
RELEASE the tension on the saw as soon as you stop sawing.
How can you tell if your saw is set correctly?
The split can be considered optimal when there is a mixture of 65-70% sawdust and 30-35% air between the saw blade and the tree it is sawing.
An external manifestation that your saw is set correctly is that 80-85% of the sawdust is thrown out of the cut.
If you open the saw too far, a lot of air remains and insufficient removal of sawdust.
If the saw is not set, densely pressed hot sawdust remains on the surface of the board.
A saw that is set too far will cut in jerks; a saw that is not set too far will cut in waves.
Another very important point: only the upper third of the tooth should be separated; only the sharp corner at the very top of the tooth should be involved in the sawing process.
Sharpen the saw with minimal metal removal (i.e., remove burrs) and then cut it apart.
When entering a log, the saw jumps upward and cuts straight almost to the end of the log, after which it falls down. This phenomenon is called “squeezing”, i.e. presses the saw. This is caused by too large a tooth sharpening angle. The sharpening angle should be reduced by a couple of degrees.
When entering the log, the saw makes a jump upward and the board turns out to be curved “like a saber.” This is most likely caused by the fact that the sharpening angle is too large and the clearance is insufficient. The sharpening angle of the tooth should be reduced and the spread should be increased. The saw “dives” down and the board turns out to be curved “like a saber”. This is caused by an insufficient sharpening angle and insufficient setting at the same time. You should increase the sharpening angle by a couple of degrees and increase the spread.
There is too much sawdust left on the board and it feels loose to the touch. Divorce is not enough; it should be increased. Reduce the sharpening angle.
The cut goes like a wave. If the saw is sharp, then this is due to too small a gap; the gap should be increased.
A dull saw that has never been sharpened cracks along the tooth sockets. This is caused by the blade not being cut enough for the job they are trying to do, or by the blade being continued to be sawed after it has become dull.
The saw becomes cracked at the back. This is caused by the fact that the rear stops of the guide rollers are too far from the back of the blade.
Sawdust “rolls” onto the saw blade. This is caused by the fact that the saw is not set apart enough and there is not enough air left in the cut, the saw blade rubs against the sawdust, heats up and wood dust gets baked onto the saw. Increase divorce.
The sawdust “rolls” on the inner surface of the tooth, but this does not happen on the surface of the saw. This is due to poor sharpening quality (too much feed or too much metal removal and, as a result, poor quality of the surface on the tooth cavity), or too high a sharpening angle of the tooth, or the fact that they continued to saw with the blade after it had already become dull.
After sharpening, the blade becomes covered with cracks in the tooth cavities. During re-sharpening, too much metal was removed at one time, resulting in over-correction of the tooth surface.
Many problems are caused by the sharpening stone not being refilled frequently and accurately enough.
Making the sawmill base
And since it’s already the custom, it’s always worth starting from the foundation. Having decided on the installation location, start clearing the area for installing the machine. After clearing, it is necessary to compact a sand cushion from gravel and sand (the base will not sag). We install formwork and carry out concrete work.
The bases must be reinforced with wire or reinforcement. This will allow you to get away from variable loads, in simple and understandable language to relieve internal stress. This way we will avoid unnecessary cracks and damage to the base. You will also need to prepare mortgages, for what? More on them a little later.
After carrying out concrete work, when the concrete has set and hardened, you need to lay out guides from a 50 * 50 mm corner (edge to the top). This moment will allow our design to acquire a more rigid structure. The material can be used as a corner, a channel or an I-rail (these elements are more rigid compared to a profile or corner). We weld all the components together using an electric welding machine, and also weld them to the embedded parts.
After carrying out such operations, you need to think about how the log will be held on the frame when cutting. You need to make a fix. I won’t describe much, for this you will need to do the following, as shown in the drawing:
Read also: Why does the chandelier blink when the light is on?
This device will allow you to securely fix the material.
Design and principle of operation
A homemade band sawmill with your own hands greatly simplifies the sawing workflow. This method reduces wood loss during sawing. Advantages of a self-made band sawmill:
- High quality of material processing.
- Compact size compared to professional equipment.
- Precision in work.
- Affordable price.
- Simple device design.
- Light weight.
- Reliable and robust system.
- Silence.
- Easy to transport.
- Low energy consumption.
The structure of a band sawmill for woodworking is organized according to the principle of blocks. The unit uses an automatic saw feed system, adjustment of the cutting width of wood, and an indicator showing the load on the device.
Before you start making a band sawmill with a gasoline engine with your own hands, you need to prepare all the necessary materials and tools. You can buy some of them at hardware stores. A homemade cutting device will save money and get the job done efficiently.
The center of gravity of the device is close to the ground. This allows it to stay stable on any surface. The mass of the unit must be 2 times greater than the materials processed on the machine. The rail tracks of the band sawmill make it possible to easily move the tree in different directions and place it at different angles.
The basis of the band installation is the saw, which can reach 70 mm. This device is designed for long-term use when processing large pieces of wood.
There is an electric motor above the machine, which is convenient when cutting materials. The frame for the belt installation can be made independently. As a rule, it is strong and holds the entire structure for a long time.
The mechanism is lifted using a bearing support and additional pipes. The movements of the band sawmill are linear in the direction of the supporting parts.
The operating principle of the belt mechanism includes several stages. First, a log is placed on the rails. It is then secured with screws and stops on both sides.
The process must be under control. It is necessary to install, turn, clamp and move the material. A special lubricant cools the frame, which extends the life of the belt mechanism.
There are some difficulties in making a machine with your own hands:
- during installation: use of a welding machine;
- it is difficult to make a stable surface for installation;
- it is necessary to sharpen the tools correctly;
- It is difficult to achieve safety when operating the device.
The band sawmill is suitable for cutting wood. The place for making the machine must be lighted, ventilated and spacious. To ensure safe use of the device, careful handling of the cutting parts is necessary.
The procedure for making a homemade band sawmill
There are certain recommendations regarding the question of how to make a band sawmill with your own hands. These include the following:
It is important to choose the right location for installing the equipment. If an electric motor is used as a driving element, it is recommended to eliminate the possibility of increased environmental humidity to prevent a short circuit.
For ease of processing logs, the area of the workshop or shed should be at least 18 square meters. The work of a band sawmill involves manual feeding of logs, the weight of which is quite large. That is why work on creating the structure in question begins with the manufacture of the frame. It must be stable and have an elongated shape. One part of the machine is designed to accommodate the main structural elements, the second for feeding the workpiece. The elongated part, where the log is located before processing, has rails that help move the workpiece. During production, a profile with a cross-sectional area of at least 5 centimeters is used. Particular attention is paid to the evenness and horizontal guides. The homemade product cuts the workpiece in a horizontal plane. That is why you should consider how the height of the saw will change. Various mechanisms can be used. In our case, an electric motor is used to transmit rotation to the main structural elements. When choosing an electric motor, it is taken into account what voltage it should be powered from (220 or 380 Volts), what power is needed, as well as the placement of the main fastening elements. It is recommended to choose a motor that is powered by a 220 Volt network and has a power of at least 2 kW. The power of the electric motor determines how productive the created machine will be. If you choose the wrong electric motor, it will overheat during operation.
The electric motor mount must be located on the opposite side from the place where the workpieces are fed. In this case, it is important to pay attention to the strength of the fastening - during operation, a great impact will be exerted on the electric motor. In most cases, the electric motor is placed under the frame, creating a protective casing (from water and mechanical stress). The next important point is the type of drive used to transmit rotation. For many years, direct installation, when the output shaft of the electric motor is rigidly connected to the cutting element of the band sawmill, has not been used. The reason is that the load on the electric motor will vary over a wide range, and there is no protective mechanism to prevent the saw from stopping. Therefore, the drive used is a combination of pulleys and a belt. If the load is large, the belt will slip. By changing the diameters of the pulley, you can reduce or increase the rotation speed of the cutting element of the machine. However, the power from this remains unchanged (the use of a belt drive determines the loss of several percent of efficiency). In addition to the above points, it should be taken into account that over time the belt wears out, the movement of the pulleys leads to the appearance of sound. An important design element is the rollers on which the cutting blade is attached. One of the rollers is driving, the second is tensioning. Let us note the point that homemade versions are often created using ordinary wheels instead of rollers. When creating this structural element, it should be taken into account that the tape must have good tension, for which one of the rollers is spring-loaded. When creating a structure, you should pay attention to the strength of fastening of all elements, since during sawing a strong lateral load may occur on the blade - if a mistake is made, it can fly off.
The above points indicate the main points for the production of a homemade sawmill. You can make a band sawmill yourself at minimal cost. After all, you only need to buy or find an engine, pulleys and rollers, find a metal profile for the frame and a blade for sawing. The reliability of the design depends on the technical condition of all components and the quality of their connections. Therefore, before using the sawmill, you should check it carefully.
Drawings and design
The dimensions of a homemade sawmill may vary among different designers. The main requirement is that the structure must be stable and trouble-free (as far as this is possible in reality when performing sawing work every day).
To begin with, they create on paper reduced versions of a copy of the mechanism to be repeated to solve specific issues.
For a band sawmill, the length of the unit is at least 6 m. This is the size of industrial boards (edged and unedged) produced at the sawmill and supplied to building materials warehouses. The width of the device is at least 3 m: this distance provides vital space for efficient and fruitful work on such a machine.
When the dimensions of the future machine are familiar to the home craftsman, he will estimate how much consumable material will be needed to manufacture the device. The basis of the machine is a support frame and rail guides, without which the sawing work of cutting a tree trunk into boards would be carried out with a noticeable curvature of the produced wood material.
Strengthening the machine in the projection of the parallel corners of the guides will require the installation of transverse spacers, spaced no more than 2 m from each other.
When working on a sawmill in a garage, you will only need a drawing of the main device. The operation of a sawmill in an open area will require a canopy that protects from precipitation and significantly reduces wind flows that destabilize work in adverse weather conditions. In other words, the workplace is prepared before the sawmill assembly begins. Further calculations of the main functional units are carried out as different stages of assembly pass, and the master, in turn, must clearly imagine what the assembled unit looks like and how quickly and convenient it is to work on it.
Installation features
Equipment of this series is easily installed on a concrete base or just beams along a rail track, but only of high strength, with a system for fixing tree trunks. An enclosed space is not necessarily required to secure the unit. It is convenient to use in an open area, but you need to provide protection from precipitation. Extending the path allows you to saw logs longer than eight meters.
Cleaning scrapers are located in the lower part of the saw body supports, through which the path is cleared of waste. Movement along the guides is carried out manually.
Scheme of the Taiga band sawmill
The vertical movement of the saw unit in such models is carried out through a mechanical gearbox with a chain drive, which ensures the required stop in the required position and precise adjustment of the lifting height. In Taiga T-1, the carriage is raised by manual rotation of the gearbox input shaft, in other modifications this is done automatically.
The band saw is installed on the drive and output saw pulleys. Rotation from the engine is transferred to the drive pulley by a belt drive. The working unit is equipped with calming rollers, ensuring uniform tension and preventing possible sagging.
To prevent the saw blade from jamming due to exposure to tree resin, the saw has a lubrication system that allows you to regulate the flow of lubricants. This ensures the long-term integrity of the unit.
The equipment is controlled using a push-button remote control located on the saw carriage; the machine master is able to be in a comfortable position when performing the operation of sawing the workpiece.
Sawmill control panel
Rules of use and safety precautions
After manufacturing and setting up, you can use the sawmill for work, observing certain rules and safety precautions.
It must be remembered that the canvas can tear, burst or come off. Therefore, if you have doubts about the reliability of the fastening, it is better to stay at some distance from the equipment.
There are the following rules for operating an electric saw:
- The size of the saw teeth is directly dependent on the workpiece. The larger the part, the larger the teeth of the blade.
- It is most practical to use universal tapes. Then, when changing the material being processed, there will be no need to change the blade frequently.
- You need to select the installation location of the device in advance. There must be an outlet nearby and the place itself must be well ventilated.
- Before work, check the tension of the cutting belt.
- It is not recommended to turn on saws for more than two hours at a time. After such intensive work, the tape is removed from the pulley and left to “rest” for twenty-four hours.
- The machine needs regular lubrication.
- The teeth on the saw must be set correctly.
As a result of proper assembly, the tool you need on the farm will appear, assembled according to the drawings of a band sawmill with your own hands. With a little skill, working with it is convenient and easy. The original cutting material is transported by trolley. Saw material is placed on the bed, fixed, and the log or other material is processed using a saw.
A homemade band saw needs care and regular checks. If fasteners fail or become loose, it is better to stop work and correct any deficiencies noticed. When operating the device, you must be careful and careful.
General characteristics
It's no secret that wood is one of the most popular materials in private construction.
Despite the rapid expansion of the range of such products and the emergence of cheap alternatives, wood is still in demand and has no analogues. And although purchasing good material in a hypermarket is not considered difficult, because solutions in the form of boards, timber or slats are available in every building materials shopping center, the opportunity to make similar products at home looks much more attractive. This is not strange, because in this case you deprive yourself of many costs, and the only thing you need to buy is commercial timber. But cut lumber is very expensive. Naturally, it is unwise to buy your own sawmill to touch up a renovation or repair a roof. If you intend to build some kind of structure on a clean site, then a sawmill can be a very useful solution. And if you also try to make it yourself, this will reduce the costs to a minimum.
Today, several key modifications of such equipment are used. However, if you intend to make a homemade sawmill, then most likely you will need to choose between two main types:
- option with fixed saw placement,
- option with a trolley where the workpiece is fixed.
It is she who moves along the rails during operation. Any other varieties are modernized versions that significantly simplify the task and ensure maximum quality of work. For example, you can take a mobile saw.
The dimensions of the structure depend on the location. It is no secret that all areas (adjoining houses, country houses, etc.) have their own characteristic layout, so the selection of the optimal dimensions of the machine must be approached with special care. Any drawings available on the network (relevant literature, Internet resources and other sources of information) serve as “guidelines” - in terms of individual components, parameters and other properties. A homemade sawmill is made in such a way that it is convenient to work with it in a specific place under specific conditions. In most cases, such solutions are used for dissolving logs and cutting boards.
Main types of sawmill
Today there are several types of sawmills. Each option has its pros and cons.
Band sawmill
The mechanism is based on the block principle. The device can function with both cheap and expensive components. The sawmill consists of a frame, a mechanism for tensioning the saw, a motor, a clamp, a wheel, and a belt drive. Sawing of the log occurs using a band saw. And to ensure proper operation, retaining rollers are provided. This is a very convenient device, but it has its drawbacks.
- A wave effect is possible when sawing logs.
- Equipment operating skills required.
- Before sawing, you need to adjust the machine.
Disc corner sawmill
By far the most popular model. Also used in wood processing enterprises. The design of the equipment is very simple. It consists of a support on which a shaft with a disk is located.
When sawing, the disc moves along the log. This allows you to achieve accurate results.
Tire frame saw
The equipment is easy to make yourself. The structure consists of a carriage, trolley, support, saw, motor and tire. Suitable for cutting long logs. It has small dimensions. The device is easy to transport. Operates from the electrical network or from a fuel generator. This equipment is not suitable for working with large quantities of wood. Typically used by private individuals.
Frame sawmill
The rarest type of device. During operation, the mechanism remains motionless. Capable of sawing large quantities of wood at once. The main disadvantages of the device:
- Large amount of waste.
- Large-sized design.
- Large cutting element thickness.
Main advantages:
- Ease of maintenance.
- Reliable design.
- Durability.
Review of popular units
The Taiga sawmill is characterized by a wide variety of models.
Sawmill Taiga
Taiga T-1 is a modification of the sawmill with manual movement of the saw carriage in the vertical direction; manipulation allows it to be used in conditions of power problems. The compactness of the machine allows it to be transported by a UAZ vehicle.
Taiga T-2 was put into production in 2002; many consumers transport the unit by Gazelle vehicle. In the transport position, the machine can be easily disassembled; this feature allows two workers to handle loading and unloading operations. It is not a problem to use in a private area or in the event of power outages.
Taiga T-2M or an analogue of the Rainbow band sawmill has a high cost, the device is highly attractive in terms of price and quality. A lightweight modification that does not lose performance, but makes transportation easier due to its low weight.
Technical characteristics of the Taiga T-3 sawmill
The Taiga T-3 sawmill is used for sawing logs in the longitudinal direction. The output is finished products of the required width and thickness.
The engine of this unit allows you to perform work in shifts and process timber of different hardnesses. The saw carriage has a reinforced structure. The gasoline unit is often purchased separately.
Fuel consumption is up to 1.5 liters with a power of 10 kW. It is possible to run the engine idle; this feature makes it easier to start and reduces gasoline consumption in case of downtime.
Taiga T-4 is a large-sized sawmill, characterized by high productivity and high power consumption. Currently not in serial production.
Assembly order
The DIY installation process is divided into 3 stages. After each, the dimensions, tolerances, and stroke limits of the moving parts are checked against the working drawing.
- Support frame frame. Welded (bolted) joints are made. They check the quality, diagonals, location of seats, stability.
- Feeding part. In the case of a fixed table, the level is set to a horizontal plane. The coincidence of the longitudinal axis with the supporting frame is recorded. For a moving platform, first place the rails at the same level coaxially with each other and the base. Load the trolley with a check for smooth running and no chafing of the wheel flanges. A small homemade circular sawmill can have a light trolley on bearings and rollers. For them, a guide track is made from a corner for passage forward and backward. On larger models, the principle of moving a carriage with a disk above a log fixedly fixed on the table is used.
Household disc sawmill Astrogan 2
Cutting organ. The first to be installed is the sawmill shaft with the saw. The support bearing assembly is mounted on the subframe, the axis of rotation and the presence of runout are checked. Then the engine is hung on the mounting slots. The fastening bolt should not be located at the edge of the groove. If a V-belt/chain drive is used, then with repeated revolutions it becomes loose and subsequent tensioning is necessary. When replacing with a new product, the motor is again fed closer to the shaft. Continuous adjustment can be made with spacer bolts on each side. A heavily tensioned belt or chain will overheat when the equipment is in use for long periods of time.