Just recently, homemade plywood boats were at the peak of popularity. Currently, quite a large number of various techniques for processing plywood have appeared. But since the watercraft in question plans to be small in size, nothing complicated will be needed to create it.
The affordable cost of materials, mobility and simplicity of design are the undeniable advantages of a homemade plywood boat.
General information
One of the most common models of boats made from fiberglass material is the WaveRunner-285 boat. It is considered a full-fledged planing vessel, which is quite suitable for walking on the sea or tourism. The ship, which is characterized by the fact that it has an increased freeboard, as well as a fairly large width, is also convenient in that its bow can accommodate a comfortable salon with an adjacent toilet and galley. In the stern of the boat, you can make a double cabin with your own hands, the location of which will be located strictly under the cockpit. The unit control department will be located above the engine compartment, and it will also be protected from wind and water splashes by inclined glass.
Cutting, making parts
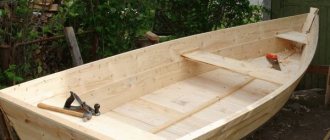
All markings are made on plywood sheets, after which the material is cut along it. For this you will need an electric jigsaw. Do not attempt to cut plywood with other tools. Otherwise, it will result in poor cut lines and chipped material.
The tailgate and frames are glued to the required thickness and strength.
At the beginning of assembling the boat with your own hands, you need to make calculations, and then mark and cut the plywood with a jigsaw.
If it is still a boat or motor boat, then the transom must be additionally covered with fiberglass and reinforced. A hardwood board will help with this. To increase strength, some connections can be further reinforced with self-tapping screws.
Professional advice: if you still decide to do the design yourself, do not make a mistake with the calculations of the carrying capacity, otherwise later you will only be able to boast of a decorative “vessel”.
Boat power
When equipping a boat with your own hands, you need to consider which engine will be installed on it later. This particular model is designed to install either one or two motors. However, it is important to consider here that the total power for the normal functioning of the facility should be in the range from 250 to 500 hp. With. They must also have a direct reverse gearbox, which will allow them to reach a speed of 15-30 knots, which in km/h ranges from 28 to 56. In addition, the vessel may also have propulsion systems or additional outboard motors.
It is worth noting that building a boat with your own hands saves from 50 to 75% of material resources from the amount that would have been spent if the unit had been purchased at a shipyard and not built independently. It is also worth noting that the given technology for building a small vessel is not the last word in shipbuilding. This is just a practice-tested, established method that will allow you to construct an acceptable fiberglass boat with your own hands.
Beginning of work
Starting the construction of a small fiberglass boat is no different from building from any other material. The first step is to lay out the theoretical frames, as well as the contour of the stem, on a plywood panel or on a sheet of cardboard. The breakdown should be carried out in the actual size of these parts.
It is also important to note that the board or plaza on which the layout is made must have a width corresponding to the width of the boat, plus 300 mm. The height of this object must be 400 mm higher than the expected height of the housing. Experts recommend first creating drawings of the boats, on which all the necessary parts will be marked with dimensions. This is done in order to avoid mistakes during the manufacturing process.
Another important detail is that the upper ends of all frames must be extended to the height that is shown as a horizontal line on the plaza. It is perpendicular to the DP line and is called the Shergel line.
Assembling patterns
When carrying out work on plasma marking of patterns, it is very important to take into account factors such as the thickness of the slats and the thickness of the sheet metal that will be used as lining of the inner surface of the matrix. In other words, when drawing up a drawing of a boat and subsequent assembly, it is necessary to set aside from the theoretical line of each of the frames the distance inward that will correspond to the total thickness of the slats and sheet metal. It is this marking option that should be used when cutting out patterns and their further assembly.
The individual parts of the transverse patterns must be connected using materials such as linings and brackets made from pieces of plywood with a thickness of 8 to 10 mm. A similar indicator is suitable for a boat whose length will be around 10 m. It is best to glue the linings to the patterns, and then additionally screw them with screws or nail them.
How a fiberglass casting from a matrix became a boat
For most people, having your own boat is associated with the luxury and wealth of the owner. The reason for this is Hollywood propaganda of the American way of life: huge boats with cabins and Jacuzzis, equipped with powerful stations that create a huge wave and consume tons of fuel...
The first question of the buyer of a boat or motorboat is usually this: Does it have a cabin?
He still doesn’t know why he needs this cabin, because he will always have to carry this cabin with him - in the wind, in the calm and on the waves. She will slow down and sail forever...
By and large, I needed a simple motor boat: light, attractive, economical and fast, with little habitability - exclusively for overnight stays.
Many different options were looked at, their pros and cons were taken into account, and I already had a little motorboat experience, and I knew what I needed: a keel hull of more than 5 meters (for traveling on waves), without a booth - a minimal superstructure (to reduce weight, windage and rollability).
Such boats were only seen in pictures in foreign magazines - the circle was closed.
In the magazine “Boats and Yachts No. 172. Summer 2000” I read an article by Riga resident Evgeniy Sletin about his “Vikings”, and I understood - what I needed! Through the editorial office we managed to contact him, and the lower shell was brought from Riga - the first casting from the new matrix of the Viking-19 boat, and a boat was designed on its basis.
The top shell is plywood covered with a layer of glass mat on which gelcoat is sprayed. The gelcoat is sanded and polished.
Later, the KiYa magazine published an article about the construction of this boat.
This is what happened with the help of hands, desire and... a little money for cognac - to dilate the blood vessels in the brain:
Stages of boat construction
After the sea voyage Kaliningrad - Rostock [Rostock], the upper shell began to come off from constant blows. The joint was sanded, degreased and 2 layers of glass mat on polyester resin were applied. The aluminum tank was also replaced with a stainless one made of 2.0 mm steel, because... the aluminum began to leak for the second time - gasoline oozed through the micro holes.
As a fuel level sensor in the tank, a sensor from VAZ is installed (available for different resistances) and a device is also from VAZ (it has a diameter of 55 mm, like marine instruments, and costs 10 times less).
Because the alignment turned out to be aft - later homemade transom plates were installed, which improved the ride on the wave and at low speed.
Equipment and sea trials of the boat
Video clip about the creation of the boat - “The History of a Vodka Engine” Installing hydraulic controls on a boat Send us your story about the construction of the boat, its equipment, and it will be posted on the website!
The boat was not built for sale, but for operation, so below are links to reports on its use.
How to make a boat: plating and matrix
Next, before assembling the existing patterns into a matrix, it is necessary to attend to the creation of the outer cladding of the structure. In order to create the most comfortable conditions when working with the outer skin of the boat, it is necessary to provide a part that ensures the tilt of the matrix on both sides of the ship.
If you do everything correctly, you will be able to work while standing on the floor next to the workpieces. The matrix itself, in any case, must have a very strong and rigid structure. This is necessary so that during the construction of the unit the shape of its body is not distorted.
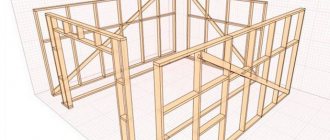
How to make a boat with a strong matrix? Large structures are assembled from longitudinal beams, which will form the horizontal base of the boat. Inside the resulting frame, it is necessary to install walkways that will facilitate the work of gluing the body. After the longitudinal beams, which are the base of the matrix, have been installed, the future position of all the patterns is marked on them, and a steel wire is stretched along the beams, which will be a string indicating the vessel’s DP.
Installation of patterns
It is recommended to start the process of installing blanks from the midship frame. Before securely fastening this element, it is very important to make sure that the pattern is strictly vertical and perpendicular to the DP. It is attached to the beams that serve as the base. After all the other workpieces have been mounted, the stand located in the transom DP has been installed, and all the elements have been braced with braces to avoid any movement, you can proceed to the stage of covering the inner surface of the matrix using longitudinal slats.
To perform this task, material with a thickness of 12 to 15 mm and a width of 50 mm is most often used. To equip the bottom of the boat, it is better to use slats with the same thickness, but greater width - up to 100 mm.
Main works
The main material needed is plywood. It makes no sense to list all the advantages of plywood sheets. It should just be noted that FSF sheets of different thicknesses (from 5 to 15 mm) are needed for the manufacture of individual parts. This moisture-resistant material will be processed several times during work. It is important to pay attention to the fact that the plywood is of high quality: it does not have cracks, all kinds of knots, and various delaminations. The reliability of your boat or boat, including your safety, depends on this.
To make a boat with your own hands, you need to prepare sheets of high-quality plywood of different thicknesses.
Pro tip: the larger the sheet, the more convenient, faster and easier it is to work with.
Also in the process, in addition to plywood, you will need:
- Wood. Necessary for the design of internal struts, sides and seats. The choice should be made on edged planed boards. As a rule, lighter types of wood are suitable for this.
- Suture material. Necessary for fastening the cladding parts into one whole. A thin wire, a plastic clamp or a nylon line (thicker) can help with this.
- Glue. It is necessary to ensure that the seams have proper tightness. In the age of progressive technologies, more and more craftsmen prefer polymer resins.
This list can be continued, but if we stop at the essentials, then we can supplement it with various varnishes and impregnations that serve to prevent swelling and rotting. To cover the seams you will need fiberglass or its equivalent - fiberglass. And don't forget about beauty. Paint will help you with this.
If we talk about choosing a tool, the list can be considered almost standard:
- saw for working with wood:
- jigsaw/jigsaw, set of blades of various sizes;
- grinding machine;
- hammer, chisel, pliers, etc.;
- various brushes: varnishing, impregnating, for painting material (plywood).
It’s difficult to give advice on choosing a model. After all, each master has his own preferences. You can take medium sizes:
- The length of the average swimming structure will be 3.5 m.
- Width – 1.35 m. This is quite enough for a boat/boat.
- Side height – 50 cm.
All about do-it-yourself roofing – kryshikrovli.ru.
Aluminum water boat
The low cost of raw materials, as well as lathes, has led to the fact that many owners have decided to independently manufacture certain parts and elements from metal. It is believed that the production of an aluminum boat is one of the most difficult tasks, which is practically impossible, but at the factory they are created without difficulty, since they have special tools for this. However, this is not so.
The most difficult thing in making this type of boat yourself is making its pattern from metal. This term refers to the marking of exactly how it is necessary to cut out the necessary parts from aluminum.
When making such a unit from metal, the whole process comes down to assembling a kind of construction set. This is true if the blanks are not cut out yourself, since this still requires a lot of skill and high-precision equipment, but a computerized model of the boat is purchased. Yes, the cost of such a model will also be quite high, but if you compare it with buying a ready-made vessel, you will see significant savings.
High-speed small craft
Another option for a vessel that you can make yourself is a speedboat. A rather important part in the construction of this type of unit is the choice of engine and its location. This part can be placed in the cockpit of the vessel, and the part that will protrude can be covered with a hood.
This definition of the place was not chosen by chance. It will expand the range of devices suitable for installation. You can use engines from cars such as Zhiguli or Volga. In addition to these models, it is quite possible to install a diesel engine from a tractor. However, this is only possible if additional hot air removal is provided. You can use a fake chimney for this.
Air-cooled engines can also be installed. Since a high-speed boat must have good stability when moving quickly through the water, it is recommended to place this part closer to the center of gravity of the entire vessel. The greater weight of the engine will give greater stability to the entire structure.
DIY sports RC boat)
I decided to build it from balsa: the internal frame is 2mm, the outer skin is 1mm.
The inside of the hull is impregnated with liquid epoxy resin and has a large number of stiffeners hidden under the double deck. After complete assembly it turned out to be very durable and does not play anywhere.
Closer to the end of manufacturing the body, all the components for it were ordered. The list was very long. In total, the components and delivery cost almost 10 kilo rubles.
From the main one:
- Turnigy 5200mAh 2S 30C lithium polymer battery in a hard case (weight: 336g ) - www.parkflyer.ru/product/191560/ - high-speed digital servo BMS-621DMG + HS (metal gears) 7.2kg / 0.10 sec (weight : 46.5g ) - www.parkflyer.ru/product/9439/ - regulator for Birdie 100A boats with 5A BEC (weight: 114g ) - www.parkflyer.ru/product/167451/ - steering wheel (large size) (weight: 110g ) - www.parkflyer.ru/product/102678/ - brushless Inrunner 2848SL 3900kv (water cooled) (weight: 153g ) - www.parkflyer.ru/product/8594/ - carbon corner stabilizers (weight: 30g ) - www .parkflyer.ru/product/102685/
— adjustable sternshaft bracket (weight: 40g ) — www.parkflyer.ru/product/102697/
— shaft with coupling and propeller (set) (weight: 20g ) — www.parkflyer.ru/product/104322/
— 6mm x 300mm brass tube (weight: 20g ) — www.parkflyer.ru/product/102663/
— adjustable transom plates (weight: 43g ) — www.parkflyer.ru/product/104593/
Hobby King GT-2 2.4Ghz (2 channels) equipment was chosen as radio control. Well, and, accordingly, a huge number of necessary connectors, fasteners, heat shrinks, propellers of different diameters and pitches for selection, rods and everything else).
Charging with a balancer, adapters for charging were purchased in advance, so that was all.
So, I'm posting photos of the construction process. I’ll also upload a video of the very first swim)
I’ll say right away that there was a lot of joy and adrenaline when you see how a model you built with your own hands functions quite well))).
Regarding its weight and dimensions:
the weight of all the filling used so far is 845g ;
bare body weight - 260g ;
fully assembled weight - 1105g ;
length including rudder - 830 mm;
transom width - 150 mm;
maximum height (including cabin) - 105 mm.
After selecting the screws I settled on this:
— propeller on a 4mm shaft (size: 43mm x 26mm x 9mm ) (weight: 9g ) — www.parkflyer.ru/product/7356/
Watch video from 1.09 minutes)