When there is serious construction ahead, you need to temporarily live somewhere, relax, store some things - in a word, you need to set up a temporary home. For this purpose, a small house is built - a change house, in some cases temporary, but it is more reasonable to provide for its use in the future, for example, as a guest house, a small garage, a summer kitchen, a place to store equipment and household items. The structure can become a decoration for your site.
Such a small house can be made with your own hands. Let's consider several options. There are three main options: wood, metal profiles and a finished trailer. The dimensions of the cabin are usually 5-6 m in length and 2.5-3 m in width. But everyone decides for themselves, taking into account plans for the further use of the building.
Layout of the site for construction
Before you start building a log cabin with your own hands, you should prepare and plan the site where the future structure will be located. To prepare the site, according to the prepared drawing, which shows the full dimensions of the cabin, you should find a suitable place on the summer cottage that would correspond to the parameters of the future object.
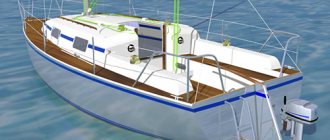
Spacious change house with an original design
If the search is successful, preparation of the selected area should begin. The site must be level and clear of weeds, bushes and other elements. After the site is completely cleared, it should be treated with poison or saltpeter, which can prevent further spread of vegetation.
Having completed the stage of combating vegetation, care should be taken to lay an insulating layer that can protect the building from moisture coming from the soil.
A very thick oilcloth, which can be bought at any construction supermarket, is suitable for this.
The main thing is not to save money and choose the most dense film, which can double the service life of the foundation.
After laying the insulating layer, level the level and make a slight slope, applying a layer of sand mixed with crushed stone. This action will not only strengthen the base, but will also help provide additional drainage.
You can see what a terrace attached to a house looks like in this article.
What a wooden country house with a veranda looks like is detailed in this article.
The article contains drawings of a garden gazebo made of wood, which you can make yourself:
Let us return again to the importance of this point, since wooden cabins can accumulate excess moisture, which will have a detrimental effect on the durability of the building.
Recommendations
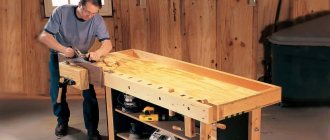
Construction of a 3x6 m shed is considered painstaking work, but you can easily handle it yourself, without the help of specialists. This will help significantly save the cost of installing the structure. If you are making a change house with your own hands for the first time, it would be useful to consider the following tips:
- before interior design of walls and ceilings, the location of electrical appliances should be determined, since the wiring must be carried out in plastic or metal sleeves;
- Before attaching too heavy objects to the walls, you should install an additional crossbar;
- You can only equip a shower or bathroom with moisture-resistant materials; installing a dry closet would also be a good option;
- In order for the change house to be used in winter, you will need to install a heating system, and also during construction, lay thermal insulation materials on the walls, roof and floor.
To learn how to make a 6x3 change house with your own hands, see the following video.
Choosing material for the shed
Today, the most popular are country houses made of laminated veneer lumber. This material allows you to build a high-quality and at the same time inexpensive change house. A similar beam is used to create a frame for walls and roofs.
Spacious wooden cabin
The base of the building is best made from profiled timber. It is stronger, more durable, but, accordingly, more expensive.
This material is also perfect for a terrace and can provide the necessary structural strength. The amount of timber should be prepared based on the preliminary construction plan.
The easiest way to cover the walls and roof is with boards 15-20 millimeters thick. You should also take care of the insulation of the building.
The best material for this may be polystyrene foam or thick foam rubber, which is also very easy to purchase at a hardware store. The drainage part of the roof can be made from a large amount of material, including: sheet metal, roofing felt, tiles and other types.
More photos of wooden cabins can be seen in this article here.
Foundation
How to build a cabin - step-by-step instructions for building a cabin begin with the foundation.
The peculiarity of a small wooden structure is its low weight. But even this does not mean that it can be placed directly on the ground. To protect against the effects of soil moisture (including precipitation in the form of rain and snow), a raised base is necessary.
The simplest type is a columnar foundation. Its strength is enough to support the weight of the cabin. For temporary placement (setting a horizontal level), bricks or cinder blocks laid simply on the ground are often used.
But in any case, it is better to use solid blocks. An option like the one in this photo, even for a temporary foundation, is not the best choice, especially since the block was initially laid sideways and the pressure falls not on the walls, but on the voids.
We begin the construction of a change house from the basics of the foundation.
Although cinder block is a type of concrete, hollow blocks are used to build walls.
Even a columnar foundation must be done according to the rules. A small depression is dug under each base, the bottom is tamped, a cushion of sand (at least 20 cm) is poured in, which is watered with water to compact it, and blocks are laid on top. Sand prevents the capillary rise of moisture by acting as drainage.
There are alternative options for a columnar foundation.
A geomembrane is laid on the ground cleared of the top layer, a layer of sand is poured on top, and then a base is laid out from blocks.
Foundation for a change house
Instead of sand, you can use crushed stone of small or medium fraction.
How to build a construction trailer
Even large format paving slabs can serve as the basis for a columnar foundation made of blocks.
For permanent dislocation, it is possible to use asbestos-cement pipes as pillars, dug to the depth of soil freezing and filled with concrete. This is if it is not a construction trailer being built, but a summer cottage trailer.
The distance between the pillars is usually chosen based on the size of 1.5-2.5 meters. Therefore, in addition to the corner supports, there will be 1-2 additional ones around the perimeter plus internal ones (for partitions and for timber that provides rigidity to the subfloor).
In addition to the columnar foundation, the arrangement of a slab foundation is applicable. Of course, a reinforced concrete monolith is redundant for such a structure, but large-format paving slabs on a sand-fill base are quite suitable.
Highlights of the construction process
To make the change house inexpensive, you can make a simple foundation, especially since there is no point in installing such a lightweight structure on more expensive supports.
Foundation and base
The foundation option under consideration can provide the necessary ventilation, which can easily eliminate excess moisture after rain.
So, we install concrete block elements; if they are unavailable, we can make do with bricks. Between the stone and the timber, insulation should be placed, the best material for which would be ordinary roofing felt, rolled up in two layers.
Next, we use a wooden beam 100x150 millimeters thick and begin to lay out the base, which should be in a single horizontal plane.
The timber should be laid strictly level. The base elements are secured to each other with end brackets. Sheet metal and dowels need to be used to secure the load-bearing base to the foundation.
If the summer cottage will be transported in the future, it is worth leaving only a minimum number of fastenings of the base to the foundation, so that in the future you can simply dismantle the entire structure.
What is the technology for waterproofing a pool is described in detail in this article.
How copper sulfate is used in a swimming pool is described in detail in the article.
You can find out what the bowl of a polypropylene pool looks like and how much it can cost from this article here:
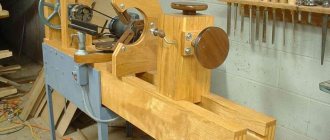
Installation of the cabin frame
Installation of the frame begins by making corner structures.
Material 50x100 millimeters is perfect for this.
Fastening is best done on metal corners, securing the racks with temporary wooden supports, which are dismantled when leveling a single plane.
Vertical beams are erected in the same sequence. For intermediate partitions, timber with parameters of 50x50 millimeters is perfect. And this is what summer cottages made from sip panels look like.
Roof of the cabin
The next stage in the construction of a summer cottage is the installation of the covering, which must be strong and even so that there are no problems in the future with the installation of the roof.
The process of laying roofing material
The rafters should be mounted in equal spacing at a distance of 60 centimeters from each other. Beams are also secured using metal corners and self-tapping screws.
Remember that the wooden roof elements should be slightly longer than the base of the frame. This will create a canopy that ensures proper drainage of water during rain.
Marking window and door openings
When building a turnkey log cabin, you should take into account the location of window and door openings. To do this, you need to install additional horizontal racks, which can strengthen the opening and ensure easy installation of windows and doors.
Two-section change house
Entrance and window elements can be installed immediately to reduce time and provide the structural rigidity necessary for further construction.
Floor installation
The simplest stage in the construction of a log cabin is the installation of floors.
To begin with, you should lay a layer of insulation, for which you can use the same dense polyethylene.
It is also simply secured using a construction stapler.
Following this, a timber frame with parameters of 100x100 millimeters is laid, onto which a floorboard 15-20 millimeters thick will be attached. An important point at this stage is to treat the board with protective agents that can prevent the material from rotting and the appearance of pests in it.
External cladding
The walls of the building should be sealed with a film that can protect the object from wind and moisture.
Traditional cabin with veranda
All steps are similar to the previous ones: the insulating material is secured using a construction stapler, and the seams are additionally sealed with tape.
Following sealing comes one of the last stages - sheathing, which can be carried out either using boards or chipboard.
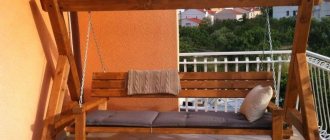
Almost all garden sheds located in dachas and made of timber have terraces .
Railings can also be made of wood, having previously treated it with sandpaper and painted or varnished.
Interior arrangement and decor of the cabin
Wooden houses and cabins are arranged in the same manner, which depends on the purpose of the room.
If this structure is technical and is intended purely for storing equipment, then the walls can be left untouched and everything can be left as is.
If desired, you can arrange a sleeping place using available material. Provide lighting and a portable water source.
Making the base
Our foundation will be the same for all three cabins. The only exception would be a ready-made trailer on wheels - there is no need to build a foundation for it.
FoundationFoundationFoundation
We make the basis as follows:
- we get rid of the top fertile layer of soil;
- compact the bottom and walls of the resulting pit;
- cover the hole with geotextiles;
- pour a layer of sand over the geotextile and compact it thoroughly;
- We place the cinder blocks symmetrically on the resulting pillow;
- We wrap each support with a layer of roofing felt.
Important! If you plan to attach a small porch to the shed, consider installing supports for it at the same stage
Electricity
We will not install full-fledged wiring into the change house. Such buildings are not permanent and do not require such equipment. But how, in this case, can at least organize lighting and heating? A good extension cord with a cord of suitable length will help us with this. We turn it on to the nearest available source of electricity and pull it into the change house.
In a change house, we can include a tee in such an extension cord for greater convenience and the ability to use several electrical appliances at once.
Lighting
We arrange it at our discretion. In general, a few simple lamps installed in the main functional areas will be enough for a change house.
Heating
The heating is done electrically. A budget option is a pair of fan heaters. More expensive and efficient - an oil heater or convector. We select the power of the heating unit in accordance with the area of our shed.
At the end, all we have to do is furnish the room. At this point, we focus entirely on our preferences and needs.
| Parameter | Wooden cabin | Metal shed |
| Parameter | Wooden cabin | Metal shed |
| Price | Cheaper. To further reduce the cost, natural wood can be replaced with wood boards. | Expensive. Metal has a higher cost. |
| Durability | Lasts less than metal ones. Wood does not tolerate moisture well. | Lasts for decades. |
| Mobility | It is easier to transport, but there is no guarantee that the wooden structure will withstand transportation normally. | Transporting is more difficult, but safer. |
| Possibility of installing communications and additional elements | Can. More difficult. | Can. Easier. |
| Environmental friendliness | Eco-friendly | Less environmentally friendly when compared with wooden cabins. |
Good luck!
Prices for popular models of electric heaters
Electric heaters
Exploitation
Year-round operation of the premises is impossible without electricity, heating and ventilation devices supplied to it.
The roof of a one-story building is made of a single-pitch or gable roof. Water and snow drain from such roofs by gravity. This will prevent leaks inside the room.
Winter water supply is buried to the depth of soil freezing. This value can be viewed in SNIP “Building Climatology”.
Pipes that are located above the freezing depth are equipped with heating elements. It is turned on if the water in the pipe freezes due to irregular use.
Heating of the cabin
Before commissioning, it is necessary to consider how to organize heating.
To heat the room the following are installed:
- wood burning stove;
- electric heating devices (oil radiator, infrared heater, convector);
- gas heater.
When installing the stove, the walls and floor of the cabin are protected from direct fire with metal sheets.
All heating devices are located in a free place, away from flammable materials.
Covering external structures with thermal insulation materials reduces heat loss. Reduces energy consumption.
Ventilation in the cabin
When waterlogged, wooden interior structures absorb moisture. Fungus and mold form. The tree needs to be replaced. When the air is too dry, the interior finish dries out and cracks.
Both excessive moisture and dryness inside the room should not be allowed.
Ventilation solves these two problems. With its help, a constant climate is maintained.
There are two types of air exchange systems:
The first ventilation system consists of an air duct that removes air from the room to the street. To create traction in the system, the height difference from the fence to the outlet should be several meters. On the room side, a plug with an adjustable mechanism is installed on the air duct. Outside, a mesh and a protective element are placed on the top of the pipe to drain raindrops.
In a forced ventilation system, there is no need to create a height difference. The air is driven by a fan, which is electrically driven.
The two types of systems can be combined with each other.
What are they?
In fact, the choice of cabins is quite large. If you are faced with this question for the first time, you may not immediately decide on the option that is right for you. For example, some people need a change house as a summer house on their plot, while others need it as an office, a security point, and so on. Temporary shelters can be simple and light or comfortable and beautiful. Their main advantage is that these buildings have different layouts and sizes. However, these objects do not need to be registered in the state register, since they are considered temporary.
So, cabins are generally divided into metal and wood. To make a choice, you need to consider the pros and cons of both buildings.
- Wooden cabins do not differ in high strength from metal ones. They are more susceptible to destruction due to temperature changes and precipitation. However, they retain internal heat much better and do not have much weight. They are easy to disassemble and look very attractive.
- Iron buildings are distinguished by their strength. Metal sheds are difficult for thieves to break into. They do not rot. When it rains, there is a lot of noise inside these cabins. Iron always heats up well in the summer, which means it will be hot inside the building (this issue can be solved by installing an air conditioner). In winter, the metal cools down and does not retain heat well (the issue is solved by excellent insulation and cladding).
For the manufacture of cabins, various materials are used, which divide these structures into the following:
- wooden: frame, panel and timber;
- metal: block containers, frame or sandwich panels.
The price and size depend on the type of assembly. The cabins also have unique layouts, namely:
- vest - consists of two isolated rooms separated by a corridor;
- standard – has no internal partitions;
- vestibule - here the room is separated by a vestibule;
- block container - consists of some separate, isolated sections;
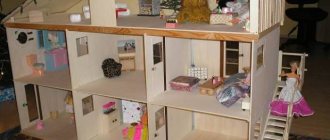
- staff trailers - can consist of several floors.
Naturally, all temporary structures have certain dimensions. They can fluctuate in one direction or the other. However, they are united by one whole - their dimensions and workmanship resemble small capital buildings, but at the same time they are fundamentally different from them.
Country two-room cabin with toilet and shower: dimensions and layout
The best option for a garden plot or cottage is a two-room country house with a toilet and shower. In fact, this is already a small country house. And in terms of functionality, and in terms of space, and in terms of ease of use. And here’s the thing, if you order a house of the same area, it will cost you 25-30% more than a change house. These are some interesting features.
Change house for two rooms with separate entrances
Sizes: which ones are more convenient?
The normal width of a cabin is 3-3.5 meters. With this width, the rooms are functional and comfortable. Even if the length of the cabin is 6 meters, you can fence off a toilet with a shower in the middle part, and place rooms on the sides.
Country two-room cabin with toilet and shower 6*3 meters
The change house with shower and toilet is convenient - all the necessary premises are under this roof. You especially appreciate this during rain, early spring or autumn. But if the length of the trailer is only 6 meters, the rooms are narrow - two meters or so.
It will be more spacious in the rooms if the length of the change house is 8 meters. The width does not need to be increased. Then the rooms will be approximately 9 square meters each, which is already enough for a comfortable life. That is, a two-room country house with a toilet and shower should ideally have a size of 3*8 meters.
Optimal sizes: based on economic feasibility
So, we have decided that the minimum dimensions of a two-room country house with a toilet and shower are 3*6 meters, conveniently 3*8 meters. But there are some nuances.
Look, in its “pure” form, taking into account the thickness of the walls inside the room, it will be about 2.5-2.6 meters wide and 2.8-2.6 meters long, with the trailer being eight meters long. Agree, this is not enough. You can only put a bed in such a room. There will be a very narrow passage between the wall and its back that cannot be used in any way. There will also be a very small area in front of the bed (one-and-a-half), into which you can squeeze a small bedside table/chest of drawers and a chair.
Change house 8*4 - enough space for comfortable living arrangements
So, if possible, it is advisable to increase the external width to 3.5 meters. From an operational point of view, this is convenient, but economically unprofitable. It's not just about increasing the amount of materials required. It will increase, but not very significantly. The point is the large number of scraps that will result. The standard length of boards and beams is 6 meters. So the optimal size is 3 by 6 meters. But, as we found out, it is not very convenient. And with a change house length of 8 meters, pieces of 4 meters each remain. So the second optimal size that a two-room country house with a toilet and shower should have is 8 * 4 meters. In this case, the amount of trimming will be very small. So the costs won't increase too much.
If this option seems too big to you, you can go the other way - buy some of the building materials in small sizes - 2 meters each or in the pieces that you need. They are available at every sawmill and since they are a re-grade, they cost significantly less per cube. So increasing the area can also help you reduce the cost of building materials.
The minimum dimensions of a cabin with shower and toilet are 4*.5 m
Wide cabins have only one drawback: they can only be transported with the permission of the traffic police:
- If the width is up to 2.55 meters, no permit is required.
- From 2.55 m to 3.50 m - written permission.
- More than 3.55 meters - accompanied by a traffic police car.
This may concern you only if you are going to transport it somewhere or are planning to buy a ready-made one. If you build it or order it from a company, this should not worry you.
Why should you order from us?
There are many companies that sell construction trailers in Moscow. But we differ from them in advantageous advantages, and here they are:
- Your order will be at your site within one day after payment;
- We will take care of transportation;
- We provide a guarantee for our products and provide warranty service;
- A large selection of layout options will allow you to create the housing you need;
- You can rent a cabin from us;
- We are proud that our products are of high quality. It will serve you for decades.
We are ready to fulfill orders of any complexity. If you have questions about our products, please contact our managers! Call now by phone.
Bottom harness
If you have certain skills, you can build a shed with your own hands (step by step). It is quite possible to carry out such work in seven days.
An important step is the formation of the lower trim. You can use a channel for this, fastening it with anchor bolts. For fastening, holes are pre-drilled in the supports and metal. If wooden blocks are supposed to be laid on the piles, then the heads are covered with two layers of roofing material; it can be replaced with bitumen mastic. The above-mentioned wooden beams must have a certain cross-section, which is 100 x 50 millimeters.
What and how are they built from?
The toilet appears first on the site, and then the change house
Yandex.RTB RA-1479455-2
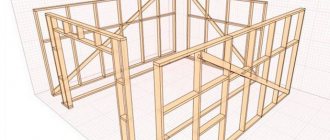
Almost all cabins are built using frame technology. The building materials for the frame are wooden beams of at least 100*150 mm or a profiled metal pipe 60*60*2 mm.
For cladding, the choice of materials is much wider. Use:
- edged board;
- sheet material - plywood, OSB, chipboard;
- profiled sheet;
- siding.
In any case, the cladding is done on both sides - outside and inside. The outside can be metal, but the inside is often made of either lining or stuffed with plywood or OSB.
One of the options for a garden shed
Yandex.RTB RA-1479455-7
Thermal insulation is laid between the two skins. Although the structure is temporary, spring and autumn, and sometimes summer nights, can be very cold. Therefore, without insulation there is no way. Any insulation can be used. Better - mineral wool, cheaper - polystyrene foam. Extruded polystyrene foam has the best characteristics, but also the highest price. Just when choosing insulation, keep in mind that foam plastic almost does not muffle sounds, so those who are particularly nervous will not be able to sleep. Therefore, the optimal choice is mineral wool. What layer? If you think about it, then in central Russia, preferably 100 mm, but at least 50 mm.
Please note that the floor also needs to be insulated. Especially the floor. There is a lot of pressure from below. Therefore, it must be double: first, rough, on top, across the board, logs are laid, insulation between them, and then the finished floor.