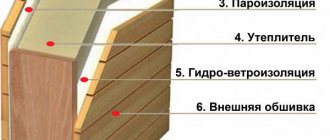
To protect the protruding base of a wooden house, it is necessary to install a flashing on the foundation to protect the concrete structure from destruction. Problems usually do not arise for buildings made of SIP panels and “frameworks” - the top shelf is attached to the sheathing and covered with a ventilated facade. In log houses, it is necessary to ensure the tightness of the junction points and to outline the cutouts of the outer corners.
Do-it-yourself installation of low tide on the base of a wooden house
Since the foundation and walls are the load-bearing structures of the building, their protection from moisture is an important measure to protect the house from destruction. One way is to install ebb tides.
Simple Arithmetic
To eliminate the one-sided interpretation of the purpose of basement ebbs, it is necessary to clarify: installing ebbs in a wooden house has two goals -
- protection of the crown molding from dampness;
- protecting the base from getting wet.
The low tide protects the base and foundation of the house from moisture.
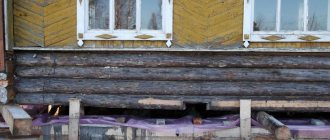
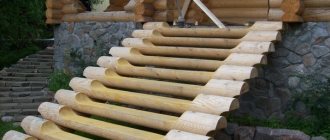
The weak point of a wooden house is the first row of logs or beams that are laid on the base. This row is called the frame crown, and it is most susceptible to dampness, since all the water from the wall rolls down and lingers on the base ledge. This is a feature of wooden house construction in which the strip foundation is laid wider than the walls.
Of course, the upper part of the foundation is waterproofed, and a lining is laid in the first row (a board 20 cm wide and 4-5 cm thick must be opened with an antiseptic), however, for reliability, a drain board is installed in the log houses.
It is very important to carry out preparatory operations on the construction of the base before installing the drain board. These operations include:
- leveling the top of the plinth with cement mortar;
- laying roofing felt in two layers;
- installation of a lining along the entire perimeter of the top of the foundation;
- fastening a block with a beveled edge.
To fasten the drain board when installing a log frame, a groove is selected from the outside of the second log of the crown into which it is inserted with one edge. The second edge rests on a beveled block attached to the base.
A bit of materials science
In addition to the drain board, metal and plastic flashings are used in wooden houses.
Metal products for water drainage are steel, aluminum and copper. Of the steel ones, the most in demand are galvanized castings and those coated with a polymer film. Their performance characteristics are higher, and they also have different colors.
Plastic products are good for everyone and there are even special elements for corner joints. They are inferior to metal ones in terms of strength, but win in price.
Proceed with installation
Since there are fewer and fewer supporters of installing a drain board, an alternative is to install drip panels from other materials. Installing metal and plastic ebbs on the foundation base of a wooden house is practically no different.
You can begin installing the drip linings after erecting the walls, removing the scaffolding and finishing the base, but it is better to do this at the final stage. Moreover, such an operation can be done with your own hands.
- The first thing you need to start with is to measure the perimeter of the house in order to know the length of the ebbs that you need to purchase or make yourself. To the resulting figure you need to add 10% of the length for trimming corners and overlap when joining.
- Now you need to decide on the width of the ebb. Considering that the fastening is carried out at an angle (about 15 degrees), you need to apply a ruler from the wall to the edge of the plinth. Mark the application point with a marker. The width is calculated taking into account 2-3 cm of overhang.
- If the ebb shelf width is up to 7 cm, it can be mounted without a backing. If the width is greater, then the ebb should rest on some kind of base (for rigidity). This is done by installing a lath along the edge of the base or longitudinal bars, applying cement mortar or polyurethane foam.
- Along the height of the marked point, a line is drawn along the entire perimeter using an even strip (rule) or beaten with a cord.
- Installation is carried out first from one corner of the building, then the second, then a straight section, then the third corner, etc.
- The connection at the corner is made from two ebbs, cut at 45 degrees, and the edge of the second ebb is cut with an allowance of 1.5 cm for fastening with rivets. Straight sections are overlapped with a margin of 3 cm.
- Sealant is applied to the upper shelf of the ebb, and the ebb is screwed to the wall with self-tapping screws, preferably roofing screws with a rubber gasket.
- If you choose the option of making ebbs with your own hands, then the upper shelf does not bend, and the ebb is inserted into a groove cut into the wall using a hand-held circular saw. Fastening is carried out to a rail mounted on the plinth.
The groove made must be treated with an antiseptic.
Color spectrum
Metal and plastic models of ebb tides have a wide selection of colors, which allows them to be used in combination with other finishes from the same materials, forming a unique set. For example, a base molding made of steel coated with a protective polymer layer and blue paint will look harmonious on a house where the roof is finished with blue corrugated sheets or metal tiles of the same color. In this case, the facade itself can be finished in any way: plaster, siding or composite panels.
An example of finishing a house with harmoniously selected protective elements
Aluminum and copper shimmers are produced in the same natural color. Concrete structures can be adapted to any exterior by painting. Protective elements made of natural stone have the colors of the rock from which they were made.
Low tide for a plinth made of natural granite in the exterior of a house
We install ebb sills on the base ourselves
Purchasing ready-made ebb tides is not difficult. A more important undertaking is the installation of ebb tides on the foundation. In order for the work to bring you satisfaction and help you save money, you can do the installation yourself. To do this, you must meet a number of important requirements:
- The fastening of the tides must be sufficiently rigid to avoid vibrations due to wind or contact. This is especially true for lightweight plastic products and metal sheets.
- The connection of individual parts along the length and especially in the outer and inner corners must be done most carefully.
- It is recommended to place a small amount of weather-resistant polyurethane foam under low tides to reduce their noise.
- When working with parts coated with a polymer layer, you must try to avoid damaging it. Touching metal objects may cause scratches. Currently, aerosol paints have appeared in construction stores that match the colors of the polymer coating of the drips, which makes it possible to eliminate the resulting defects.
To work with the most accessible metal and plastic castings, you should prepare the following tool:
- plumber's scissors with bent jaws or
- a grinder with a cutting disc for metal, as well as
- screwdriver;
- level.
- Before making castings for the foundation plinth with your own hands, you should carefully mark the installation sites. To do this, you will need a building level at least a meter long, preferably one and a half to two. Using these assistants, the lowest points are determined and, focusing on them, horizontal lines are drawn at the required distance from the base. The markings can be made using a marker or marked with a cord rubbed with chalk, since it is necessary to correctly install the ebbs on the base of a wooden house at the same level.
- The next stage is installation on the walls. It does not present any particular difficulties, since it is convenient to attach the ebbs to the foundation using special roofing wood screws. They have a hex head with a diameter of 8 or 10 mm. For ease of screwing, purchase an appropriate head, which is installed in the chuck of a drill or screwdriver, since it will be inconvenient to place the ebbs on the foundation, for example, with a wrench.
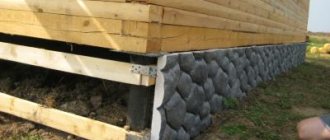
- Installation of ebb tides on a wooden wall is quite simple. A more complicated process occurs when installing ebb tides on the foundation of a building made of concrete blocks or bricks. In this case, through holes with a diameter of 6 mm are pre-drilled in the upper flange of the tides with a distance of 0.5 meters between them. Next, having installed the parts on the wall level, mark the mounting points on the wall.
- At the resulting points, holes are drilled with a carbide drill to a depth of 40-50 mm. Plastic dowels are installed in the resulting recesses. Next, galvanized or painted self-tapping screws with a press washer are screwed through the holes in the castings into the dowels. This is how the concrete foundation of a house is protected.
- The greatest difficulty is the process of installing flashings in the outer and inner corners of the house. It is advisable to cut the parts so that the connection is high-quality and airtight. To do this, you need to carefully make the markings using a template or using a square and a ruler, since not everyone can make the corner on the foundation cast correctly the first time.
- Since the main part of the flashings are made of thin sheet steel or sheet plastic, they have sufficient mobility and in strong winds can cause inconvenience to home owners. In this regard, together with how to install the ebbs on the foundation, a small amount of polyurethane foam is sprayed under them. As it expands, it will fill the free space and create support for the profiles.
Thus, we talked in detail about how to correctly make a casting from the foundation of a house made of various materials, and revealed the features of installation and cutting of parts. By protecting the foundation of your home yourself, you can save on hiring third-party labor and get the job done efficiently.
Criterias of choice
Base flashings are installed at the final stage of façade finishing. With the help of these strips, a boundary is conventionally defined that visually separates the base of the foundation from the outer walls.
The drip strip on the base of the building should visually complement and complete the image of the entire exterior design
Main selection criteria:
- protective ability;
- lifetime;
- size;
- material;
- suitability for repair if a fragment is damaged;
- appearance.
The flashings for the plinth are chosen in the same color scheme as other elements made of the same materials (roof, drainage system, canopies, window flashings, etc.) or to match the façade finishing. The material used to decorate the façade must be taken into account. For example, on a house made of PVC panels, the casting for a facade made of natural stone will look ridiculous, just like its plastic alternative on a facade made of granite chips.
An example of incorrectly selected material for façade sills
Also, when choosing a shimmer, do not ignore its thickness, specific gravity, uniformity of color, uniformity of structure, quality of the coating, if any, and degree of difficulty during installation.
Low-price planks are usually not as durable. If you live in difficult climatic conditions, take this fact into account when purchasing and do not give preference to cheap materials.
A properly selected form factor should ideally match the contours of the ground part of the base:
- external and internal corners;
- roundings;
- bay windows;
- niches;
- bulges, etc.
How to determine the required size and number of slats? Measure the width of the plinth protrusion and add at least 5 cm to it - this will be the estimated width of the strip. A difference of at least 5 cm is needed so that water flowing from the low tide does not fall on the vertical surface of the base.
When deciding on the number of strips of thin material (metal or PVC), keep in mind that the strips are laid with a slight overlap during installation and require adjustment
The required number of strips is calculated as follows: sum up the total length of the base and divide it by the length of one strip. We add 1 or 2 to the resulting value (this is a margin for overlaps, cuts or possible damage).
Installation of flashings on the facade. We install ebb sills on the base ourselves
Purchasing ready-made ebb tides is not difficult. A more important undertaking is the installation of ebb tides on the foundation. In order for the work to bring you satisfaction and help you save money, you can do the installation yourself. To do this, you must meet a number of important requirements:
- The fastening of the tides must be sufficiently rigid to avoid vibrations due to wind or contact. This is especially true for lightweight plastic products and metal sheets.
- The connection of individual parts along the length and especially in the outer and inner corners must be done most carefully.
- It is recommended to place a small amount of weather-resistant polyurethane foam under low tides to reduce their noise.
- When working with parts coated with a polymer layer, you must try to avoid damaging it. Touching metal objects may cause scratches. Currently, aerosol paints have appeared in construction stores that match the colors of the polymer coating of the drips, which makes it possible to eliminate the resulting defects.
To work with the most accessible metal and plastic castings, you should prepare the following tool:
- plumber's scissors with bent jaws or
- a grinder with a cutting disc for metal, as well as
- screwdriver;
- level.
- Before making castings for the foundation plinth with your own hands, you should carefully mark the installation sites. To do this, you will need a building level at least a meter long, preferably one and a half to two. Using these assistants, the lowest points are determined and, focusing on them, horizontal lines are drawn at the required distance from the base. The markings can be made using a marker or marked with a cord rubbed with chalk, since it is necessary to correctly install the ebbs on the base of a wooden house at the same level.
- The next stage is installation on the walls. It does not present any particular difficulties, since it is convenient to attach the ebbs to the foundation using special roofing wood screws. They have a hex head with a diameter of 8 or 10 mm. For ease of screwing, purchase an appropriate head, which is installed in the chuck of a drill or screwdriver, since it will be inconvenient to place the ebbs on the foundation, for example, with a wrench.
- Installation of ebb tides on a wooden wall is quite simple. A more complicated process occurs when installing ebb tides on the foundation of a building made of concrete blocks or bricks. In this case, through holes with a diameter of 6 mm are pre-drilled in the upper flange of the tides with a distance of 0.5 meters between them. Next, having installed the parts on the wall level, mark the mounting points on the wall.
- At the resulting points, holes are drilled with a carbide drill to a depth of 40-50 mm. Plastic dowels are installed in the resulting recesses. Next, galvanized or painted self-tapping screws with a press washer are screwed through the holes in the castings into the dowels. This is how the concrete foundation of a house is protected.
- The greatest difficulty is the process of installing flashings in the outer and inner corners of the house. It is advisable to cut the parts so that the connection is high-quality and airtight. To do this, you need to carefully make the markings using a template or using a square and a ruler, since not everyone can make the corner on the foundation cast correctly the first time.
- Since the main part of the flashings are made of thin sheet steel or sheet plastic, they have sufficient mobility and in strong winds can cause inconvenience to home owners. In this regard, together with how to install the ebbs on the foundation, a small amount of polyurethane foam is sprayed under them. As it expands, it will fill the free space and create support for the profiles.
Tool
Considering that the installation of ebb tides on the foundation will be done with your own hands, you should know what will be useful to you during the installation process:
- Measuring tool – long tape measure, ruler and pencil;
- Wood hacksaw;
- Miter boxes - used for precise cuts of boards at different angles (only for cutting corners in drain boards);
- Square;
- Drill, drills and screws;
- Metal scissors or grinder with cutting disc;
- Riveter and set of aluminum rivets.
Ebb tides on the base
Flashings for the basement foundation are installed as protection against sedimentary phenomena. They also protect against moisture getting between the base itself and the finishing materials. The easiest way to install drip linings is where the base protrudes slightly compared to the entire wall.
On the modern market there are many materials from which flashings for the foundation base are made.
Consequently, ebb tides are of the following types:
- Metal. They are made of galvanized steel and then painted. There are tints of black, brown, and beige. The metal itself has an anti-corrosion coating, so it does not lose its appearance over the years and continues to protect the structure from moisture.
- Aluminum. They also serve as reliable protection against moisture and have anti-corrosion properties. Modern aluminum ebbs can be found in a wide variety of colors.
- Copper. One of the most expensive, but at the same time the most durable and reliable material will harmonize perfectly with a roof made of copper, natural stone or brick.
- Plastic. This is perhaps the most budget option. Plastic reliably protects the surface, but this material is not durable, so such tides will have to be changed from time to time. Nevertheless, this option looks great if the walls of the house are covered with siding.
- Made from ceramic blocks. Such blocks will harmonize perfectly with a base made of natural brick.
Do-it-yourself ebb installation
To begin installing ebb tides, you first need markings. It can be done using a level. To completely mark the line along which the ebb tides will be installed, you can use a chokeline. The marked line will correspond to the upper fastening of the ebb.
Now you can start preparing the parts themselves. When cutting them from sheet material, add 2 cm to the length on all sides
They are needed to make bends during installation.
Before the installation itself, it is also very important to check that there are no deep holes on the ebb mounting line. Otherwise, they will create cracks into which moisture will penetrate.
If the wall is not level, it will need to be plastered first to align the plinth on this line.
Fastening correctly
It is necessary to fasten the ebb itself to the wall using dowels in increments of about 30 cm. After completing this work, it is necessary to fill the gap between the ebb and the wall of the building with sealant.
If the base is made flush with the entire wall, then it is not necessary to do the finishing clearly along the border line. When finishing, its height can be raised if it looks better from an aesthetic point of view.
Average prices for creating a product by region
Depending on the region and the material used to create the tide, prices for products can vary significantly; average prices in various major cities are presented in the table:
| City | Stone | Metal | Galvanization | Plastic | Concrete | Clinker brick | Tree |
| Price rubles per m | |||||||
| Moscow | 400 | 130 | 140 | 85 | 300 | 250 | 280 |
| Saint Petersburg | 410 | 135 | 120 | 90 | 310 | 265 | 250 |
| Kaliningrad | 420 | 130 | 140 | 82 | 310 | 240 | 260 |
| Novosibirsk | 395 | 140 | 150 | 89 | 305 | 245 | 270 |
| Vladivostok | 500 | 160 | 170 | 95 | 330 | 280 | 300 |
Installation process yourself
Installation of drip sills on a plinth is usually not too expensive. However, you should monitor the correctness of this work. After all, the safety of the foundation of the building largely depends on it. And that means the entire building.
We are preparing
The preparatory stage is necessary for each type of work. This rule also applies to the installation of ebb tides. The preparation is as follows:
- the wall surface is checked. All its defects are revealed. These may be unevenness, cracking;
- Then the identified defects are eliminated. Sealant, sealants, putty, cement mortar are used;
- Next, the wall surface is thoroughly cleaned and sanded. This measure will allow the tides to be fixed most tightly to the wall. This means it will reduce the risk of leakage.
To make ebb tides, you should carefully measure the width and length of the foundation line. This approach will make it possible to prevent errors during manufacturing and errors during installation of the finished product.
We install ebb tides
Using a level, the horizontalness of the foundation line is checked. Now we carry out the actual installation.
The structure is strengthened on the facade using self-tapping screws, anchors, and cement mortar. Installation is always carried out only after the façade has been completely finished. To install the drip tides you will need the following tools:
- screwdrivers;
- metal scissors;
- perforator;
- screwdriver;
- fasteners.
For the most durable fastening of products, slopes should be made. For this purpose, a radius cord is attached to the corner of the building. It connects to the opposite corner and is adjusted by level. A slope is made along it using prepared cement mortar. Now you should let the solution dry completely. Further work is carried out in a few days.
Next, the ebb tides are secured using fasteners. The long parts of the ebbs are mounted with self-tapping screws. The joints of the parts should be coated with sealant. The overlap is made at least 3-5 cm.
The proposed self-installation scheme is simple. Even a novice master can do it. Despite its simplicity, this measure will protect the foundation. This means it will extend the life of the building.
Installation inside and out
The design features of the products and what they are made of provide for different installation methods. Let's consider options for fastening drip strips using the example of various materials.
Base casting made of stone
Preparation stage
In order not to be distracted by trips to a construction store or searching your pantry during the installation process, the first thing you need to do is prepare the tools that you will need during the work process, as well as purchase all the necessary materials.
To install you need to have:
- drip strips;
- impact drill and screwdriver;
- extras;
- grinder, tile cutter, hacksaw with fine fraction, metal scissors (based on the type of product);
- sealant;
- polyurethane foam;
- hardware or glue (depending on the type of tide);
- pliers and a hammer or rubber mallet;
- laser and hydro level;
- tape measure, square and pencil.
Based on the base surface and the stage of construction or finishing of the house, the preparatory work may have some differences.
Preparing the basement of the walls for installation of drip tide
Price for aluminum rule
aluminum rule
For example, in the case of a wet facade, we clean the surface to be covered from debris, eliminate defects by filling cracks and joints with sealant. In order for all the tides to be aligned along a single horizon line, we make horizontal markings. To do this, we determine the highest plinth point, set the horizontal line with a laser level and stretch the thread along the wall (or draw a line with a pencil). Using this marking we will attach the upper bend of the ebb.
If the foundation protrusion is rough, it will need to be leveled with a cement screed with the addition of liquid glass for additional protection from moisture.
For log walls, the preparation looks approximately the same, only the cracks are sealed with an antiseptic instead of mortar.
If it is planned to install an NVF, frame racks are mounted and a horizon line is drawn along them
When using stone products, concrete castings or elements made of clinker tiles, surface preparation consists of cleaning sections of the walls from dirt, eliminating defects, leveling the surface with a screed and marking.
Attention! It is necessary to install the ebb for the base after all work on insulation and cladding of the ground part of the base has been completed.
If the façade design includes a recessed plinth, it does not require additional protection.
Installation of ebb and flow sills made of plastic and metal
The entire installation process begins with corners and protrusions. Elements for external and internal corners may be included in the package. If they are not there, cut them yourself. It is correct to make a corner connection in the middle of the casting strip, extending it after installing it in a permanent place on both sides, since joining the finished strips in the corners will be much more difficult.
Correct cut of the outer corner on a metal element
Cut out the outer corner element:
- draw the marking of a right angle 90 0 on the bar;
- on one side we make a cut strictly along the line;
- on the opposite side we leave an allowance of 15-20 mm for overlap and cut it off;
- the allowance for the upper bend on the same side should be at least 3 cm;
- the lower limb must remain intact;
- bend the fragment along the cut line at the bottom bend, the corner is ready.
PVC ebbs are joined in the corners in approximately the same way. The resulting cracks are filled with sealant.
Types of tides
Currently, house foundation castings are becoming widespread thanks to the diligence of many owners and timely consultations from experienced builders. Any choice of this or that material begins with the collection of information. Flashings for the foundation of a wooden house, block or brick building are structures of complex shape, the main task of which is to drain water flowing down the walls beyond the base.
Types of tides
Ideally, moisture from the low tide should fall on the blind area and flow along it into gutters to be drained as far as possible from the foundation of the house. In this case, the negative impact of precipitation can be minimized and the structure can be preserved for decades. To solve this problem, base flashings, depending on the material from which they are made, are divided into the following types:
- Steel,
- Aluminum,
- Copper,
- Plastic,
- Concrete,
- Wooden
Let's look at each option in more detail, paying special attention to its positive and negative sides.
Steel castings
Steel ebbs
Steel elements are quite widespread and can be purchased at any construction base or in a specialized store. In addition, it is easy to install such flashings on the foundation of a house with your own hands without the use of hired labor, which allows you to reduce the overall costs of this type of work.
Aluminum ebbs
Aluminum castings
This type has the same advantages as the previous one. In addition, aluminum has higher weather resistance and significantly lower weight, which ultimately allows reducing the load on the foundation of the house. These products also differ in price, which is slightly higher than the cost of steel castings.
Copper tides
Copper tides
Another type of metal ebb is made from copper sheets, which gives the base protection a noble appearance. When used with the appropriate finish, these products retain their reddish hue without the green copper oxide deposit. The limiting factor in the distribution of copper castings is the maximum price of the entire group of metal castings.
Plastic elements of base protection
Plastic protection
Plastic castings for foundation plinths differ from the analogues described above by the minimum cost in the line. Thanks to the achievements of modern industry, it has been possible to obtain products that have maximum resistance to exposure to sunlight, which has significantly increased their service life. This type is also convenient for installing the drip sill on the foundation plinth with your own hands.
Concrete protection elements
Concrete flashings for the foundation plinth have also been used to solve the problem of protection from precipitation. At the same time, they are characterized by all the pros and cons of the sand-cement mixture, the main one of which is the very high mass. This leads to a significant limitation in the use of such products. Basically, building codes allow the installation of concrete sills on reinforced plinths.
Wooden base casting
This option is ideal for finishing the base of the foundation of a wooden house, which retains the appearance of natural building material. For flashing, it is recommended to use edged lumber from wood species that are highly resistant to soda. One of the most accessible trees for residents of our country is larch.
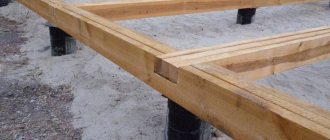
Foundation drainage
Drainage of the foundation of a house must be carried out on waterlogged soils and at high groundwater levels (where the need to drain excess liquid in a timely manner is especially important), but it is optimal to play it safe and create a full-fledged system at the construction stage of the building. If it later turns out that natural water drainage is ineffective and drainage is still necessary, its installation for a fully built house will be more labor-intensive and require greater financial costs.
Scheme of water drainage from the foundation with the installation of a drainage system.
Sequence of work
- A drainage trench is created with your own hands with a small indentation (up to 1.5 m) or close to the concrete surface of the foundation (optimally the work will be done before backfilling the axillary cavities). Requirements for trench geometry: slope towards water intake points 1-1.5%, bottom 20-40 cm below the foundation base of the house.
- The trench is lined with geotextile or other filtering film (permeable to water, but retaining silt and sand) so that its upper edge is higher than the hydraulic lock.
- A drainage pipe with holes is placed in the trench to ensure the collection and drainage of water. The pipe must drain the liquid into a pit or drainage well.
- The trench is backfilled using a permeable material or mixture (possible options are gravel, sand, crushed stone). The presence of clay reduces the permeability of the backfill.
- The hydraulic lock device is the surface filling of a trench with soil with low water permeability (for example, clay) after the horizontal surface is lined with geotextiles. To increase the density of the waterproof backfill, it is compacted. This hydraulic lock prevents the drainage system from overflowing during heavy rainfall.
- The blind area of the house is mounted on top of the hydraulic lock and completely covers the trench with the obligatory protrusion of the edge of the blind area beyond the drainage structure.
A high-quality foundation flashing with a drainage system will protect the foundation of the house from water.
How to connect flashings at 90 degree angles. Installation instructions for drip tides
Installation instructions for drip tides
Tides are designed to provide protection from adverse weather conditions. Low tides allow water and snow to flow down to the ground and not accumulate on the window ledge or foundation. Low tides significantly extend the service life of facades. The main material for their manufacture is aluminum and galvanized sheets.
Low tides are divided into
•Ebbings for the foundation
•Shields for fences
The master sheet bender produces castings of any complexity and configuration. Product manufacturing time is from 10 minutes.
To calculate the price for manufacturing ebb tides, contact our manager, or use the price list
Installation instructions for window sills
The purpose of window sills is the window sill, the final element when installing windows; it removes water from the window, preventing it from getting onto the window ledge. The window sill must be installed immediately after installing the window, especially in the winter, otherwise moisture will very quickly begin to destroy the window ledge.
Window sills are made on a special bending machine. Typically, thin sheets with a thickness of 0.45-0.5 mm are used. The sheet is cut to the customer’s dimensions, then the blanks are given the required shape on the machine. In this article we will tell you how to properly install window sills.
To install ebb tides you will need:
- Screwdriver with ph2 attachment
- Tinsmith's pliers
- Metal scissors
- Low expansion foam
- Self-tapping screws press washer 16mm
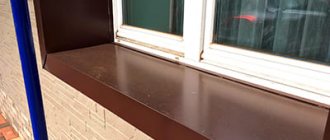
First, let's prepare the window ledge, clean it of dust, cement and plaster residues. Next, measure the length of the opening and add 4 cm to the bends. We cut the workpiece to size. Next, we trim the ebb according to the principle shown in the picture. We bend the trimmed edges of the ebb using tinsmith's pliers. We try on the ebb in place, if nothing interferes, we proceed to the next stage of installing the ebb. Temporarily set the ebb tide aside. On the prepared surface of the window ledge, apply mounting foam in a zigzag pattern from edge to edge and along the bottom. We apply the ebb, placing the back part under the window, and press it against the window profile, secure it with self-tapping screws to the window frame
It is important to maintain a tilt angle of at least 110 degrees. After you have secured the ebb with self-tapping screws, you need to load it
To do this, you can use cans of water or other weights that will not damage the ebb. Low tides must be loaded for at least 12 hours. The ends of the flashing in contact with the walls can be additionally sealed with sanitary sealant. After installing the drip sill, do not forget to remove the protective film.
Why are external window sills needed?
The main task of the external window sill is to protect the lower part of the window structure from moisture and sunlight. This is especially true for wooden houses, since deformation of the lower casing strip can lead to complete breakage of the entire window.
However, when choosing a sill design, you should not forget about the aesthetic aspect, since a well-designed window sill will significantly improve the appearance of the entire facade.
Let us consider in more detail the protective function of the ebb, since due to a lack of understanding of this point, mistakes are often made that nullify all efforts to install an external window sill.
Installation of a plastic window, as well as any other windows made using profile technology, is carried out in compliance with the installation gap between the window frame and the casing.
In the lower part, this gap is realized using a staging profile, which can be either continuous or in the form of separate sections. Along the entire perimeter, the installation gap is filled with mounting foam.
Despite the fact that after hardening, the outer part of the foam is covered with waterproofing tape, the flow of water and condensate flowing from the glass is too much of a load for this type of protection, so the main task of the ebb is to ensure the removal of excess moisture from the bottom of the window opening.
The mistake mentioned above is that the external window sill is installed without tilting, which is why water begins to accumulate in the lower part of the window, after which it is only a matter of time before the casing becomes skewed.
Separately, it is worth mentioning the situation when it is advisable to install the low tide not only on the outside of the window, but also on the inside. The need for this arises when arranging the interior decoration of windows in a bathhouse, where water condensation constantly forms on the windows.
Fastening ebb tides
It can be done both on the wall surface and on guides that are installed in advance. The latter option is used when in the future it is planned to attach the facing material to the facade of the building.
The ebbs are fixed to the walls using dowel-nails, and to the guides - using self-tapping screws. The canopies are connected to each other with an overlap of at least 3 cm. It is recommended to coat the joints with frost-resistant sealant. It is advisable to carry out a similar treatment between the ebb and the wall. Wide ebbs are additionally reinforced with brackets.
The corners are cut out from the casting strip, fixed with fasteners, and additionally lubricated with silicone sealant.
Deciding on the sizes
Metal castings can be sold in long strips - up to 6 meters long; you can find companies that will cut them into pieces of the length you need. The second option is good, since you don’t have to think about where to put the leftovers. The length of the window sill is determined by the width of the opening. The ebb board is usually made wider by 2-4 cm on each side. When preparing, the excess is cut off, leaving protrusions on both sides of the window opening. But you can cut it exactly to the width of the opening. It depends on the exterior wall finish and your desire/taste. In any case, if you order planks of a certain length, and do not cut them yourself, add a few centimeters - this way you can correct it if they are cut crooked.
The dimensions of the window tide are determined by the window opening
The depth of the tide on the window should be such that its edge protrudes a few centimeters. You don't need a protrusion that is too large - it can get in the way, but 4-5 cm is quite normal. In this case, the flowing water will not fall on the wall or under the foundation. With such a protrusion, moisture pours onto the blind area around the house, then goes into the storm drain.
Metal window sills have a larger range of sizes
When choosing a plastic casting, you may encounter difficulties. The narrowest ebb is 15 cm, and then the increase occurs in a certain step. Typically this step is 50 mm. So there may well be a situation - either too little or too much. You need to make a decision based on the situation - how critical is the ingress of water close to the foundation, how often do people walk along the windows. After evaluating these factors, you can choose a wider or narrower one.
Requirements for the drip plate
In order for the drip plate to perform its functions efficiently, it must be:
- practical;
- safe – have no sharp edges, do not emit harmful substances;
- resistant to temperature changes, UV rays and liquids;
- silent (if possible);
- inexpensive;
- easy to install and maintain;
- replaceable in fragments.
In addition, when choosing a drip strip, you should not ignore its aesthetic role. It can carry not only practical functions, but also decorative ones - to decorate the façade of a building in a unique way.
What are the sizes of the tides? The drip strip should be at least 3 cm wider than the base. This is due to the fact that the plank should not only cover the base, but also drain water away from the walls of the building and not allow liquid to flow along the foundation plane located under it.
What are they, are they needed?
The ebb for the foundation plinth is a strip that resembles a shelf . The ebb is installed along the entire perimeter of the protruding part of the base with a 5-10 degree slope in the direction opposite to the wall. Installing such a strip allows liquid to drain from the surface of the foundation.
The ebb for the base is made from waterproof materials, either independently or to order in specialized stores.
Installing this structural solution allows you to extend the service life of the foundation and avoid its destruction under the influence of moisture and low temperatures.
Neglecting to install the drip lining for the base leads to rapid destruction of the base and a decrease in the load-bearing characteristics of the foundation. Subsequently, this becomes the reason for the formation of cracks on the surface of the walls of the house, requiring urgent reconstruction of the entire monolith. A particularly neglected foundation can lead to the destruction of an entire building.
A little about low-tide materials
Wooden house construction specialists can advise you on other options for solving the problem of how to make a basement ebb in a country house. In this case, an ebb made of metal or plastic will suit you.
Metal components come in several types of metal, with galvanized, aluminum, and copper being the most common. The last two options are expensive. Most popular. Galvanized ebbs that have a polymer coating are used. It's not so much cheap as it is practical. The polymer film has a sufficient degree of protection, and the polymer coating can be made in several color options.
Plastic components are also in demand, and there are even special corner joints that do not require manual modification. Plastic is universal in a number of parameters over metal structures, for example, in strength, but they win in the price category.
Types of structures and their main features
You can find several options, some of them are common, others less common:
| Copper and aluminum products | Such designs are not found very often due to their relatively high cost. They are rarely on sale; most often they are carried to order, which is also considered a minus. In general, these options are quite durable and can withstand weathering and temperature changes well. |
| Concrete tides | Another solution that is very rare due to the large weight and complex installation process, but sometimes when purchasing cladding for the plinth it is possible to purchase protective elements that have the same design, which means they will fit perfectly into the finished composition |
| Plastic systems | Plastic began to be used for the production of this group of products relatively recently, but is already very popular due to several undoubted advantages: low weight, high strength and resistance to adverse influences, as well as the quietness of the elements when water drops hit them |
| Steel options | Without a doubt, this type is the most popular, and in the near future this position will be maintained. The advantages include such factors as affordable price, simple installation process, you can do the work yourself, a variety of colors and many coating options - from galvanizing to paint and polymer layer |
Important! If you want to make castings yourself, then you will need several sheets of galvanized steel, which are subsequently cut into pieces of the required size.
Sometimes it happens that the foundation protrudes beyond the cladding; in this case, you can make an ebb from a wooden batten
How to make a corner at low tide?
Some difficulty comes from processing the corners of the house: the joints must be airtight and look neat.
The ready-made set of PVC flashings already includes the corresponding additional elements. This is a solid cast corner; after installing it, all you have to do is seal the joints with the walls and straight sections.
The corners of metal castings can be processed in different ways:
cut the edges at 45 degrees and lay with an overlap at the joint;
close the joint with a separately cut rectangular strip and secure it with screws;
The joint of the ebb corner with a separately cut rectangular strip
cut both abutting ebbs at 45 degrees with allowances and connect them with a standing seam.
Connecting the corner of two ebbs with a standing seam
When processing an internal corner, you can simply place one of the joining planks under the other and secure it with screws or make an overlay.
Making an external view corner
When making the ebb from plastic, the cutting of the corner elements is simplified. To do this, the lower and upper parts must be cut out, an additional type of element must be built on the area being placed, and then all connections must be treated with silicone material or sealant.
When using metal elements, the work is done differently.
- First, the shelf of the upper and middle view is cut, in one section up to 90 degrees in angle, and in the other an overlap of about 2 centimeters is made.
- Then the corner parts are connected; to do this, the bar is bent at the cut area, and the overlap must be brought inward. The corner element is fastened using self-tapping screws or rivets.
The most reliable connection is considered to be a seam fastening; for this, 2 centimeters are left on both sides of the corner. To fasten the seam connection, you must use a special tool and also have experience with such work.
You can also connect the corner, leaving a small gap; it is subsequently closed on top with a strip, which is secured along the seam using self-tapping screws.
It is necessary to protect the foundation from water ingress on all sides of the house, taking into account the porch and other decorative elements.
Installation of concrete or tile drip
It is more correct to install drip linings of these types simultaneously with the cladding of the house, since installation is difficult due to size adjustment. For fastening, a special cement-based adhesive mixture for external use is required. You can make such a mixture yourself from sand and cement. The cement mortar should have a thick consistency.
Installation starts from the corner. You need to apply the adhesive solution to the ebb and firmly attach it to the markings. After the solution has dried, it is necessary to seal the joints and seams with a sealing compound. After the solution has completely dried, you can begin to veneer the walls of the house.
It is important to remember that concrete castings are difficult to process, so they should be prepared strictly according to size. Clinker can be cut with a special cutter.
It is also possible to install flashings without using clamps
- Along the marked line in the crowns, special cuts are made using a circular saw. In this case, a slope is made parallel to the ebb shelf of the middle type.
- Wooden blocks are placed on the upper section of the base element, their upper side is cut off, observing the required angle, and secured using dowels.
- Planks without a top shelf are curved and must be inserted into the cut, which is filled in advance with sealant. Fastening is carried out in the middle part to the bars, which serve as support.
This method is most suitable for log buildings that do not have external finishing. At the same time, the completed cut alleviates the stress created in the logs and prevents the appearance of cracks as a result of drying out.
You can also install the drip sill using the first method, but no brackets are used, that is, fastening is done using dowels or self-tapping screws in the upper part. And from the outside, the material rests on the base.
The rigidity of the ebb along the entire perimeter is created by the presence of special ribs on the corner parts of the external and internal corners. At the same time, the design is resistant to wind.
The most reliable fastening when installing ebbs is to use brackets or install a strip in the cuts; the latter option has a beautiful appearance.
Low tide fasteners for a log house without finishing
First of all, it is necessary to make cuts in the lower crowns of the house wall to secure the ebb. It is necessary to observe the angle of inclination of the shelf. A wooden block with a beveled upper part is fixed to the horizontal surface of the base. The angle of inclination should correspond to the angle of inclination of the tide. The upper bend of the ebb must be inserted into the cut. Fasten the ebb directly to the bars.
The slope, like all adjacent wall crowns and the base itself, must be treated with a compound that prevents rotting, burning and insects. Also, for additional protection, it is necessary to use a sealing compound.