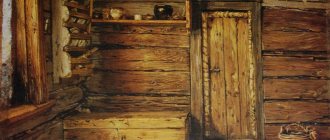
The Old Russian word “platband” was derived from the phrase “on the face.”
This is where its meaning lies. After all, for a long time in Rus' the façade of one’s father’s house was called a face.
Its appearance spoke volumes about both the owner’s condition and his character.
An untidy and dirty house still evokes a negative attitude among observers today. On the contrary, high-quality carved frames aroused respect and interest in its inhabitants among passers-by.
In the course of the development of house-building technology, platbands began to perform, in addition to a design function, also a protective function. Initially, these elements were made only from wood, many were carved with a unique pattern. Today, modern artificial materials, as well as metal and natural stone, are additionally used for these purposes.
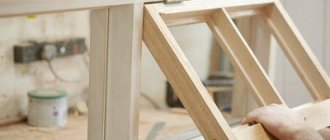
Home craftsmen, using high-tech household tools and materials, can easily make window coverings on their own, implementing any design idea they like, thereby giving the house a unique look and additionally protecting it from cold air entering the premises.
What is cashing?
Platbands are narrow and long decorative elements installed outside and inside around windows in order to give the windows a finished look and protect the mounting seams located between the wall and the window from the entry of cold air and atmospheric moisture.
Note. Cash is available in the form of small rectangular strips of different colors and unique decor: carved, patterned and modern.
Why do you need finishing of slopes?
A beautifully designed window frame creates a holistic architectural composition for the house, thereby increasing its aesthetic appeal.
The main functions of cashing on PVC windows:
Guaranteed protection of joints and cracks between windows and walls of the house.- Decorating window openings and changing its appearance can visually elongate a low house, or expand a building of a narrow shape.
- Gives the building a style of a specific era or popular in the region.
- Emphasizes the style of the house, unites all the buildings in the local area into a holistic architectural ensemble.
- Reducing heat losses and external noise levels in the area where the frame adjoins the wall.
Photos of window trims
Sources
- https://oknologiya.ru/ulichnye-nalichniki/
- https://stroyday.ru/stroitelstvo-doma/fasadnye-raboty/nalichniki-na-plastikovye-okna.html
- https://stroychik.ru/okna/nalichniki
- https://balkon4life.ru/osteklenie/furnitura/plastikovye-nalichniki-na-okna/.html
- https://dachadesign.ru/nalichniki-na-okna/
- https://homehill.ru/otdelka/okna/nalichnik-plastikovyj.html
- https://m-strana.ru/articles/nalichniki-na-okna-v-derevyannom-dome/
- https://stroim.guru/okna/nalichnikov-na-plastikovye-okna-s-ulitsy.html
- https://househill.ru/otdelka/okna/plastikovye/nalichniki.html
What are they?
Russian platbands have been used for several hundred years, during which time many different forms have appeared, which have been supplemented with modern innovative building materials.
Reference. In order for the buyer to navigate among this variety, they are grouped according to several parameters: by material of manufacture, by design and installation location.
According to the material of manufacture
Window structures made of metal-plastic can be decorated with casing made from any type of material.
The external design is subject to such requirements as the ability to withstand external atmospheric factors, reliability, durability, sanitary and fire safety, as well as heat and noise protection. Internal cashing has fewer requirements for moisture resistance and frost resistance .
Metal and aluminum casing is preferable in houses with styles: minimalism and hi-tech. In the retail chain today you can find high-strength and durable platbands made of galvanized steel, coated with a polymer coating.
All metal platbands have the following advantages :
- High strength and weather resistance.
- High biological and fire resistance.
- Ability to create complex shapes.
- Easy installation and maintenance.
- Bright color.
Note. Users consider the disadvantages to be the high price of 1000 rubles. up to 3000 rub. per set and a tendency to corrosion, which is mainly relevant for structures made of ordinary metal and not coated with anti-corrosion compounds.
MDF
MDF (MDF) - platbands have a fibrous, medium-dense structure, which is obtained by pressing wood dust in a vacuum environment.
The outer side of such platbands is covered with melamine or varnished veneer.
As a rule, the implementation of such cashing comes in sets designed for standard windows, with a cost per set from 1000 to 3000 rubles. depending on the shape and installation method.
The advantages of MDF cashing include:
- Environmental safety, which allows the material to be used indoors.
- Versatility, suitable for openings made of any wall material.
- Attractive appearance.
- High thermal insulation and sound insulation characteristics.
- Simple installation technology.
- Easy care.
- Affordable price for economy options.
The disadvantages of MDF platbands are considered to be low strength, susceptibility to precipitation and flammability.
Note! This type of cash can only be used for interior work; to increase their service life, it is recommended to coat them with paint or varnish.
Plastic
Plastic platbands integrate well with metal-plastic windows, while looking stylish and neat. There is no need to paint them during use; they receive color design at the production stage. Most often they get a white or brown wood color.
Advantages of plastic casing for PVC windows:
- Easy installation and maintenance.
- High biological resistance and weather resistance.
- Long service life.
- Affordable price, from 30 rub. up to 200 rub. for 1 m.p. depending on the width of the product and fastening.
- Versatility for any wall materials and window structures.
- Large selection of shapes, from straight to carved.
- Light weight.
- No additional finishing required
Disadvantages include a high fire hazard and susceptibility to mechanical damage.
Tree
Wooden casing is a traditional Russian material for finishing window products; many sets are unique carpentry works of art.
Their advantages include:
- Highly environmentally friendly.
- High aesthetics.
- Creating a high designer image.
- High protective characteristics for heat and noise protection.
- Low thermal conductivity.
Users include the following disadvantages of wooden frames: high hydrophobicity, low biological protection, high fire hazard and a fairly high price; a set of standard windows costs from 2,000 to 10,000 rubles.
Note! In order to reduce the disadvantages of wooden cashing, it must be treated with antiseptic and anti-fire compounds, and also periodically painted with waterproof paints and varnishes.
By place of application
Platbands on plastic windows are installed for internal and external slopes. Because they are subject to different loads, they have different requirements. The most durable and massive products are installed outdoors than indoors.
For external installation, the structure is subject to increased requirements for exposure to ultraviolet and other atmospheric conditions. Planks of both types of cashing must completely cover the installation seam and correspond to the design style of the slopes, as well as the interior of the room and the external design of the home.
By design
The following types of casing are most often installed on PVC windows: carved, flat, shaped and profile.
Carved platbands
are most often made from coniferous wood, best of all from pine , which is easy to cut, cheap and quite durable, due to the presence of resins in its structure.
Deciduous trees can be used, but they are more expensive and difficult to process.
Recently, carved sets made of metal and plastic can be purchased .
carved
Carved cash usually consists of repeating parts and patterns. The two vertical slats are the same on all windows. Such platbands are made manually using a jigsaw.
Advantages of carved casing for PVC windows:
- Beautiful appearance.
- High protective characteristics for heat and noise.
- Long service life.
Important. The disadvantages of carved structures include high price, complexity of manufacturing and installation work, and low mechanical strength.
Flat
Flat platbands are the simplest and most inexpensive designs. They are made from any material: wood, metal, MDF and plastic. They are installed if exquisite decoration of PVC windows is not required. Their advantage is ease of production and installation, and buyers are also attracted by their low cost and high protective characteristics.
Profiled
Profiled platbands are distinguished by the presence of a certain convexity on the outside. It can be of different shapes: symmetrical and asymmetrical. The profile can also be made in the form of a curved surface, with different angles. This can be a complex, combined profile that combines rounded surfaces and corners.
Shaped
The platbands are of a shaped type, and also have a finishing on the outside that is not angular, but a relief type . It is usually quite difficult to perform. Such platbands are made of wood and imitate it on plastic or MDF material. The latest modifications can only be used indoors.
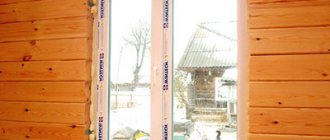
Foam slopes
When finishing plastic windows with your own hands, you can make slopes on the windows from foam plastic.
A foam slope does not require insulation
This is an interesting example of how to make street slopes for windows, but it is short-lived. Such external slopes are made simply, the main thing is to take the necessary dimensions and cut out the parts.
Polystyrene foam has many positive qualities, which makes it possible to use it when finishing external slopes:
- external slopes made of foam plastic are maximally insulated;
- high sound insulation in the house is ensured;
- polystyrene foam does not rot or become moldy;
- simple installation - making external slopes from this material is very simple;
- the work is done quickly, since there is no need to make complex preparations;
- if you install elements made of this material on plastic windows, then you don’t have to be afraid that a load will be placed on the structure - polystyrene foam has the lightest weight among all finishing materials;
- polystyrene foam is easy to process, so you can give the part any size;
- The surface of this material is then finished with plaster or painted.
This material can be used to insulate the walls of a house along with the accompanying design of window openings.
How to choose guides?
The choice of cash for windows begins with careful measurement of the window unit.
In the retail chain it is sold by length or in sets for standard window sizes. The length of one element is 2.2 or 2.5 m, and the width is from 40 to 70 mm. The latter, the widest ones, are used when the cracks in the wall and window frame are very large, in which case wide slats mark them perfectly. Next, pay attention to the cashing material. Aluminum and PVC last longer than wooden and MDF trims. The latter can only be used for interior work.
In addition, when choosing platbands for PVC windows, you need to pay attention to the following :
- availability of a quality certificate;
- strength characteristics;
- noise and heat protection characteristics;
- lifetime;
- terms of Use;
- fastening system.
Thread
To make a pattern on a workpiece yourself, you will need a set of wood carving chisels, saws and many other tools. Their set depends on the complexity and type of pattern you choose. Nowadays, the appearance of modern power tools makes the job much easier.
The most commonly used carving techniques are:
- Through type of processing. In this case, the design is sawn or cut through the wood. These patterns are made using a saw and jigsaw. This technique helps create openwork, lacy-looking products.
- The flat creased type is characterized by the creation of a pattern that will be lower in level than the main background. When choosing this technique, you will need a knife, semicircular chisels and cutters.
- Relief type. The elements in it are somewhat raised above the rest of the background. To create it, you need chisels of various shapes.
Characteristics
The main dimensions of the platbands are established for PVC windows in accordance with GOST 30674, published in 1999, and for wooden and metal windows, respectively, No. 11214-03 and 21519-03. These documents allow a range of protective slats in length from 150 to 250 cm, in width from 3.8 to 9.8 cm, and in thickness from 1 to 1.3 cm.
Technical characteristics of wooden platbands:
- Density at a humidity of 12%, depending on the type of wood: spruce - 450 kg/m3, pine - 650 kg/m3, and cedar -580 kg/m3.
- Specific gravity changes significantly when products are saturated with moisture, so the material should be stored in a dry place.
- Thermal conductivity: coniferous species - 150 mW/(m K), and for deciduous species - 200 mW/(m K) and higher.
- The strength of larch is the highest, almost 1.5 times greater than that of pine.
- Environmental friendliness is high.
- Biological and fire safety is low.
Important! Before installing wooden casings, they must be treated with antiseptic and fire-retardant impregnations.
Technical characteristics of PVC trims:
- Waterproof material.
- The coefficient of thermal expansion is high, so such casing must have stiffening ribs, which simultaneously impart strength to the entire structure.
- Light stabilizers are added to the PVC of this type of platbands to prevent the destruction of the surface layer under the influence of UV rays.
- High resistance under the influence of natural factors.
- Durability is at least 20 years and will depend on operating conditions.
- Thermal conductivity coefficient is 0.19 W/m x °C.
- PVC cash does not support combustion; in the presence of fire, it chars, but does not burn.
Specific characteristics for heat and noise protection will depend on the quality of the source material and the accuracy of the installation work on the window block and slopes.
MDF cashing is divided into two groups depending on density: low density LDF from 600 to 720 kg/m3 and high density HDF from 800 to 920 kg/m3. When purchasing these products, it is important to know the emission class, which is responsible for the evaporation of formaldehyde into the room: E1 is allowed for children's rooms and E2 for all others.
Technical characteristics of MDF trim:
- Product grade: I - homogeneous smooth surfaces without defects.
- II - with small scratches 0.03 mm deep and minor chips on the edge.
- III - pronounced defects, can be used for rough construction work.
- For this type of product, it is very important to have a mounting lock with a depth of at least 5 mm, otherwise it may break off.
- Thermal conductivity: 200 mW/(m K) and above.
- Strength is low.
- Environmental friendliness, biological and fire safety are low.
Interior examples
Owners of modern apartments and private houses give their preference to plastic and wooden building materials. In practice, interiors look great where the finishing of interior doors is made of PVC and wooden trims.
Here are detailed instructions for installing wooden cashing:
- Preparation. Using a knife, clean the doorway from any protruding foam. Then check the position of the wall and door frame with a level lath. If irregularities are observed, then eliminate them using the methods described above.
- Tags. Install the planks so that the rounded corners of the door frame are visible, and the straight corners coincide with the corners of the decorative frame. Attach the strips and use a pencil to mark points at a distance of 3 mm above the box. If the location of the cash suits you, then install it.
- Attach vertical strips to the marks; the points must be placed at the required height for their subsequent fastening.
- Trim vertical elements at a 45 degree angle.
- Secure the vertical trims with self-tapping screws or nails, then the horizontal ones.
If you carefully install a wooden cash register, the interior will noticeably change, becoming more solid and rich. Interior doors will acquire a completed appearance and will look much more interesting.
The following instructions will allow you to correctly install PVC trims:
- Measure and apply markings to the cashing mounting profile. It is a plastic product equipped with latches for fastening the front profile.
- Cut the planks at a 45 degree angle. The mounting profile can be cut 10 mm shorter than the front profile. This makes it easier to take measurements.
- Attach the mounting profile to the wall with self-tapping screws.
- Measure the front from the floor to the corner of the door frame. Do not forget to take into account the thickness of the connecting elements. Usually it has a value of 3 mm.
- Vertical frames should be cut at an angle and secured in the mounting profile using latches.
- Install connecting elements into the cut corners. Cut the front profile at a 45 degree angle. Then install it in the designated place.
Thanks to the attractiveness of the fittings, the joints look beautiful. There is no need to use silicone caulk to mask gaps.
Doors with wooden lining:
Doors with plastic lining:
You can install cash on interior doors with your own hands, without involving experienced craftsmen
It is important to prepare the necessary tools, take advantage of the advice and recommendations of experts, and follow the instructions. If you are patient and careful, you can add a piece of beauty to the interior door and the interior of the room
Necessary consumables
Consumables for carrying out cashing installation work depend on the type of material from which they are made and the type of installation: external or internal.
As a rule, most often performers
use finishing nails, liquid nails and self-tapping screws .
The first option is used for internal installation for MDF trim and on wooden walls.
To do this, the nails must have a diameter of no higher than 1.5 mm and a length of at least 40 mm so that they fit into the base of the opening. The caps are cut off and nailed to the box.
For stone walls, nylon driven dowels with self-tapping screws are used , which are suitable for any modern material. When fixing the casings with self-tapping screws, special recesses are made using a drill to hide the caps. After screwing, their presence is masked with plastic overlays that match the color of the casing.
It is possible to strengthen cashing with liquid nails only when the surface of the wall and the slope is located in the same plane. If there are deviations, the platbands will not be able to be tightly fixed to the surface.
In addition, the strength of the installation is greatly influenced by the professionally selected adhesive. The most reliable are TITE BOND with red letters or with the designation Heavy Duty, which is capable of fixing even the heaviest parts.
Important! In order to simplify the assembly process, MDF and PVC models are produced telescopic. Mounting locks are installed on the slope, onto which the outer planks are placed and latched.
Drawings for carved frames
Ordinary platbands with a smooth surface will not be able to complete the composition of the facade of the house. You can make carved parts yourself or choose ready-made ones.
First, you should select designs for carving, and then use these designs to make cardboard stencils for window trim.
If you have the appropriate skills, sketches can be made independently. They can also be found in special publications and the world wide web.
To accurately select a subject for carving, it is recommended to make a drawing of the facade with all the decorative details. Next, you should establish the compatibility of the elements, and only after that make the final choice.
Cardboard stencils are made from the drawings, which are then placed on the frame blank, and their contours are transferred to the wood.
The best option for wooden planks are pine planks without defects.
To work you will need the following devices and mechanisms:
- feather drill ⌀1.2 cm;
- screwdriver;
- grinding machine.
After transferring the pattern onto wooden blanks, it is recommended to drill several holes in the blank along the contour of the pattern. By inserting a jigsaw into these holes, the elements of the platband are cut out.
For a high-quality result, cutting should be done without interruption, in one movement.
After cutting is completed, it is necessary to get rid of burrs and other defects using a grinding machine, cover with a protective solution, and then paint the finished product.
Step-by-step installation instructions
Since the retail chain has many modifications of platbands for PVC window slopes, the installation technology will depend on the material and type of installation: external or internal.
When purchasing ready-made kits for standard window units, the user must first read the manufacturer’s installation instructions. The general step for installing any type of platbands is preparing the surface on which the protective device will be installed. It must be clean and even, and the gaps that are present between the frame and the wall must be sealed and, if necessary, insulated with any heat-insulating material.
On the outside
Carved wooden frames, painted or varnished, are laid out on the table, where they are assembled into a single structure. Assembly is carried out from the inside out to hide the fasteners. The prepared casing structure is secured around the perimeter of the PVC block using self-tapping screws.
Important! To prevent them from being visible from the front side of the structure, they are screwed not into the patterned elements, but into the inner dark part of the outer surface of the casing.
Next, center the patterned part on the pommel. It is usually made from solid wood. If the board is not of such thickness, then the unit can be assembled from several boards connected together, fastened with metal corners.
Next, installation of the platband is carried out in the following order :
- The carved element, applied and centered in relation to the pommel, is temporarily secured along the contour with clamps.
- The visor is installed along the upper edge of the pommel.
- The tiara is placed on the visor, also with self-tapping screws, screwed between the patterns.
A set of external metal trims, as a rule, comes along with the slope, ebb, side and top trims. For assembly, the kit includes self-tapping screws to match the color of the cashing.
Instructions for performing installation work of metal platbands on slopes of PVC windows:
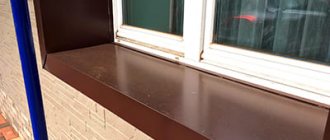
- Measure the lower width of the opening for trimming the ebb. It should have a margin of at least 6 cm in width, and at least 3 cm on the sides.
- Make ebb tide cuffs at the top and bottom, 3 cm each.
- Installation of the ebb is done on foam; for reliability, you can secure them with several self-tapping screws along the edges.
- The installation of the low tide is checked with a level. The operation is carried out especially carefully if foam was used, which can unevenly raise the ebb.
- Install the top casing on the screws to the siding.
- The side trims, cut to size, are tucked behind the corner of the top bar.
- Fasten the side parts with self-tapping screws to the siding.
Important. Most modern PVC flashings have special lintels that can be easily secured to the slope of the window block using dowels with press washers. The installation diagram for such elements is: top, sides, and the ebb is fixed at the bottom.
During the installation of PVC trims, holes are drilled around the perimeter of the slope into which dowels with press washers are driven.
Then the elements cut to size are applied to the press washers and clicked onto them with strong pressure.
How to cash out plastic windows outside a wooden house:
Inside PVC structure
As a rule, wood, plastic and MDF trim are installed indoors on window slopes. In this area there are no serious atmospheric influences on the structure, so it is quite acceptable to install such platbands using glue.
Instructions for internal installation work of cashing on slopes of PVC windows:
- Along the perimeter of the slope, markings are made with a cord to the required width of the plank.
- According to the mark made, 3 strips are cut: a top and two side strips with ends at 45°.
- Prepare the glue.
- For high-quality adhesion, the glue is applied with a comb to the wall in the abutment area and on the back side of the casing.
- Apply the top and side strips and remove excess glue.
Important! High-quality liquid glue sets quite quickly, so you won’t have to hold the planks for a long time. But if the glue dries slowly, then they grab the trim parts with self-tapping screws.
After the platbands are securely fastened, you will need to fill all the technological cracks and stud spots with sealant, after which the layer is leveled with a spatula.
Arrangement of platbands
Classic window trims consist of four elements: an upper and lower trim, two side strips. They can be connected using a single spike (as in the figure). They can also be connected end-to-end, as they do not carry any load. In this case, they simply fit the planks tightly one to another, securing each element separately.
Classic four-piece version
If the window has a window sill, there is no need for a bottom trim. When installing, first fix the window sill, then the side strips and lastly the top trim.
If there is a windowsill
The width of the platbands is selected individually each time, but is usually in the range of -100-250 mm. When choosing the width, we proceed from two technical parameters:
- the platband must extend onto the frame by at least 5-10 mm;
- in order not to interfere with opening the windows, they should retreat from the hinges by 10-20 mm (the further, the wider the shutters open).
The final width is selected based on the style of the house. In some places narrow planks are more suitable - 100-130 mm wide, in others wide ones - 200-250 mm are required. To avoid mistakes, you can “try on” the planks by pinning them on a couple of nails and see from afar which option you like best.
Installation of a classic wooden frame for windows
The thickness of the planks for the manufacture of platbands is 20-35 mm. In most cases, a board 20-25 mm thick is used, since this is the optimal size for DIY work - not too difficult to process, but quite voluminous for making a decorative pitchfork.
Possible difficulties and errors
The biggest mistakes that performers make are associated with incorrect measurements, the choice of platband material for a specific slope and consumables for installing planks.
The most common mistakes when installing cashing on window slopes:
- If the platbands form a closed space, a 45-degree cut is made on vertical strips on both sides, and if there is a low tide and a window sill, only on one side.
- Horizontal planks should have a 45 degree cut on both sides.
- The surface of the wall and slope is not prepared for the installation of platbands.
- Consumables for fastening are incorrectly selected depending on the external and internal installation.
- The structural joints between the window and the wall were not pre-sealed and insulated.
- Self-tapping screws are not protected with protective tips.
Is it worth doing it yourself?
For those who decided to install platbands, this issue has become a pressing problem. Some people solve the problem by simply starting to do everything themselves, while others turn to companies that provide such services for help. For those who decide to contact the company, you will be pleased to know that there is a wide selection of products.
If you are a good builder, then it will not be difficult for you to carry out the installation yourself, but if you are not confident in your abilities, it will be better to turn to specialists. Designers who help you choose platbands will help you choose from all the options the sample that is ideal for your windows. The good news is that the price of this pleasure is low, and the result will really please you from year to year.
Pros and cons of use
The use of platbands for slopes of plastic windows is a mandatory step, therefore many manufacturers of such window structures offer users the appropriate kits when ordering PVC windows. This is due to the fact that in this option they integrate well with the installed window unit in design and size.
Installing cashing on the slopes of PVC windows creates the following advantages :
- Designs the style of home ownership, uniting all the buildings on the local area into a single architectural ensemble.
- Protects all technological gaps that formed during the creation of the window structure from precipitation, heat loss and moisture.
- Reduces exposure to street noise.
- Wide range of colors of products.
- A large number of modifications in the retail chain, the ability to choose for each window.
- Resistant to deformation.
- Easy installation.
The disadvantages of cashing out PVC windows include:
- For wooden products - dependence on humidity, the possibility of biological destruction and a high fire hazard.
- For metal ones - high anti-corrosion susceptibility of the metal.
- For PVC - low strength characteristics.
- For MDF - can only be used indoors
Drywall slopes
Exterior finishing of windows using drywall is a dubious undertaking. GKLV brand plasterboard can be used when finishing the external slopes of windows facing a glazed loggia or balcony. Before installing this material, the surface of the base must be treated with an antiseptic. Installation can be carried out with or without insulation.
Without insulation
With insulation
The surface of drywall can be decorated in any way.
It would be a mistake to install external plasterboard slopes on window openings exposed to direct exposure to precipitation. This material is not suitable for outdoor use .
Average prices
The cost of platbands depends on the level of equipment, the material of the planks, the fastening mechanism and the type of installation: internal or external. The most popular modifications are :
- MDF, beech color, length 2400 mm, telescope lock, 370 RUR / piece.
- MDF, oak color, set 70 mm, RUB 2,162. for 1 window.
- MDF, laminate, milky oak, flat, 2150x70x6 mm, 159 rub. /PC.
- MDF, laminate, milky oak, flat, 2150x65x10/23 mm, radius 109 rub. /PC.
- Metal, set, dark oak, Qunell N-75mm, about 2,800 rubles, per set, 450 rubles. per piece
- Plastic “modern” sandy 150*650 mm, 462 RUR/piece.
- Plastic standard 15*45*6 m white, 288 RUR/piece.
- Plastic 80x12mm, 2.2m, “Ideal Marmori M”, white, RUB 72.85/piece.
- Telescopic plastic 2200*70*23 mm, “Cappuccino velor”, 250 RUR/piece.
- Wood, pine, flat, 20*100* 2200, 182 RUR/piece.
- Wood, pine, flat, 20*150* 2200, 273 RUR/piece.
- Wood, pine, flat, 20*200* 2200, 364 RUR/piece.
- Wood, pine, flat, 30*100* 2200, 237 RUR/piece.
- Wood, pine, flat, 30*150* 2200, 345 RUR/piece.
- Wood, pine, flat, 30*200* 2200, 473 RUR/piece.
- Wood, pine, figured, 68* 2200, 375 RUR/piece.
- Wood, carved set 1.5*1.5 m, 4820 rub.
Stage 4. Pattern selection
Since ancient times, platbands have been decorated with the most bizarre patterns, which were believed to protect the house from evil spirits and the evil eye. Today, the production of carved frames is carried out mainly by qualified craftsmen.
Often, professionals themselves use stencils; without them, only one-time individual orders are carried out.
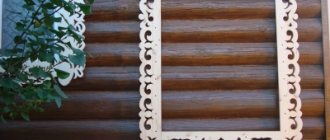
Stencils today are freely sold in a fairly wide range. They consist of the following components:
- bottom bar;
- top bar;
- vertical slats.
In addition, there may be additional decorative details - hangers, flowerpots, etc.
Stencils for platbands
Stencils
Peculiarities
Platbands were traditionally used in wooden houses. They helped decorate the windows and effectively complement the composition of the facade. With the help of such elements, you can visually increase the window opening or reduce it. Initially, great importance was given to the design of the house; each owner sought to show the individuality of his building.
With the help of platbands you can achieve different effects.
- Visual decoration of the house, giving it a special color and charm, the ability to distinguish it from a number of standard ones.
- Giving the window a different shape using platbands of different configurations, sizes and patterns. A small window can be made large if you use openwork designs.
- Creation of a holistic composition of all facade elements. Using the same trim on windows and doors allows you to complete the design of your home.
With the help of platbands you can protect window openings from the negative influence of environmental factors. The seam between the frame and the house may have small gaps, into which moisture gets in during rain, and with strong winds, dirt gets clogged. All this contributes to the development of harmful microorganisms that destroy wood. Therefore, the frame begins to let air through, which significantly reduces its thermal insulation qualities.
The platbands cover that very gap and do not allow moisture or dirt to reach it. In addition to the obvious advantages of platbands, there are also negative factors. It is also worth knowing about them when planning the installation of such parts on the windows of a wooden house. These include several factors.
- Active reaction of decorative elements to weather conditions, which contributes to material deterioration. To prevent this from happening, you need to treat the products with a special substance, which significantly increases the service life of the casing.
- Need for constant care. Platbands must be painted or varnished annually. If this is not done, the product will begin to crack. As a result, instead of decorating, it will only spoil the appearance of the house.
- When planning the manufacture of platbands, you need to choose the right material for them. If this is not done, it is unlikely that the desired effect will be achieved. If it is difficult to cope with such a task alone, it is better to enlist the help of a professional.
Now there are products made from modern materials that can have a wide variety of appearances. At the same time, caring for them is much easier. They are not affected by the environment, they are not afraid of moisture and even cold. They do not crack over time and serve reliably for many years. For aesthetic connoisseurs, this is not the best option. But for those who want to decorate their home and diversify the appearance of the facade, this is what they need. It is this product that will create the necessary appearance, but will not require increased attention.
Sealing cracks with sealant
As noted above, there may be gaps between the cash strips and the wall, since the walls in wooden houses have vertical deviations.
To prevent various insects from living in them, the cracks must be sealed. Acrylic sealant is perfect for this. Before applying it, the edges of the cash strips and the wall adjacent to them must be covered with paper tape and only then the cracks must be filled with sealant using a construction gun. You can level the sealant with a rubber spatula, removing excess with a rag. At the same time, you can carefully seal the gaps, if any, between the window, window sill and casing with sealant.
The sealant takes several days to dry, so there is no need to rush to remove the tape from the wall. Only after making sure that the material has dried completely can the tape be carefully removed.
Now the cashing of the window in the house made of timber is completed.
If you liked the article, share it on social networks. You will find even more information on Instagram.
What are the advantages of plastic finishing
Undoubtedly, plastic is not the only material used to finish window slopes. You can use regular plaster followed by putty and painting with various compounds, or drywall, which also requires further work on applying putty and painting. Regarding plaster slopes, we can say that not everyone can make them on their own. This also requires professional skill and skill.
But the plastic used is good because it combines a perfectly flat surface, like drywall, and the absence of painting or pasting work. In addition, slopes finished with plastic once do not require further repairs or periodic painting. All care involves wiping with a damp cloth. Therefore, recently finishing window slopes with plastic has gained wide popularity.
In just one day you can cover all the slopes in the house, which is much faster if you plaster them or finish them with plasterboard. In addition, the use of plastic panels makes it possible to insulate slopes if a layer of heat-insulating material is laid under them. A wide selection of panels in color and texture will help to harmoniously fit them into the existing interior of the room. And the cost of plastic products is affordable to almost all segments of the population. With careful use, their lifespan can be more than tens of years.
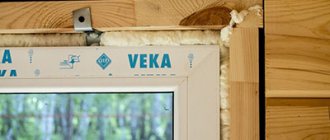
Preparing for installation
Installing modern metal slopes on windows with your own hands will require the preparation of special materials and tools for this type of work:
- metal sheets;
- level;
- fasteners;
- mounting foam and silicone sealant;
- screwdriver and bits;
- painting knife;
- metal scissors;
- roulette
Excess polyurethane foam must be cut off.
Surface preparation consists of removing construction dust and contaminants from it. Excess polyurethane foam is cut off with a painting knife, and the seams and joints are treated with silicone sealant. Do-it-yourself installation of a metal slope on windows should be done after the seams have dried.