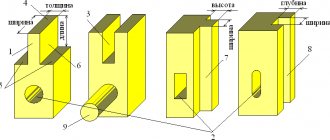
In practice, the side of a square washer is taken to be 4.5d (where d is the diameter of the bolt).
The dimensions of square washers are taken according to the diameter of the bolts according to Table 3 (Fig. 2).
Table 3: Bolt range
| p/p | Bolt diameter (mm) | Sectional area (cm²) | Weight, kg | Bolt square washers dimensions (mm) | |||||||
| according to the rod, dbr | by cutting, dnt | by rod, Fbr | by cutting, Fnt | 1 linear meter of bolt | one nut | working bolts | coupling bolts | ||||
| hexagonal | square-rat-noy | dimensions, mm | weight of 1 puck, kg | dimensions, mm | weight of 1 puck, kg | ||||||
| 1 | 2 | 3 | 4 | 5 | 6 | 7 | 8 | 9 | 10 | 11 | 12 |
| 1 | 6 | 4,701 | 0,283 | 0,173 | 0,22 | 0,004 | 0,004 | 30x30x3 | 0,01 | — | — |
| 2 | 8 | 6,377 | 0,505 | 0,316 | 0,39 | 0,008 | 0,007 | 40x40x4 | 0,048 | — | — |
| 3 | 10 | 8,051 | 0,785 | 0,509 | 0,62 | 0,014 | 0,014 | 50x50x5 | 0,095 | — | — |
| 4 | 12 | 9,727 | 1,13 | 0,744 | 0,89 | 0,020 | 0,021 | 60x60x6 | 0,164 | 45x45x4 | 0,06 |
| 5 | 16 | 13,4 | 2,01 | 1,408 | 1,58 | 0,052 | 0,053 | 80x80x8 | 0,386 | 55x55x4 | 0,088 |
| 6 | 20 | 16,75 | 3,14 | 2,182 | 2,47 | 0,093 | 0,095 | 100x100x10 | 0,760 | 70x70x5 | 0,18 |
| 7 | 24 | 20,1 | 4,521 | 3,165 | 3,55 | 0,141 | 0,144 | 120x120x12 | 1,341 | 90x90x7 | 0,42 |
| 8 | 27 | 23,1 | 5,722 | 4,18 | 4,49 | 0,182 | 0,187 | 140x140x14 | 2,091 | 100x10 x8 | 0,591 |
| 9 | 30 | 25,45 | 7,065 | 5,06 | 5,55 | 0,291 | 0,297 | 160x160x15 | 2,93 | — | — |
| 10 | 36 | 30,80 | 10,17 | 7,44 | 7,99 | 0,496 | 0,506 | 190x190x18 | 4,957 | — | — |
The minimum distances between bolts and the minimum distances from the edges of the tree are established taking into account the permissible chipping stresses of the wood. This will be discussed in more detail in the following sections of the site.
In capital construction, when reliability and stability of the structure are required, bolts can be used only if special means (for example, staples) will prevent the occurrence of shear in the contact seams (node 33).
For example, calibrated holes can be used, i.e. such when the diameter of the hole is equal to the diameter of the bolt, or subsequent filling of the gap between the bolt shaft and the edges of the hole is carried out.
Bolts are used in structures that work in tension when suspending building elements (Fig. 3) and as non-load-bearing connections in the form of clamping bolts.
1.2. Connection on rod dowels
Rod dowels are cylindrical steel rods, usually without nuts and threads, which are driven into drilled holes with a diameter reduced by 0.2...0.5 mm (Fig. 3, item 6).
The tightening bolts (Fig. 3, item 1) have washers (Fig. 3, item 5) installed under the head (Fig. 3, item 2) and nut (Fig. 3, item 3).
It is recommended to install large and thick washers on both sides.
The use of rod dowels is of great importance for load-bearing connections, because with it, you can not be afraid of deformations due to the selection of gaps in the holes and creep of structures.
Connections using rod dowels allow you to achieve high performance: with a small area they can absorb relatively large loads.
They are best used for packages of boards, as well as for connecting to steel elements located inside the structure (node - 35).
The picture of node -34 shows an option for attaching the ridge truss assembly. The block braces are attached to the upper chord with four dowels. In the middle there are coupling bolts. The upper chords of the rafters are bolted to the ridge beam.
The sketch of node 35 shows an option for fastening a two-branch rack with a single crossbar. This fastening provides an almost rigid connection of a two-branch rack with a single crossbar using dowels located along the ring.
Tightening bolts provide a tight connection and are used when installing rafter systems and wall partitions.
In the connections discussed above, no more than 4 rods per connection should be used.
The minimum diameter of the rod dowel is 8 mm.
Blind steel cylindrical dowels should be buried into the wood by at least 5 diameters.
When using large-diameter dowels, cracks may appear at the ends of the elements being connected, caused by chipping of wood along the fibers.
Therefore, the end distances are slightly larger than the intermediate distances.
Types of nails
The traditional construction nail is the most common type of nail used for various types of work on construction sites and for repairs at home. A construction nail is a straight rod that has several notches near the head. During operation, these notches increase friction, which improves the quality of the connection. The flat cap is quite small compared to the length of the rod. Today, copper, galvanized and steel nails without any coating are used. The length ranges from 12 to 300 millimeters and even more. For reliable, long-term fastening, nails made from hot-dip galvanized steel are best. Non-galvanized black nails are also suitable for temporary fastening. For example, they are excellent for working with scaffolding. The disadvantage of nails that are not coated is also considered to be their instability to corrosive effects. If nails are chosen for work inside the house, then it is better to choose electro-galvanized nails.
Screw nails are nails whose working body looks like a screw rod. Most often, this type of nails is used to work with structures that may be subject to further deformation under the influence of various factors, for example, under the influence of high humidity levels or large mechanical loads. If we talk about various pier floorings, the external upholstery of buildings or floors, it should be clarified that nails with a hidden head will increase the strength of structures by at least 4 times when compared with traditional nails.
The roofing nail is used to effectively hold sheets of soft materials, such as felting felt, construction paper, roofing shingles, roofing felt or bitumen coating. This type of nail is a round rod with a large flat head that protects against ruptures at penetration points and holds thin material of soft texture.
The finishing nail has a small oval head, which allows it to be used for almost invisible fastening. They are often used to connect various wooden parts together. For example, for fastening parquet, clapboard boards, platbands, decorative trim, and so on. The use of a finishing nail is acceptable wherever the nail head needs to be embedded in wood. To produce this type of nails, low-carbon steel without further coating is used, as well as galvanized, brass-plated and copper-plated steel.
A rough nail is a rod with a transverse notch applied to it, with a conical point and a conical or countersunk head. It is hammered mainly into pre-prepared holes of a slightly smaller size. Only with this method can the tightest nail fit be achieved. Ruff nails provide excellent joint strength. As a rule, it is almost impossible to pull out such a nail. When dismantling it, it will most likely break.
A slate nail is a nail that has a head of relatively large diameter. This cap is coated with an anti-corrosion coating. it is not inseparable from the nail. Based on the name, you can understand that this type of nails is used for installing slate and other roofing coverings. The length of a slate nail can be from 17 to 120 millimeters, and the head in diameter can reach 14. Anti-corrosion coating is applied because slate nails are exposed to excessive temperatures and moisture. To improve waterproofing properties, a rubber gasket can be placed under the foot of the nail. It is necessary to select nails of this category based on the maximum height of the ridge of the slate used. The peculiarity of such nails is the fact that they cannot be bent, since over time a crack may form at the site of the bent fastening.
3. Connection with brackets, clamps and anchors
Auxiliary steel fasteners (staples, clamps, anchors, etc.) are most often installed in units for connecting wooden elements during assembly and installation, to comply with the design dimensions of structures and when they operate with little effort.
Steel brackets are placed in the nodes of structures made of beams or logs. Depending on the cross-sectional dimensions of the elements and the length of the staples, their diameter can be 8...18 mm.
The staples are driven into the wood without drilling holes in such a way that the place of driving does not coincide with the core part of the wooden elements.
And the distances from the top of the corner of the bracket to the center of the penetration of the bracket into the structure must be the same.
The distance from the center of the staple to the end of the element (S1) is the same as for dowels (see the section on installing dowels).
Table 7: Steel fastenings for timber structures
| p/p | Name | Sketch | Unit of measurement | Dimensions, mm | |||||||
| 1 | 2 | 3 | 4 | 5 | 6 | 7 | 8 | 9 | 10 | 11 | 12 |
| 1 | Straight construction staples | l/h | 150/70 | 200/80 | 250/90 | 300/100 | |||||
| 2 | d, mm | 8 | 10 | 8 | 10 | 8 | 10 | 10 | 12 | ||
| 3 | Weight, kg | 0,1 | 0,15 | 0,12 | 0,18 | 0,14 | 0,22 | 0,26 | 0,38 | ||
| 4 | Construction needle staples | l/h | 350/110 | 400/120 | 450/130 | 500/140 | |||||
| 5 | d, mm | 10 | 12 | 12 | 16 | 12 | 16 | 16 | 18 | ||
| 6 | Weight, kg | 0,3 | 0,48 | 0,49 | 0,86 | 0,54 | 0,96 | 1,06 | 1,34 | ||
Adviсe:
If you are driving a nail into a thin part, you need to blunt its point a little, for example, by hitting it with a hammer. If you douse a small nail with water, it will be easier to hammer into the board. If the nail becomes bent while driving in, pull it out and replace it with a new one.
You can use pliers or pliers to remove small nails. A nail puller is great for removing long nails. In cases where secret fastening is necessary, you can first bite off the head of each nail with pliers.
Make sure it is firmly supported before nailing the pieces together. During operation, the support should not vibrate or bend, otherwise the nails will not be driven into the wood well and will often bend. When you use a table, workbench or stool as a work surface, the workpiece must be placed above the leg. If you are working on large structures, you will most likely need to drive nails on the floor. Place all fastened parts in the door opening, this is where the floor vibrates and springs the least. If it is not possible to provide a strong support, you can place an ax, a second hammer or a block of wood under the workpiece.
If you plan to hammer several nails into one board, be sure to arrange them not in one line, but in a checkerboard pattern.
You need to drive a nail with your right hand, holding it with your left. The striking movement should come from the hand, you do not need to apply it with your whole hand, as you will quickly get tired. The blows can be intensified only when the nail “sits” tightly into the wood.
Release the blows when 5–6 mm of the nail remains above the surface of the part to prevent misfire and deformation of the workpiece. To drown the cap in the tree, you can use a center punch or any other core. It is best to fill the resulting recess with putty.
If you need to connect two parts, first drive a nail into one of them so that its point protrudes slightly from the back side. After which you can attach the resulting structure to the second part and hammer in the nails so that the workpieces do not move and the connection remains intact.
To give the connection greater strength, nails can be driven into the workpieces being fastened not completely perpendicularly, but at an angle to the plane of the wood from 75 to 85 degrees. The ends of the nails that will go through must be bent using a triangular file.
In order to easily remove a recessed nail, you need to use a chisel or screwdriver to pry up its curved, sharp end and, if possible, level it. Then, using a hammer, you need to hit the sharp side until the recessed head appears outward, after which you can grab it with pliers and completely remove the nail.
If it is not possible to get to the sharp end of the nail, place a piece of wood under the nail puller and try to pry the head of the nail with it.
The nail should be several times longer than the thickness of the board being attached. If you are working on hard wood or on an outside edge, it is recommended to drill a hole halfway down the depth of the nail. For the work, choose a drill with a diameter equal to the thickness of the nail. If you notice the wood starting to split, clamp it in a vise or dull every nail you use. In order to eliminate the possibility of a gap between the boards, nails should be driven in obliquely in the direction of the joint.
The risk of splitting the workpiece is higher in cases where you choose large nails for the job, especially if you drive them along the edges of the plank or board. To avoid splitting, you need to slightly recess the tip of the nail using a chipper. For the same reason, you should not use too strong hammer blows. Remember, the nail will hold better if it is driven across rather than along the grain.
In some cases, special nails, also called basting nails, can be used. They are driven into the workpieces to be joined before using the main nails. After the work is completed, the basting nails are removed.
Tenon to socket connection
Tenon-to-socket joints, or simply tenon joints, are used when two parts are joined at an angle or intersection. It is probably the strongest of all frame joints in joinery and is used in the making of doors, window frames and furniture.
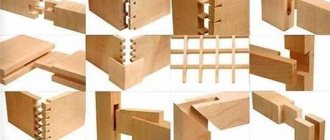
Types of tenon-to-socket connections
The two main types of tenon joints are the usual tenon-to-socket joint and the stepped tenon-to-socket joint (semi-dark). The tenon and socket make up approximately two-thirds of the width of the material. The socket is widened on one side of the groove (semi-dark), and a tenon step is inserted into it from its corresponding side. Semi-darkness helps prevent the thorn from being turned out of the socket.
Conventional tenon-to-socket connection
1. Determine the joint position on both pieces and mark all sides of the material. The marking shows the width of the intersecting part. The tenon will be at the end of the crossbar, and the socket will go through the post. The tenon should have a small allowance in length for further stripping of the joint.
2. Select a chisel that is as close in size as possible to a third of the thickness of the material. Set the thicknesser to the size of the chisel and mark the socket in the middle of the post between the previously marked marking lines. Work from the front side. If desired, you can set the thicknesser solution to a third of the thickness of the material and work with it on both sides.
H. In the same way, mark the tenon on the end and both sides until you mark the shoulders on the crossbar.
4. In a vice, clamp an auxiliary support in the form of a piece of wood high enough so that you can attach the stand to it, turned “on edge.” Secure the stand to the support, placing the clamp next to the marking of the socket.
5. Cut out a nest with a chisel, making an allowance inwards of about 3 mm from each end so as not to damage the edges when removing waste. Hold the chisel level, keeping its edge parallel to the plane of the counter. Make the first cut strictly vertically, placing the sharpening bevel towards the middle of the socket. Repeat from the other end.
6. Make several intermediate cuts, holding the chisel at a slight angle and with the sharpening bevel down. Select a retreat, using the chisel as a lever. Having gone deeper by 5 mm, make more cuts and select a waste. Continue until about halfway thick. Turn the piece over and work the same way on the other side.
7. After removing the main part of the waste, clean out the nest and cut off the previously left allowance to the marking lines on each side.
8. Cut a tenon along the fibers, running a hacksaw along the marking line on the waste side, and cut out the shoulders.
9. Check fit and adjust if necessary. The shoulders of the tenon should fit neatly into the post, the connection should be perpendicular and have no play.
10. To secure, you can insert wedges on both sides of the tenon. The gap for this is made in the socket. Working with a chisel from the outside of the socket, widen it to about two-thirds of the depth with a 1:8 slope. The wedges are made with the same bias.
11. Apply glue and squeeze tightly. Check for squareness. Apply glue to the wedges and drive them into place. Saw off the tenon allowance and remove excess glue.
Other tenon joints
Tenon joints for window frames and doors are somewhat different from tenon joints in semi-darkness, although the technique is the same. Inside there is a fold and/or lining for glass or panel (panel). When making a tenon-to-socket connection on a part with a rebate, make the plane of the tenon in line with the edge of the rebate. One of the shoulders of the crossbar is made longer (to the depth of the fold), and the second is made shorter so as not to block the fold.
Tenon joints for parts with overlays have a shoulder that is cut to match the profile of the overlay. An alternative is to remove the trim from the edge of the socket and make a bevel or cut to match the mating piece. Other types of tenon-to-socket connections:
- Side tenon - in the manufacture of doors.
- A hidden beveled tenon in semi-darkness (with a beveled step) - to hide the tenon.
- A tenon in the dark (tenon steps on both sides) - for relatively wide parts, such as the bottom trim (bar) of a door.
All these connections can be through, or they can be blind, when the end of the tenon is not visible from the back of the rack. They can be strengthened with wedges or dowels.
Correct connection of parts with nails
To ensure that the part connected with nails is as reliable and durable as possible, follow several useful recommendations. The first thing to consider is that the nail used for a particular connection must be the correct size. If glue is also used to fasten the workpieces, give preference to thin long nails, which should be at least three times longer than the strip being attached.
Secondly, when installing large structures made of wood, the most effective adhesion when working with T-shaped joints can be achieved by driving the nails crosswise. And thirdly, a reliable, strong connection can be achieved by driving several nails diagonally in relation to each other.
You should also avoid driving multiple nails into the same wood grain. This may cause the surface to crack. Try to place all nails in a checkerboard pattern or simply offset. For the same reason, you should also saw off the end of the driven strip only after all the nails have been driven in.
Always use a support stand when working with wood pieces and nails. This is the only way to avoid vibration during impacts, which can damage both the surface of the product and the nail.
Nails for special work
Nails necessary for special work are necessarily available in every workshop and are purchased as needed. Only a professional salesperson will tell you which nails, for which type of work and materials you should use. Specialty nails come in a variety of lengths and some come in a variety of shapes and colors. For example, nails used for upholstery may have chrome-plated heads. This coating does an excellent job not only of decorative function, but also resists corrosion. If you purchase special nails, use a little more than the quantity you need.
How to disguise a nail?
Nails with small heads can be driven into a wooden surface and disguised so that their heads become almost invisible. To do this, you need to use a chisel to break off a small sliver from the wooden surface. We drive a nail into the resulting hole and close it back with a chipped sliver, which can be fixed with wax or carpenter's putty. To make your task easier, it is best to choose nails with a recessed head that can be driven deeper than the level of the wood piece.
How to hammer small nails?
Connecting parts with small nails. Hammering small nails can cause problems. To work with small nails, use pliers that are convenient for holding them while driving. This way you can avoid accidental and unpleasant hits on your fingers. You should not release a nail that is not yet sufficiently fixed to the surface.
If you are working with nails 15-20 mm long, try using an awl to make small holes where you can later insert the nail to make it easier for you to hammer it in. To make the nail stand more stable on the surface, you can strengthen it with bread crumbs or plasticine.
Lug connections
Lug joints are used when there is a need to connect intersecting parts located “On Edge”, either at the corner or in the middle (for example, the corner of a window sash or where a table leg meets a crossbar).
Types of lug connections
The most common types of eyelet connections are corner and T-shaped (T-shaped). For strength, the connection must be glued, but it can be strengthened with a dowel.
Making an eyelet connection
1. Make the markings in the same way as for a tenon-to-socket joint, but divide the thickness of the material by three to determine one-third. Mark the waste on both parts. On one part you will need to select the middle. This groove is called an eye. On the second part, both side parts of the material are removed, and the remaining middle part is called a tenon.
2. Saw along the grain to the shoulder line along the marking lines on the waste side. Use a hacksaw to cut out the shoulders, and you will get a tenon.
3. Working from both sides, remove material from the eye with a chisel/mortise chisel or jigsaw.
4. Check the fit and adjust with a chisel if necessary. Apply glue to the joint surfaces. Check for squareness. Using a C-clamp, clamp the joint while the glue hardens.