When installing a staircase with your own hands, one of the important steps is the manufacture of railings. They are very important, as they ensure safe ascent and descent and give the march a complete, harmonious look. The cost of manufacturing and installing railings for staircase structures is quite high. However, safety and aesthetics should not be neglected. You can make and install balusters with your own hands. With the right material selected and all technologies followed, you can get a result that will pleasantly please you.
How to choose the right balusters?
When choosing supports for fences of various designs, various factors are used. Among them:
- appearance;
- price;
- size;
- performance material.
When ordering fencing installations from specialized organizations, they produce structural elements from wood of the same species. The same principle must be followed when installing fencing yourself. You cannot install balusters made of oak, and railings made of alder or larch. The purchased products must have the correct geometric dimensions. They should not have:
- defects;
- deformations;
- blue on the surface;
- emptiness inside.
You should not buy products with fallen knots or made from raw wood.
Prices for various types of balusters
Balusters
What type of wood to choose
In order for the staircase to remain strong and presentable for a long time, it is recommended to make all elements: railings, balusters, steps from the same type of wood. When making supports for stairs, it is best to choose hard wood:
- Oak. Noble and strong, it has the highest performance characteristics. It is durable, resistant to temperature changes, moisture and decay. Oak products have a beautiful dark shade. The products practically do not crack or warp. Despite the density of the wood, oak can be processed in all available ways.
Example of carved oak balusters - Ash. It has a very beautiful texture of valuable wood. The main advantage of ash is its resistance to moisture and rot. The structure of the tree is elastic and dense, withstands heavy loads well, bends well, and is resistant to deformation.
- Beech. Beautiful and easy to process, beech is almost as strong and durable as oak. The wood is perfectly polished and sanded, and lends itself well to decorative finishing with various compositions. The disadvantage of beech is its susceptibility to rotting and deformation in places with high humidity. In order for beech products to be of high quality, you need to choose properly dried wood.
- Birch. Rarely used for making balusters. The main disadvantage of birch is its tendency to rot, cracks and severe shrinkage.
Drawings and patterns of birch balusters
Although wood has good strength indicators, it is easy to process, sand and paint. After appropriate processing, birch can be given the appearance of noble wood. - Larch. Over time, wooden larch balusters only become stronger. The wood is resistant to warping and high humidity, it does not rot and burns very poorly.
- Pine. A budget option with good resistance to fungi, moisture and temperature changes. Wood lends itself well to processing with cutting tools and is the most popular material for creating stairs.
To make balusters with your own hands, it is important to choose wood of the correct moisture content, without cracks, knots and other defects. Overdried wood is very fragile, and wet wood can crack after drying.
Various types of carved balusters
It would also be wiser for novice craftsmen to choose inexpensive types of wood - pine or birch, which are easy to process. Valuable species such as oak or walnut are too expensive to be damaged during the training process.
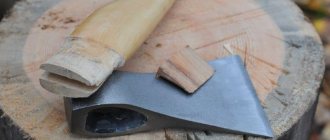
Manufacturing technology of wooden balusters
The wood lends itself well to processing. This allows you to apply patterns of various types and complexity to the surface of the blank balusters. Craftsmen create supports suitable for interiors from modern to high-tech. Work begins with the development of a product sketch. After its approval, a drawing is drawn up indicating all dimensions, including bends and cuts. Before starting to manufacture the support, the dimensions indicated in the drawing are transferred to the workpiece and marks are made. Each of them is assigned a number. Cutting out decorative parts requires cutters of various shapes.
Cutters for cutting out decorative elements on balusters
Round supports are made using the rotation method. The operation of lathes is based on this principle. They are adapted for processing blanks made from various types of wood. In a lathe, the workpiece is fixed in the spindle head. It rotates at a given speed around its axis. The ornament is applied to the surface using a rigidly fixed support of the cutter. The position of the tool is adjusted using movable slides. They can move manually or automatically. The type of ornament applied to the surface of the blank depends on the position of the cutter.
On milling machines, a rotating spindle is used to secure the cutter. A stationary workpiece is fed to it using a support. The industry produces universal machines that combine turning and milling functions. They make products with complex ornaments. In the absence of universal CNC equipment, difficult-to-cut patterns are made on sequentially used lathes and milling machines.
Making balusters on a CNC machine
After applying the pattern to the surface of the products, they undergo finishing treatment. First, the supports are ground by hand or machine and then polished. Products prepared in this way can be coated with wood varnish or paint.
Find out how to age wood with your own hands, and also familiarize yourself with aging methods and mistakes when working in a special article on our portal.
Video - How to make Roman-type balusters yourself?
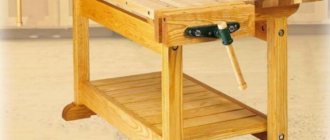
Simple do-it-yourself slide with a carriage for a hand router
Hello, dear readers and DIYers!
Surely many of you use a hand router quite often, but you can seriously expand its functionality by making a special device for it. In this article, Zach, author of the YouTube channel “Workshop Edits,” will tell you how to make a carriage with a slide for this common tool, allowing you to level surfaces of a fairly large area.
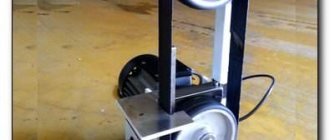
This homemade device is quite simple to make if you have a circular saw, and if you don’t have one, then all the elements can be ordered at any furniture factory.
Materials. — Sheet MDF — Wood screws
Manufacturing process. When thinking about the size of the sled, Zach tries to customize it as best he can to fit his needs. In particular, the author never has to level surfaces more than 60 cm wide with a router. This means that this will be approximately the width of the sled.
The main dimensions of the parts that will need to be cut by the author are provided in the drawing.
Next, the master proceeds, in fact, to the sled itself. He measures the width of the router base, which is 5.5 inches, and returns to the table saw. He cuts another wide strip (5.5 and 1/8 inches) of material. This reserve will subsequently give the master additional room for maneuver when he works with the router.
Finally, he cuts two three-inch wide strips for the sides of the sled. According to the author, this height of the sides of the slide should fix the router in one position.
At the final stage, the master mills a groove in the slide. To do this, he uses an inch cutter. Everything turned out to be quite simple: the master made several passes, each time increasing the overhang of the cutter by a small amount, so that the result was a neat slot with rounded edges, which were additionally processed with sandpaper.
Through this slot in the slide the author will work the cutter on the surface of the material that is located below. This processing method will be reminiscent of scraping parquet.
Good mood, good luck, and interesting ideas to everyone!
The author's video can be found here.
Source
Flat balusters: step-by-step instructions
Flat supports are easiest to make yourself. Their production does not require complex equipment. Skillfully made supports have an attractive appearance. They can decorate any interior.
Step 1. The first stage of work is devoted to preparing the materials and tools necessary for the manufacture of balusters: jigsaw, paper, marker, scissors, ruler, sandpaper or sanding machine, dry boards or plywood.
Electric jigsaw
Prices for popular models of jigsaws
Jigsaw
Step 2. At the second stage, a sketch of the future support is developed. To do this, the full size of the contours of the product and patterns are applied to the paper. After this, a support template is cut out according to the dimensions marked on the paper.
Stencils
Step 3. The third stage is devoted to applying a stencil to the workpiece, drawing the contours of the future product on it and cutting out a support along them with a jigsaw.
Flat balusters cut with a jigsaw
Step 4. At the fourth stage of work, the surface of the products is processed. For these purposes, use sandpaper or a grinding machine.
Prices for popular models of sanders
Sanders
Sanding a piece of wood with an emery wheel
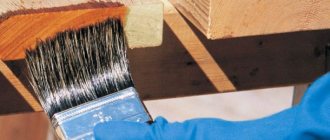
Step 5. To extend the service life of products, their surface is treated with an antiseptic. After it dries, the supports are coated with wood varnish. This improves their aesthetic appearance.
Features of varnishing stairs
Find out how to make a wooden countertop for a bathroom sink with your own hands in a special article on our portal.
Norms
If wooden and wrought iron balusters are used as supports for stair railings, the distance between them should not be more than 150 mm. This norm is especially important to observe when creating stairs in a house where children will live.
The small distance between the vertical posts will protect children from falling from great heights. The height of the balusters should be more than 90 cm. For teenagers, additional lower railings can also be installed.
Mounting supports: options
When choosing the fastening of supports for enclosing structures, various factors are taken into account:
- wood type;
- size and shape of products;
- fencing design.
Professional craftsmen most often use wooden pins or dowels to attach volumetric supports. It is recommended not to make their diameter larger than 1/4 of the diameter of the baluster base. This may cause the product to crack.
Fencing fastening diagram
According to the requirements of the current SNiP, fencing is installed on stairs with more than 5 steps. The minimum distance between the supports is 10-15 cm. The upper part of the supports is attached to the handrails. The method of fixing the lower part of the balusters depends on the type of structure. They can connect:
- with steps;
- bowstring or stringer;
- landing.
It is not allowed to use nails to connect structural elements. During use they quickly become loose. This leads to loss of strength and imbalance of the fence. When fastening balusters to a narrow string, a special board of greater width is placed on it. It serves as the lower support of the baluster.
Staircase design elements
Incorrectly installed and poorly secured supports make the operation of the ladder dangerous. The most durable mounting should have support posts. Intermediate balusters are installed between them at equal intervals. When attaching the supports to the string, their base and upper part are cut to the slope angle of the flight of stairs.
Fastening supports with dowels
The fastening process begins with marking the location for drilling holes for installing dowels. It is located exactly in the center of the base of the baluster. The depth of the hole is equal to 1/2 the length of the dowel inserted into it. The strength of the connection of structural elements is increased with the help of wood glue. They fill the hole before installing the dowel.
Scheme of fastening the structure with a dowel
The recesses are drilled in 2 stages. They start with a hole with a diameter of 5 mm, and then gradually expand it, changing drills of different diameters. The dowel should not go completely into the hole. The length of the outer ends of the fasteners must be at least 5.5-6 cm. Before installation in the base of the stairs, they are lubricated with glue and sprinkled with fine sawdust. This increases the adhesion strength of structural elements.
Fastening the supports with a metal pin
One end of the fastener should have a screw thread, the other should have a nut thread. The depth of the hole for the stud in the base depends on the length of the fastener. Usually it is from 10 to 20 cm. First, a 1-2 mm indentation is made with a drill in the center of the base of the support. After this, they begin to screw the fasteners into it. The ends of the studs protruding from the supports are inserted into the holes drilled through the steps, after which a nut and washer are put on them and tightened until they stop.
Fastener location diagram
Find out how to make a hatch to the attic with a ladder with your own hands, and also read the step-by-step instructions in a special article on our portal.
Fastening supports with self-tapping screws
The easiest and fastest way to attach. Self-tapping screws ensure the strength of the connection of the elements, but have one big drawback - after installation of the structure, their caps are visible. This spoils the aesthetic appearance of the staircase. This type of fastening is widely used for connecting flat balusters when constructing gazebos and porch railings.
Purpose and advantages of wooden racks
Balusters for stairs perform the following important functions:
- ensure safety of movement along a flight of stairs;
- perform a supporting function;
- add additional rigidity to stair railings;
- are the most noticeable element of the decor.
Wooden balusters are in high demand due to the special properties and advantages of wood products:
- Environmental friendliness. Natural wood is absolutely safe and does not emit substances hazardous to the body. On the contrary, natural resins and essential oils have a healing effect.
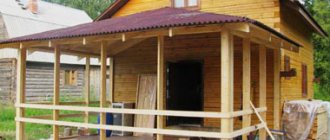
Ready-to-install railings assembled from wooden balusters - Energy and attractiveness of natural material. Balusters and railings for stairs made of wood can be very elegant and original. Products made from valuable types of wood in combination with decorative finishes make the interior luxurious and unique.
- Large selection of wood products. Wood is an excellent material for realizing any design and stylistic ideas.
- Wood goes well with any style and material.
- The ability to make balusters with your own hands. You can make staircase racks yourself, saving significant money.
- High strength and durability. High-quality wood products can last a very long time. The minimum service life of balusters made of hardwood is at least 50 years. Option for installing railings made of wooden balusters
- Possibility of repair and replacement of damaged elements. Replacing or repairing a damaged part is not difficult.
Gypsum
It is much easier to make balusters from plaster. In the retail chain you can easily find ready-made casting molds suitable in shape. Stores dedicated to landscape design offer such forms in a wide range.
If the finished mold is not suitable for some reason, you can make your own using silicone or rubber. You will need to carve a sample according to which the mold is prepared.
When the issue with the form is resolved, the casting process begins. The two halves of the form are fastened together. Dissolve the gypsum powder to the consistency of thick sour cream.
The finished mixture is poured into the mold and left to harden for a day. If small defects are found on the casting, they can be easily eliminated by machining.