Articles
All photos from the article
Today, metal perforated, plastic and wooden corners are widely used to protect the corners of walls, and the finishing can be either frame (plasterboard, lining), or plaster or with wallpaper - the point is that the corners are chipped and erased with any facing materials.
Different angles for wooden structures
In most cases, this L-shaped device has an angle of 90⁰, but if necessary, it can be changed to blunt or sharp, in addition, its faces can be either the same or different in width. We now want to tell you how to make and install such protection, and we will also show you a video in this article.
Sequence of finishing work
The first option is preferable in a wooden house, since wood tends to expand or shrink in size and “breathe”. If the base material is the same as the coating, their joint oscillatory motion will not cause multidirectional stresses leading to deformations and the appearance of defects on the surface.
In brick and concrete houses, before attaching the lining, a sheathing is installed, which can also serve as a frame for laying thermal insulation. It is convenient to place corrugated hoses for electrical wiring and heating pipes in the space between the covering and the wall.
The second is the correct measurement of the room and calculation of materials. This will help you avoid unnecessary expenses or waste time on additional trips to purchase missing components. The amount of lining is determined based on the area of the walls, excluding openings. The length of the ceiling and floor plinth is equal to the perimeter of the room. To decorate the corners you will need shaped strips. Materials are purchased with a margin of 10-15% for defects or other defects.
Before starting work, it is unpacked, allowed to “get used” to the new conditions, and treated with antiseptics and fire retardants, if there is no factory preparation.
Before installing the sheathing or directly attaching the lining to the wall, prepare the surface - clean, level, seal the cracks, and coat with antiseptic compounds. This will protect the structure from the appearance of mold and fungi.
The third step is installing the sheathing. Most often it is made from wooden blocks with a cross-section of 20x30, 40x50 or larger. The thickness of the element depends on whether insulation will be laid under the lining. A ventilation gap is left between the thermal insulation layer and the coating, which prevents condensation from accumulating.
The frame pitch is 40-60 cm, the direction is perpendicular to the finishing boards. The space between the bars should be filled tightly with insulating roll or slab material. For residential premises this is usually mineral wool; outside, expanded polystyrene foam or other polymers are more often used. They are not afraid of moisture.
The geometry is controlled using a bubble or laser level. Dowels or construction nails are used as fasteners for the sheathing.
Lathing for lining, installation of profiles and frames
Installation of the lining should be carried out on a pre-leveled base made of plywood or fiberboard sheets.
It is not always possible to use such materials as a base surface, so many builders use leveled lathing made of wood, metal profiles or plastic to fasten the panels. In our article we will get acquainted with the purpose of the frame and the nuances of its installation. Why do you need sheathing for lining? Using fiberboard sheets or plywood to level the base is not always cost-effective. In addition, such products will not be able to smooth out all the irregularities. It is also impossible to attach the lining even to perfectly leveled concrete or brick walls. In this case, you need to use dowels to secure the panels, which will only complicate the work.
The way out of this situation is to pre-install a frame made of wooden slats or a metal profile. The sheathing is a mesh with a certain distance between the guides. With its help, you can not only reduce material consumption, but also perfectly level the surface.
Wide range
Based on the type of raw material they are divided into:
- Corners made from softwood (pine, spruce, larch, cedar);
- Corners made of hardwood (birch, linden, beech, oak);
- Combined, in which the wooden base has a metal or plastic edging, which increases decorativeness and protects its edge from damage.
By installation type:
- To mask the joints of panels forming an internal corner - baseboards;
- For decorating external corners, having an “L” shape.
Varieties
Wooden decorative moldings can be external or internal. It is quite difficult to distinguish them by external indicators, since they are similar. A variety of wood species are used to make corners, such as:
If wooden corners are not suitable, you should consider a folding profile made of medium-density fibreboard. The main advantage of the profile is flexibility. The product bends well, which allows you to give it the desired shape.
Plastic models made to look like wood are considered popular. Polyvinyl chloride is used to produce corners. Perforated metal corners are also very popular. It will not be possible to decorate a room with such a corner, since perforated models are made only of the hidden type.
Fasteners for lining
Profile strips can be placed vertically, horizontally or obliquely. In dry rooms, the direction of the board is chosen arbitrarily, consistent only with the design idea or one’s preferences.
In places where there is high humidity or water may flow into the spaces between the planks, the boards are installed either vertically or horizontally so that the tenon points upward.
The lining is fastened using fasteners; the following methods are distinguished:
Nails
The fixation must be reliable, and the material must be firmly held on the frame. It is desirable that the fasteners are invisible and do not corrode in a humid environment. These requirements are met by finishing nails, the head of which is cylindrical in shape, and its diameter is slightly larger than the shaft. The surface of the hardware is coated with zinc, brass, copper or bronze; they are not afraid of exposure to water.
The length of the dowels is 20-50 mm, the cross-section is 1.2-1.8 mm. The diameter of the cap is 1.6-3.4 mm. The nail penetrates the wood easily without splitting it. With a hammer, it is sunk into the thickness of the material.
Specialized equipment for driving nails - a pneumatic gun. It allows you to quickly, efficiently, and without expending much physical effort, attach the lining to a vertical surface and ceiling.
The length of the nail should exceed the thickness of the profile board by 2.5-3 times. Most often, hardware from 50 to 60 mm is used. They are driven in with a hammer using a hammer with a cone-shaped end, or with homemade devices made from a bolt or punch. You can nail the strip through the middle of the element, obliquely from the longitudinal tongue or from the side of the groove into the protruding lower shelf.
Kleimers
Clamps are staples made of spring steel or galvanized iron with a tongue for the board and 3-4 holes for nails, screws or staples. The element is inserted into the foot and secured to the frame with hardware. From the front side of the finishing surface, the connection is completely invisible.
The clamps are selected taking into account the thickness of the lining; the thicker it is, the more powerful the fastener should be. The amount of foot lift varies from 2 to 5 mm in increments of 0.5 mm. The number of the hardware is chosen in accordance with the size of the tenon of the wooden profile, otherwise the fastening does not hold the part tightly or it will have to be pressed on with hammer blows.
Clips are not designed to bear loads, so hangers, ceiling lamps, shelves, and cabinets cannot be fixed to the coating. Before attaching the lining, determine where to hang the equipment. If it is heavy enough, additional embedded parts are mounted on the wall.
Self-tapping screws
Self-tapping screws are rods made of hardened steel with threads and a head for a screwing tool. To fasten the lining, use yellow and white hardware with a protective anti-corrosion coating. The thread pitch is increased compared to metal fasteners, since wood has a layered, loose structure.
The most commonly used self-tapping screws are 20-45 mm long and 2.2-3.5 mm in diameter. They are screwed in with a screwdriver, a screwdriver, and holes are pre-drilled in solid wood. You can fasten the lining using the through method, then use products with a hidden head. After installation, the recesses are filled with dowels, leveled and puttied.
The clamps are attached to the sheathing with thin small screws, nails or staples. Recommended dowel sizes are 10-12 mm.
Compared to nails, self-tapping screws have higher fastening strength, are less susceptible to pulling out, and can be removed if necessary. They are more convenient when using clamps, since fasteners can be damaged by hammer blows.
Experienced craftsmen advise how to properly fasten the lining: use nails and screws in inconspicuous places, and place a clamp in plain sight.
The lining is fastened with staples using a construction mechanical, pneumatic or electric stapler. The fasteners are embedded into the wood with virtually no physical effort, so a large amount of work can be completed in a short time. The advantage of the method is the absence of irreversible damage to the material. The most popular sizes are 4-14 mm - the length of the legs and 11.4 mm - the width of the bracket.
How to properly attach the lining? – Some useful advice from Professor Opilkin
D wood
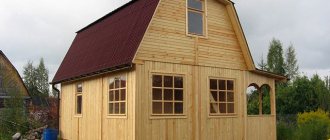
- this is my favorite finishing material, created by nature itself, decorated with a scattering of knots or a uniquely beautiful texture. Durable, reliable, beautiful, environmentally friendly. Having a country house, being the owner of your own piece of land is everyone’s dream.
Wooden panels for installation on walls and ceilings today can be selected from various types of wood, different shapes, sizes, and thicknesses. No plastic can compare with natural wood.
We will look at the installation of such wooden panels today in our article. This is a lining that can be used for various purposes. It is suitable for cladding the interior of a room: walls, ceilings and even floors. But some types of lining are suitable for exterior decoration of a building.
How to fasten the lining so as not to spoil its appearance and at the same time maintain the reliability of the fasteners?
When you resort to the help of professional teams, questions about the methods of laying the lining disappear. But sometimes, in order to save money or out of interest, the owner decides to install the boards himself. I really hope this article will help you in your work.
Calculation of the squaring of the paneling on walls and ceilings is carried out using a simple formula: multiply the working (without tenon and groove) width of the panel by the length (we get the area of one board). Next, take the area of the wall and divide by the area of one board. We add ten percent to the cut and find out the required volume of boards.
Photo 1. Installation of lining on the sheathing
First, you have to install the sheathing. Lathing is wooden blocks onto which panels are subsequently attached. If the panels are laid vertically, then the sheathing is mounted horizontally and vice versa. The bars, using a screwdriver and ordinary wood screws (it is better to use yellow, galvanized ones, rather than black ones), are evenly screwed to the wall. Markings and a building level will help you make it level.
If you decide that you need sound insulation, then you can put insulation between the bars. The pitch of the sheathing will be fifty centimeters.
So, ways to attach the lining:
- self-tapping screws into the front face of the board;
- finishing nails;
- self-tapping screws into a tenon or groove;
- kleimer (hidden fastener).
How to nail euro-lining and stihl lining to the wall?
High-quality installation requires accuracy, a good eye and, of course, a tool. If you are using screws, you will need a screwdriver, and if you are using nails, then a regular hammer. It is better to choose special finishing nails without large heads, otherwise the visible part of the board will resemble a wooden barn in the village.
Photo 2. Installation of lining in the face
When we use a hammer and a screwdriver, we make markings so that the nails or screws are at the same level. Laying the lining in an open way will look quite beautiful if you choose nails without heads and screws with a decorative bead head.
Personally, I don't like working with a hammer. Nails often damage panels and cause wood to splinter. The percentage of waste turns out to be higher, which is generally unacceptable when working with expensive breeds.
But I like a screwdriver and special screws with a cutter that doesn’t split the wood and doesn’t require pre-drilling a hole. For example, Essve lining screws are an excellent option with a decorative bead head and a structure designed specifically for wood. With such an arsenal, it’s very easy to correctly attach the lining – see for yourself.
Photo 3. Essve self-tapping screws for lining
Important!
When installing into a layer, it is IMPORTANT to hammer in two nails or two self-tapping screws, so that the boards will be securely pressed and will not twist (bend) them.
How to attach Eurolining and Shtil lining to the ceiling and walls in a hidden way?
It’s very simple - use a galvanized plate: a clamp. We put the plate on the rear tenon of the panel and, using a screwdriver, screw it to the joist (sheathing) with the frequency of spaced bars. The approximate consumption of clamps is 100 pieces per five square meters, if you attach the lining to the sheathing installed after fifty centimeters.
The durability of this method of fastening the lining will be ensured by the use of reinforced clamps if the planks are made of larch or other heavy wood species. You can use the method of alternating clamps, reinforced-regular. Now you know how to properly attach eurolining and stilts to the wall and ceiling using clamps.
Photo 4. Fastening the lining to clamps
How to use screws to carry out the installation procedure in a hidden way?
This method is quite popular. The screw is screwed into the tenon, or less often (if you are working with eurolining) into the rear groove at an angle and overlapped with the next plank. Here it is important to choose a self-tapping screw design so that the thin wood does not split. Otherwise, there will again be a lot of waste.
Photo 5. Tenon mounting method
There should be a cutter at the tip of the screw, the head should be cone-shaped so that when laying the lining it (the head) can be “drowned” into the wood.
Photo 6. Method of mounting in a groove
So, we have addressed the main question in this article. The LesoBirzha online store is ready to provide you with not only high-quality lumber and related products. Our consultants will tell you how to fasten lining and eurolining, and offer the services of professional teams of carpenters. Contact us. We are happy to help you.
Purpose of elements
Like any facing material, wooden corners used for wall decoration have different functional purposes. They are mainly used:
- To perform a decorative function - as a facing base used at the final stage of finishing work;
- To perform a protective function - thanks to the use of such products, not only the likelihood of damage to the corner joints of wall panels is reduced, but also injury to a person from the untreated edge of the main cladding is eliminated;
- To combine decorative and protective functions, products with cable ducts are used, which not only hide wires inside their structure, but also reliably protect them from mechanical damage.
Using internal corners, gaps and cracks between walls, between walls and ceiling, and between ceiling and wall panels are masked.
Such materials are suitable for use in any type of premises.
The external type is indispensable when the length of the wall does not allow the use of a multiple number of finishing units for cladding.
In this case, the gap or uneven cut of the last cladding element in a row will be securely hidden under the decor.
Beautiful examples
There are many variations on how to sew up a corner when laying lining:
- The easiest way is to adjust flat surfaces for a tight fit. To do this, the outer plank must be placed between the finished covering of the adjacent wall in the gap of the material laid on its plane. It is advisable to sand the cut end to reduce its sensitivity to humidity and microclimate changes.
- The other option is more labor-intensive and specific. Requires installation at an angle of 120°. For this, special j-cloths are used. They have the same length, but a slightly different profile and dimensions. It is necessary to calculate the distance for this element so that it does not have to be cut.
We invite you to watch the video “How to properly close a gap in a corner with clapboard”:
Finishing corners for a room lined with wooden lining is a very important undertaking. Several tasks are performed at once: places where the panels are not tightly joined are sealed to increase the thermal insulation of the coating, visible defects are repaired so that the surface is beautiful and aesthetically pleasing. Protected sharp edges will prevent accidental damage and bruises.
Vertical lining
With this layout of the boards, the sheathing is installed horizontally. The bars are pre-treated with impregnations against rotting and pests. The locations of the guides are marked on the wall in increments of 40-60 cm. The dowel or self-tapping screw is deepened into the wall by at least 50 mm. If necessary, the hole is drilled.
Before attaching the lining, determine the most visible angle. The first profile is nailed down. Alternately, insert the board with a tenon into the groove of the previous element and fix it with fasteners to the sheathing. Verticality is controlled by the building level.
The hardware is driven into the bottom flange of the groove at an angle, the caps are recessed so that the ridge of the next lining fits freely into the recess. The last board is cut to the size of the remaining part and nailed.
Required Tools
To simplify the installation of wooden or steel sheathing, you need to prepare the appropriate tools and materials:
- wooden slats of a certain section or galvanized metal beams;
- self-tapping screws (dowels);
- a hacksaw or jigsaw for cutting lining;
- grinder, used for trimming metal profiles;
- axe;
- electric drill for drilling holes for dowels;
- tape measure and pencil;
- cord;
- building level;
- battery-powered screwdriver or screwdriver;
- antiseptics and fire retardants for treating wood against rotting, fungus and mold.
When using wooden beams for lathing under the lining, choose only high-quality products. There should be no chips, knots or cracks on their surface. The durability of the entire coating will depend on the quality of the frame material. Humidity is considered the decisive factor here. This figure for wood should not exceed 16%, otherwise the material will be deformed during operation, which will lead to the appearance of unevenness on the skin.
The frame guides are fixed to a brick or concrete wall using dowels. For fixing to a wooden base, self-tapping screws will be sufficient. To simplify the work of installing the sheathing under the lining, it is necessary to use screws of the required length, and also place wooden wedges under the slats in places where there is sagging.
Application
In addition to the classic options for wall decoration made from softwood, today on the market for repair and finishing materials you can find combined analogues that combine the structure of natural wood with chromed metal, decorative plastic and even glass.
For example, an ordinary protective outer corner made of wood, edged in the form of a chrome strip of metal, will add zest to the interior design, somewhat diluting the minimalism of such a style as “high-tech”.
If we take wooden elements for decorating walls made of deciduous wood, then their undoubted advantage (in addition to greater hardness than products made from coniferous wood) is the possibility of additional, independent decoration.
Using various stains and dyes, you can turn an ordinary birch plinth into exclusive products made of mahogany or ebony.
Modern polymers have also found wide application in the production of decorative finishing materials.
Budget options use regular colored polyvinyl chloride plastic or plastic that imitates natural wood.
In the production of exclusive products, a combination of metal, plastic and strips of glass inserts can be used.
How to choose wood moldings
In order for wooden corners to fit into the overall style of the room and fully fulfill the assigned tasks, you need to be able to select them correctly. First of all, pay attention to the shape and size of the corners. If you need to select corners for finishing the facade, give preference to wide products, as they will better hide unevenness and protect the surface.
Please inspect the product carefully before purchasing. If there are cracks, unevenness and other visible defects on it, this indicates that low-quality material was used for the manufacture of wooden corners (including lining). Therefore, it is better not to buy products.
Horizontal lining
The sheathing is mounted vertically from the corners, observing a step of 40-60 cm. To fix the insulation, additionally nail horizontal jumpers every 1.2 m or arrange an additional frame so that the slabs do not slide down. Before attaching the lining, a vapor barrier, heat insulation and waterproofing are laid.
Installation of lamellas begins from the top element, since the last bottom strip is usually trimmed. At the ceiling level, a whole lining looks visually better, and a non-standard width board near the floor will be covered with a plinth.
When fastening the lining horizontally, the tenon is directed upward. Gently tapping a piece of wooden profile with a mallet with a rubber tip or a hammer, install each subsequent board in place and secure it with fasteners from below. The first and last element, as well as short pieces less than 10 cm long, are nailed or secured with self-tapping screws.
If the wall is sheathed from the bottom up, the board is secured to the sheathing from the bottom side, and a self-tapping screw is screwed into the tenon along the top, flush with the surface.
Installation of wooden sheathing for lining
The process of installing wooden sheathing under the lining proceeds according to the following algorithm:
- We treat wooden products with an antiseptic.
- We draw marking lines on the wall.
- To create a flat plane, we fix the profiles at the top and bottom of the wall, then at the corners of the room.
- When all the elements are fixed, we proceed to the installation of horizontal or vertical slats.
We install each of the elements according to the building level indications.
If necessary, place pieces of plastic under the guides in places where there are significant gaps with the wall. You can also use wood chips for this, but they will not withstand prolonged use. To securely fasten the frame, it is recommended to use self-tapping screws of different lengths. All electrical wiring under the frame is laid in corrugation, which will prevent possible fire of the material.
To make the wooden sheathing resistant to moisture, all profiles are impregnated with a water-repellent solution.
Installation Features
Since wooden facing corners (especially for sealing internal corners) are usually sold untreated, before installing it it is necessary to dry it and impregnate it with antiseptic and fire-retardant compounds.
The method of installation of such cladding primarily depends on its functional purpose. Today, for fastening corner elements during finishing of residential premises, the following are mainly used:
- Fastening from the surface of surfaces joined at an angle using self-tapping screws with a countersunk or decorative head;
- Planting a wooden corner with special adhesive compounds;
- The use of locking, hidden fasteners used to fasten the plastic corner.
For domestic premises (kitchen or bathroom), a simple fastening using self-tapping screws is suitable.
For living rooms, where it is desirable to hide the fastening element itself, you will have to resort to an adhesive connection or the use of a locking fastening.
What determines the method of fastening?
First, pay attention to the cladding material: block house, lining or wooden panels.
Secondly, the type of room plays an important role:
- For example, for domestic premises such as a kitchen or bathroom, you can safely choose the simplest wooden corners and secure them with self-tapping screws.
- But in rooms where it is important to hide the fasteners, for example, in the bedroom or living room, it is better to secure the corners with glue or using hidden and locking fasteners.
Each of the above methods has both its advantages and disadvantages. Therefore, before choosing, always carefully read the necessary information.
The process of clapboard paneling in the corners
The ceiling lathing is mounted on hangers or brackets. The horizontal level is set with a laser level, focusing on the lowest point of overlap. A fishing line is stretched along the walls, and frame bars are placed along it in increments of 25-35 cm for eurolining, 40-60 for other types. When finishing an entire room with clapboards, first the walls are sheathed, then the ceiling.
Before fixing the lining, all communications are laid and embedded parts for massive lamps are installed. If the ceiling is insulated, use a stapler to attach a vapor barrier film to the sheathing or wooden wall from the side of the ceiling. Thermal insulation is inserted between the frame bars and covered with a membrane. The rough surface should be directed towards the insulation.
They begin to install the lining on the side opposite to the entrance so that the last cut board does not catch the eye. If the length of the lamellas is insufficient, use a layout with joints along one line or with staggered seams. The border is covered with a decorative strip or the ends are carefully sanded. Then the docking point is neat and unnoticeable.
- Having installed the first strip of the lining in level, we fasten the side adjacent to the corner into a “tenon” using self-tapping screws, a screwdriver and a long bit;
- then, we fasten the second side of the plank into the “groove” using the same yellow, small self-tapping screws and hard clamps. If you use nails, then in order to avoid damage to the outer edges of the lining, finally put something on the head of the nail, the same pliers, for example;
- Having installed the bar along this wall, we proceed to constructing the corner. We start the adjacent wall in an absolutely mirror image, by fastening the first plank, level, and in the “tenon”, in the “groove” we also fasten it using a clamp and a screw, along the entire sheathing;
- Finally, we frame the corner using a fillet, filing it down if necessary if we are filing several corners at the same time, not forgetting to take into account the baseboards. The fillet is a thin thing, and to prevent the nails from splitting, it must be drilled with a nail without a head inserted into a screwdriver; additionally or as an alternative, it can be mounted on liquid nails.
This is how you can briefly arrange both an internal and an external corner. One thing is clear that this work is painstaking and responsible, so you should not neglect even the smallest things.
Self-tapping installation
Through fastening with self-tapping screws through the entire board, and not through a groove, is the simplest, fairly reliable, but not the best solution for wooden lining. With this method, the integrity of the material is compromised, so the holes must be regularly treated with special protective mastics to prevent destruction and rotting of the wood. Despite all efforts, over time, the installation sites of fasteners may become noticeable, which significantly impairs the aesthetics of the decorative finish. Usually the first and last panels are mounted this way for reliability, and for the rest they use fastening with finishing nails or clamps.
Common mistakes
To avoid mistakes, it is important to know how to properly attach the lining:
- Choose well-dried material;
- Prime and paint before installation so that there are no areas difficult to reach for finishing;
- Leave a gap between the board and the adjacent wall to compensate for shrinkage or expansion;
- Secure the first, last and outer elements firmly - with nails or self-tapping screws;
- When finishing interior decoration, insert the tenon into the groove tightly so that cracks do not form when the wood dries out;
- When sheathing the outside, gaps are left in the tongue and groove joint to compensate for moisture expansion of the wood;
- Select nails, screws and clamps according to the size of the lining;
- Clamps are not intended for fastening boards in unheated rooms and outdoors;
- Do not carry out work in the cold or in the rain;
Mounting on clamps
Clamps are special stamped brackets with a hook and holes designed for fastening finishing panels. Products are available in several standard sizes for various types of lining and finishing panels.
This type of installation is more labor-intensive and expensive, but has a number of advantages:
- Durability of the structure. The clamps are rigidly fixed to the sheathing, and not to the lining. The structure of the panels is not damaged, which eliminates the occurrence of cracks and other damage. The likelihood of mechanical defects is reduced and the overall service life of the skin is increased.
- The lamellas on the brackets can be easily removed without damaging the material.
- High aesthetics - the clamp connection ensures a tight fit of the panels to each other, while the fastening elements themselves remain invisible.
The clamps remain inside the connection
The work is performed in the following sequence:
- Place the first plank with a tenon in a corner (for vertical mounting), in the ceiling or floor (for horizontal mounting) and firmly attach it to the sheathing beams through nails or self-tapping screws.
- Place clamps on the edge with the groove and secure the panel through the holes with self-tapping screws.
- Insert the second part with a tenon into the groove of the previous one and press it tightly along its entire length, using a tamper and a hammer.
- Place clamps on the free edge with the groove and attach it to the sheathing beams. Insert the next lamella, etc.
- Every 7-10 panels, check that they are installed correctly with a level.
Useful video on choosing clamps and attaching them to self-tapping screws:
Current prices for your city:
Corners for protection
Varieties
Note. Metal corners for fastening wooden structures should not be confused with decorative protective ones, since the first option belongs to the category of fastening fittings.
- To protect the integrity of the cladding, as well as a decorative element, external or internal corners made of wood can be used, although there is no difference between them, since the wood is the same on both sides. Installation, as a rule, is carried out using adhesive compounds such as carpentry, silicone sealant, “liquid nails”, and in some cases this is done using self-tapping screws with an anti-corrosion coating. Below we present in the table several options for corners made of different types of wood, on which the price of the product also depends.
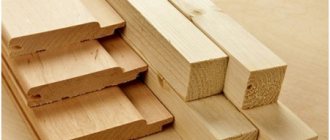
| Breed | Length in mm | Width in mm | Thickness in mm |
| Pine | 2000-3000 | 20-30-40-50 | 20-30-40-50 |
| Alder | 1500-3000 | 20-30-40 | 20-30-40 |
| Linden | 2000-2500 | 20-40 | 20-40 |
| Oak | 1500-2500 | 20-40 | 20-40 |
Note. In addition, wooden corners also include plinths (fillets) made of the same material, but they are used exclusively for internal joints between walls and floors or walls and ceilings.
Folding MDF profiles
- A folding MDF profile, four versions of which you see in the top photo, perfectly imitates any type of wood. Its main advantage is that its sides can be bent at any angle that is necessary in each specific case without any restrictions.
All restrictions lie in the standard dimensions of such a decorative product - they are made strictly 2600 mm in length, but the width of each side can have two options - 22x22 mm and 28x28 mm.
PVC profile
- Perhaps the most common are plastic corners that look like wood or any other material, but they are all made of polyvinyl chloride (PVC) and the angle is either 90⁰ or 85⁰ to increase the tightness of the fit.
In addition to color, such profiles can also differ in size - their length can be 2700 mm or 3000 mm, but the width of the sides has many more options and can be 10X10 mm, 15x15 mm, 20x20 mm, 25x25 mm, 30x 30mm, 40x40mm, 50x50mm and 60x60mm. Installation of decorative elements is carried out using “liquid nails” or silicone sealant.
Perforated metal corner (UP)
- A perforated metal corner, although it serves for decoration, is not such an object in itself, since it is a hidden type profile and is installed for a clear outline and rigidity of the corner being finished. Its sides are 25 mm wide, and the length can be 2500 or 3000 mm, which is quite enough for standard residential premises.
Note. There is also a flexible perforated corner that they make from PVC. But the instructions recommend using it for arched structures, most often plasterboard, to create a clear curved edge.
Installation nuances
There are situations when the use of wooden corners cannot be avoided during cladding work, for example, in exterior finishing, this is the installation of a block house, where you will definitely have to cover the joints with profiles with your own hands - there are simply no other options.
In such cases, fastening is done only with the help of self-tapping screws or, in extreme cases, nails - this is the most reliable fixation, which is not afraid of gusts of wind and deformation of the material (no glue is used for external work).
But here it is very important that the joint is strictly 90⁰ - otherwise it is better to use two separate layers (boards or flat slats).
How to do it yourself?
Very often, the perimeter of the room does not allow the required number of panels to be placed on the area to be finished. This is hidden due to the way the panels are joined in the corners. This technique is the least noticeable and allows you to use any materials, regardless of the standard size of the element.
The main task that is set before the master when finishing walls with clapboard is to make a monolithic coating that will not contain visible areas of transition or joining.
- If a whole board does not fit between adjacent slats and the tiled adjacent wall, it must be cut to the required dimensions along the canvas.
- In order for the surface to be even and smooth, for greater protection from moisture and other negatively influencing factors, the cut area must be sanded before covering everything. This is done with ordinary wood sandpaper. When the element fits easily and firmly into place, the board can be fixed.
When finishing external corners, special wooden corners with an edge width of 3-5 cm are used. They are simply placed on the top of the corner along the entire length and secured with finishing nails. Planks of different sizes are placed in the inner corners, which act as anti-gap elements.- If on the outer corner the protruding parts of adjacent panels form an acute angle with each other or protrude strongly, they can be carefully ground off with a plane before covering with a wooden corner.
Preparing the Wood Panel
Before you begin installing the clapboard cladding, you need to first prepare them. Preparation consists of several stages:
- A transition to the microclimate of the wood room is required, which is achieved by keeping it in room conditions for about 2-3 days with a horizontal location on the floor. To save space, you can lay the panels in several layers, laying them with bars or fiberboard sheets. This simple operation will protect the lining from deformation after you close the wall.
- Carefully check each individual board for flaws, chips, cracks, discoloration, and other defects. If such panels significantly spoil the appearance of the cladding, they should be put aside and used as a material for testing paint coatings, reaction methods for fasteners, etc.
- The front surface must be sanded to become smooth, even, and denser. This will increase the decorative qualities of the material, but will significantly reduce its consumption.
- When subsequently painting or varnishing, it is necessary to treat the canvas with primers. Dust and dirt are removed from the surface, and the pores between the fibers become clogged. This increases adhesion to paints and varnishes and reduces their consumption.
- If the lining must be painted, then for a better finish it is necessary to apply 1-2 layers of coating over the entire front surface, including the tongue and grooves. This will make the coating more uniform.
Preparing the walls
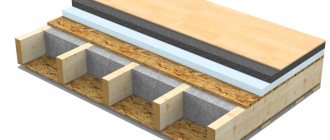
Preparatory work with the walls consists of applying a special protective composition to them, if it is wood, and, if necessary, installing a steam, moisture and heat insulating layer.
Of course, this should only be done after installing the sheathing. This design facilitates the fastening of the canvases and provides an air gap, which is necessary for the “breathing” of the facing material. If small gaps form between the sheathing beams and the wall, then to increase the strength of the structure it is necessary to seal them with wood pads made from available materials at hand. The fastening must be strong, so only construction dowels or special anchors are used.
To prevent a thin bar, the cross-section of which does not exceed 2x2 or 2x4 cm, from splitting, preliminary drilling of holes is required in the place where the fasteners are screwed in and in the wall.
How to attach?
The material consists of grooved planks, which are attached to adjacent elements of the facing layer using a tongue-and-groove connection. Any of the available methods is suitable for fastening:
- self-tapping screws;
- finishing nails;
- decorative screws;
- mounting stapler;
- kleimers.
At the same time, the latter option is more expensive, but it provides reliable fastening of the slabs with complete invisibility of the fasteners used. It is often used for the installation of expensive types of finishing in rooms with high humidity, since any damage to the fibers of the surface of the board in the future under the influence of temperature fluctuations or moisture will become sources of destruction.
- vertical;
- horizontally;
- diagonally;
- a combination of individual sections with different directions of the canvases.
After covering the entire room, all cracks, corners, and other elements of joining planes must be sealed. For this purpose, various strips, corners, planks, and wooden plinths are used.
Perforated fasteners
When beams, as well as floor surface logs, are hidden in the interior space, they can be connected using beam shoes. This fastener for wood structures is suitable for fastening solid wood not just to wood, but also to concrete and brickwork. It is created from durable steel.
Manufacturers advise fastening such fasteners to the parts being connected with special screws, and in case of excessive load, or fixing to a stone material, use the holes for the necessary bolts. In addition to anchor shoes, today you can purchase special clamps, corners and much more.
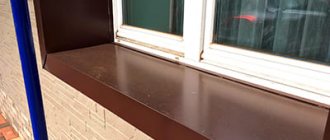
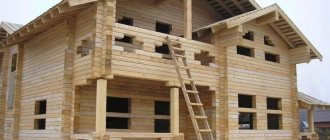
Metal, plastic and wooden corners: existing varieties and installation nuances
Today, metal perforated, plastic and wooden corners are widely used to protect the corners of walls, and the finishing can be either frame (plasterboard, lining), or plaster or with wallpaper - the point is that the corners are chipped and erased with any facing materials.
Different angles for wooden structures
In most cases, this L-shaped device has an angle of 90⁰, but if necessary, it can be changed to blunt or sharp, in addition, its faces can be either the same or different in width. We now want to tell you how to make and install such protection, and we will also show you a video in this article.
Tenon and groove
This galvanized wood fastener consists of a tongue and groove section that fit together to provide better transfer of horizontal as well as vertical forces.
The connection can be visible or hidden; for these purposes, the steel parts are recessed into special grooves in advance.
Three-dimensional slats
The modern Italian company produces fastening elements that are placed perpendicularly and vertically at an angle, using T-type slats created by extrusion from a high-strength steel alloy. They are produced in several modifications designed for different levels of loads.
The fastening system must be selected according to the size range of sections of the combined beams and the dynamic as well as static loads acting on them.
During the installation process, the slatted base is attached to the beam using self-tapping screws. Then a groove of the same size as the slatted shelf is created on the end part, attached to the base of the joist beam. If there is no perforation, the shelf is equipped with a log and the connection is secured using self-tapping screws.
Installing eurolining
To the question of how to properly fasten eurolining, you can answer the instructions, for which you will not need any additional knowledge and skills, the main thing is to follow the steps exactly and carry them out without deviations.
If you find it difficult to take advice aurally, but you perceive it better visually, then watch the video, which shows the entire process of installing wood panels in detail.
Preparatory process
If you decide to install and create a wooden structure with your own hands, then you should know some rules that will help you quickly cope with the task.
To start:
- carry out all the electrical wires and wiring that are necessary to provide electricity to the room or room, place them in special corrugations. They are made of material that does not burn, this will ensure the safety of living in such a room;
- Do not forget that any finishing material needs acclimatization, which means that the material must be brought into the room where you will carry out construction work a day before the start of the work process.
If the question arises - how to fasten the eurolining, then in the instructions you will find all the answers, including a list of fasteners that will be needed for such a process. It should also be taken into account that the sequence of arrangement and direction of the panels affects the appearance of the entire structure.
Eurolining can be located:
- horizontally,
- vertically,
- diagonally,
- combined arrangement.
Installing the sheathing
- The sheathing is made of small bars, onto which it will subsequently be attached;
- The material of the beams does not matter, the main thing is that the wood is impregnated with protective compounds for the durability of the entire structure;
- The frequency of fastening the sheathing beams should not exceed 0.8 meters;
- All fasteners must be checked constantly using a building level (photo below).
The sheathing is installed depending on how the eurolining is attached:
- If the eurolining is placed vertically on the wall, then the sheathing should be horizontal;
- If the sheathing material is attached to the wall horizontally or diagonally, then the sheathing must be vertical.
We insulate the walls
To keep the room you decide to cover warm, you can insulate it yourself. Insulation must be installed before you begin installing the eurolining - between the wall and the sheathing.
If the room must be isolated from water and moisture, it is necessary to use, in addition to cotton wool, a special film that will serve as protection against water and moisture. The photo below shows the method of its application.
Hidden fasteners
Eurolining can be fastened with various fasteners: nails, clamps, self-tapping screws. The best option from those listed are clamps, because this type of fastener is considered hidden.
Another advantage of the selected element is that the fasteners for eurolining are completely protected from rust, because the material from which it is made does not lend itself to a process such as corrosion.
If we consider the cost of all fastening materials, then we can say that the highest is the price of clamps, but the result with the use of such elements is better.
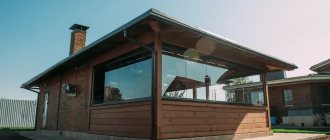
Eurolining is gradually beginning to increase its popularity as a modern, high-quality material for finishing walls. Despite its higher price compared to conventional lining, this material is characterized by increased dimensional accuracy, stable humidity characteristics and more convenient fastening to walls. How to install eurolining with optimal labor costs and high quality installation?
Eurolining is a convenient and aesthetic finishing option
Hidden details Hedgehog
These connectors are steel washers, the base of which is equipped with holes drilled under the slope. These holes are for self-tapping screws. In the center of the washer there is a threaded hole into which a pin is inserted. Its free end is threaded into a special hole and secured on the back side of the beam with a piece with an enclosed washer.
The created connection functions perfectly not only in pull-out, but also in shear. If there is excessive load in the area of the end part of the joist, it is possible to install several elements at the same time.
Fastening corners made of polystyrene foam and stone
Expanded polystyrene seems to be a non-flammable raw material. Does not absorb dirt and water. Such profiles can be painted. These aesthetic elements not only protect corners, but also look great.
They are attached with special glue and the usual acrylic sealant. Stone - it’s good for lining external corners.
- Before laying the stone, you need to prepare the surface. Cleaning of dust, dirt, aged material is done and then primer is applied.
- A very dry surface should be wetted to increase the adhesion of the glue.
- First, the glue is diluted according to the instructions supplied with it. It retains its qualities for 2 hours.
- Prepared in a plastic container, mixed with a drill and a monogram. For 1 m2 of area you will need 6 kg of mixture.
The stone is applied to the plane with force. Next, the level checks the evenness. The stone is laid in 3 rows and left for a short time. The glue will dry in 2 hours.
If you do not wait for this period, the masonry of further rows will not be strong and may collapse under its heavy mass.
Fasteners with complex threads
Unusual self-tapping screws, which make it possible to save time and money, since this option does not require metal parts. Self-tapping screws are equipped with threads, which help create a high degree of resistance when pulled out, and are also tightly screwed into an array, which completely changes their traditional functioning.
In this case, the work of the screws occurs exclusively by pulling out, which gives them the opportunity to absorb most of the forces that fall on the connection. So, you can fasten elements at an angle, combine parts, minimizing their deflection, as in the photo of wood fasteners below.
Installation of plastic corners on slopes
In the case of a standard installation, the adhesive mass is applied to the inner surface of the product. The exception is elements with a latch. Installation is simple, the disadvantage is that dismantling is impossible.
Installation of corners is carried out after completion of finishing work.
Preparatory activities
- If installing fittings on an untreated surface, carry out a preliminary check for protrusions, potholes, and protruding nails. For maximum adhesion, you need to achieve a flat surface.
- When working with some surfaces, before installation it is necessary to degrease and wipe the corner from dirt.
- Take measurements of the window opening. When measuring, take into account small overlaps so that when cutting the connection, gaps do not form. The recommended overlap length is 1 – 5 mm.
- When cutting off parts, you don’t need to cut the corners right away; it’s better to do it locally.
- By overlapping each other. The resulting difference is covered with sealant to match the color of the material.
- Trimming a corner joint. Looks nicer, requires skill.
Special purpose self-tapping screws
Using similar elements, fairly massive wooden products are attached. The cap has milled ribs and is easily recessed into the product, while the tip is created like a drill. In the middle of the screw, the cutter makes a larger hole, helping to tighten the element as tightly as possible.
An adjustable self-tapping screw will be useful for fastening door frames, window openings, and solid wood sheathing to wood and metal. The self-tapping screw is screwed directly into the box, as well as the wall surface located behind it, or the power part.
The self-tapping screw acts as a weather vane for high-quality fastening of solid wood cladding to a base made of steel. It has a tip in the form of a drill and wings placed above it to expand the hole in the tree.
When drilling metal products, the wings break. As a result, having made a thread in a metal part, the self-tapping screw fits tightly to it, while the solid element is attracted by its head to the metal.
Types and features of material
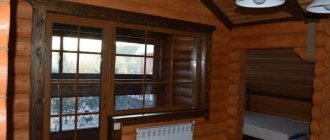
The origin of the name of the material has its own history. Previously, freight cars were finished with such groove boards. For other purposes, the material was practically not used, not to mention the cladding of living quarters.
However, over time, they learned to use it for finishing baths and saunas, which provided comfortable operating conditions for the room, since the surfaces did not heat up to such high temperatures as the air (how to line a bathhouse with clapboard?).
Lastly, the panels migrated to the interior of residential apartments, in particular for finishing the kitchen, hallway and corridor, but the name “lining” is used to this day.
Depending on the type of wood, the panels are:
- conifers, usually pine;
- fake;
- alder;
- from larch.
Different types of wood have different properties, so they may not be suitable for exterior decoration or use in rooms with high humidity, such as larch or cedar.
By standard size there are:
- narrow canvases with a thickness of 13 cm;
- wide stripes up to 24 cm;
- thin from 1.5-1.9 cm;
- increased thickness up to 2-2.5 cm with a shortened tongue.
Important To choose the right material, you should take into account not only the type of wood, but also its size. This way you can save a lot if you correctly calculate the dimensions of the room.
here
Categories:
- block house with a rounded surface contour;
- American - with several grooves on the inside of the profile;
- regular with different widths;
- Eurolining with standardized dimensions.
Type of veneer covering:
- MDF;
- PVC;
- tree.
Lining made of wood or MDF belongs to the category of wooden or natural panels, and PVC belongs to plastic or artificial coverings.
The following classes of panels are distinguished:
- A;
- IN;
- Extra.
The differences between the material of each category are the presence of knots, their number and type.
- Category A lining has a small percentage of these formations that do not fall out over time.
- Group B includes materials of the lowest quality, most often for rough or facade finishing.
- The highest quality panels are in the Extra category, where not only are there no knots, but the surface of the material is perfectly smooth. Such products are intended for cladding inside saunas and baths.
Based on surface type, materials are divided into:
- processed;
- unprocessed.
Advice If the board already has some kind of protective coating, then it is very difficult to repaint it without damaging the existing appearance. If you need to implement your own design using various means and compositions, then it is better to purchase untreated panels.
We invite you to watch a video about the types of lining: