Various kinds of crafts made of plywood and wood, made by skilled craftsmen, are highly valued all over the world, causing universal admiration. Undoubtedly, carving is creativity and art, but you can certainly master it with effort and constantly honing your skills. This optimal hobby related to wood and plywood will not require too much free time from you and equipment that is not very expensive. Of course, this means carving plywood using jigsaws!
Openwork carving
It is rapidly gaining popularity: who doesn’t want to make an excellent piece of decoration for themselves, decorating their home, furniture, and creating an artistic ambience! Cut-out products of different thicknesses are optimally integrated into many existing decorative styles, and we get, for example, frames for photo cards with ornaments, words, individual letters, figured shelves made with jigsaw carving on plywood. In addition, such creativity is an action that is accessible to anyone interested in the process, even a beginner. You just need to get an idea of “how it works.” And you can start creating!
Using a hand jigsaw is quite easy
Video to get started:
Why use plywood to create carvings?
This wood material is chosen for the following reasons:
- moisture resistant;
- temperature changes do not have a negative impact;
- quite low cost;
- ease of learning to cut with a jigsaw;
- low weight of products.
It is also necessary to choose plywood of the 1st and 2nd grades for crafts. The rest are not suitable for creativity: the surfaces have cracks with knots and chips (unless they can be used for internal substrates). Birch plywood (3-10 mm thick) is most suitable for cutting.
At the present time, this material is divided into a fairly large number of subspecies - each for specific purposes.
- Experts and folk craftsmen advise using sheets produced using a urea-formaldehyde composition. Such material is marked “FC”. This type of plywood can be bought “clean” or coated, for example, with varnish. It is most convenient to transfer the drawing to untreated plywood sheets for cutting with a jigsaw.
- Plywood marked “FOF” is intended for furniture production, and is often produced over 12 millimeters in thickness.
- The FB brand was originally developed as a boat material, which is why its cost is high (but if it is possible to use it, then it is suitable for cutting with a jigsaw).
- But masters do not recommend purchasing FSF. Although attractive in appearance, it is toxic because it is made using a composition of phenolic resins.
Produced grades of working material
drawings, sketches and drawings for cutting, photo gallery, manufacturing instructions
loading…
Hand-made window trims are a wonderful decoration for the facade of a house (ready-made stencils and templates will be given in the article below). They make the house unlike any other, visually changing its proportions.
Today, with certain skills, you can independently create elegant frames for windows in a wooden building. Moreover, they can be made not only from wood, but also from other materials.
Specifics
When the owner decides to install platbands, he strives to arrange traditional decor in his possessions.
Platbands have the following advantages:
- Excellent decorative function. This visually enlarges the building.
- Complementing the overall style of the architectural design.
- The space between the window opening and the wall plane is protected from moisture and dust.
- Heat losses and noise levels are reduced.
- The individual features of the house and the style of the chosen era are highlighted.
Platbands also have some disadvantages:
- Wood needs certain treatment to prevent high humidity and deformation.
- Products require regular care and treatment.
- They do not harmonize with metal-plastic windows. In this case, the platbands are made in the same color scheme.
Create your own templates
Today there are many platbands. Their types are determined by the methods of their installation to the window. According to this criterion, there are two varieties:
- Telescopic. Their specifics: L-like protrusions that coincide with the grooves of the window frame.
- Invoices. Installation takes place on the window frame. Fasteners - construction glue or nails with screws.
Please note: finished samples are created in full size. They are printed in compliance with the required parameters.
An elegant solution is the installation of carved products. It is possible to independently implement such plans only if you have special equipment.
Popular materials
- The most common material for platbands is wood. Products made from it have an elegant and harmonious appearance.
- Plastic versions are also often used. They are characterized by strong resistance to temperature changes and ultraviolet radiation. Plastic options are sold ready-made.
- Another popular material is MDF. It is prepared from wood waste. It is more environmentally friendly than plastic. In addition, products made from it have a look reminiscent of natural wood.
- Polyurethane. Variations from it are highly practical. Facade stucco is often made from this material.
The nuances of choosing the right wood
As already noted, wood is the most popular material for platbands. And the performance characteristics of wooden platbands depend on the type of wood used.
Here we usually pay attention to such options.
- Hard deciduous. These varieties include ash, oak and beech. They are very durable. But it is quite problematic to create patterns on them.
- Soft deciduous. These are: linden, aspen and alder. They are easier to process. Patterns are even created on their surface by hand. And such surfaces are thoroughly treated with special means.
- Cherry and apple tree. They are optimal for creating small components that can be attached to the base.
- Pine and birch. They are also easy to handle. And they have excellent working qualities.
- Various combinations of wood types. The use of special protective compounds for powerful impregnation here is mandatory.
Using high-quality wood, a beautiful, original design of the window opening is obtained.
The nuances of creating templates on your own
The basis of the work comes down to creating stencils and design.
Printing stencils on your own is something that everyone can do. It is important to achieve a combination of the chosen ornament with the entire style. Mixing geometric and floral patterns is not allowed.
When working on platbands, the following subtleties are taken into account:
- There should be harmony in the color palette of the walls and decorative elements.
- It is imperative that the appropriate parameter is selected correctly. The platbands should not be very wide or small.
- A high-quality version of the coating is selected. Special paints and varnishes are used.
- A template is required for making external carved components.
- The pattern is correctly positioned on the workpiece. The details follow along the wood grain.
When it is possible to achieve a color combination of platbands and the plane of the walls, a complete and harmonious facade is obtained.
Manufacturing stages
Before creating window decor, carved frames are selected from photographs. You need to make a template in advance. It should turn out to be the same for the design work of all openings.
The following methods for creating patterns are usually used:
- Overlay thread . It has separate pattern elements. They are attached to the same base.
Example:
Installation of overhead components should be on the base in compliance with the template pattern.
- Slotted thread . Here they make a through ornament. It looks like wood lace.
Example:
For all working methods, the presence of stencils is mandatory. This is what they look like:
Tip: for simple patterns it is not necessary to make a large-scale stencil. A piece of notebook paper is enough.
Also in your work you must have the following tools:
- Jigsaw.
- Hacksaw (oriented for wood).
- Knives and chisels.
- Drill.
- Milling technology
Platbands must be created from prepared materials. The working stages are:
- Meticulous measurements are taken.
- The selected tree must be dry. If it is wet or humid, then it must be brought to dry conditions. The width of the boards is determined by the parameters of the window opening. The thickness of the material reaches at least 3 cm if a slotted thread is made, and at least 1 cm when an overhead thread is made.
All workpieces are pre-treated with a protective compound. They are cut using templates. And the cutting of ornaments is done using a jigsaw. It is better to use different types of files for this tool.
Working with an electric jigsaw requires certain skills and special care. The created holes must be filled. An excellent tool for this is sandpaper. After powerful grinding, the part is treated with special impregnation.
Next, all prepared parts are installed on the base. Here you need to use glue or special nails. In such work, it is better to avoid using self-tapping screws. They will cause the products to crack.
Installation specifics
The created platband can be attached to the desired position using the following methods:
- On a dull thorn. Installation of such parts is carried out on the inside. Special holes should be made in the frame for them. Glue is applied to the spike and distributed evenly. The tenon is inserted into the groove. This fastening protects the platbands from dust and moisture.
- Using a through tenon. The joint area here is thoroughly treated with varnish.
These methods are justified when working with a wooden window. To attach to metal-plastic, a special powerful liquid glue is used.
Required care
The installed platbands require constant attention and care. For processing, special preparations are used - powerful impregnations. They create high-quality protection against:
- wood pests;
- appearance of cracks;
- sudden fire.
Carved versions must be coated with a primer, then varnish or paint. The intensity of such treatments is once every 3-5 years. In this way, the service life of the products will be seriously extended, and at the same time their attractive appearance will be preserved.
When installing plastic or metal products, no special care is required. It is necessary to provide high-quality protection against corrosion for products. Periodic paint updates are also required.
Thus, it is very possible to independently make platbands of extraordinary beauty with elegant patterns. Some carpentry, carpentry and tool handling skills are required. This way you can decorate window openings in a very original way and add an elegant twist to your chosen architectural style.
How carved frames are made using the slotted carving technique, see the following video:
dachniki.guru
What additional materials and tools will be needed?
- Stencils and drawings with drawings for work. You can come up with them yourself or copy them on the Internet.
- Carbon paper to transfer patterns and lines according to the drawing;
- Glass paper and sandpaper, a set of files - for grinding parts;
- Joiner's (optionally casein) composition for gluing parts;
- Transparent varnish – for coating;
- To make holes inside the material to thread the blade through, use a drill and an awl.
Adviсe:
- Before starting cutting with a jigsaw, carefully sand the material with glass paper, and only then transfer the patterns according to the drawing.
- Transfer elongated shapes of designs with narrow elements onto plywood so that they are located along the fibers of the “face” of the material.
Features of working with a jigsaw
The design of a jigsaw is very different from its manual relative. The file is fixed only on one side, so it is several times thicker than a manual one; instead of a thin arc holder, there is a massive body with an electric motor and gearbox.
A jigsaw provides many times more productivity than a manual jigsaw for cutting, but you have to pay for it with more weight, strong vibration and reduced cutting accuracy when making curved cuts.
The unit allows you to quickly make cuts along a straight line or along a curved line with large radii.
The best result for artistic cutting with a jigsaw is obtained by combining a manual and electric document. Particularly fine details of the design and small radius roundings should, of course, be entrusted to a hand jigsaw.
An ordinary household or professional jigsaw is not very suitable for cutting. Its purpose is construction work, and cutting out complex designs with a jigsaw will lead to rapid fatigue due to the heavy weight and damage to the material.
Band jigsaw
However, there are also band jigsaws - in them the blade is clamped on both sides, the material rests on a massive wide work table and the arc of the holder from a manual jigsaw is visible in the design. With such a semi-professional device, you can achieve even greater cutting accuracy than with a hand tool. But this miracle unit costs accordingly.
Artistic cutting with a jigsaw: drawing, stencil and work
Let's get to know the devices
A jigsaw is a toolkit that is designed for working on different contours. The device includes a blade equipped with teeth small enough to cut the working material, practically without forming burrs or chips.
Manual
The “founder” of the genus is, of course, the manual jigsaw. Everything ingenious is simple: a metal U-shaped arc, and a working blade is stretched between the ends, which is secured with clamps. They hold the files during operation, and with their help, its tension is also adjusted. The handle for convenient operation is located on one side of the frame. The tool clamps can be rotated, thereby creating a different plane for carrying out work, providing opportunities for carving plywood with a jigsaw of increased complexity.
Adviсe:
- When creating with a hand-held device, you must be extremely careful: the design is quite fragile, and with intense pressure, the blade sometimes breaks and needs to be replaced. Every novice craftsman should stock up on additional working files.
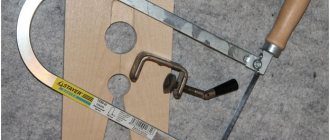
- When working with a jigsaw, it is convenient to use an auxiliary board: it protects the table and solves problems with the convenient location of the plywood workpiece.
Jigsaws
This device operates using electricity. It is a housing where the mechanism is located, and the control handle is also located there. The sawing element is located at the bottom of the device at the front. The blade is protected, and this allows you to cut along the contour very smoothly, without deviations. Professional models of equipment have many attachments that greatly facilitate the work process, for example, leveling the edge of the material. Jigsaw blades can also have teeth that vary in shape and size. They should be selected in accordance with the material for the saw to avoid damage to the plywood sheets during operation.
- Household electric jigsaws for non-production purposes are usually of low power (from 350 to 500 W). For beginners, this is the most common option when you are just learning to cut out crafts and figures from plywood (usually of small thickness). It is quite safe to operate such a device, especially when it is equipped with protection.
- A professional jigsaw is intended for industrial purposes, has a power of more than 700 W, high speed and cutting accuracy. It can cut sheets over 10 cm thick, aluminum, and thin steel.
Video: simple jigsaw:
Fraser
Sometimes this device is used for carving. It is a type of special hand tool, with the assistance of which you can perform various types of work on wood and plywood in everyday conditions. However, working with it requires some skill; but craftsmen who deftly handle this equipment can create real, highly artistic masterpieces of folk art.
Preparing the stencil
Drawings for creative work come in different sizes, depending on the scale of the products being manufactured. For example, for diagrams of a shelf or a piece of furniture, for a three-dimensional toy, you should take a sheet of whatman paper in A1 format, a roll of wallpaper left after repair may also be suitable, and for small figures (such as souvenirs) we take office paper (A4 or A3 format).
Using a marker or pencil, we draw the contours of the future object on the surface of the paper, adhering to the specified dimensions. Templates are presented in the public domain in a wide range, we choose the appropriate one (for beginners, as a rule, it is not too complicated). Or you can come up with your own options for cutting with a jigsaw and then transfer it to a paper base.
Then we transfer the images to the surface of the working material (plywood, boards). To do this, cut out a figure from paper, apply it to plywood and carefully trace along the contour with a pencil. The lines must be precise and even. If necessary, correct it by erasing it with an eraser.
The contours are applied “from the rear” of the material so that no remnants of the drawing are noticeable on the finished form. The internal areas can also be shaded so as not to cut off an extra piece, thereby indicating an inviolable fragment.
Example drawings
Vase
Snowflake
Deer
Typewriter
Advantages and disadvantages of the tool
Any technique is imperfect. Of course, using an electric jigsaw is much easier than using a hand saw. Before you decide to purchase such a tool, you need to understand for what purposes you will use it, as well as understand the pros and cons of the device.
Advantages:
- Nowadays it is possible to purchase high-quality devices at a relatively low cost.
- The simplicity of the equipment allows even a beginner to cut the material.
- As a rule, manufacturers focus on universal models with large cutting depths.
- You can purchase various accessories that will make your work easier.
- The thin blade allows you to cut real masterpieces.
Flaws:
- When working with thick canvas, it is difficult to remove sawdust.
- When working, you must follow safety rules, since the saw is not equipped with a safety mechanism.
- Because the saw is fixed at only one end, it cannot be made thin enough.
An electric jigsaw works best with thin materials. If you need to cut a plinth, lath, or parquet board, then this tool is ideal.
How to carve plywood
Working with the device will not be difficult if you properly prepare for the creative process.
- The work area must have good lighting;
- The working plane must be protected from damage. You can, for example, lay a sheet of plywood or cover it with film;
- All necessary tools and spare blades should be prepared in advance. And we can begin.
The first step should begin with drawing the inner outline of the drawing or drawing. To do this, you need to make slots into which the blades of the device will be inserted. Usually, when cutting large contours, there is no problem, but in small remnants, working with a jigsaw from the inside can cause chips, burrs or cuts. You must act very carefully.
Working with a jigsaw
- Secure the working material on the table so that the blade does not catch on the surface of the plywood.
- Turn on the device and start cutting. The jigsaw is not very difficult to control: move the tool forward along the lines. If the equipment is equipped with additional options for tracking the result of work, use them.
Working with a jigsaw - After finishing cutting, sand the ends with sandpaper or files.
- Carry out further finishing work on the cut product: varnishing, painting, etc.
How to saw with a hand jigsaw
- Secure the piece of plywood with one hand and hold the cutting jig by the handle with the other.
- Start moving along the drawn contours, moving the jigsaw up/down. This should be done around the perimeter of the drawing.
Working with a hand jigsaw
As you can see, there is nothing super complicated in this work. And you will acquire a real creative hobby by learning how to operate these devices.
How to cut plywood with a jigsaw
Sawing plywood with an electric or manual jigsaw is undoubtedly a creative process. And you will be able to create decorative items of various styles with your own hands: from fairy-tale cartoon characters for children to decorations for furniture and home.
Device structure
Learning to operate a stationary device is not the easiest task. But if you are determined to start making something with your own hands, then you need to familiarize yourself with the structure of the equipment:
- In order to control the process and create the correct direction, the tool is equipped with a support plate.
- To start sawing, you need to install a special file with fine teeth. Depending on the type of work, it can be changed.
- Carving with a jigsaw is possible due to the fact that the device is equipped with a motor.
The power of the tool can vary from 200 to 900 watts. Much depends on what material you are going to cut.
- To make sawing material as convenient as possible, the tool is equipped with a handle.
- To correct the movement of the saw, guide jaws or rollers are installed on electric jigsaws.
- In order to start sawing, you need to press the “start” button. It is important that for the jigsaw to work it is not necessary to clamp it all the time.
Jigsaw device
In addition to the standard equipment, many devices are equipped with backlighting, high-quality protection, a chip blowing function or a sound muffler. All these additions are not necessary, but greatly simplify the work.
Photo gallery of examples of work
Safety precautions
Basic safety precautions are required for all types of physical work.
- The workplace must be properly prepared. It should not be cluttered with unnecessary objects or tools.
- The work table or workbench must be well secured and set to the individually required height.
- The workplace should be well lit.
- When working, you should use personal protective equipment, such as gloves, safety glasses, etc.
- When using a power tool, make sure it is in good working order. For beginners, study the technical documentation of the tool they use.
Gingerbread men
- The whimsical design of these New Year's wooden figurines in the form of a popular holiday treat will amuse and delight lovers of non-trivial design.
- Material: oak cuts, 5 mm thick. Finish: Clear oil finish
Sawing and processing wooden toys
Print the proposed sketch to the desired scale. Cut the pre-selected piece of wood to the required size.
Considering the many curved cuts and small shaped slots, it is better to choose workpieces of small thickness - 3-5 mm.
Transfer the template to a wooden base, then use a 1.5 mm drill to make a series of holes through which the blade will pass (don't forget to drill a hole for hanging the figurine).
Start by sawing out the internal elements, and then trim the figures around the perimeter, this will reduce the risk of breaking the fragile toy.
Given the amount of fine work involved, it is best to use #3 reverse tooth files for this project, which in addition to a more controlled cut will reduce the likelihood of chipping on the back of the piece.
Remove the paper template: If adhesive was used for transfer, sand off any remaining paper using P180 sandpaper. If you plan to apply a clear finish, add a final sanding with P280 grit.
How to choose plywood for sawing
A successful project begins with the right choice of materials. How to choose high-quality plywood for sawing - read our article.
New Year's decor set
The next set of templates is a series of New Year's decorations that can be used as Christmas tree decorations or as independent interior decor. The set includes several types of figurines, which are a kind of designer set: they can be combined in different combinations or used separately as full-fledged New Year's decorations.
The first set of figures are simple stylized Christmas trees in two design solutions: with straight and figured geometry. They can be hung on the Christmas tree or used as regular home decorations.
Stylish Christmas trees for hanging with straight and shaped geometry. Material: birch plywood, 4 mm thick. Finish: acrylic paint + glitter spray paint.
Complete your holiday decor set with figured spirals. These are stylish and truly multifunctional New Year's decorations.
By cutting out several figures of different sizes, you can use each spiral separately, make a pendant from several pieces, or combine them into a voluminous decoration, as in the photo.
Working with curved cuts will require certain skills. For best results, we recommend using #2 or #3 files and working with not very thick workpieces.
All finished figures can be combined into beautiful rotating pendants. To do this, you will need to additionally cut out decorative crossbars in the form of shooting stars, as well as individual stars. To keep the structure rigid and rotate better, thin wire is used for hanging.
Stencils for cutting
Set of decorations in Christmas style
A set of three ornaments inspired by traditional Christmas motifs. The set includes a pair of stylized angels and an openwork Christmas tree assembled from two halves. The latter can be used as a pendant or as a free-standing decoration.
Such toys look good in their natural form, with an open wooden texture. Therefore, linseed, mineral or any other non-tinted oil is best suited for finishing.
Stencils for cutting
The width of the central slot should correspond to the thickness of the workpiece used. To ensure a good fit between the two halves of the plywood Christmas tree, cut the groove a little smaller, then carefully file it with a file or sandpaper until it fits snugly.
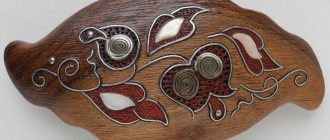
Christmas decorations in stained glass style
- You can add a little variety to the standard cutting technology and make one of the proposed options for New Year's decor that imitates stained glass style.
- The decorations in the foreground are made using pseudo-stained glass technique.
The essence of this technique is quite simple: you need to cut out two stained glass frames and place a sheet of cardboard between them, painted on both sides. In order to avoid the tedious adjustment of two parts, it is better to immediately cut them in series, placing the blanks in a stack one on top of the other.
Of course, it is much more convenient to do such work on a jigsaw.
Cutting templates
Ornamental decorations with geometric patterns
A series of sketches for making simple, but at the same time very expressive New Year's decorations. The through openwork pattern gives these toys a characteristic visual lightness and endows them with grace; at the same time, this feature puts forward a number of requirements for manufacturing. The wooden blank must be thin, but at the same time strong enough so that the fragile pattern does not break.
For a series of these projects, it's best to use hardwood (under a clear finish), or even better, thin plywood if you plan to do an all-over stain that will hide unsightly plywood edges. To make such jewelry, it is most convenient to use spiral saws, which allow cutting in any direction without the need to rotate the workpiece.
Volumetric pendants in an openwork frame
The main feature of these New Year's decorations is a beautiful openwork frame with a slight three-dimensional effect. This simple effect is achieved in a simple way. The oval center of the pendant is carefully cut out according to the template, moved back and fixed with glue. Thus, the openwork frame protruding to the foreground gives additional volume and makes the ornament more interesting.
The rest of the project assumes a standard cutting algorithm.
Separately, we note that if you work on a machine, it is better to use #2 or #3 spiral files for this project; they will be easy to cut out not only the openwork frame, but also the main ornament of the decoration.
As for the finish, the frame and middle look more beautiful in a contrasting design, painted in different colors. For such decorations, it is best to use alkyd or oil paints, which provide good coverage and color saturation.
Christmas tree made of plywood with a themed openwork pattern
A voluminous New Year's decoration contains many small details and requires a certain perseverance from the performer, but the beauty of such a craft justifies all the effort expended. You can complete this project as a full tabletop decoration or small pendant by reducing the size of the original drawing.
The project is designed primarily for the use of a jigsaw. The parts are cut out serially, placing two wooden blanks in a stack.
This way you will not only spend half as much time cutting, but you will also be less likely to damage fragile openwork parts.
For the same reasons, it is more advisable to use thin plywood as the starting material - it is stiffer and easier to work with when cutting detailed patterns.
When both halves are ready, according to the markings on the diagram, two longitudinal slits are made on each part.
Through these grooves, the two halves are connected together, forming a free-standing three-dimensional structure.
If desired, you can glue both parts together, but practice shows that it is better to leave the decoration disassembled - this way you can more conveniently and safely store the plywood Christmas tree until the next holidays.
Sawing snowflakes from wood
What kind of New Year's decor could there be without snowflakes?! Such decorations will always find their place of honor in the New Year's decoration of the house and bring a real holiday atmosphere to it.
Templates for cutting out New Year's snowflakes
New Year's gnomes
Make a series of these easy Christmas gnome ornaments and use them individually or as a makeshift garland.
DIY New Year's gnomes. Material: plywood. Finish: oil paints
Pattern for the New Year's Gnome project
Sawing out voluminous toys from wood
The aerobatics of sawing wood is mastering the technique of making three-dimensional toys.
Outwardly they look complicated, but in reality their creation is not so different from ordinary “flat” sawing.
True, here you definitely can’t do without a jigsaw machine, since you will have to work not with sheet materials, but with thick wooden blanks that a manual jigsaw cannot handle.
Let's look at the features of this technique using the example of making a simple three-dimensional icicle.
- First we cut out the blank. In our case, it is a rectangular wooden block. After this, we transfer the pattern template to two faces. In the photo, the front and side projections are the same, but there are projects in which they are different.
- Using a small drill, we drill holes for the blade to pass through, and then carefully cut out the internal waste part. First on one side, then on the other. Carefully remove the waste from the center of the workpiece.
- Now you need to remove all excess material around the perimeter. This operation is done in two stages. First, the waste is cut off on one side (Fig. 3).
- Now the two cut parts need to be taped back together, as shown in Fig. 4. After this, we turn the workpiece 90° and sequentially cut off all the remaining waste parts. Manipulation with tape is necessary for two reasons. Firstly, markings remain on the cut pieces. Secondly, these edges have a flat plane and ensure stability of the workpiece when cutting the second profile.
- As a result of simple manipulations we get an elegant three-dimensional toy.
Now is the time to start putting these skills into practice!