Marquetry (from the French marqueter - “to modify”) is a type of inlay, a technique for finishing surfaces by gluing decorative elements made of veneer (thin plywood) onto a wooden base. Marquetry is widely used for the artistic design of furniture and decor in the form of beautiful patterns, ornaments or designs.
Marquetry is an ancient craft in which a craftsman uses cutting tools and glue to create unique works of art. This inlay technique requires enormous patience and perseverance from the artist, as well as the obligatory presence of talent and efficiency.
What does "marquetry" mean?
When a beginner hears this word for the first time, he asks the question: “Marquetry - what is it?” The term marqueterie is taken from French and means “mosaic”.
The principle of this technique is as follows: thin slices of valuable wood are assembled into a separate pattern and glued to the base. This is a kind of inlay. The base can be the simplest wood. The work uses plates, the so-called veneer (translated from German as “chips”), no more than 3 mm thick, varying in color and texture. They are used to create mosaic paintings of extraordinary beauty and decorate furniture, walls, floors, and ceilings.
New techniques
Contemporary marquetry cabinet made from Tasmanian timber.
In the 1980s, Georges Vries developed a technique called VRIZ, where two layers of veneer are laid on top of each other and sanded through the top until the grain is transparent. It was used mainly in France by professionals and students of École Boulle marquetry. With his technique, Georges Vries contributed to the revival of marquetry, which he called RENAISSANCE. He launches modern marquetry. In the USA, this technique was used by one of the teachers, artist Patrice Lejeune, at the American School of French Marquetry. The school staff are also suggesting a new name for it: "Given that 'piercing' is an unfortunate mistake in the world of veneering, we decided to use the word 'Fusion' instead, by which the artist expresses his intention to sand the veneer as a decorative, textural effect rather than as a mistake." "
- VRIZ - ombres et lumières. (1994)
- VREEZ - empreinte (1985)
- VREEZ - Femme aux violons (1984)
- VRIZ – Espace (200×240 cm)
Patrice Lejeune again uses a technique he calls "spraying": using waste materials - sawdust, shavings, scrapers, etc. - as pigments to create various effects. Perhaps this is no longer marquetry in the pure sense of the word, as it flows into textured painting, even to some extent into collage. This technique was also invented by Georges Vries, who used it on a series of large panels exhibited in the Paris arena. In 1996 it was used mainly in France by professionals and students of the École de la Bonne Graine.
Advanced technology was also used in marquetry. These include laser cutting, where the design is drawn or imported as CAD or vector with a file and each piece is cut individually; Each type of wood and thickness may require some adjustment of the beam power; the offset will determine the gap between the parts. In some cases, the beam leaves a dark edge due to the high temperature required for the process.
Historical reference
According to art scientists, the marquetry technique was known many thousands of years ago. During excavations of the ancient tombs of the pharaohs, unique products were found using mosaics made of cedar and ebony. The masters of Ancient Greece and Rome also successfully used it in interior decoration and furniture design.
During the Renaissance, a powerful breakthrough was observed in the technical part: the invention of a special machine made it possible to establish the production of sawn veneer, and the cladding of furniture with valuable wood became widespread. The population is beginning to become interested in marquetry; almost everyone knows what it is. Wooden mosaic is becoming not only popular, but also more affordable. Up to a hundred valuable tree species are used in our work; their rich color palette and varied texture allow us to create real masterpieces.
In the 18th century, the art of wooden mosaic came to Russia. Stacked mosaics were used to decorate floors, walls, doors, and furniture. The most popular subjects in those days were scenes from the Bible, natural motifs, landscapes, and geometric patterns.
Along the way, craftsmen develop new techniques: engraving, etching, tinting, ignition. This allows you to achieve greater naturalness, similarity to the original and show the originality and originality of the master.
Today, the marquetry technique is no less popular. Wooden mosaic is used not only for interior decoration and furniture, but also to create beautiful panels, paintings, wall panels, and stained glass windows.
Choosing veneer: tips for beginners
As in any other business, experience is needed here. A person starting to work for the first time has many questions; many things seem complicated, including the very meaning of marquetry, what it is, as well as the main components of working in this technique. Advice from experienced craftsmen greatly simplifies the task and makes the process fun.
For example, when choosing veneer, you should remember that its color changes after sanding and varnishing. A beginner will be helped by a special palette in which veneer plates are arranged in a circle, from lighter to darker. This way you can choose the right shade using the basic law of technology - the law of contrasts. It turns out that the same pattern will look different if you use veneer of different textures and colors. And one more trick: each plate can be varnished on one side in order to have a complete idea of the future color.
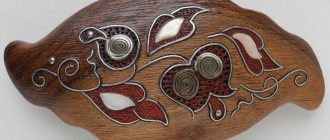
Metal nails in inlay
To get a chain of touching circles, the wires are first inserted through one, and after they are glued and sanded, holes are drilled in the gaps and the rest are inserted.
It is better to take thinner wires from a different alloy - after final finishing this will provide a difference in shades. Konstantin believes that in one work at least three shades of metal, that is, three alloys, should be used so that the design looks harmonious.
The eroded metal is ground (22).
Strokes and patterns
First, they are simply drawn with a pencil, and then cut with a spitztikheel sharpened in the form of a triangle with the top down (23). The sharpening angle of the gravel is approximately 45 degrees, which is due to the high hardness of mother-of-pearl.
The working methods of this tool differ from engraving with a drill, which draws lines in any direction. Using a graver, they cut approximately along the axis of the hand, and the workpiece, together with the vice, is turned on the table so that the cut goes in the direction most convenient for the master. In this case, the thumb of the working hand (by the way, the master is left-handed) rests on the finger of the right hand, which allows you to control the tool: it cannot fall forward and cause an irreparable scratch.
The gravel is sharpened on a diamond disk inserted into a drill, and then the agate is edited by hand.
The larger lines that form the main pattern are cut first. Then thin lines are marked with a pencil and cut through them with a thinner pencil. Lastly, the dots are made with a power tool called a mat (it looks most like a tiny jackhammer and strikes with the tip). When all the lines and dots have been applied, the mother-of-pearl is painted over with a black alcohol-based dye, which penetrates and is absorbed into the surfaces of the sections. Excess dye is erased from the mother-of-pearl planes with a hard drawing eraser.
Knife-cutter: how to make it yourself
The master's main tool is a special steel knife with a flat, beveled blade. If you don’t find one ready for sale, you can easily make it yourself from a medical scalpel. Part of it needs to be blunted along the entire length with a sharpener and a handle attached. Or you can just wrap the bottom of it with duct tape. Alternatively, you can improve your straight razor by dulling the bottom to avoid cutting your fingers and wrapping it with duct tape or duct tape. There should be several such tools: for small and large parts. Whatever the cutter knife is made of, the main parameters include the following: blade thickness - from 1 to 1.5 mm, width - from 10 to 15 mm, length - from 15 to 20 mm, bevel angle - 30-45 degrees.
Materials for work
The raw materials for inlay are:
- Marble. White, green or black stone serves as the base for the composition. White marble is more popular. It has the amazing ability to change shades depending on the light falling on it. The Indian Taj Mahal was built from white marble. During the day, when the sun is shining, it is snow-white, under the rays of the setting sun it is pink and silver when the moon is bright.
- Tree. Walnut wood is distinguished by its amazing texture. Harder and less susceptible to cutting is wood from ash, apple and pear trees, oak, acacia and maple.
- Metal. As a basis, for example, for weapons, it is steel. To create ornaments on wood, sheet copper, tin, brass, aluminum, bronze, silver, and gold are used. They are easy to make and give a beautiful combination with wood tone.
- Gems. Here everything depends on the imagination of the master.
- Ivory.
- Nacre.
Attention! The decoration method and technique depend on the selected raw materials.
Basic techniques for creating inlaid products:
- A large part is prepared from raw materials for decoration. Its outline is cut out on the base and the decor is glued into this “nest”.
- A more complex way to decorate using patterns. Beveled recesses are made along the contour of the sketch applied to the wood, into which the inserts are then pushed.
Stages of creating inlaid wood objects
- Drawing. The quality and accuracy of the created product depends on a thorough sketch. They copy diagrams and patterns for inlay onto tracing paper, for example, with metal on wood. Using tracing paper, transfer the sketch onto the surface of a wooden blank.
- Depending on the insert, a notch or recess is made.
- Applying glue and cutting parts.
- Grinding, surface leveling.
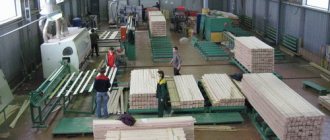
work process
Basic instruments for marquetry
All work is carried out on a special table with an inclined table top covered with hard polystyrene. If this is not the case, you need to prepare a separate lid with a slope and use it on a regular table as a work surface. In addition to the knife, you will need:
- Sharpening block. It is recommended to sharpen the knife immediately before starting work. For this purpose, use a special abrasive stone moistened with water. Sharpening is a delicate process. It is not recommended to use an electric sharpener, as this can burn the cutting edge of the knife.
- Sanding leather. It is used to straighten the blade during operation. Usually a small piece is glued onto a wooden block. This way the knife cuts the veneer more accurately, without tearing the edges, the cut is perfectly smooth, the veneer practically does not crumble, and the resulting parts are easier to join together.
- Copy paper.
- Whatman.
- A simple pencil.
- Black gel pen.
- Ruler.
- Eraser.
- PVA glue.
- Nitrolac.
- Drill with special attachments for grinding.
- Sandpaper of different grits.
- Buttons.
- Gummed tape.
- Press.
- Sponges.
- Buttons.
Advantages of gummed tape
Often, experienced craftsmen share their secrets with beginners, talking about marquetry, what it is, what basic tools and materials are used, and be sure to point out individual details and possible errors in the work. For example, you cannot use tape; it leaves traces of glue that are difficult to get rid of. Therefore, the best option is to use gummed tape, a special paper strip, one side of which is treated with glue. When wetted with water, the second side also becomes sticky. When purchasing, you should not choose a tape that is too wide; it is inconvenient to work with small parts. In this case, it can be cut lengthwise into small strips.
Wood tauching
Inlaying wood with metal (copper, silver, aluminum, brass, etc.) is a fairly common type of technique. Recesses are made in the wood according to the diagram, and wire or liquid metal is placed in them. The main condition is that the wood must be strong and dry so that it can withstand the effects of molten metals. The grooves are made using a knife or chisel. Before placing the wire, the grooves are lubricated with glue, and then it can be carefully hammered in with a hammer.
This type of inlay is the most complex, so you need to carefully adhere to safety precautions. When working with wire straightening, you must use safety glasses to protect your eyes from possible damage. Basic means of protection should be at hand, because the work is complex, and any thoughtless movement can lead to injuries or burns.
Mosaic looks very impressive on wood products. By working on it, you can reveal yourself creatively and give free rein to your imagination. The process of creating even the smallest thing (for example, a souvenir) is very interesting and exciting. You can start small, and then expand your horizons and move on to planning large projects.
The interior of the room will change dramatically if at least one wall is decorated, or if there is a decorative element in the room.