Axes were used with equal effectiveness in carpentry and military crafts, but the main area of application was still in the peaceful field of activity. They were intended for chopping wood and felling trees; without them it was impossible to build a simple hut.
An important part of a steel tool is the ax handle, for which you need to select wood and process it accordingly. As a toy, you can cut a wooden ax out of plywood. Just like in popular computer games.
What kind of ax can you make?
Having different purposes of use, the ax takes different forms:
- carpentry – light, with a small blade: used for processing wood and other malleable materials;
- cleaver – heavy and with a conical blade: for splitting stumps and logs of hard wood;
- tourist and its subspecies, tsalda - with a long blade and overall short length: needed to accompany the tourist in his activities and clearing thickets;
- taiga - more tourist and multifunctional: also used for chopping firewood;
- kitchen - with a very durable blade: needed for cutting bones when preparing food and semi-finished products.
Making any of them yourself at home does not require superpowers.
How to protect an ax handle from rotting
The wood of the ax handle gradually becomes unusable under the influence of moisture. It is necessary to protect the instrument from damage. To treat the handle, you cannot use covering agents, which include paints and varnishes. In this case, the tool may slip out of your palm. For protection, it is recommended to use drying oil or linseed oil. There are other antiseptic agents that are absorbed into the wood.
It is necessary to process the ax handle in several steps. Each new stage of treatment should be carried out after complete absorption of the previously applied product.
Treating the ax handle with a protective agent
Tip: You can add a bright red pigment to the ax handle treatment product. As a result, the tool will be clearly visible in thick grass and can be easily found if lost.
At the end of the article on how to make an ax handle with your own hands, there is a video where the master clearly demonstrates the basic techniques of work.
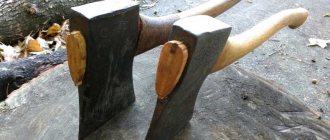
It is not easy to choose a new wooden ax for a cleaver, the configuration of which is largely determined by individual preferences.
A truly comfortable handle would be a custom-made handle, made using accessible technology that does not require special skills.
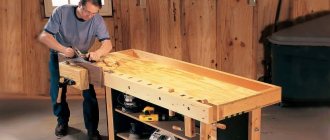
Wood processing can be easily done on a carpenter's workbench or on a workbench that replaces it. The list of the most necessary tools is as follows:
- Wood hacksaw;
- Carpenter's axe;
- Plane;
- Hammer;
- Chisel;
- Roulette;
- Sandpaper.
Using a power tool (grinder, circular saw or electric plane) will make the process of making a cleaver handle much easier, but you can do without them.
Types of axes
Humanity has been using axes of various shapes and sizes for several tens of thousands of years. Today, store shelves are filled with hundreds of types of beautiful axes for repairs, industrial wood harvesting, and participation in medieval reconstructions.
If desired, you can chop wood and cut down trees with any ax. But only a specialized tool will help you complete the task quickly, using a minimum amount of energy. Before starting work, determine the type of ax you have.
Felling ax
A huge felling ax is the first item that comes to mind when thinking about lumberjacks. The length of its ax reaches 1 meter. The massive butt and wide blade increase the impact force. This tool will be useful for owners who prepare firewood with their own hands.
Cleaver
The cleaver is a classic ax for chopping wood. Without it, this activity turns into a long, exhausting routine. The heavy blade with a dull sharpening is ideal for cutting firewood for future use.
Army hatchet
An army hatchet is a small, versatile, easy to transport and maintain, a tool that is familiar to any military personnel. It can be used both for preparing branches for lighting a fire, and as a hammer for driving in pegs or bladed weapons during battle.
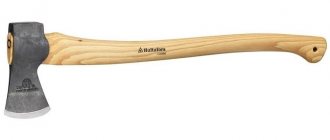
Carpenter's ax
A carpenter's ax is a universal tool for working with wood. Its lightness and sharpness make it an indispensable assistant in the countryside and garden. The weight of such an ax can vary from 0.8 to 1.2 kg, depending on the materials and dimensions. It should fit easily into your hand. The notch (notch above the blade) serves to lighten the blade and improve its cutting properties. Our step-by-step guide will show you how to make this type of ax at home.
Making slip protection
To protect the ax from accidental slips, a plate is made from a steel plate 2–3 mm thick. The metal is bent with a hammer, holding the part in a vice along with a suitable iron blank.
The overlay is “finished” directly on the tool handle with light pointed blows of a hammer.
The protection is fixed to the handle with screws through pre-drilled holes.
A well-repaired cleaver with your own hands will be a good helper when preparing firewood.
The condition of the wooden handle should be checked before each splitting of logs. You should not risk your health by working with a tool with an ax that is shriveled and dangling in its socket.
The ax is actually a very important tool. Of course, if you are a real carpenter, you should definitely know how to make an ax that is perfect for certain tasks. Professional carpenters usually use several axes at once. However, this type of tool is also necessary for people living outside the city, or simply for city residents who occasionally go to their summer cottages. After all, the bathhouse needs to be heated with wood, and you can chop it only with an axe. And so that no misunderstandings arise in the process, and the tool does not let you down, you should know all the subtleties of how to make an ax with your own hands, as well as how to prepare it for work. The ax itself can be completely different in shape. But the ax must be properly mounted, wedged, and sharpened at a certain angle.
Types of axes
There are several types of axes, and each has its own purpose. Professionals distinguish this tool by the width of the butt, which can be wide, medium and narrow. At the same time, some use it for universal work, others for cutting wood, and some varieties are used for neat carpentry work.
Main types of axes:
- cleavers;
- for felling forests;
- construction;
- tourist.
Within each of these groups, there are various tool options designed for narrow-profile or other special work.
A striking example of this is a fire axe. Its design is no different from others, but opposite the blade it has a pointed pickaxe. With its help, you can hook heavy objects, secure yourself on the roof, or break door locks.
Handle differences
An ax handle is the name given to an ax handle. There are many varieties of them, made from different materials. Plastic and metal items are not in widespread demand, and their practicality can be confidently questioned. The most common wooden components of the tool are capable of dampening inertial vibrations during operation.
Classification of axes by handle:
- Lumberjack When using this tool, you need to hold it with both hands. Although this ax can be used quite successfully to chop wood, its main purpose is to cut down trees.
- Woodcutter. The ax is widely used in household farming. It is suitable for some types of carpentry, chopping wood and cutting small trees and branches.
- A carpenter. It is used primarily for processing logs and various wood products. They can be used to chop wood and cut down small bushes. The handle allows you to comfortably use the tool with one or two hands.
- Central Russian This ax is designed to be grasped with both hands, usually equipped with a powerful, sharp blade, and is used for butchering animal carcasses. It is noteworthy that the second name of this instrument is the taiga ax. On long-distance expeditions, it is very convenient to cut clearings with its help.
- Ermak. It is of medium size, and the small handle, held with one hand, implies a stronger load when working with the tool. It is convenient to carry with you. It is used primarily for household needs and chopping wood.
- Sturdy. The small size allows you to take it with you on hiking trips. With its help, you can build a hut, trim small tree trunks, chop firewood, or cut up a hunting trophy.
There are a number of other varieties, but they are classified as professional, intended for special work that requires specific skills.
For example, an ax with a straight short handle and a small sharp blade beveled at an angle is used for wood carving.
Shape and dimensions of the ax
A firewood cleaver should have a slightly curved handle 50–70 cm long for medium logs and 80–100 cm for large stumps. The ax handle is made of an oval cross-section, consisting of two semicircles connected by straight sections. This handle provides a confident grip and tactile control over the trajectory of the cleaving axe. Only the seating part of the ax for the cleaver is ovoid in shape, corresponding to the hole in the metal tip. A bend is made in the tail part of the handle in order to better hold the cleaver, which tends to slip out of the hand during strong blows. In addition, the downward-pointing end causes less twisting of the hand at the final moment of the blow.
Review of homemade ax models
In addition to restoring old axes, blades are made from other available materials. The type and purpose of such a tool is limited only by your imagination and skills. Springs, reinforcement, a circular saw blade, and stones can be used. A homemade ax may be better and more beautiful than one bought in a store.
Spring ax
The spring of a regular car is made from light, elastic, durable alloys. One 100x400 mm plate made from a spring is enough for a small decorative or throwing hatchet. To create a full-size blade, several springs must be welded into a small sheet of metal.
Draw the blade of your future ax and cut it out with a grinder. Keep in mind that the handle will wrap around it on both sides, much like a knife design. To make it, you can use a shovel handle or parts of old wooden furniture. Legs and slats will do.
Reinforcement cleaver
Unnecessary pieces of construction reinforcement can be turned into a convenient splitter for firewood. To begin, weld two identical squares from the reinforcement so that they are diagonally sized so that the logs can pass through them freely.
Then weld the letter “H” from the same reinforcement, and weld a blade with an obtuse sharpening angle onto the jumper. Connect the ends of the resulting structure with squares. The cleaver is ready.
Circular saw ax
A circular saw is an excellent material for a beautiful kitchen hatchet. Simply use a grinder to cut out a blade along with a handle from a circular saw blade, drill a couple of holes, and screw on the wooden trims.
Don't be afraid to experiment in your workshop. Skillful hands can breathe life into seemingly unnecessary, rusty garbage.
Nothing is impossible
Looking at the work of blacksmiths, the thought comes to mind that there is nothing difficult in making an ax. But in practice, this turns out to be much more difficult.
In addition to a piece of metal for forging an ax, you need: a forge, an anvil, holes for the eye. Not everyone has such a set of tools. Of course, you can make a forge and punches, but you can also try to make an ax in a different way.
Selecting a workpiece and making an ax handle
The length of the ax is selected based on the height and strength of the master. The quality of the wood also plays an important role. Lightweight axes, weighing about 800-1000 g, have handles from 40 to 60 cm long. For heavy tools (1000-1400 g), the length of the ax varies from 55 to 65 cm.
Latest entries Lilac perennials that are beautiful, compact and do not crowd out other plants Why when buying seedlings you should not take the sellers’ word for it and how to determine the age of the plant using 3 signs Tomato seedlings have become purple or whitish: why the color has changed and how to save the plants
The force of the blow depends on the length of the axe. The longer the ax handle, the easier it is to chop wooden logs. The strength and height of a person also matters
Not every type of wood is suitable for making an ax handle. For this purpose, a true master searches the entire forest before finding a suitable tree. Most often, a blank for an ax handle is made from the root part of a birch tree, or better yet, from growths on its trunk, which are distinguished by their special twisted and very dense wood. Instead of birch, you can use maple, oak, acacia, ash and other hardwood deciduous trees. The workpieces must be dried well in natural conditions, which will take a lot of time.
On the prepared blank, the contours of the future ax handle are outlined according to the selected template. There should be a thickening at the end of the ax handle, designed to “braking” the hand in case the tool slips. Then the excess wood that is outside the contour is removed with a knife, an ax with a perfectly sharpened blade, a chisel or a jigsaw, which is much faster. After fitting the ax on the ax handle using a mallet, and making sure that these parts fit tightly, you can continue further finishing of the tool handle. Glass is used for scraping, and fine-grained sandpaper is used for grinding.
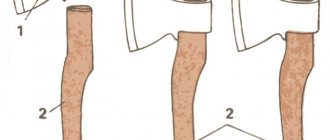
Above is a drawing of an ax handle (a) that meets the requirements of GOST 1400-73, and below is a marching ax handle (b) with an area of unbroken fibers of 40 mm
Important! If the ax easily fits into the eye, this means that the master made an error in the calculations and drew the template incorrectly. In this case, even a driven wedge will not correct the situation, ensuring a short, tight fit of the ax on the ax handle.
How to select and prepare wood
An ax handle is the handle of a working tool. Labor productivity completely depends on how easy it is to work with it. Therefore, a regular straight stick will not work in this case. A real ax handle is a curved beam with an oval cross-section and straight sections. The tail part should be widened and bent downwards. Only with this option the hand of the person performing the work will be able to reliably hold the tool without experiencing fatigue for a long time.
The following types of wood are best suited for making an ax:
- maple;
- birch;
- acacia;
- ash.
Wood should be harvested in the fall. Birch is perfect for carpentry tools, while maple is more often used for camping tools. Its impact strength is less than that of birch. The ideal option is considered to be very durable and rarely changes shape. It is better to make an ax handle from a section of wood located near the root, and the workpiece should be 15 cm wider and longer than the future product.
Attention! Before the prepared beams are used to make an ax handle, they must dry for at least a year in a dry, dark place, for example, in the attic. This is necessary so that when finished, the handle does not shrink and start to dangle in the eyelet.
Fresh wood can only be used if the ax handle breaks, as a temporary option that needs to be replaced quickly.
Making an ax using the metalwork method
Ideas on how to make an ax outside the forge lead to the metalworking method. The ax consists of three parts:
- ax blade
- ax handle
- wedge
If everything is clear with the materials for making an ax and a wedge, then the question of what, and most importantly how, to make a canvas is puzzling. Knowing that the blade consists of a blade and a butt, you understand what is needed to make an ax:
- metal strip for blade
- piece of pipe for butt
The full size drawing will show the amount of material needed. The blade requires a hard metal, such as a car spring.
We transfer the outline of the drawing to the spring and saw off all the excess. We also make descents using a grinder. It is important here not to overheat the metal so that the edge remains hard and holds an edge well.
For the butt of a medium ax you will need a pipe with an internal diameter of 38-40 mm. It is better if it is thick-walled. We cut the pipe to size from the drawing. Then we heat it, for example with a gas burner, and compress it in a yew to give it a more rectangular shape.
The blade and butt are connected by welding. It is important to weld the metal thoroughly so that the ax does not crack during operation.
Then we grind the seam with a grinder, if necessary, boil the shells, and grind again. For additional strength, you can rivet the butt and blade with strips of metal.
A good ax requires the presence of a properly made ax handle. To the question - what can an ax handle be made from, there is a simple answer - from hardwood.
The most common wood for making ax handles is birch. But, if you make an ax not only for chopping wood, but for the soul, then you should look for a type of wood with a more expressive texture.
Making your own handle
First, a block of dried lump is made from a thickness of 3–5 mm greater than the width of the mounting hole. The reserve will allow you to later adjust the workpiece in case of mistaken removal of excess wood somewhere. If it is necessary to remove a thick layer, use an ax or a circular saw, then plan the surfaces with a plane, simultaneously leveling the planes.
On the resulting workpiece, mark the outline of the ax handle with the same margin of a few millimeters.
For convenience, the piece of wood is clamped and transverse cuts are made with a hacksaw in increments of 35–40 mm, not reaching the marking line by 2–4 mm.
Next, use an ax or chisel to knock down pieces of wood in small pieces, following the direction of the chip and not allowing it to go deeper than the drawn contour.
The shank is filed perpendicular to the axis of the ax handle to reduce the likelihood of chipping the wooden product.
Having completed the rough processing, mark the dimensions of the mounting hole.
Why find the center at the end of the workpiece and align the tip along it.
The final shapes are given to the workpiece by planing the convex surfaces with a plane, and the sunken parts are selected with a sharp knife.
Working carefully, remove thin shavings and periodically turn the part over to change the direction of the cut. As a result, you get an almost finished ax handle.
Now the upper end of the handle is chamfered for approach.
They try to lightly insert the handle into the eye, after which marks will remain on the wood, showing how much material needs to be removed.
Focusing on these marks, they continue to adjust the axe. Then another test attachment is made to identify areas of chipping.
Subsequent fine-tuning of the handle is carried out with sandpaper, smoothing out all irregularities and bringing the surfaces to a smooth state.
The tip is finally placed on the finished ax handle, ensuring an even fit. The protruding end of the piece of wood is cut off with a saw.
Place the cleaver vertically and hammer in a wedge, the length of which should not exceed the size of the butt to avoid cracking. If the wedge is not completely buried in the wood, the excess is cut off with a hacksaw.
The handle of a firewood cleaver is impregnated with a protective and decorative compound, leaving the surface rough. Do not use varnishes or oil paints that form a glossy finish.
How to attach an ax to a handle?
Below is an operation algorithm showing how to place an ax on a turned and polished ax handle. This is one possible way:
- Fit the top of the ax handle to the eye of the axe. At the same time, plan off the excess wood with a knife. You should not use a file, as it “sweeps” the wood.
- On the ax handle, placed in a horizontal position on the table, place the ax on top, and with a pencil put a mark on the handle to which it will be mounted. Divide the segment in half and put a second mark.
- Clamp the ax handle vertically in a vice with the wide end at the top. Take a hacksaw and make a cut to the second wedge mark.
- Buy a metal wedge in the store or plan a wooden analogue, the thickness of which should be from 5 to 10 mm. The length of the wedge made for an ax with your own hands should be equal to the depth of the cut, and the width should be equal to the size of the eye of the ax.
- Place a board on the table and place the ax on it, placing it upside down. Place the ax on the ax handle and start tapping it on the board. Then turn it over and tap the ax handle on the board, while the mounting process continues. Turning and tapping must be done several times. As a result, the ax handle will fit into the eyelet.
- Next, place the ax handle vertically and insert a planed wedge into the cut, driving it with a mallet halfway or almost to the end. Using a hacksaw, cut off everything that remains sticking out from above.
- Apply oil (motor oil, linseed oil, sunflower oil, etc.) to the ax handle, let the excess drain off and leave to dry. Wipe the ax and handle with a rag.
After fitting the ax to the ax handle, shown in figure (a), make its attachment (b) and wedging the handle (c): 1 - axe, 2 - ax handle, 3 - wedge
How to choose the right wood for a handle
It’s curious, but not all tree species are suitable for making an axe. It is recommended to use only hardwood that has been previously dried in special chambers or kept in a dry place. Failure to comply with these requirements will lead to the fact that during use the handle will dry out and securely attaching the blade to the ax handle will be very problematic.
Home craftsmen use several types of wood to make wooden handles, each of which has its own advantages and disadvantages. Let's try to figure out which wood makes the best ax handle.
Birch
This is a “come and take” raw material, but the availability of the material does not guarantee high quality. To make a high-quality birch ax handle, the wood will have to be dried for 10-12 months. Even after this, the material remains sensitive to humid environments.
Maple
It is also an accessible and widespread material with a limited scope of application. In particular, maple handles are not suitable for making quality tools for a carpenter or lumberjack. However, the wood has a beautiful texture, making it ideal for decorative and souvenir wooden products.
Hickory
This unusual name hides an American walnut that grows in Canadian forests. For the manufacture of an ax handle, this is the best option, successfully combining strength, elasticity and durability. However, only American and Canadian loggers can truly appreciate these benefits.
Jatoba
This is a type of wood unique in its properties, which is used for the manufacture of sports equipment and furniture. Jatoba is easy to process and has a presentable appearance. At the same time, such solid wood is not inferior in strength to oak, so ax handles made from it are very reliable.
Ash
Among the listed options, ash is considered the optimal balance between availability and quality. At the same time, the wood has an interesting texture, so after appropriate processing, the wooden ax handle will have a presentable appearance without loss of strength and elasticity.
Important nuances
The strength and durability of the ax is determined by the resistance of the wood to dynamic shock loads. The reasons for premature breakage of the handle look like this:
- the use of soft wood reduces the service life of the ax by almost 2 times;
- poor drying - the blade landing site begins to become soaked;
- low density of the ax head - the blade walks along the surface, eventually breaking the handle.
It should be clarified that a properly made handle can last for several years without requiring repairs.
Wood for an ax
The type of wood and the drying of the workpiece determine the durability of the ax for the cleaver. Freshly cut lumps are not suitable for handles: when the wood dries out, it becomes much thinner, cracks and warps. At home, a natural drying method is used, which allows you to prepare the workpiece in a dry shed for two years and in one year if you keep the wood in a heated room. The harvested wood is sawed off 15–20 cm longer than the future ax for the cleaver, in order to subsequently remove the ends covered with cracks.
Among the available tree species, ash has the best properties: its handle is strong, elastic and does not dry out much over time. It is easier to find a suitable birch log, but it takes longer to dry, and it rots faster. A maple ax handle is less loose, and is slightly inferior to a birch one in terms of impact strength, but is more durable and easy to process.
Sharpening an ax blade
After choosing a tool, the owner is faced with a new task - how to sharpen it. Yes, the manufacturer supplies this tool in a ready-made condition. But sooner or later, the sharpening done in the factory workshops will become dull and the need for independent editing will arise. Practice shows that it is better to spend some time on editing it than to do the work with a blunt instrument. It is advisable to perform turning of a product using a template. It is made independently. To do this you will need a small piece of tin. After choosing the sharpening angle, you need to mark it on the sheet metal and cut out the angle. After this, attach the template to the blade. The angle of deviation from the required one will be immediately visible. Using a marker, mark the cutting edge accordingly.
Sharpening an ax blade
When sharpening, the master must consider the following factors:
Characteristics of the wood he will have to work with. What kind of work will have to be done, harvesting lumber is one thing, cutting out locks on logs installed in a log house is another. Of course, the material from which the blade is made must also be taken into account.
Choosing the cutting part of the ax
When you are faced with a choice in the process of purchasing a piercing part, be sure to pay attention to the metal from which it is made. There must be a GOST inscription confirming implementation in accordance with the norms and requirements. You should be wary if you see a sign like: OST, MRTU, TU. In this case, the metal production technology could be changed by the manufacturer. If we talk about choosing a good Soviet ax, then it is better to buy it on the regular market.
You can test the quality of an ax the old-fashioned way, by striking the blade of one against the blade of another. If one of the products is made poorly, then it will be on it that marks from the impact will remain. Also, if you hang the ax, you can knock on it and listen to the sound. He will be characteristic.
Please note that if the blade is good, there should be no dents or flaws; the eye should be cone-shaped; also the eye and blade must be coaxial; and there must also be at least a small thickness of the butt, and its ends must be perpendicular to the blade.
If you were unable to find a product that meets all standards. You can make a good ax yourself. Even if some misunderstandings are discovered in the purchased product over time, they can be eliminated by sharpening the burrs, boring the lugs, and giving the butt a symmetrical shape.
Bringing the ax into proper shape: the final touch
All that remains is to place the hatchet on the ax handle, but before that the wood needs to be prepared. The ax handle needs to be perfectly polished and lightly burned over an open fire or covered with stain. Next, a hatchet is mounted on it, and the wood is again processed, this time with linseed oil. No varnishes are used in such work. Otherwise, the ax handle will slip out of your hands.
The final result turned out very well
Impregnation of the ax handle and ax attachment
The upper part of the finished handle must be impregnated with a water-repellent composition. There are two options:
- drying oil;
- linseed oil;
- ski resin.
Lubricate the wood with the chosen product and leave it until it dries. The treatment is repeated several more times until the fat is absorbed. Ski resin can penetrate deeper layers of the workpiece, but it is difficult to find in stores. Therefore, the first two options are often used.
Advice. You can add a bright dye to the impregnation agent. This way it will be difficult to lose the finished tool.
The ax attachment to the handle is done as follows:
Watching videos and photographs will help you better understand the manufacturing technique. Making an ax handle with your own hands is more difficult than buying it ready-made. However, if you have the desire and some skills, it is quite possible to get a high-quality tool.
How to make a battle ax
Not all axes can be purchased in the store; for example, it is impossible to buy a battle axe. And therefore, if you want to get such a product, it’s easier to make an ax with your own hands.
You can take an ordinary construction tool as a basis, see Fig. 2, and use it to make a combat blade.
It has certain disadvantages:
- It has an irrational form.
- It has excess mass, which will interfere with manipulations during the battle.
Viking battle ax
It should also be noted that the upper ledge will create difficulties during chopping and striking. That is, it gives the ax an unnecessary torque directed counterclockwise, thus causing increased wear on the ax handle. It won't hurt to grind off the protrusion located below. In addition, straight sharpening is not entirely suitable for a battle axe.
How to carve a toy ax
A homemade plywood ax can serve as an interesting toy for a child or be an excellent addition to a New Year’s costume. Often young children, teenagers and even adults want to make wooden axes, like in computer games like Minecraft. You can make such a product in 1.5-2 hours with minimal financial costs.
Making an ax from solid wood will take more time because the wood will be more difficult to process than plywood. The parts are cut out with a special cutter or a sharp knife, removing the chips layer by layer, ensuring that the dimensions and proportions are maintained.
With plywood everything is simpler. First you need to find a ready-made template or draw it yourself in full size. The drawing is transferred to a plywood sheet. The blade and handle are cut out separately with a jigsaw.
To make the wooden toy look more natural, it is better to glue the blade from two halves, after cutting a groove for the handle.
Then both halves of the plywood ax blade are placed on the handle, secured with pins and glued together with PVA glue for wood. After drying, the wooden blade is given a sharpening angle. This operation can be performed with an ordinary file. At the final stage, all surfaces are sanded and the blade is coated with several layers of silver paint. You can apply a custom design or stick a sticker. The finished wooden toy looks very beautiful.
An ax is one of the tools you need to have on the farm. Of course, you can buy it in a store, but if you want to have a reliable and convenient thing, it is better to make a tool yourself. The article will talk about how to make an ax handle at home with your own skillful hands and correctly attach the metal blade.
Homemade ax for hunting
What product does a hunter who spends a lot of time in the wild need? How can it be made? Yes, no one argues, in specialized stores you can buy a product for every taste. But not all of them meet the needs of hunters.
In order to make the cutting part of a product for hunting, you need to use a solid piece of metal. But somehow it’s more common to hold an ax with a wooden handle. For the manufacture of the blade, grade 1040 steel is used, this is a structural alloy steel, the Russian equivalent is 40G.
Homemade ax for hunting
You can make the cutting part by ordering it from the village smithy. The master is able to forge the necessary blank for the blade. He is also able to make and install a steel handle. If such a handle does not suit you, then you can install a wooden one. When making it, you need to take into account some simple rules:
The handle cannot be varnished - the hand will slip.
When choosing its shape, it is necessary to take into account the width of the grip of the palm; it is necessary to make stops that will allow you to hold the ax in your hand.
A little about sizes and shapes
Each master made an ax with his own hands, focusing on his height and specific application. It is no secret that a tool designed for chopping wood will be somewhat different from a similar product intended for cutting down trees. In this case, a small carpenter's hatchet for small carpentry work will be the exact opposite of the two categories listed above.
Despite this, a professional ax with a wooden handle always consists of three main parts:
- working part made of metal with a sharpened front part;
- ax handle - a handle made of wood;
- wedge - a spacer element that connects parts of a structure together.
When making it yourself, special attention is paid to the metal part, otherwise the tool simply will not cope with its main function. Here, not only the shape and material are taken into account, but also the aspect ratio and sharpening angle.
Modern axes are usually made from medium-alloy tool steel, which has been heat-treated and hardened.
The blade shape is selected depending on the application. For example, products designed for arborists are often used for cutting down tree trunks and removing large limbs. This kind of work requires a great depth of penetration, so the shape of the ax should be wedge-shaped. Cleavers that are used for chopping wood have a similar shape, but have thicker “cheeks” and a sharper sharpening angle.
The length and size of the ax directly depend on the impact loads. If significant impact force is required, the handle is made longer to provide a larger swing. Here the dimensions are 700-900 mm. The length of the handles of log axes (carpentry tools) usually does not exceed 500 mm; a good cleaver is attached to a shaft of about 800 mm.
The shape of the ax should provide a comfortable grip, so the middle part is always made curved, the seat and shank have thickenings. The blade angle usually varies between 70-90 degrees.
Case with flap and strap for butt
This option is similar to the second one (above), but is made in a slightly different way. Here only the lower edges of the main part are sewn. The tool is inserted from above, wrapped around the side strap and the loop is put on the button. Then lower the flap and fasten it. The ax is ready to be carried.
Case with flap
Sometimes it is first better to create a model of a product from cardboard or whatman paper, and then transfer its dimensions to the material.
- The ax is placed on the sheet and the main part is traced to the end of the eye. They try to do it carefully. When outlining, add 0.5-1 cm on each side (around the perimeter) for future seams.
- Then they turn the tool with the tip up and outline the butt or measure its width and mark it on paper. If this element has a rounded shape, then you have to add another 1–2 cm. To measure this part, it is best to use a flexible ruler or twine. Place them along the line of the width of the butt, mark the end, and transfer them to paper.
- After this, the tool is turned over, the other side is drawn and the valve is completed. Its shape can be any (rectangular, triangular, etc.), and the height depends on your preferences.
- The edges under the main part and the sides are sewn together. A loop is made on the valve, and a button is sewn on the cover, or button halves are secured on both parts.
It is better to choose a thread for sewing such a valve version with wired fiber - shoe thread. This will give a double guarantee:
- the wax layer will reliably protect the ax from moisture;
- a sharp metal blade will glide along such a thread and will not cut the seams.
A lighter version of this cover is made in the form of a rectangle. A loop with a button is also used as a fastener.
Large loops are sewn at the back for threading the belt. You can attach pockets, rings, and hooks to the free spaces to attach other tools.
This is the final stage of making a cover at home. Most people don't sew the loops on, but rather reinforce them to the back of the case with rivets, which seems like a reliable option. According to many tourists and experts, this is not entirely true.
The ax is a fairly heavy tool and pulls the case down. Once under such pressure, the rivets bend, cut through the material with their edges, and it subsequently breaks.
It is not advisable to make the loops very narrow, otherwise the tool will begin to pull back the belt. Their length is chosen so that the metal tool does not “run” along the belt. It should be securely fastened and move along the belt with little effort.
Rules of care
If you want your ax to serve for a long time, you should take proper care of it. Tool failures not only impair the quality of work, but also pose a danger to those who use them.
It is very important to ensure that the ax is well seated on the ax handle. If the handle is broken, it is better to replace it with a new one
It is important to protect the ax from rust during the rainy season. To do this, simply apply regular machine oil to the metal parts.
If it was not possible to protect the product, then the tool can be cleaned of rust quickly and easily using special products that are sold in household stores. It is advisable to store the ax in a case, which is often sold complete with it.
For sharpening axes, a round sharpener is best suited, which should preferably be wetted. When sharpening, the tool should be held by the butt and the middle of the handle. The sharpening stone must always rotate towards the blade. If there are a large number of notches, the cutting edge is smoothed with a file. You cannot sharpen axes using the grinding wheel of an electric sharpener.
To learn how to choose the right axe, watch the following video.
Made of plastic
Making a cover is not difficult if you use plastic that softens when heated. Many similar artificial materials have these properties. The easiest way to make a case is from plexiglass or polyvinyl chloride.
Required tools and materials:
- PVC pipe 100 mm, PVC or plexiglass sheet;
- hacksaw, saw, jigsaw;
- hair dryer, burner, metal bath.
Step-by-step manufacturing instructions
In the case of using sheet PVC, make a drawing of the cover as described above.
It is better to outline the ax along with the handle. It is necessary to leave a margin of 10-20 mm around the perimeter.
Then do this:
- Mark the place for the bend (a strip slightly larger than the width of the butt).
- Heat the sheet in the middle of this strip.
- Place the ax and bend the plastic.
- The place where the ends meet is heated well, one is wrapped and welded.
- It is processed with a file or “sandpaper”.
- A lid is made from plastic and placed on top or secured on small hinges.
Wooden case
Some people make an ax case from scrap wood or thick plywood. This type of case can be seen in the fairy tale film “Three Fat Men” at the executioner.
It is an ordinary box in the shape of an axe. These are actually two halves on hinges.
Required tools and materials
- sheet of thick plywood 8-10 mm;
- wooden blocks 10×10 mm;
- glue;
- piano hinges or small door hinges;
- screws, small nails;
- jigsaw;
- hacksaw or saw;
- hammer.
The ax is placed on a sheet of plywood and outlined completely (along with the handle), adding 1.2-1.5 cm from each edge. Then they turn it over and outline the second side a little further away.
Next steps:
- Measure each line (for example, the top of an ax) and cut off bars of the appropriate size.
- After that, they are glued to one of the sides, screwed with screws or nailed.
- If the ax handle has an irregular shape, then its length is determined with a rope. It is applied along the handle along all bends. When the end of the ax is reached, a knot is tied or a mark is made with paint. The parts are cut out based on the size of the rope. To avoid mistakes, add another 2–3 cm. In this case, you need to use plywood to make the walls. It is soaked in water for about an hour or more, and then pulled or tied to the handle, wrapped with rope or tape over the entire surface. As it dries, it will take the desired shape. After this, it is strengthened on one of the sides of the future cover, and the unnecessary part is cut off.
- Screw or nail the hinges.
- The second side of the case is attached to them.
- One or two latches (clasps) are attached to the opposite wall.
How to make a case for an ax from PVC
Start by trimming the pipe or gutter into a flat shape. It's simple: you need to evenly heat the material with a hair dryer until it becomes soft and straighten it and even press it with a flat board. Do not overheat: PVC may shrink from excessive heat.
Then a flat piece of PVC needs to be bent so that it completely covers the blade and partially wraps the butt. To do this, you need to heat the workpiece again with a hairdryer, give it the desired shape and press the fold with a flat board.
Then you need to insert the ax blade into the workpiece and press the PVC around the blade, heating the material with a hairdryer. The part that goes onto the butt also needs to be bent around the butt and only a small free space should be left so that it remains possible to remove the ax from the case
to give a finally dense shape that fits the blade well, heat the surface of the workpiece together with the ax and press it with a press. The foam rubber will gently press the material to all the irregularities of the chopping part of the tool.
As a result, you will get a hard case like this, into which the tool blade will be inserted very tightly. Thanks to the partial fit of the butt, the cover adheres perfectly to the blade and can only be removed with some effort. The excess edges of the workpiece need to be cut off, but there is no need to solder or seal the edge in any way due to the rigid shape that follows all the curves.
How to sharpen an ax correctly
For comfortable work, it is important that the product is sharp.
The sharpening procedure should be carried out regularly, since the tool becomes dull over time.
This can be done with a power tool or by hand using a sharpening stone, which provides greater sharpness.
However, there are types of tools that must remain blunt.
This applies to the cleaver and fire axe, otherwise it will get stuck in the wood.
Therefore, in order to understand how to sharpen an ax, you need to determine what type of product is used.
Choosing the right angle for sharpening is also an important point.
It is most often 20-30 degrees.
If you need a sharp blade, then a 35-degree angle is selected.
When sharpening, avoid overheating, otherwise the steel will soften and quickly wear out.
Mistakes during work are most often made not only due to the lack of the necessary skills, but also in a hurry.
When using a power tool, there is a high risk of overheating the metal, which changes its properties.
For an electric sharpener, you need to set the minimum speed and choose the most even circle.
The blade is held towards the rotation of the circle, and to avoid overheating it is periodically lowered into water.
Advice from professionals
Please pay attention to some simple tips when sharpening your tool:
- do not use a grinder for sharpening: it has high speeds, which will lead to overheating of the steel;
- work slowly, in a calm rhythm;
- use water for cooling;
- set the power tool to low speed;
- Proper storage helps keep the blade sharp longer: it is better to put the product in a case made of thick fabric or leather;
- To protect against corrosion, cover the metal part with oil and wax;
- wear safety glasses and gloves to protect yourself while working;
- a double-sided product is sharpened on one side, thicker on the other, in order to be able to use it for different purposes.
Safety precautions when working with an ax
The use of any sharp or chopping tool requires compliance with certain safety precautions
The scope of use of the taiga ax is quite extensive
To prepare firewood for the winter, survive in the harsh conditions of the Taiga, or simply take a break in nature and light a fire, you need to know how to work with an ax correctly:
- Its head must be securely fixed to the handle and not loose - otherwise it may come off and injure you or people nearby.
- Also make sure that you have enough room to swing the tool freely, and completely cover the handle with your hand.
- To avoid damage to the blade when chopping wood on metal or stone, place wood underneath - it will extend the life of the metal part.
Upon completion of the work, do not leave the equipment on the ground so that it does not rust and the ax handle does not become damp.
Spoiler
- https://vashnozh.com/topory/topor-svoimi-rukami
- https://lesoteka.com/instrument-i-oborudovanie/kak-izgotovit-samodelnyj-topor
- https://pochini.guru/sovety-mastera/kak-nasadit-topor-na-toporishhe
- https://sdelatlegko.ru/kak-sdelat-topor/
- https://diz-cafe.com/tech/kak-sdelat-topor.html
- https://pilka-nn.ru/oborudovanie/dekorativnyj-topor-svoimi-rukami.html
- https://kakpostroit.su/chehol-dlya-topora-svoimi-rukami/
- https://homius.ru/vechnyj-chehol-dlja-topora.html
- https://nowifi.ru/oruzhie/holodnoe/164-taezhnyy-topor.html