People who do not have experience working with wood processing machines do not understand how to work with a wood router: they will be helped by techniques, tips, and devices recommended by experts. Knowledge will allow you to master this difficult task at home. Gradually, the young master will learn to cut patterns on the material, engrave, carve, saw straight and spiral grooves. Below you can find information on what you can do with a wood router at home and the basic rules for working with the tool.
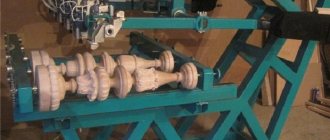
Using a router you can make balusters for stairs
Why do you need a milling machine?
What can be done with a router? This question often interests people who first learned about a wood processing machine. Milling equipment makes it possible to cope with a wide range of tasks. Machines will be needed not only by owners of large enterprises, but also by those who like to work with wood in their free time.
Milling cutters are widely used in:
- furniture and door production (cutting material, trimming, drilling holes, making grooves for edges, engraving);
- making plinths, balusters (applying various patterns on wood, making complex ornaments);
- production of bas-reliefs, high reliefs (removing the top layer from wooden blanks, thanks to the immersion of the cutter to different depths, a pattern is formed that will protrude above the main surface);
- souvenir production (figurines and wooden structures, engraving of images).
Note! Even handmade craftsmen who make wooden toys and jewelry can use a milling machine.
Wood milling. Lessons.
Milling is the process of processing a material by removing its parts of a certain shape and creating a configuration to obtain holes, grooves, joints, and parts of complex shapes. A cutter is a tool with one or more blades that produce cutting by rotating.
How to mill wood
There are certain rules for working with wood, following which you will preserve your health. They themselves are simple, we list them below.
- The part intended for processing must be securely fixed on the work table, without play. This condition will prevent the part from moving or falling out of the socket.
- The movement of the milling machine blades should be directed along the wood workpiece. If this rule is not followed, the quality of the edges of the cutting line and the evenness of its boundaries will suffer.
- To mill shapes of complex shapes, such as a circle, ellipse and others, it is recommended to use compasses that allow you to make curves of various radii.
How to mill wood
For milling wood, there are the following milling machines:
- Plunge - suitable for holes, grooves - the cutter moves along a vertical axis.
- Edging – suitable only for edges and chamfers. They have a guide bearing available.
- Lamellar - ideal for rounded longitudinal grooves.
- Dowel - suitable for grooves for dowels, for tongue-and-groove assembly.
How to set up the instrument
Working with a milling cutter is a rather complicated process. The master must not only skillfully handle the instrument, but also set it up correctly. In cases where there is a need to use a cutter whose diameter exceeds 10 mm, the pin should be lowered until it touches the turret stop.
Step-by-step tool setup process
If the work uses a cutter whose diameter reaches 16 mm, and the final milling depth should reach 14 mm, the master must:
- Set the router to the zero mark.
- Lower the pin until it touches the turret stop.
- Set some indicator of a whole value.
- If a slight play is detected above the stop, it is recommended to lightly tighten the screw and fix it.
- Now you can begin to remove the lock of the coarse adjustment scale, which should be raised by 14 mm, which will increase the gap between the turret and the pin.
- Using a revolving stop, you need to set the immersion depth, which will be equal to 3 mm. The presence of steps on the stop allows you to increase the depth of immersion gradually.
Note! The fine adjustment screw allows for additional precision.
What can you do
Having figured out how to work with a router, you can start creating grooves, grooves and quarters. Such slots are used in the manufacturing process of detachable and permanent type connections. With this tool you can create:
- complex surfaces and contours;
- edges;
- clamps and spikes.
Complex surfaces and contours most often have to be made by workers in furniture factories and workshops for the production of artistic wood products. If you follow all the rules and recommendations regarding the use of the tool, working with a hand router will be easy and interesting.
Operations for creating edges are performed during the manufacture of cornices, platbands and glazing beads
Open groove
When you plan to process a workpiece, forming grooves from the very edge, you need to properly fix the tool. The main cutting element should hang over the edge of the tree. Next, the wizard needs to follow the step-by-step algorithm:
- Having lowered the knife to the required depth, you will need to fix the position of the basket.
- Now you can start the engine and process the wood.
- After completing the edge processing process, you should raise the cutter and loosen the lock. Only after this can you turn off the engine.
The blind groove is made in a similar way. However, the master does not begin work from the outermost part of the part.
Deep groove
To carry out this type of wood processing, at the end of each pass of the processed area, you should set a new indicator for the immersion depth of the cutter. At this point the tool should be turned off.
Experts recommend not setting the depth level to more than 5 mm, which will allow the master to do the work carefully. When processing the last layer, it is worth setting the depth to 1.5 mm, which will help create a clean surface.
Advice! Working with a manual wood router requires the attentiveness of the master (especially a beginner).
Narrow groove
To form a narrow groove in the workpiece, an additional device will be required. A flat base is attached to the sole of the instrument. Guide rods must be installed on both sides of the accessory. This will allow you to achieve a straight trajectory of the milling machine.
It is important that the axes are located in line with the central part of the knife. During operation, it is recommended to guide the router in such a way that the rods are evenly pressed against the side parts of the workpiece.
End surface
Often carpenters need to process the end parts of the workpiece. This process requires the craftsman to obtain a clean edge.
- The first step is to make a shallow cut. The milling machine should be driven in the direction of rotation of the knife. This will ensure an even layer on the main part of the wood.
- To clean the end surface, it is necessary to move the router against the direction of rotation of the knife. Soon the appearance of the wooden product will take on the desired shape.
Working with a hand router is not an easy process, but following the recommendations of experts, anyone can master it.
How to correctly install a cutter on a specific machine model can be understood from the instructions
Curved edges
What can you do with a router at home? In addition to forming narrow, deep and open grooves in the workpieces, the master can make curved edges.
To form a curved edge in the workpiece, the master must prepare templates with a thrust ring (a round plate with sides). The ring will move along the template and set the correct trajectory.
Note! You can fix the part on the base of the milling machine using special fasteners.
When working with the material being processed, the structure must be pressed against the table with clamps. The use of templates allows each craftsman to create absolutely identical products from which furniture or other interior elements are made.
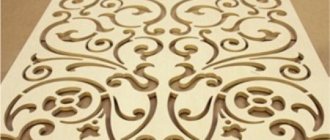
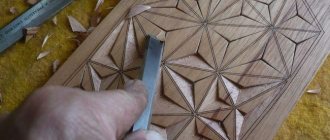
Decorative finishing
Patterns on wooden surfaces decorate carpentry. The most interesting method of processing natural wood is patterned and artistic milling. Working with the tool is quite simple due to the fact that the wood is pliable in work. During the decorative finishing of the material, the master will need:
- jigsaw;
- vice;
- chisel.
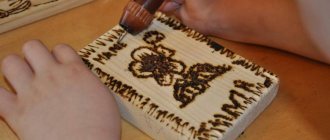
You need to transfer the image you like onto a wooden canvas. The patterned canvas is fixed on a stable surface. The router must be moved smoothly along the contour of the image, removing the wood layer by layer. This gives volume to the workpiece.
To create a variety of patterns, you need to use cutters of different sizes.
Compass for router
When carrying out work in a home workshop, you may often need accessories for a hand router that make it easier to mill a round surface. An example is a special compass that you can make for a router yourself. The main recommendations for carrying out the work are as follows:
- To create a simple design you will need: a bolt with a nut, a small piece of plywood, several self-tapping screws and a wooden wing. In manufacturing, the router itself is used, as well as a saw with a screwdriver.
- On the surface of the piece of plywood used, an area about 50 mm wide and 150 mm long is marked. Note that the width must be greater than the router platform, the length must be greater than the machining radius.
- After marking the working part of the site, holes should be made for the mounting bolts. You can drill with a percussion, the diameter of the resulting holes should be 20-30 mm.
- A through groove is created along the center line. Its width should be less than the width of the axle bolt.
- On the reverse side of the created platform, a recess is created for a nut with a washer, the second nut is attached to a wooden wing.
- The central axis is being assembled. As a stud, you can use a bolt of the required length, the head of which is sawed off.
After creating a homemade compass, it is attached to the router and you can check the device in operation.
Basic rules of work
Before you start working with the tool, you should familiarize yourself with the information on how to use the router. Below are the basic rules for working with woodworking machines.
Rotation speed adjustment
When starting to work with woodworking tools, you need to set the basic parameters. First of all, you should adjust the rotation speed.
When choosing this parameter, you should take into account the level of material rigidity and the characteristics of the router. The table presents expert recommendations regarding the speed level depending on the type of material being processed.
| Material | Cutter diameter | Recommended speed |
| Hardwood | 4-10 mm 12-20 mm 22-40 mm | 5-7 mm 3-4 mm 1-2 mm |
| Soft woods (spruce, pine) | 4-10 mm 12-20 mm 22-40 mm | 5-7 mm 3-6 mm 1-3 mm |
| Gypsum boards | 4-10 mm 12-20 mm 22-40 mm | 3-7 mm 2-4 mm 1-3 mm |
| Plastic, lining | 4-15 mm 16-40 mm | 2-3 mm 1-2 mm |
Advice! When choosing a device, it is worth remembering that high-quality equipment has up to 8 speed settings.
Fixing the cutter
Before starting to work with the tool, you need to take care of fixing the cutter. It is worth considering that each model has its own characteristics. For detailed installation information, please refer to the instructions.
Modern wood processing units contain a shaft rotation lock button, which makes it easier to fix the cutter. The device must be unplugged from the outlet and placed on the set marks. If there are none, then ¾ of the length of the cylindrical part will be required.
The part is inserted to the required depth. The shaft is fixed. Using an open-end wrench, you need to tighten the cutter until it stops.
Milling depth adjustment
Adjusting the milling depth does not take much time. The master will need:
- Place the device on a flat surface.
- Release the clamps and press the cutter until it rests against the surface.
- Then you need to unscrew the lock and release the turret stop.
- When choosing a turret stop leg, it is necessary to give preference to the one that will correspond to the depth of machining. The disk with legs returns to the correct position.
- The bar must be held with a finger, and the screw must not be fixed. The moving pointer moves so that its value coincides with the zero mark.
At the final stage, you will need to raise the rod to the mark corresponding to the milling depth indicator. The turret stop lock is lowered.
When fixing the power tool, the equipment must be disconnected from the mains.
Working methods
Before using the woodworking machine, you need to check that the screws and all threaded parts are tightly pressed. The safety nut and collet are removed. The master must make a control cut. You may also need to use a copying sleeve in your work, which helps to confidently guide the cutting elements of the device along a complex trajectory.
Milling cutters can use various cutters when cutting wood and wood-plastic products:
- compression;
- chipbreakers;
- end;
- with straight knives;
- single-pass.
Advice! To apply an image to wood, it is best to use a carpenter's pencil.
Edge processing using templates
To perform wood edge processing, experts recommend using templates. Below you can familiarize yourself with the processing features of the outer parts of the product.
If the width of the part is no more than the length of the cutting edge
The sample is securely mounted to the table. The cutter is installed in such a way that the roller can move along the template, and the cutter can move along the surface being processed. Next you will need to decide on the speed of movement. After the tool is turned on, you need to carefully move it along the workpiece. You can not only pull the woodworking machine, but also gently push it.
The width is greater than the length of the cutting part
After the first pass, the workpiece must be removed and a second pass must be performed. The processed part can perform the functions of a workpiece. The bearing must be guided along the machined surface. In cases where the cutting part is again missing, an additional pass should be made.
At the final stage, the product being processed is turned face down. The part is fixed with clamps. The craftsman will need a cutter with a bearing at the end, which will move along the treated surface. In this way, thick parts can be processed.
Obtaining a figured and curved edge
In order for the curly edge to turn out beautiful, it is important to process the workpiece well. There should be no cracks, bevels, or uneven edges. This will avoid the appearance of flaws during milling.
Important! If it is necessary to create a curved workpiece, it is recommended to carry out rough processing, bringing the product profile closer to the desired sample.
Next comes the finishing of the edge parts, during which you need to use templates and be as careful as possible.
Climb milling is rarely used, only when there is a possibility of obtaining a flake
Secrets of milling tenons
“Tongue and groove” is the most reliable way to fasten wooden parts. It is used in the construction of timber houses, flooring and other household needs.
Product for making spikes
To make such a locking connection, it is necessary to maintain high precision when cutting tenons. And the best assistant in this difficult task is a tenon-cutting device for a hand router.
General view of the tool for making a dovetail
Thanks to its versatility, it is possible to mill various joints, including straight and more complex ones, such as dovetails.
The main element of the tenoning device is the copying ring. It ensures the precision of the cutter's movement and moves along the groove in a special template for the router. You can make a copying machine with your own hands. To do this, you need to select groove templates that will be cut using a milling machine.
This is interesting: Drill chuck: how to remove, replace, disassemble - video, photo
Caring for a hand-held milling device
The milling cutter is an unpretentious device that does not require complex maintenance. It will be enough if the technician takes care of cleaning the device from chips and dust, and also promptly replaces the brushes on the motor and checks the condition of the bearings on the motor shaft and cutters.
Hoses can be cleaned with a brush previously soaked in turpentine, which dissolves tree resin and removes dust deposits.
Milling is an interesting and exciting process that anyone can learn. The expert advice listed in the article will help beginners who do not know how to properly handle the tool. Having gained experience working with a woodworking machine, a young specialist will be able to create real masterpieces from wood (for example, Russian nesting dolls, boxes, etc.), mill tabletops, or independently cut out parts for furniture.
End mills
Today, wood end mills are found in all home workshops. Their key feature is the location of the blades on the end part. The force is transmitted by transmitting axial load. As a result of using this embodiment, it is possible to obtain various recesses and grooves in wood. A different number of blades can be located on the surface, due to which the cleanliness of the processing changes. Wood cutters for hand routers often have a monolithic design, but composite versions are also available on sale. This category includes the following options:
- Burrs.
- End
- Spiral.
- Spherical.
- Conical.
- Profile.
All of them can be used to produce grooves of various configurations. They are often used to produce tenon and mortise. That is why such a tool for wood belongs to the category of grooved products.
The scope of application of the group under consideration is very extensive. An example is the list below:
- Obtaining grooves with a complex configuration.
- End surface processing.
- Decorating a flat or complex wood surface with various ornaments.
Burrs are also used to produce rollers or holes with certain parameters. They are required to perform an intermediate operation. In some cases it is used to bring the product to the final result.