At all times, products carved from various types of wood have been very popular for interior decoration and the manufacture of individual pieces of furniture. Wood turning has always attracted hobbyists who want to show their creative imagination and skill. Modern turning units make it possible to produce individual furniture parts, interior elements, blanks and parts for folk crafts.
Basic principles of turning
The main principle of turning is the optimal combination of two types of movements. The first is rotational, which is produced through the use of an electric motor and gear system, the second is translational, mainly manual, to supply the necessary turning tools. This operating principle is inherent in all types of lathes. It allows you to work with parts of the most complex configurations. Machining on lathes is carried out with the following types of tools:
- chisels;
- reimers;
- Meislers;
- incisors.
Each lathe has its own mounting system. It can be equipped with additional equipment that expands its capabilities for processing various types of wood.
A special tool rest is used to accurately feed the wooden blank. It allows you to install it in the required position while maintaining the required alignment. Correct and high-quality turning is facilitated by a precisely set angle at the roller.
Types of lathes
Working on a universal lathe
In addition to the universal type lathe, which is now most often found, there are many other types of such equipment. Among them:
- screw lathe. Used when cutting threads onto a wooden workpiece. In addition, a similar machine also processes wooden parts that are cone-shaped;
- turning and milling devices. Used in the manufacture of grooves, their subsequent boring and processing of other types;
- desktop lathe equipment. Due to its small size and weight, it is widely used at home and in educational institutions;
- CNC machines. Their main difference from all other types of turning equipment is automatic operation without human intervention.
Types of turning equipment
Despite the variety of joinery products, all turning operations can be implemented using the following types of units:
- milling;
- turning;
- thicknesser;
- sawing
Milling is used for cutting out profiles and relief elements. To obtain the required shape and specified relief size, a milling cutter of a specific size is used.
A wood lathe allows you to carry out the entire range of turning, cutting recesses, grinding and polishing operations.
A thickness planer is capable of planing workpieces to a given thickness. In addition, depending on the number of knives on the shaft and the degree of their sharpening, it is possible to obtain a surface with a high degree of accuracy.
A sawing machine is necessary for carrying out work related to the preliminary preparation of flat wooden blanks. Sawing can be done along the installed beam or across it while maintaining the texture of the wood.
All woodworking (including turning) units are divided into three categories:
- industrial (used at large woodworking enterprises, furniture factories);
- semi-professional (used in organizations performing work in small quantities);
- household or desktop (used for individual work in home workshops).
The main differences are performance and weight and size characteristics.
Finishing the workpiece
This method is used to process cylindrical elements of varying lengths, fixed between the centers of the tailstock and headstock. Accordingly, you have the opportunity to make any parts: from railing posts and table legs to tiny chess pieces. In particular, skilled craftsmen are skilled at making and sharpening billiard cues.
The first step of the job is to determine the location of the axle of the piece of wood to clamp it between the center of the tailstock and the driving center.
The second stage is to make a blank (from cutting a log or a square block of wood). This can be done in the 1000−1500 rpm mode. In this case, the chips should be removed from right to left using a grooved concave wide chisel to pre-process the reyer. If the workpiece is long, then roughing is carried out in several steps; the tool rest moves closer to the part as it is finished, without changing its height position.
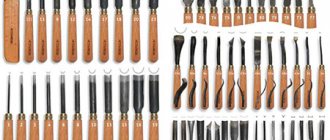
When turning parts, there are tools of various shapes for processing shaped surfaces:
- hook,
- semicircular cutter,
- flat chisel,
- beveled chisel (or popularly - jamb),
- grooved chisel, etc.
Depending on the type of tool used and the stage of the work process, it is necessary to bring the tool rest closer to the workpiece from time to time. At the end of the process, when the part is ready, the final finishing is carried out:
- polishing,
- toning,
- grinding,
- waxing, etc.
The finishing touches occur when the support has already been removed.
Types of jobs
Such units allow the following types of turning work:
- turning of various types;
- grinding;
- cutting off excess part of the workpiece;
- drilling end holes.
Turning has three types:
- longitudinal;
- transverse;
- corner.
Longitudinal turning involves smooth movement of the cutting tool at a constant speed of rotation of the wooden blank. The turning tool moves at low speed parallel to the axis of rotation. Transverse turning is performed as a result of the movement of a turning tool under a certain force perpendicular to the axis of rotation. Angular turning is used to obtain complex shapes. In this case, the tool is directed at a certain angle to the surface of the workpiece. These methods produce the most complex sample shapes. It should be remembered that in order to properly sharpen a wooden workpiece, you should clarify its density, select the spindle rotation speed and the necessary cutting tool.
To work with one of the types of turning, the following methods of tool placement are used:
- lower;
- top;
- straight (perpendicular or at an angle).
By choosing one of the techniques, you can carve a given shape or make the necessary groove at any angle.
Processing technology
The principle of operation is the gradual removal of chips from the workpiece using a machine and hand tools.
The bed should be parallel to the body. You should not bend over your workplace or move far from it. The optimal distance is the length of the forearm. Installation height is at elbow level.
You need to observe working hours, take breaks every 20–30 minutes.
Primary processing of the blank is carried out by gripping the tool from above, closing the fingers from below. This is how a rough product is held securely at high lathe speeds.
It is more convenient to process a turned part with a lower grip . This position allows for more precise tool movement during finishing adjustments.
Stage 1: making preparations
Actions:
- You need to take a block of any type of wood. Its dimensions should differ slightly from the dimensions of the intended product.
- An ax is used to shape the workpiece into a cylinder. It is not recommended to attach a solid block to the machine: there is a high risk of injury from large pieces of wood flying off.
- The place where the shape will be turned is indicated (center of rotation).
Stage 2: choosing a chisel
To process a blank, 3 chisels are required:
- Grooved. Its semicircular shape is suitable for removing the rough top layer from the workpiece.
- Grooved semicircular concave. To prepare the product for finishing.
- Oblique. Helps in turning cones, trimming ends, and finishing.
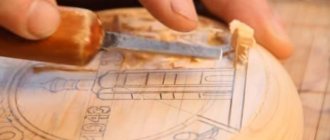
Wood carving begins with sharpening chisels and other cutting tools.
Stage 3: fixing the workpiece
All machines have a place for fastening the workpiece. Often the fastener is a hexagon with spikes. To prevent the workpiece from falling out of the mechanism during operation, it is recommended to use a chisel to make indentations in its ends where the tenons fit.
The support bracket of the hand rest (hand support) is installed at a distance of 5 mm from the blank and slightly above the axis of rotation. As the volume of the workpiece is ground off, the tool rest is brought closer to the surface of the product, and the rear spindle of the machine is tightened every 5–10 minutes.
Selection and preparation of workpiece
Wood belongs to the category of ornamental material that allows you to create the most bizarre and spectacular products. The beauty and originality of the crafts made depend on the type of wood chosen, the capabilities of the lathe, the skill level of the craftsman, and the accuracy of the work performed.
Work on a lathe requires careful selection of wooden blanks. Deciduous trees are usually chosen as wood. The most popular are: linden, pear, alder, oak, beech, walnut, and various types of birch. Of the rarest types of wood, red and black are used. However, it should be remembered that the basis of each of the rocks has its own characteristics that must be taken into account when processing. These features include:
- density;
- presence of original texture;
- absence of cracks and knots;
- for coniferous and some deciduous trees, for example, cherry, the absence of so-called tars;
- for coniferous species the presence of external and internal blue.
For beginners, it is advisable to choose for work well-dried blanks that have a solid structure and medium density. They are good for training on the simplest turning equipment. To acquire skills in working with wood, it is advisable to choose a product of simple design.
Machine setup
To ensure that the best degree of turning of a wooden blank is obtained, it should be properly configured and the cutting tool should be selected wisely. First of all, you should correctly position the tool rest on a wood lathe. This will optimize the processing process.
Setting up a wood processing machine includes the following operations:
- Secure the prepared blank using the fastening elements of a specific lathe (drive chuck or faceplate).
- Place the tool rest in the center of the workpiece with a gap of about 3 mm.
- For devices with mechanical feed, it is necessary to install a carbon ruler.
- Set the control adjustments to the required position (including spindle speed).
- Select and check the quality of cutting tools.
- Check the serviceability of the external elements of the machine, including the electrical power cable.
- Turn on the machine and check its operation at idle speed.
- If possible, carry out trial processing on a rough workpiece.
The quality of processing and safety depend on the correct configuration and installation of initial modes.
Working on a wood lathe: tips for beginners
When roughing a square block, carefully cut the corners with a chisel, without leaning too hard on it. Bring the part to a cylindrical shape of the largest diameter, moving the tool rest towards the axis of rotation as you grind the allowance.
Depending on what shape you need to give the part, draw the main lines for marking the convex and concave parts with a pencil, turning the workpiece by hand. Mark the block so that the widest parts of the part are always located on the side of the headstock.
Start by grinding the two edges of the workpiece with a chisel. Leaning on the tool rest, it should smoothly enter the tree (without sudden movements), remaining perpendicular to the axis of rotation.
Size check
Check the size regularly with a caliper. Experienced woodworkers usually press the cutter with their elbow to their thigh to free their hand for the measuring tool. As soon as the caliper begins to vibrate, reduce the thickness of the chips. In this way, grind the largest diameters first, and then proceed to turning necks, tori, balls, shoulders, etc.
To carve the one and a half, use a grooved chisel to machine the shaped surface. Holding it perpendicular to the axis, lower the cutting edge from the outside into the bar, lifting and slightly turning the handle. To get a whole torus, perform the same operation on both sides.
The neck (arch) is turned with the same cutter as the torus. After roughing the bottom in the middle of the neck, grind the right half-neck, this time moving the tool from bottom to top and to the right. Never move the cutter immediately from one side of the neck to the other - they need to be turned one at a time.
The listels (small bands often left on both sides of the neck) are turned with a meisel cutter. It does not have back corners on the side edges of the rod, like a chisel, but it does have a thin groove for the chips to escape.
A fillet is a smooth transition from one surface to another - essentially a combination of a torus and a neck. Therefore, first sharpen the neck, and then the torus adjacent to it.
A part clamped on both sides is never completely cut off. Carve grooves from both edges, leaving jumpers of small diameter, and saw off the ends with a hacksaw, first stopping the machine.
To complete the finishing of the part, remove the tool holder and sand the part from below with fine sandpaper (grit from 16 to M63). As you work, turn the sandpaper crosswise to avoid ring scratches.
To finish the part while rotating, rub it with a piece of wax and polish it with a thick cloth or cork material.
Machining a workpiece clamped at one end
When making a box, the wooden block is closed only at one end. Depending on the shape and size of the part, different means of fastening are used: a chuck with three or four jaws (some clamp at eight points), a pigtail chuck (with set screws that screw into the part), a collet chuck, or a faceplate.
This work requires considerable skill. Here you need to be very careful when turning the ledge so that the diameter is not made smaller than necessary.
How to secure a workpiece
An important element in processing a wooden workpiece is its correct fastening on the machine. To solve this problem, various devices have been developed that provide reliable fixation of almost any blank. Such devices include:
- driving chuck;
- faceplate.
Each of these devices has certain design features that allow you to securely fasten and hold the part during processing.
To secure the future part in the driving chuck, you should drill a small hole in the center of the end of the workpiece. The central tooth of the cartridge is inserted into this hole and then, using a little force, the remaining teeth are inserted. This fastening ensures strict positioning of the blank relative to the axis of rotation.
The faceplate is made in the form of a round metal disk. In the middle of this disk there is a hole through which it is put on the lathe spindle. There are holes made around the perimeter of the washer through which the workpiece is attached to the faceplate using self-tapping screws. To maintain alignment, it is advisable to pre-mark the center of the future part.
Safety precautions at work
Working on a lathe, regardless of experience, requires compliance with established safety rules. It doesn’t matter whether a beginner turner or a sophisticated professional is working. All safety regulations can be divided into the following categories:
- requirements for the workpiece;
- correct fixation of the blank and the procedure for turning on the machine;
- tool preparation;
- preparation of personal protective equipment.
The first category of requirements includes:
- check the integrity of the workpiece;
- no obvious defects;
- humidity level;
- compliance with the requirements for the shape of the blank (this will eliminate runout of the part).
The second list is related to work rules. Before turning on the turning unit, you must read the instructions. It describes the sequence of preliminary work, the order of switching on, operating rules and possible malfunctions. In addition, the instructions, depending on the installed fixing device, contain recommendations for the correct installation and fastening of the blank. The main requirements for turning work are:
- securely fix the blank;
- check the integrity of the power cable (it supplies high voltage to the engine);
- serviceability of the grounding cable;
- all controls must be set to their original positions;
- there should be no debris or unnecessary objects on the bed and surface of the machine;
- During turning operations, chips should be removed gradually in a thin layer (it is necessary to avoid deep penetration of the tool into the workpiece, otherwise it may be destroyed, which will lead to fragments getting on your hands and eyes);
- It is advisable to press the elbow tightly to the body (this will create additional support, allowing for improved fixation of the instrument).
All tools that are planned to be used during work must be in good condition. Handles should not have cracks or obvious defects. The cutting edge must be sharpened according to the rules.
Before starting work, you should take care of personal protective equipment. These include: a protective gown, a hat and safety glasses. Having personal protective equipment will help avoid injuries.