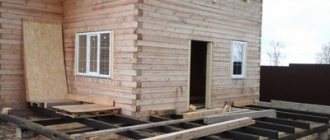
Insulating the veranda in a wooden house will expand the usable area that can be used in winter. It is better to think through all the nuances during construction. If this is not done immediately, the budget and labor costs may increase 2-3 times.
A room that was built several years ago is more difficult to insulate. During the work, expensive interior decoration is damaged and has to be purchased and reinstalled.
Veranda in a wooden house.
Features of arranging a warm veranda in a wooden house
Not all insulation materials are suitable for terraces due to the influence of climatic factors. Heat insulators based on natural minerals cope best with their task.
They allow air to pass through well, remove moisture and protect the wood from rotting. Polyurethane foam is less breathable, so it is more often used for exterior finishing.
In addition to choosing the material, you need to think about the type of insulation: external or internal.
Making a veranda warm in a wooden house is possible only if the following conditions are met:
- availability of heating;
- good ventilation in the room;
- The thickness of the seal is no more than 55 mm.
Thermal insulation system structure
In order to efficiently insulate a wooden house, prevent the appearance of condensation on the surface and inside the insulation, and also prevent the formation of dampness, the best option would be to install a ventilated facade.
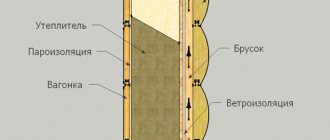
Regardless of what material is used, the structure is multilayer and consists of the following elements:
- Load-bearing wooden wall.
- Wooden or metal sheathing.
- Insulation.
- Windproof membrane.
- A frame for finishing, which also allows you to form a ventilation gap between the finishing and the insulation.
- Exterior finishing.
The main layers of the insulating “pie”
Types of insulation
There are 3 types of insulators, divided by structure. They have different origins and properties. Some may be dangerous to humans, because... When burned, they release harmful substances. To avoid this, you need to choose non-flammable insulation.
Cellular
Environmentally friendly, non-toxic materials, which include polystyrene foam, foam concrete, aerated concrete, foam glass. They have cells that retain heat; widely used on construction sites, because are inexpensive and have low thermal conductivity.
Fibrous
These materials, such as mineral wool, are made up of threads. Formaldehyde and acrylic compounds can be used as a binder.
Manufacturers claim that they are safe, but it is better not to risk your health and buy a more environmentally friendly insulator.
This is what basalt insulation is. It is made from molten rocks.
Bulk
Characterized by the presence of granules or grains. This can be sand or powder materials for backfilling. Polystyrene foam, broken into crumbs, is used as granular insulation. It is blown into the cracks by machine to seal it. The disadvantage of bulk insulators is that rodents can live in them.
How to insulate an attic
There are two standard schemes for insulating a panel house from the roof side: a cold attic and an attic (or a combined roof).
Insulating a cold attic
In this case, there is no insulation in the roof structure. Insulation is carried out over wooden floors.
This is a standard scheme for insulating a cold attic from the company Hexa, a manufacturer of insulating materials IzospanSource neanderthals.ru
It is important to meet the following conditions:
- The vapor barrier is fixed
on the surface of the false ceiling from the room side. It must protect not only the insulation, but also the load-bearing floor beams along with the sub-ceiling. Otherwise, the wooden elements of the structure will be moistened by exposure to vapor in the warm air, and the evaporation of excess moisture from them outside the room will be blocked by a vapor-proof layer.
- Choose as a vapor barrier films with anti-condensation properties
. These are two- or three-layer polymer materials with a rough (fleecy) surface that faces the room. They are able to partially retain condensate until conditions for its weathering appear.
- The insulation is laid
on a suspended ceiling between load-bearing floor beams.
- Lay on top of the insulation waterproofing
superdiffusion membrane.
- If the height of the floor beams is not sufficient to form a ventilated gap above the insulation, then they are filled with spacer counter battens
. And the attic floor boards are already attached to them.
Attic insulation
There are two options for how to insulate a frame house for winter living by insulating the attic: this is thermal insulation of the roof or the outline of the living space.
Insulating the contour of a residential attic (attic) can also have different options. For example, as in this diagram - with roof insulation from the eaves to the top trim. Source pinterest.com
But in any case, on the side of the roof on the rafters, in front of the sheathing (or continuous flooring), a waterproofing membrane must be laid.
Popular articles Pruning hydrangea for the winter
For a metal roof, a gap is required between the waterproofing and the roof covering so that condensation can drain onto the drip line and moisture can be evaporated from the under-roof space. If the vapor permeability of the membrane is low, then a ventilation gap must remain between it and the insulation to ventilate water vapor from the mineral wool.
Roof insulation
It is easier to insulate the entire roof than to “cut out” a warm contour from the attic. Especially if the house is small.
This is what the diagram of an insulated roof looks likeSource stroyfora.ru
Insulation of the entire roof is carried out as follows:
- Between the rafters laying mats
mineral wool. If the pitch of the rafters is greater than the width of the mat, then additional sheathing is installed. If less, the mats are trimmed. But in any case, the width of the mats should be 5 cm less than the pitch of the rafters.
- On top of the insulation to the rafters (and sheathing) attach a continuous layer of vapor barrier
. These can be materials with anti-condensation or reflective properties. The strips are laid overlapping, both horizontally and when extending along the length. All joints and abutments to structural elements are secured with self-adhesive vapor-tight tape. The anti-condensation or reflective surface should face the attic.
- For creating a gap
(and fastening the sheathing) a wooden block is nailed to the rafters.
Insulation of the residential perimeter of the attic
You can only insulate the part of the roof that encloses the attic itself. The insulation is laid from the line of the attachment points of the racks to the rafters, and to prevent it from slipping, a horizontal spacer is mounted between the rafter legs. At the top, the border of the warm perimeter can run along the ridge or along the line of attachment of the upper trim. The upper trim in this case serves as load-bearing beams for the attic ceiling.
Two schemes for insulating the attic contour - without a ceiling and with a ceilingSource lateres.ru
If the attic has a ceiling, then its insulation is carried out according to the “cold attic” scheme.
The attic walls are insulated in this way:
- from the roof side to the racks fasten the casing
;
- insulation
placed between the racks;
- attached to racks vapor barrier
;
- stuffed onto racks spacer bar
(to create a gap between the vapor barrier and the inner lining), the same strip serves as a counter-lattice for lining the attic.
Review of materials used for interior decoration
The most important characteristic to look for when choosing is fire resistance. A wooden cottage has an increased fire hazard. To reduce it, you need to use fire-resistant insulation.
It is also important to consider moisture resistance so that wooden structures do not dry out or rot. The third characteristic is thermal conductivity, it indicates the ability to retain heat.
Minvata
Mineral wool is a traditional insulation material for country houses. It is believed to be an environmentally friendly material, but recent studies claim that it contains harmful resins.
Advantages:
- low thermal conductivity;
- good sound insulation;
- fire resistance.
The disadvantage of mineral wool is that it absorbs water, which reduces its heat-protective properties.
Mineral wool - provides good sound and heat insulation.
Styrofoam
Lightweight and inexpensive insulation, which is often used in the interior decoration of brick and wooden houses. It is easy to install, holds heat well, does not allow water to pass through, and is not susceptible to fungi and microorganisms.
But the material must be used with caution, because... it ignites easily and releases harmful compounds during combustion.
Foam sheets for thermal insulation.
Extruded polystyrene foam
This heat insulator is superior to polystyrene foam in many properties, but its price is higher. It is durable, resistant to fire and solvents. The disadvantage of the material is that when exposed to sunlight, it loses its properties. This can be avoided by using it only inside the house and covering the top with trim.
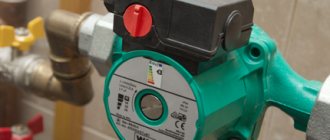
Polyurethane foam (PPU)
Sold in panels and foam. The second option is most often used, because... it allows you to insulate all joints and cracks. But to apply polyurethane foam you need a special installation, so you can’t do it without the help of a construction team.
Penofol
It is a sheet covered with foil on one side. It reflects cold air from the street and prevents heat from leaving the house. Most often, insulation is used in combination with other insulators.
Penofol reflects cold air.
Penoplex
Characterized by light weight and uniform structure. It does not crumble, which means it is convenient to install.
Other benefits:
- does not absorb water;
- resistant to rodents and microorganisms;
- has a low thermal conductivity coefficient.
Penoplex does not crumble.
What to cook
Naturally, the basis of everything will be insulation. The choice here is not particularly large - polystyrene foam with expanded polystyrene, mineral wool or penofol. The latter should not be used independently if you need high-quality insulation - it works well only in conjunction with a more solid thermal insulator.
If the choice falls on cotton wool insulation, then you should prepare in advance not only them, but also films for waterproofing, as well as a vapor barrier. They will be necessary - cotton materials easily pick up water from the air and as a result of leaks from the roof, which means they lose their effectiveness and become unusable. Foam blocks do not need such protection. Despite the higher cost and more complex installation process, when choosing how to insulate a roof here, it is better to give preference to cotton wool - it is more effective and not completely safe, which cannot be said about polystyrene foam.
The tools you will need are the most common: a tape measure, a hacksaw, a screwdriver, a hammer and others that you have in your pantry and will facilitate all operations. In any case, even a novice master has almost everything. It is worth preparing additional gloves, a protective suit or clothing that covers the skin completely - small particles may fall out of the cotton wool, causing irritation. Goggles to protect your eyes are also required.
Natural and synthetic materials for caulking
The cracks in the wooden parts of the house need to be caulked. For this purpose, fur, tow and other natural materials are used. They are sold by weight or in the form of ropes. Such insulators are environmentally friendly, but birds love to take them away. To avoid this, the seams are treated with chemical compounds on top.
An alternative could be polytherm, a synthetic material made from polyester fibers. It is non-toxic and safe for people. Available in the form of strips ready for installation.
Tow for caulking cracks.
Differences between external and internal works
Both insulation options have their advantages and disadvantages. Installation of thermal insulation inside the house can be carried out at any time of the year, regardless of the weather, while simultaneously laying insulation on the floor, walls and ceiling.
The main disadvantage of interior work is the risk of condensation forming between the material and the wall. There is a high probability of moisture accumulation if the technology is not followed, which increases the risk of rotting of wooden structures. If you install insulation inside, the area of the veranda will decrease.
When installed externally, the dew point moves to the outer boundary of the wall, eliminating the formation of condensation and destruction of wood. This method protects the logs from external environmental influences: snow and rain.
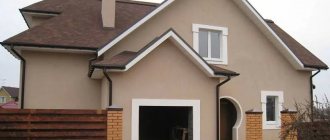
If the building is old, it can be updated with new exterior decoration. Another advantage is that the usable area of the terrace is preserved.
The only drawback of external insulation is the difficulty of working in bad weather. In this case, you can turn to professionals who guarantee good results at any time of the year.
Mistakes that are made when insulating wooden walls
When independently carrying out facing work and pre-insulating a wooden house, mistakes are often made, which we will consider below. The result is ineffective insulation, dampness in the house, destruction of wood and loss of its performance properties. The following 7 errors can be considered typical - they occur most often.
No. 1: installation of insulation without wood preparation
Old log houses are often subject to external insulation. Over the years, the log house has undergone final shrinkage, and its parameters will no longer change, which means they will not affect the front finish
But it is important to understand that the years of wood exploitation “in the open air” could not pass without a trace
Due to the fact that the insulation and sheathing will completely cover the walls, before starting work it is necessary to inspect the enclosing structures in order to identify weak areas that need to be repaired and treated. It is necessary to treat the wood with antiseptics and anti-feathers
It is important not to leave untreated areas. The solution should be applied 2-3 times
Each layer must dry completely. Insulation should begin when the wood is dry.
In order for wood to last a long time without being subject to biological decomposition or damage, it should be treated with a special antiseptic impregnation
No. 2: neglecting caulk
To prevent the log house from being blown through, use caulk. At the same time, the insulation of the structure is ensured. When inspecting walls before insulation, it is necessary to carefully inspect all areas where caulk is used - whether it sticks out, how tightly it is held. It happens that protruding, loosely twisted material is pulled apart by birds.
Insulation caulk
No. 3: wrong side selected
Log houses are insulated exclusively from the outside. This is a rule that must be strictly followed. Only this method allows you to ensure the correct use of wood and thermal insulation material. If you choose the other side and fix the insulation inside the house, then both the wood and the insulation will get wet. As a result, disruption of the microclimate in residential premises and increased humidity.
Log houses are insulated exclusively from the outside
No. 4: the insulation is incorrectly selected
The construction market offers insulating materials in a wide range of prices and performance characteristics. Of all the variety, however, only a few are suitable for insulating wooden houses: mineral wool (basalt and glass), as well as extruded polystyrene foam. The latter has excellent performance, except that when melted it releases substances that are extremely dangerous to humans. Therefore, the only alternative for insulating a wooden house is mineral wool.
One of the best insulation materials is mineral wool.
No. 5: improper transportation and storage of insulation
When purchasing, it is important to check the tightness of the heat insulator packaging. It must not be damaged and the contents must be dry.
If the insulation gets wet, its thermal insulation properties will decrease significantly. It is recommended to remove the insulation from the packaging one day before installation. And after it is fixed to the wall, it is necessary to immediately continue working on the walls so that the insulation does not remain “open”.
Check the material carefully before purchasing
No. 6: using roll insulation instead of slab insulation
Mineral wool works best for insulating wooden walls. You can find slabs and rolled material on sale. Why are mats not recommended? Because, being in a vertical position, over time the insulation will inevitably sag and gaps will appear through which cold air will rush into the house. The slab insulation maintains its shape throughout its entire service life, does not deform or sag.
The slab insulation maintains its shape throughout its entire service life.
No. 7: Incorrect calculations
Too thick or thin a layer of insulation will cause disruption of the microclimate in the room. Typically, the heat insulation is laid in two layers of 5 cm. In the south, one layer is enough, and in the north, three are required.
Correct calculations will allow you to maintain the correct microclimate in the room
Preparatory activities
Preparation consists of studying theoretical information if there is no experience in such work. First you need to buy all the materials, prepare the tools, think over the plan. If the veranda is not new, the decorative trim should be removed.
Required Tools
No specific devices are required to insulate the terrace. You can get by with what the home handyman has.
You will need:
- construction knife;
- stapler;
- roller and brushes;
- screwdriver;
- hacksaw.
In addition to insulating material, you need to buy:
- polyurethane foam;
- self-tapping screws;
- gypsum;
- vapor barrier;
- wooden beam;
- tow or jute for caulking.
Tools necessary for the work.
Advice from professionals
A common problem for developers is the difficulty of determining which side is more profitable to insulate the walls on the veranda. Professionals advise doing this outside. If the insulation is located inside the veranda, the dew point will shift. The wall material freezes, cold meets heat, and condensation forms. Dampness causes slow destruction.
The location of the thermal insulation determines how destructive the displaced dew point will be for the walls.
When arranging a warm veranda, you must not forget about the windows. It is optimal to install energy-saving double-glazed windows with three glasses. Old doors are also replaced, because a large percentage of heat loss occurs through them.
It is easier to use electric heaters for heating. Power is calculated using the standard formula: 100 W/1 m2 of room.
Instructions for insulating a cold veranda from the inside with your own hands
Temperature losses are highest in the areas of walls, windows, doors and floors, especially if there is a basement. These parts should be given special attention; you cannot skimp on insulators for them. In a wooden house, you need to take care of wood impregnation to prevent the formation of fungus.
Let's start with the floors
This is the most important part of the work, because a lot of heat goes into the foundation. If there is a basement under the veranda, insulation is much easier; there is no need to dismantle the covering.
The insulator is laid from below, from the cellar side:
- A vapor barrier is secured to the floors and wooden flooring using a construction stapler.
- Insulation slabs are installed between the beams. If they are too narrow, the gaps are filled with additional bars.
- The entire structure is covered with another layer of vapor barrier on top.
- Installing the basement ceiling.
If there is no cellar, work is carried out from the veranda:
- They lay joists.
- Expanded clay is poured between them or insulation boards are laid.
- Cover everything with a vapor barrier.
- Install flooring.
This is an option without dismantling the old floor. But in this case the height of the room decreases. In order not to lose useful centimeters, you need to remove the old boards, put an insulator between the joists and lay a new laminate.
Floor insulation.
Thermal insulation of walls
Internal insulation reduces the area of the room, so it is better to do it outside.
If this is not possible, work is carried out in the following order:
- Caulk the joints between the logs with tow or jute.
- Nail the frame from wooden beams.
- Cover it with waterproofing.
- Install a counter-lattice made of slats perpendicularly.
- Place an insulator between the guides.
- Cover the structure with a vapor barrier.
- Install drywall or lining for finishing.
Internal wall insulation.
Working with ceilings and roofs
Insulating this part of the terrace will help avoid 20% of heat loss. Installing insulation from the outside is inconvenient and can only be done at the construction stage. There are 2 ways to lay the insulator from the inside.
Using the wireframe method, you need to complete the following steps:
- If the covering is made of plasterboard, it must be dismantled and replaced with plywood or OSB boards.
- Using a construction stapler, secure the waterproofing.
- Make a frame from timber on top. Its thickness should be the same as that of the thermal insulation material.
- Lay insulation sheets.
- Cover the structure with a vapor barrier.
- Install a finished ceiling.
The frameless method is suitable for rigid materials, such as polystyrene foam, which is attached directly to the drywall with glue.
Further actions:
- A reinforcing mesh is installed on top.
- It is puttied and a fine finish is applied on top.
We insulate the ceiling thoroughly.
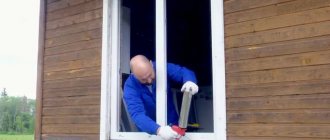
Windows and doors
The warmest option is PVC double-glazed windows. If it is not possible to install them, you can insulate wooden frames.
Stages of work:
- Seal all seams with sealant.
- Apply energy-saving film to the glass using double-sided tape.
- Heat the entire surface with a hairdryer. A household appliance will do if you don’t have an industrial one. This is necessary to ensure that the material fits tightly to the base.
- Prepare a solution of chalk and gypsum in a ratio of 1:2. Add a little water, stir. Use a spatula to apply the compound to the joints between the frames.
It is best to insulate doors with batting. It needs to be wrapped in artificial leather, forming rolls. Use a construction stapler to secure them around the perimeter of the door leaf.
Insulation of windows and doors of the veranda.
Actually putting it all together
Since the roof of the veranda will have to be insulated either with polystyrene slabs with foam plastic or with mineral wool, you need to create a base for them if there is no space in the rafter system or there are no rafters at all and the roof is laid on slats. Without lathing, there will be nowhere to lay sheets of expanded polystyrene, and there will simply be nothing to attach cotton insulation materials to. Need a frame. This structure is easy to assemble: slats or bars are placed on supporting structures in increments equal to or slightly smaller than the size of the mineral wool slabs. If polystyrene foam is used, the dimension must correspond to the dimensions of the insulation boards. The cotton wool must also be secured from below, using stretched cords or slats of wood. The frame can also be assembled from metal parts used in structures with plasterboard. Materials like penofol are attached directly to the ceiling using a construction stapler.
When the insulation is in place, it is lined with a vapor barrier from below - for mineral wool, or simply assembled decorative sheathing, as is the case with expanded polystyrene. At this point, all work is completed and you can enjoy the result.
Nuances of insulating a finished veranda in a private house
The difficulty of installing thermal insulation in a finished room is that it is necessary to dismantle the finishing materials. This must be done carefully so that a lot of construction waste does not form.
On the ceiling, the insulation from the inside must be additionally secured using a nylon cord.
It is best to insulate the remaining parts of the terrace from the outside to preserve the interior finish. The old floor is dismantled and thermal insulation is installed in the same way as on a new veranda.
Is it necessary to insulate a veranda using SIP panels?
Verandas built using SIP panel technology, at first glance, seem to be quite insulated. For the southern and central parts of Russia, where there are no severe frosts, this is quite enough. However, in more northern latitudes additional thermal insulation will be required. You can insulate such a veranda in a private house both from the outside and from the inside. The main thing is to choose the right approach and carry out the work efficiently.
With proper insulation of the veranda in the house, it will be much more comfortable to be indoors. And if you choose a suitable heating system as an addition, the extension will become a full-fledged room that can be used all year round. The main thing is to approach the procedure responsibly and do the work efficiently.
If you do not have sufficient skills and experience, then contact the professionals. They will help you with insulation of an existing veranda or build a new one on a turnkey basis. You can choose a ready-made house project with a veranda from the database, or develop a new individual one with the help of our specialists.
Recommendations for outdoor work
On the outside, only the walls are insulated. If the house is wooden, the installation is no different from the interior. The only caveat: the waterproofing is installed outside, under the cladding.
At a dacha made of blocks, the veranda is strengthened as follows:
- Thermal insulation boards made of polystyrene foam or expanded polystyrene are glued to the wall.
- Additionally, dowel nails are driven in.
- Glue is applied on top and the reinforcing mesh is pressed.
- After the composition has completely dried, the wall is plastered.
External finishing works.
Options for heating a room in winter
When the issue of heat loss is resolved, you can think about heating the veranda.
There are several ways to generate heat:
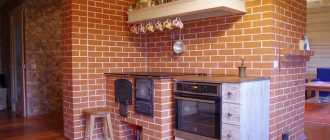
- Fireplace or stove. Used in a country house or in a country house and eliminates the need for laying pipes or electrical wiring. But stove heating requires constant monitoring so that the fire does not die out or flare up too much. If you choose this option, you need to make the surrounding surfaces fireproof.
- Climate control. The advantage of the system is that in the summer it will cool the air in the room and heat it in the winter.
- Warm floor. It can be water or electric. The latter allows you to regulate the temperature and heat the entire room.
- Heaters. Today, wall-mounted, floor-mounted, and infrared radiators are sold. Some have the function of maintaining the temperature or turning off when the desired value on the thermometer is reached. For a small terrace, 1-2 devices are enough.
Properly carried out work on insulating the veranda is the key to turning it into a full-fledged living space. If you have the time and skills, you can do everything yourself. If you have no experience, it is better to turn to professionals.
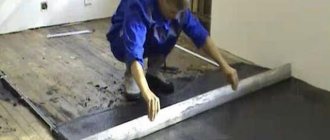
To keep your feet from getting cold: floor insulation
Besides the foundation, the floor is closest to the ground. Its insulation is mandatory if you do not want to see black spots of dampness in the corners.
Most often, concrete floors are poured on verandas. If you plan to heat the veranda using a “warm floor” system, then you should take care of it already at the stage of pouring the subfloors. It's best to choose an electrical system that you can turn on as needed. A water floor can freeze at very low temperatures, and you will have to wait until spring for it to thaw, or dismantle the coating to warm up the pipes.
If there were old tiles on the veranda, then you can lay the insulation directly on it
Let's look at how you can insulate the floor on an unheated veranda:
Recent Entries
Lilac perennials that are beautiful, compact and do not crowd out other plants Why when buying seedlings you should not take the sellers’ word for it and how to determine the age of the plant using 3 signs Tomato seedlings have turned purple or whitish: why the color has changed and how to save the plants
- The entire underground floor is covered with crushed stone, and on top - with sand and compacted tightly.
- Lay out reinforcing bars or mesh (so that the concrete does not burst) and make a concrete screed 5 cm thick.
- When the filling is dry, we create waterproofing. The easiest way is to coat the screed with water-repellent mastic. But it’s cheaper to lay sheets of roofing felt and fasten them together using bitumen mastic (or heat them with a burner and roll them).
- Antiseptic-impregnated logs are installed on top of the waterproofing, and insulation is laid between them. The best option is mineral wool with a foil-coated side. The foil does not release infrared radiation from the veranda, along with which most of the heat evaporates. Rolls of insulation are placed after all the joists are installed.
- It can also be insulated with polystyrene foam. Then the joints between the plates must be blown out with polyurethane foam, and when it dries, the excess must be cut off.
After this, planks or decking are laid, because both materials are warm. The board must be treated in every possible way to prevent rotting and painted with a protective compound. In addition, natural wood is very susceptible to poor ventilation. To avoid dampness, it is necessary to make ventilation vents in the foundation, which should be located below the floor level.
The insulation is placed with the foil facing up so that it reflects the heat back into the veranda
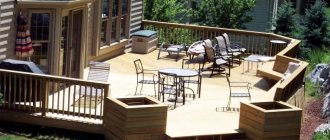
Decking does not require ventilation in the underground, because it is not afraid of dampness and temperature changes
Decking is also a board, but already treated with compounds at the factory. It is made from larch, which is not afraid of either frost or moisture. Open terraces are lined with this material, so it is even more suitable for a veranda. True, the cost of such a floor will not be cheap.