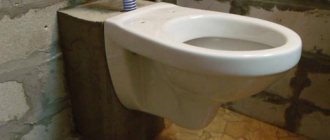
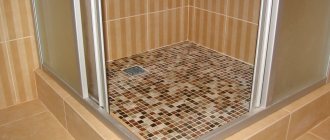
A wooden house is valuable for its high vapor and air permeability. It is easy to breathe in, it is environmentally friendly and plastic. Easily repairable. However, situations arise when it is necessary to “make friends” between two incompatible materials: wood and concrete. Concrete floors are especially relevant when arranging washrooms in bathhouses, where it is planned to install a floor with a drain, or in utility rooms, on the first or basement floor, in which a large amount of pollutants gets onto the floor. Let's talk about how to install a concrete screed on a wooden floor.
Description of plank floors
A wooden floor, from the point of view of the theory of strength of materials, is an unreliable support for concrete. The fact is that plank floors tend to change their linear dimensions, depending on the temperature and humidity of the environment. The length of the boards varies in the cold and warm seasons, the wood swells when wet and contracts when dry. In addition to linear changes in size, boards tend to change their spatial structure - as they dry, they begin to curl. Such unfavorable changes are completely unsuitable for the construction of a concrete screed, which, after setting and gaining strength, becomes monolithic, practically not subject to linear expansion.
Another obstacle to installing a concrete screed is its heavy weight.
The usual base for installing a wooden floor is logs made of wood lying on the foundation or, in rare cases, beams made of reinforced concrete or metal profiles. They are not designed for significant loads and with additional pressure, the ties can become deformed and break.
The third nuance of floors is the small thickness of the base. A standard floorboard has a thickness from 2.54 to 50 mm. Inch boards are rarely used because they bend under the weight of a person of average build. Floor boards thicker than 40 mm are also rarely used in house designs, only in those rooms that experience strong static or dynamic loads. The most popular board is 36 mm - tactile (feels), does not bend when moving on the floor. But, if you make accurate measurements of the floor level, it becomes clear that when laying tiles it also “plays”, especially if the distance between the supporting joists exceeds 1000 mm and the floor boards are not reinforced. Such “floating floors” are installed in newly built houses in order to prevent the boards from deforming when the outer walls of the house shrink. It is impossible to install a screed on such an unsettled floor that is in the stage of natural deformation. Otherwise, there is a high risk of cracking of the screed, despite the reinforcement and installation of the sliding layer.
The fourth obstacle is the wood's susceptibility to rot. The concrete screed sharply limits the flow of air to the surface of the wood and creates favorable conditions for the growth of mold fungi that destroy the structure. In addition to fungi, insects like to make shelters in unventilated spaces, many of which feed on wood. Topographer beetles, sawflies, and in the southern regions – termites.
If the developer is not afraid of the obstacles that he will encounter when arranging the screed, he can proceed with step-by-step actions.
Technological principle of leveling with concrete
How to simultaneously create favorable conditions for moving wood and static concrete? This is possible if two conditions are met:
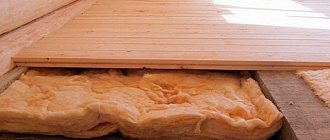
- It is necessary to carry out a sliding connection of materials. That is, the concrete should not stick to either the floor or the walls. To do this, polyethylene is placed between the concrete layer and the wood. It will perform several functions at once: waterproofing wood and concrete and sliding gasket. Lay a damping film made of foam material between the walls and concrete. This will allow the wood to expand freely under the heavy monolithic concrete slab.
- The weight of the concrete screed should be evenly distributed over the entire area of the wooden floor, that is, its surface should be flat. Then the concrete will not begin to collapse due to the movement of wood.
Design features of plank floors
The design features of plank floors include:
- Support material of the base (lags);
- Distance between joists,
- Board thickness;
- Connection type:
- regular board with straight ridge;
- tongue and groove;
- and a quarter.
Floors made of boards without connecting elements are not suitable for screeding, since each of the boards is subject to independent fluctuations in size under load or changes in humidity and temperature. This leads to rapid destruction of the screed. Boards held together provide a more reliable base for concrete. Although they are subject to linear changes in size, they behave more predictably.
An important factor when deciding whether to pour screed on a wooden floor is the material from which the boards are cut. The most popular and cheapest wood is coniferous wood: spruce and pine. It also has the lowest consumer and strength characteristics:
- High moisture capacity;
- Tendency to curl when dry;
- Susceptibility to damage by pests and microorganisms.
Larch floors are more suitable for screeding. This wood is practically not subject to rotting due to its high resin content. It has a low coefficient of linear expansion, is heavy and is not prone to deformation under load.
Hardwood is used less frequently for flooring, mainly in bathhouses or for decorative purposes.
Option 2. Installation of a monolithic screed
In general, experts do not recommend leveling wooden floors with a concrete screed. It may be too heavy for the old flooring, which will accelerate its destruction. And this order of arrangement of layers violates the immutable rule of construction: the base must be stronger than the coating in contact with it. Therefore, you need to make sure that they do not contact each other.
Poured concrete base
The most important thing is proper preparation of the base
However, in special cases, sometimes it becomes necessary to pour a screed over a wooden floor. Since these materials have completely different properties, the main task that will have to be solved is to make sure that the mobility of the wood does not interfere with the long-term service of static concrete.
Important! During the first 4-5 years of operation, the boards are most susceptible to shrinkage phenomena, so only old wooden flooring can be poured with concrete. In a new one, as a result of the loss of moisture from the wood, after some time cracks appear and the linearity of the boards changes.
Plank floor
- Such collisions always occur with wood, but to a lesser extent with old trees. Do not forget that a monolithic screed poured onto a wooden base should not be in direct contact with either the flooring or the walls.
- When the wooden covering is made along joists and is the floor of the first floor, under which there is a concrete base, then there is no need to fence the garden - remove all wooden structures and fill in a new concrete screed with light filler.
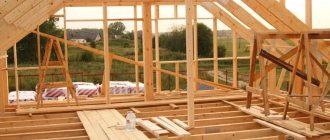
- If the floor structure itself is framed or it is a ceiling on wooden beams, then nothing can be done - you will have to pour a screed under the tiles. In this case, if possible, you need to reduce the number of layers of the floor cake if, for example, it is like the one in the picture below.
Construction of wooden interfloor ceiling
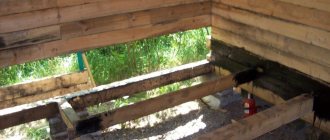
- That is, you need to remove the finishing coating or remove excess lathing, reaching the subfloor, which will reduce the mobility of the base. All elements that remain must be well secured. Here you need maximum rigidity, and if the flooring is loose in certain areas, you will have to open it to install crossbars, as shown in the photo below.
Installing crossbars after opening the deck
The last stage of preparing a wooden base, if it is not a painted floor, will be treatment with a biocidal-hydrophobic primer, which will slow down the process of its destruction and extend its service life.
Calculator for calculating the amount of ingredients of a mortar for floor screed
Go to calculations
Pouring process
Table. Step-by-step instructions for pouring.
| Steps, photo | A comment |
| Step 1. Installation of shock-absorbing tape | Shock-absorbing tape - damper, is mounted along the perimeter of the walls. It will provide the screed with a technological gap for thermal expansion. The tape can be purchased ready-made or cut from a laminate backing. |
| Step 2. Laying polyethylene | Before you proceed directly to monolithing a wooden floor, it needs to be waterproofed with rolled material overlapping the walls. For this purpose, ordinary polyethylene is used - a film 1.5-2 mm thick. Width - the larger the better, there will be fewer joints. It is only important to handle it carefully so as not to damage it. Note! You can, of course, use bitumen-based materials instead of film. But polyethylene is better in this case, since it is smooth and does not adhere to the solution at all. |
| Step 3. Marking and installation of beacons | Then you need to bring the zero level to the walls, and break off the horizontal top of the screed from it. Instead of beacons, you can use a tightly stretched cord secured to self-tapping screws screwed into the floor. How all this will ultimately look is shown in the picture. On a note! When determining the thickness of the screed, do not forget about the thickness of the tiles and the adhesive layer. The thinner the fill, the better. If you need to raise the floors, say, by 20 mm, then it is better to first install cement-bonded particle boards, and then pour a 1-2 mm screed on top of them. A large thickness of concrete will create unnecessary loads on the wooden base with its weight. |
| Step 4. Selection of reinforcement and calculation of coating layers | To make the structure lighter, there is no need to use a reinforcing mesh, at least a steel one. There are lighter composite meshes on sale. |
| Step 5. Mixing the solution | But it’s even better to simply add polymer fiber to the concrete - it’s better suited for thin screeds. If the room is small, the easiest way is to simply buy a ready-made factory mixture reinforced with fiberglass - for example, BESTO. |
| Step 6. Filling the screed | The finished solution is poured in one layer - the entire room at one time. If metal beacons were installed, then after a day they need to be removed and the recesses sealed. To prevent the screed from losing moisture too quickly, lightly moisten it with a spray bottle and cover it with cellophane. |
Prices for cement M400
cement M400
If you are going to lay tiles, allow the monolith to gain at least 70 percent strength, which for concrete is 19 to 20 days. However, as for the screed, the drying time will depend on its composition and thickness. If it is a 1-2 mm self-leveling floor, you can lay the tiles within a week.
Self-leveling screed
Pouring technology
Pouring a concrete screed requires preparation of the base. If it is possible to avoid the “layer cake” effect, wood should be excluded. If a wooden floor is the only base, then the following measures should be taken:
- Remove the skirting boards around the perimeter of the room;
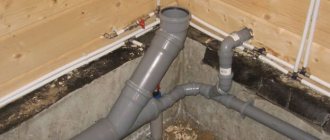
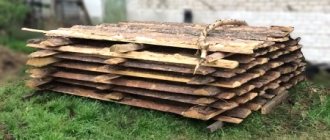
- Inspect the supports. To do this, remove about two boards along the entire length and find out on what basis the floor is constructed and the safety of the logs;
- The internal (lower) surface of the boards is subject to inspection. If there are traces of mold on it or pests are found, such boards are replaced;
- It is advisable to clean the surface of boards coated with oil paint/varnish using a plane or scraping machine;
- The outer and inner surfaces of the boards are treated with water-based antibacterial impregnation;
The boards are additionally strengthened in places of contact with the joists using screws/screws, but not nails or wooden pins, which become loose over time and allow the boards to move in the vertical direction. It is possible to firmly fix the boards to the joists only after 2-3 years have passed after the construction of the house or the laying of a wooden floor. This is exactly the period of natural drying of wood at room temperature. During this time, all internal stress in the boards is removed. Those defects that remain after the specified period are eliminated mechanically - by jointing or scraping.
On the feasibility of using polyethylene
Bearing in mind that wood is subject to linear changes in size more than concrete, measures are taken to isolate them from each other. The top layer of the floor - the screed - turns out to be floating. A thick (100-200 microns) film is used as a waterproofing agent and separator. The canvases will be laid on top of each other with an overlap of 200-300 mm, and in places of contact they will be glued together with bitumen mastic. The film is not attached to the boards in any way. In places of contact with the wall of the house, an overlap of 100-150 mm is made. The perimeter of the room is covered with damper tape over the plastic film, which will allow the concrete screed to move freely along the walls as they shrink or thermally expand.
Other types of waterproofing materials or insulation cannot be used as an intermediate layer. Roofing felt and other rolled materials impregnated with petroleum distillation products emit formaldehyde and creazote during operation, which will inevitably penetrate through the screed into the room. Under load, the rolled material is glued to the surface of the wood and tightly bonded to the concrete. Thus, materials with different expansion coefficients will be unable to move relative to each other. When there is a change in temperature or humidity, the screed will begin to crumble.
Condensation can form under polyethylene in damp rooms and on the first floors of buildings. Therefore, the surface of the wood must be treated with a hydrophobic antiseptic.
Insulation device for leveling with concrete
After the preparatory work, it is necessary to lay waterproofing coatings. This process can be divided into two stages:
- A foam tape is glued to the wall along the entire perimeter of the room; its width should be slightly larger than the thickness of the concrete screed. The presence of the tape will leave a gap between the screed and the wall, which will allow for a sliding connection. This tape also performs a soundproofing function.
- Polyethylene is laid over the entire area of the wooden floor. The main requirement is tightness. Therefore, if there are joints, they are glued together with tape or glue, and the installation is carried out with an overlap on the walls (200 mm).
If subsequent work results in a puncture in the waterproofing surface, it must be repaired. To do this, you can glue a plastic patch.
Calculations
The calculation of material requirements is made taking into account all necessary consumables with a reserve plus 10% for overexpenditure or unforeseen circumstances.
The calculation includes:
- Fastening hardware (screws, wood screws) for strengthening boards to joists;
- Hydrophobic impregnation in accordance with the manufacturer’s recommendations;
- Polyethylene film 200 microns with a margin plus 20% for overlap and lining under the damper tape;
- Damper tape - around the perimeter of the room;
- Reinforcing mesh - according to the area of the room;
- Dry concrete mixture for screed or cement and sand to prepare the solution yourself. For the screed, use the proportion of cement/sand/water/reinforcing filler:
- Cement grade M150 1:3:0.55:0.1
- Cement grade M200 1:2.8:0.45:0.1
Preparing the wooden floor for screed
This is one of the most important stages of the entire repair, so all the steps described below must be strictly followed. The work algorithm looks like this:
- It is necessary to inspect all the floorboards on the floor; in principle, there should be no floor with damaged boards. All damaged items must be replaced.
- You also need to inspect all the load-bearing joists and, if necessary, change them as well.
- After the inspection, we attach the floorboards back to the joists.
- Next, all cracks on the surface are sealed using sealant.
- After waiting for the sealant to dry completely, you need to start treating the floor with a waterproofing primer.
- Using a laser level, the finished floor line is marked.
When examining the logs, pay attention to the distance between them; if it exceeds 40 centimeters, then you need to install an additional number of them. If you need to fill a high screed, then the logs are also strengthened, or they are completely replaced with metal channels.
Preparing the base
All protruding metal objects are removed from the boards: nails, staples, screws. Remove the top layer of oil paint. Seal holes and depressions from fallen knots, large chips and dents on the boards with oil putty mixed in a 1:1 ratio with sawdust. The surface is treated with a water-based antiseptic and allowed to dry for 2-3 days with active ventilation of the room. The drier the surface of the wood, the better.
Technology of self-leveling device on a wooden base
To fill the mixture you will need the following set of tools and materials:
- Belt, planetary (surface grinding) and/or angle grinding machine. It is better to rent professional series devices for 1-2 days. They are more powerful and operate in several modes;
- Fine-grained sandpaper for finishing sanding (from 180 to 600 units), as well as a belt or attachments for a sander (grain size - from 80 units);
- Plastic or wooden grater for sanding paper, hand scraper for small jobs;
- Construction vacuum cleaner;
- Hammer and nail puller;
- Sealant or repair putty for filling cracks and gaps;
- Waterproofing compounds or polyethylene film with a thickness of 150 microns;
- Damper tape;
- Roller or coating for applying coating waterproofing;
- Wide spatula or squeegee;
- Plastic bucket or container for mixing the solution;
- Construction mixer or drill with an attachment;
- Point beacons, laser level or water level;
- Needle roller for rolling the mixture;
- Paint shoes, gloves.
Wood floor sander.
To prevent your hands from getting tired too quickly, choose tools with ergonomic, rubberized handles. They are easy to use and do not slip.
Self-leveling flooring on plywood, chipboard or OSB board must be done in 3 stages.
Stage 1. Preparing the wooden surface
When working, you must be guided by SP 29.13330.2011. The regulatory act requires rolling stock to be poured onto a level (!), solid and dry foundation. That is, without oil stains, paints and varnishes, bitumen and other defects.
First, inspect the floor. It must be in good condition: without rot, mold stains, paint residues, varnish, blackness, chips, “playing” boards. The floorboard, OSB and chipboard should be checked for differences between sheets or planks, gaps, and squeaks.
Removing old paintwork
For painted surfaces, use removers of old paintwork materials. Or use a hand grater or scraper to carefully remove the coating. This will create a fairly rough base on which the waterproofing material will “lay down” well and will not slip.
The simplest and most effective method of preparation is grinding the entire surface with a planetary or belt unit. Corundum or diamond abrasive will perfectly remove all protruding irregularities (slabs, drops) and severe contamination. Manufacturers and technologists strongly recommend not skipping the stage of carefully leveling the surface for pouring. This is necessary in order to create a single, monolithic cement sheet of the same thickness over the entire area, and therefore identical strength, without weak areas.
For the same purpose, holes, potholes, chips and cracks are filled with elastic wood sealant and putty compounds. Professional repairmen devote a lot of time to this, because they know: when rolling the solution, the needle roller very often simply “rips” the solution out of the recesses. Because of this, the frozen surface turns out uneven. Instead of putties, you can use a simpler option - sawdust mixed with PVA glue.
Laying plywood on dry boards.
Walk along the floor and mark where you need to further secure the base with screws or nails. Be sure to check each slab or floorboard. The minimum interval between fastenings is 40-50 cm.
If the boards are dry or too damaged, you can additionally sew chipboard or plywood with a thickness of at least 14 mm on top. And to avoid squeaking between the sheets, pour finely crushed chalk into the gaps.
Do not forget to first remove the baseboards, as well as protruding metal elements or hardware. “Down” all fasteners with a hammer 0.5 cm into the floor. After finishing work, use a construction vacuum cleaner and a damp cloth to remove dust and small sawdust.
Formation of a separating layer of polyethylene.
The next step is the formation of a separating waterproofing layer and its careful fixation. The film is spread over the entire surface with an overlap of 10-15 cm on the walls. If strips are used, they are overlapped by 8-12 cm.
Instead of polyethylene, the use of waterproofing compounds is allowed. And this must be done without fail. Wood and its derivatives do not like moisture; there is a risk of rotten areas forming under the ready-made filling composition. In addition, untreated wood tends to “pull” water from the solution. As a result, the cement binder will not have enough liquid to mature and gain full strength, and the floor will turn out to be loose, weak, with pits and tubercles.
It is known that cement and wood have different coefficients of thermal expansion. Therefore, to prevent the finished base from cracking or damaging the walls in the future, be sure to glue damper tape around the perimeter. Can be replaced with isolon (NPE) cut into narrow strips with a thickness of 1-2 mm.
Stage 2. Preparation of bulk solution
Pour clean, free water at a temperature of +5 to +25 °C into the container. Carefully add the dry component and mix with a construction mixer for 5-7 minutes at a speed of up to 500 rpm. The composition should be homogeneous, without lumps or separations.
Let the solution mature for 5-10 minutes, then stir again. The pot life of the solution is always indicated on the label. This is the time during which the mixture should be used. On average it is 20-60 minutes.
Stage 3. Pouring a self-leveling self-leveling floor
If necessary, mark the required level of the new cement layer on the walls or place benchmarks along the base.
Pouring a self-leveling self-leveling floor.
Carefully pour the mixture onto the surface. Start from the far corner, gradually moving towards the exit. Spread the solution with a spatula or squeegee and roll it with a needle roller to deaerate and compact the composition. After 7-14 days, the new flat floor will be ready for laying tiles, porcelain stoneware and other finishing floor coverings.
To summarize, we note: it does not matter whether the base is plywood or chipboard, HDF or OSB, boards or concrete. It is the correct preparation that is important, namely the formation of an even, hard and dry base.
Advice! If you need floor repair specialists, there is a very convenient service for selecting specialists from PROFI.RU. Just fill out the order details, the experts will respond and you can choose who to collaborate with. Each specialist in the system has a rating, reviews and examples of work, which will help with the choice. Looks like a mini tender. Placing an application is FREE and does not oblige you to anything. Works in almost all cities of Russia. Without your desire, no one will see your phone number and will not be able to call you until you yourself reveal your number to a specific specialist.
If you are a master, follow this link, register in the system and be able to accept orders.
Marking
Marking is necessary if the area of the room exceeds 2 meters on one side. In this case, the room is divided into squares/rectangles no more than 2x2 meters. Otherwise, the screed will begin to crack spontaneously. To control the thickness of the screed layer, beacons are set - wooden choppers, the upper edge of which is leveled using a laser level or using a tensioned thread set to a level.
The use of wooden choppers is convenient because after the cement mortar has hardened, they can be cut off with a knife without damaging the integrity of the screed.
Why use plastic film
Polyethylene is a budget waterproofing material that has many disadvantages: wood rots and creates favorable conditions for the development of mold and fungi. Typically, film is not used in conjunction with wood. But in this case it is a necessity. It is due to the fact that concrete does not stick to its surface, which means it can slide when hardening.
Since the use of film is a prerequisite, it is necessary to take all measures to prevent the formation of mold and fungi. A wide selection of antiseptic agents with water-repellent properties will help with this.
Waterproofing
A layer of polyethylene film is laid on a floor that has been well dried after treatment with an antiseptic. Rolled materials are rolled out along the long side of the room, from the entrance to the window. Overlapping areas of 100-150 mm are glued with adhesive mastic. Places of contact with the walls of houses are applied with mastic or pressed with damper tape with a thickness of at least 5 mm.
Pros and cons of screeds
Dry screed will correct mistakes
Dry screed has a number of advantages:
- simple production;
- if available, it is convenient to lay communications;
- easy to correct errors;
- no need to wait for drying.
However, it has some imperfections:
- Sometimes significant thickness is required, but the height of the room is reduced;
- material costs increase.
When pouring a concrete screed, the material consumption is small, but you need to wait a long time for it to dry.
In any case, it is worth making a choice towards one material or another. The right solution will avoid further problems with other coatings.
Reinforcement
Reinforcement is a mandatory operation when pouring a concrete screed on a wooden base. The reinforcement will not be able to completely prevent vertical vibrations of the boards, but it will significantly prevent the screed from longitudinal cracking along the joints between the boards.
For reinforcement, it is advisable to use polymer mesh, used for fencing garden plots or ridges.
It is better not to use a metal mesh with a mesh size of 20-40 mm, since the metal ribs lying on the plastic film when the screed moves can eventually wipe the film and open access for moisture penetrating through the screed to the wood.
Method 1 - reinforcing mesh
If the choice is made on a mesh, then it is recommended to use a plastic mesh of the OSS brand, or a fiberglass mesh of the brand:
- SSP-95;
- SSDor-330 (road mesh) coated with impregnation;
- SSM-85;
- SSDor-300.
The advantages of polymer and fiberglass reinforcement are:
- Elastic;
- Chemical inertness in contact with moisture;
- No radio wave shielding effect;
- Ease of cutting and installation;
- Light weight;
- Cheapness.
Method 2 - fiber fiber
Fiber is an unconventional method of screed reinforcement, which consists of introducing short reinforcing fibers with a length of 20 to 50 mm into the solution at the mixing stage. The fiber can be metal - pieces of steel wire, or pieces of fiberglass (bundle) of the same size. Metal fiber cannot be used when pouring over polyethylene film. Sharp edges of pieces of steel wire protruding from the solution will tear the film and damage the waterproofing.
The fiber creates multidirectional reinforcement, practically preventing stretching and compression of the screed throughout its entire thickness. It is advisable to use fiber reinforcement on lightly loaded floors with low traffic.
Many standard formulations of leveling mixtures intended for pouring screeds include fibers of synthetic materials and special plasticizers that prevent cracking.
Using microfiber instead of reinforcement
Reinforcement is the process of strengthening a concrete layer with steel reinforcement. However, working with metal elements can damage polyethylene. Therefore, it is possible to replace steel rods with fiberglass. This is a special material that strengthens the concrete screed.
The use of microfiber greatly simplifies the installation process, because it just needs to be added to the concrete during mixing. The absence of a metal structure significantly reduces the weight of the monolithic slab.
Mixing the solution
The solution is prepared at home in containers with a volume of at least 50 liters. To do this, it is advisable to buy 2 containers to ensure continuity of filling. While 2 workers pour the solution from the container onto the floor and level it with needle rollers, the third one mixes the next portion of the solution for pouring.
First, a clearly measured amount of water is poured into the container, recommended by the manufacturer of the dry mixture for the screed or specified in the recipe for preparing the solution yourself. No DIY or cooking by eye!
The concrete pouring technology, proven over decades, is aimed at achieving the highest possible strength. An excess of any component leads to a weakening of the solution or its extreme brittleness.
First, fill the container with water. Then cement is added, or the prepared solution is gradually poured from the bag. Two people prepare the mixture. One controls the mixer mounted on an electric drill or a special electric drive, the second evenly and continuously pours the mixture. After thoroughly stirring the solution, there should be no lumps left in it. Fiber (basalt, polymer pressed) is introduced into the solution and the briquette is allowed to disperse in water for 10-15 minutes. After this, the solution is mixed again for 5-10 minutes to evenly distribute the fibers. Sand is added last, as it is heavy and quickly sinks to the bottom.
You can also use a concrete mixer.
Concrete volume calculator
When figuring out how to pour a concrete floor in a wooden house, you cannot miss the need to accurately determine the amount of mixture used and the time to complete the procedure. To do this, you must perform certain calculations. A calculator will come to the aid of the builder, allowing you to accurately calculate the required volume of concrete. The online calculator will accurately indicate the required amount of mixture, providing accurate information.
Calculation of concrete composition
Another calculator will help you prepare the concrete mixture correctly. He calculates the composition of concrete components. As a result of using such a convenient online service, it will be possible to determine in advance the required amount of cement, sand with crushed stone and water. At the same time, the developer will receive the final cost of materials by entering only the value of the required grade of concrete and its required volume.
Fill
Filling begins from the corner farthest from the entrance. The solution from the container is poured onto the base, continuously trying to distribute it evenly over the surface so that the beacons are completely immersed in it. If the room area is large, barriers made of 40x40 or 50x50 mm timber are installed to prevent the solution from spreading. Immediately after emptying the container, the solution is smoothed with needle-shaped rubber rollers to remove air bubbles. The curing time of different brands of industrial screed with plasticizers can vary from 25 minutes to 2-3 hours.
If you are using a fast-hardening screed, you must work quickly. The mass hardens quickly and sagging can form at the joints of two fills, which will be very difficult to remove.
video screed on wooden floor
The main advantages of a monolithic floor
Concrete flooring has many advantages :
- Durable and reliable, designed for at least 20 years of trouble-free service. Can be used for any premises.
- Withstands enormous loads, durable. The highest load level among all types of flooring.
- Resistant to fire, moisture. Concrete floor is a monolithic structure. There are no cracks into which moisture can get in and lead to the destruction of the coating. Not exposed to fungus or mold.
- Any floor covering is suitable for finishing: linoleum, laminate, carpet, tiles, even wooden floor boards or parquet if desired.
- Safe for health. Concrete does not emit any harmful substances into the air during operation, which makes this material one of the best.
Further care of the screed
In its pure form, a polymer screed with decorative elements - glass, stone, mosaic - can be used on a wooden floor. In other cases, the screed serves as the basis for laying another floor covering. If there is a need to install a concrete screed on wood, then this is usually a damp room. Then an artificial stone or a base under the tiles is laid on the screed.
The screed, prepared independently from cement and sand, is covered in the first days, until complete hardening, with a thin polymer film to avoid cracking. Subsequently, until the concrete gains full strength, which occurs after 25-30 days, the screed is periodically moistened with a spray bottle or with a broom dipped in water.
Construction of alignment beacons
The lighthouse is a metal guide. It is used for convenient and effective leveling of the surface of a concrete screed after pouring.
The lighthouse can be purchased at the store, or you can make it yourself from any available material. The only requirement for a lighthouse is levelness.
The presence of polyethylene complicates the process of installing beacons, because the solution does not stick to its surface, and self-tapping screws cannot be used due to the tightness of the coating. But the solution is quite simple:
- Divide the entire area of the room into oblong zones, no more than 1200 mm wide. At the same time, leave a distance of 300 mm to the walls.
- Prepare concrete of the same grade that will be used for pouring the screed.
- Lay concrete in longitudinal lines according to the markings.
- Install beacons on top of the concrete, checking against a pre-made mark on the wall. For greater accuracy, you can use a bubble level.